Important Note: Denali is the latest version of PrognoCIS and is supported with Compatibility View Settings OFF for IE 11 browser.
Following are the browsers with version number that are supported by PrognoCIS
Denali:
|
Browser |
Version |
|
Internet Explorer |
11 |
|
Safari |
9.1 |
|
Chrome |
45 and above |
|
Mac OS |
OS X EI Capitan |
|
iPhone iOS |
6
and above |
|
iPad iOS |
9 and above |
|
Android OS |
4.1 Jelly Bean and above |
 Note:
IE and Chrome browsers are supported on Windows 7 and above. Note:
IE and Chrome browsers are supported on Windows 7 and above.
|
|
|
| 1. |
Introduction |
| |
• The release notes describe the
various new features and enhancements carried out in the newer version,
PrognoCISTM Denali ; with the specifications and UI details wherever applicable.
• ‘User' mentioned in the document is any PrognoCISTM User within their permissible rights assigned to their role.
• The term, ‘System' and ‘application' are being interchangeably used to refer to PrognoCISTM
Denali application.
• Patient information within images is not real or at times may be blurred to safeguard Clinic information. |
|
|
| 2. |
Home |
| 2.1 |
Label changes on Appointment and Open Enc tabs |
| |
Navigation: Goto Home screen
→
Appointment tab and/or Open Enc tab:
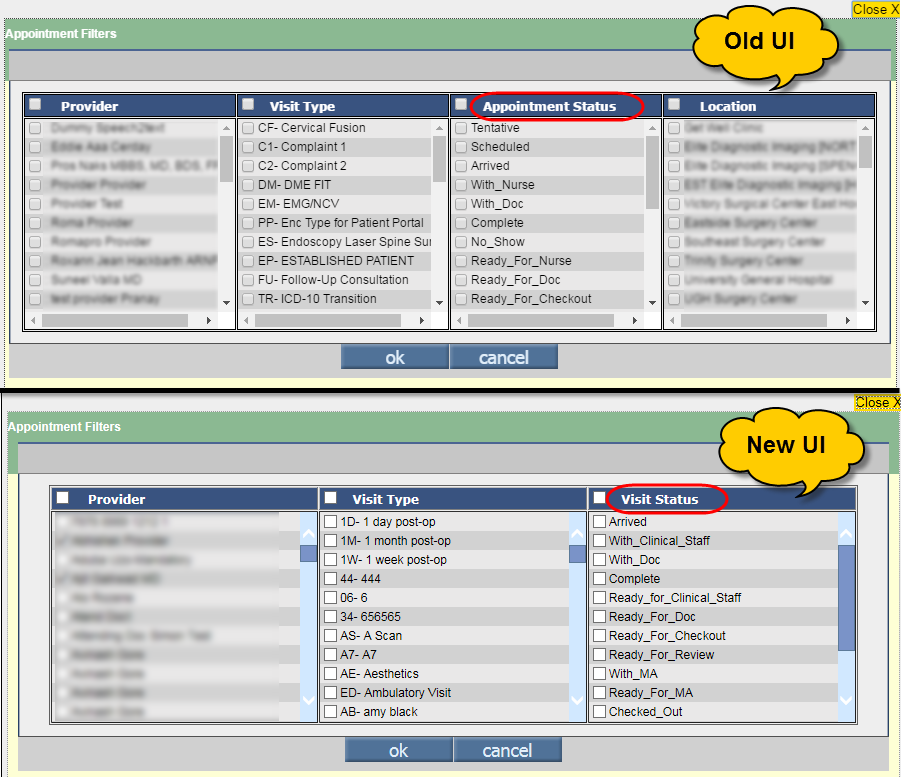
i. The label of ‘Status’ column label
on Appointment tab and Open Enc tab is now changed to ‘Visit Status’. Refer to figures 2.1-1 and 2.1-2
Figure 2.1-1: Status column on Old UI

Figure 2.1-2: Status column label changed to Visit Status on New UI

ii. The labels of Visit statuses such as
With Nurse has been relabeled to
With Clinical Staff and
Ready for Nurse has been relabeled to Ready for
Clinical Staff.
iii. The
label of Appointment Status column on
Appointment Filters popup (click
Filters button
available on both Appointment tab and Encounter tab) is relabeled to
Visit Status. Refer to figure 2.1-3
Figure 2.1-3: Appointment Status label change on Appointment Filters popup
iv. The label of Type
column on the Open Enc tab has now been changed
to Visit Type. Refer to figures 2.1-4
Figure 2.1-4: Type
column on the Open Enc tab changed to Visit Type

v. The
Visit Type column found on the
Open Enc tab is
now also available on the Appointment tab. Refer to figure
2.1-5
Figure 2.1-5: Visit
Type column also available on the Appointment tab

|
|
|
| 2.2 |
The labels of Patient workflow statuses on the Appointment schedule screen has been relabeled |
| |
Navigation: Goto
menu Appointment
→ Schedule
→ Appointment Schedule screen
→ select a patient appointment slot
→ click Patient Workflow icon on the Patient Info pane to invoke Patient Workflow popup
On the Patient Workflow
popup, the labels of statuses such as With RN and For Nurse have been relabeled to
With Clinical Staff and For Clinical Staff respectively.
|
|
|
| 2.3 |
The Status field on the Patient Workflow popup has been relabeled |
| |
Navigation:
Goto Home screen
→ click Patient Workflow icon:

OR
Goto Appointment menu
→ Appointment Schedule screen
→ select an appointment slot to display the Patient Info pane
→ click Patient Workflow icon:

OR
Goto patient Encounter
→ click Patient Workflow icon:

The label of the Status
field on the Patient Workflow popup is now relabeled to
Visit Status.
|
|
|
| 2.4 |
The sequence of columns available on Open Enc tab and Appointment tab are now in sync |
| |
The columns sequence on the
Open Enc tab and Appointment tab have been rearranged.
- On the
Open Enc tab, the Reason for Visit column is now available between the columns, Patient and Provider.
Refer to figure 2.4-1
Figure 2.4-1: Reason
for Visit column on the Open Enc tab

- On the
Appointment tab, the sequence of columns have been rearranged to match with the sequence of columns on the Open Encounter tab.
Refer to figure 2.4-2
Figure 2.4-1: Sequence
of columns changed on the Appointment tab

|
|
|
| 2.5 |
Patient Insurance icon is now additionally available on the Patient Details popup |
| |
Navigation: Goto Home screen
→ click Patient Details icon:  → Patient Information popup
→ Insurance icon: → Patient Information popup
→ Insurance icon:  available. Refer to figure
2.5-1 available. Refer to figure
2.5-1
And
Goto menu: Appointment
→ click Schedule
→ Appointment Schedule screen
→ select a Patient Appointment
→ click Patient Name hyperlink on the Patient Details pane
→ Patient Information popup
→ Insurance icon: available. Refer to figure
2.5-2
Figure 2.5-1: Insurance icon available on the Patient Information popup invoked from the Home screen
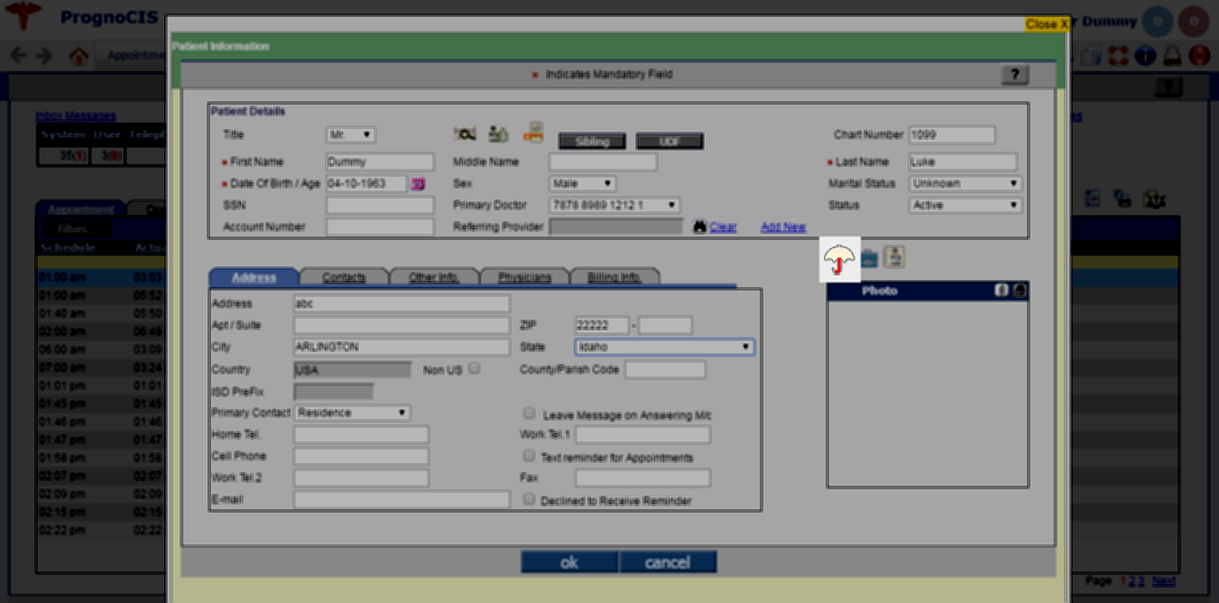
Figure 2.5-2: Insurance icon available on the Patient Information popup invoked on click on the Patient Name hyperlink on the Appointment Schedule screen 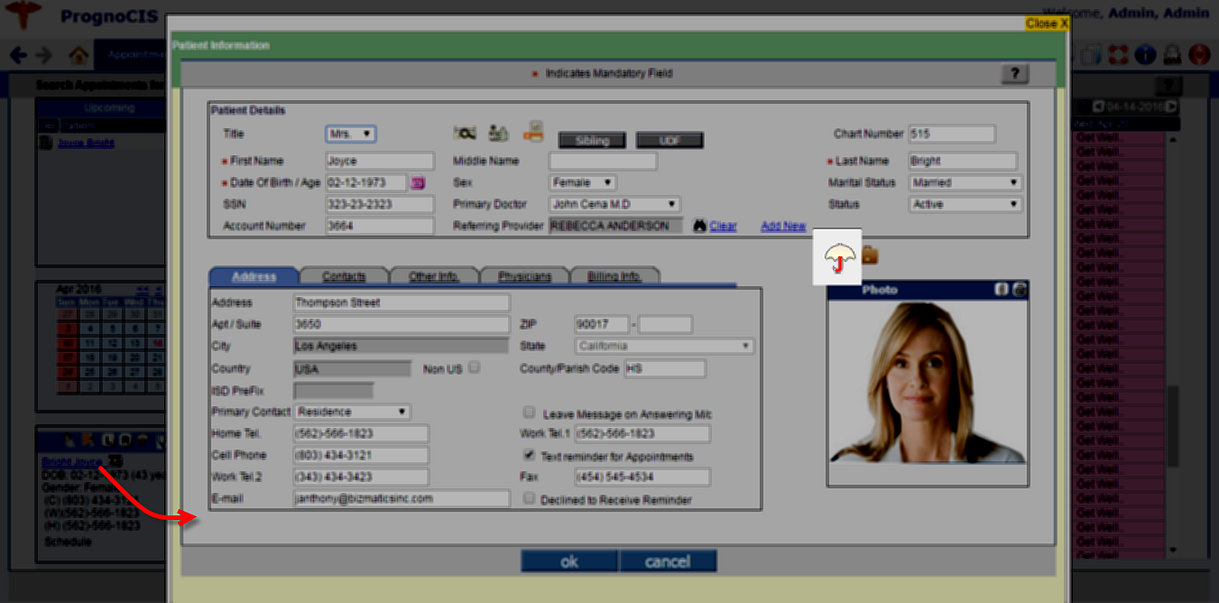 |
|
|
| 2.6 |
Last login information now shifted to the right of UI |
| |
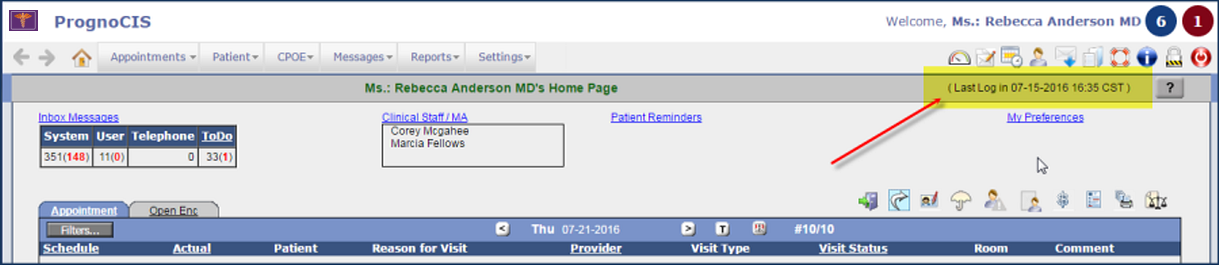
The User’s last login details which
displayed in center of the Home screen, now displays on the right of the
UI. Refer to figure
2.6-1
Figure 2.6-1: Last login details displaying on the right side of Home screen
|
|
|
| 2.7 |
Checkout docs to additionally feature Consult and Procedure |
| |
Navigation: Goto Home screen
→ click Check Out Docs icon:

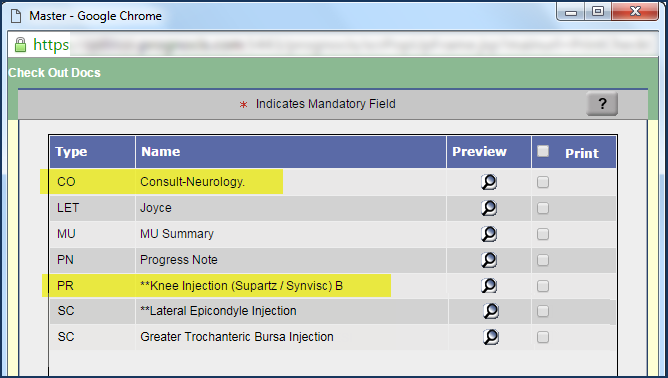
On the Check Out Docs popup, additionally two new documents, Consult and Procedure has been provided. For more information on Consult and Procedure kindly read on feature,
Order Management – Order Sheet with a new User Interface (UI). Refer to figure
2.7-1
Figure 2.7-1: Check Out Docs popup displaying Consult and Procedure related documents
|
|
|
| 3. |
Appointment – Schedule |
| 3.1 |
Changes done on Appointment Schedule popup |
| |
Navigation: Goto menu: Appointment → click Schedule → Appointment Schedule
screen →
Appointment Schedule popup
i. The ‘cancel' button label has been changed to ‘close'.
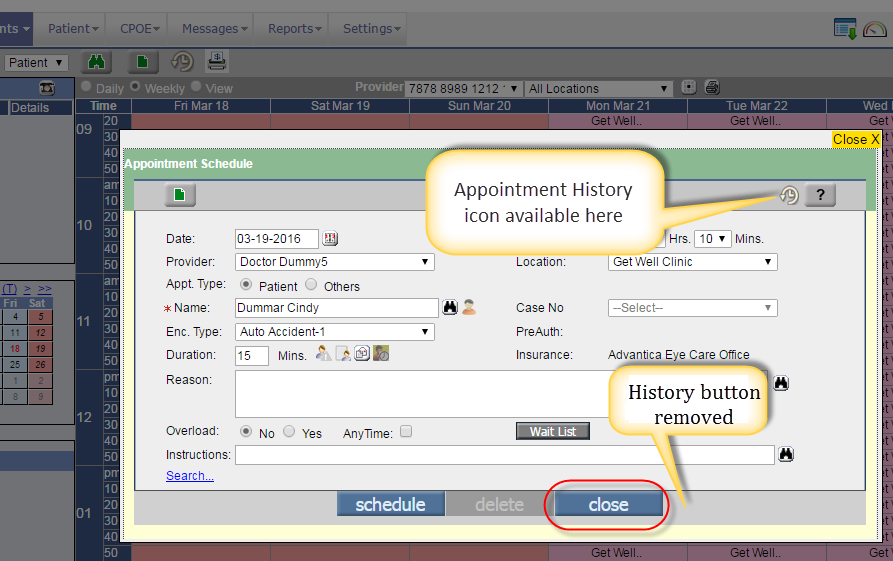
ii. The ‘history' button has been replaced by the Patient Appointment History icon:  . Refer to figure 3.1-1 and 3.1-2 . Refer to figure 3.1-1 and 3.1-2
Figure 3.1-1: Old Appointment Schedule popup
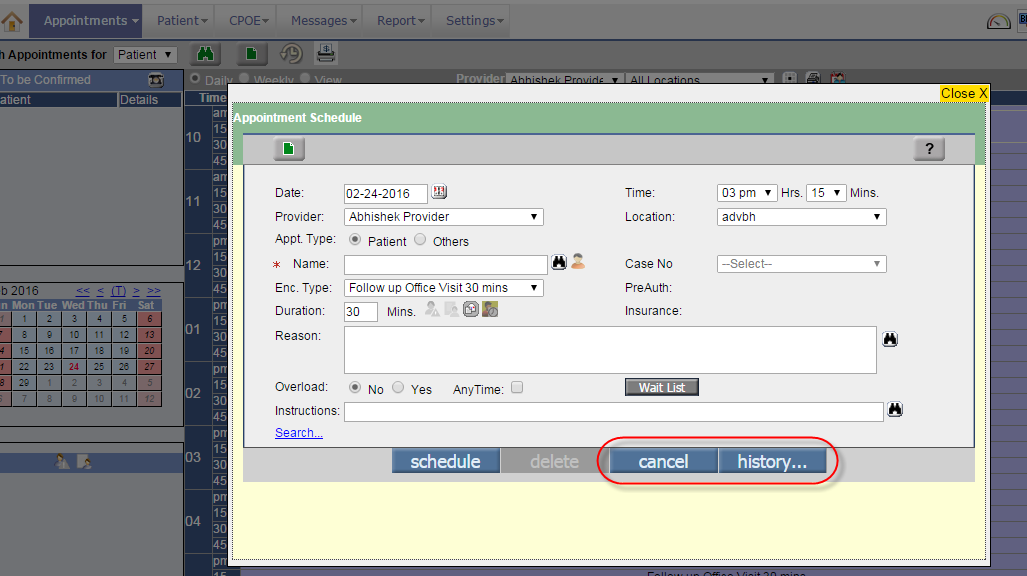
Figure 3.1-2: New Appointment Schedule popup
|
|
|
| 4. |
Patient – Register |
| 4.1 |
Patient Notes icon displays Orange if notes are entered |
| |
Navigation: Goto menu: Patient → click Register
The Patient Notes icon on the Patient Registration screen now displays in Orange color if
notes have been entered. Refer to figure 4.1-1
Figure 4.1-1: Patient Note icon displays in Orange color if there are Notes present for the Patient

Note: Patient Notes icon present on Home screen does not change to Orange if notes are present.
|
|
|
| 4.2 |
The ‘Resp Person’ label is now changed to ‘Guarantor’ |
| |
Navigation: Goto menu: Patient → click Register → click Billing Info. tab
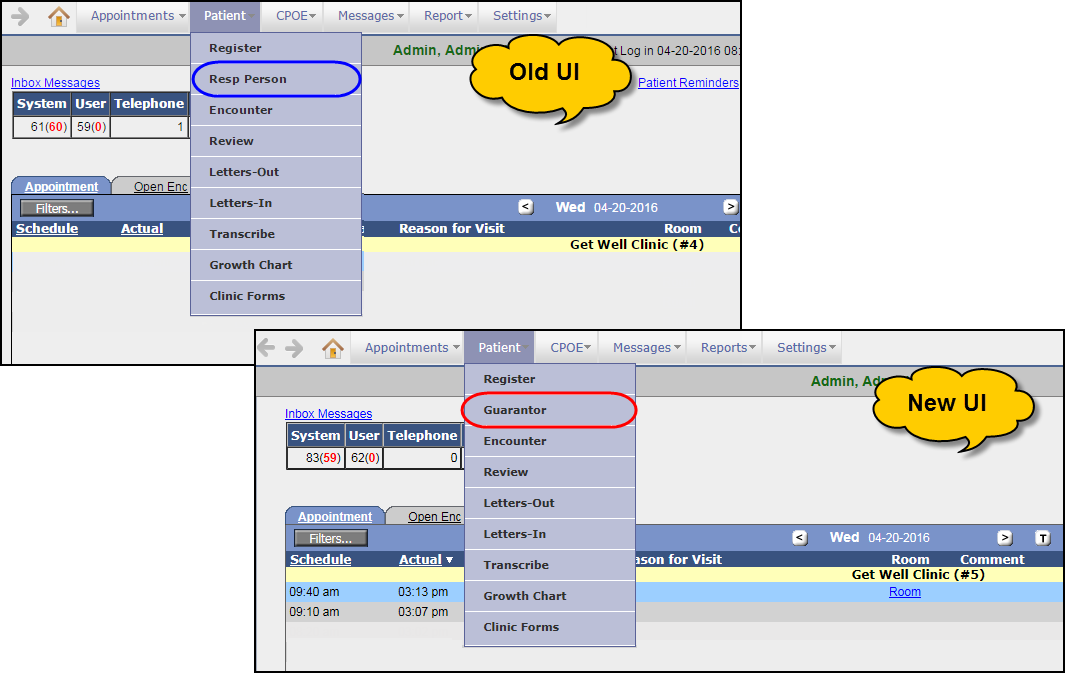
The Resp Person label under the Outstanding Receivables section has been now changed to Guarantor. Refer to figure 4.2-1
Figure 4.2-1: Resp Person label changed to Guarantor on Patient Registration screen
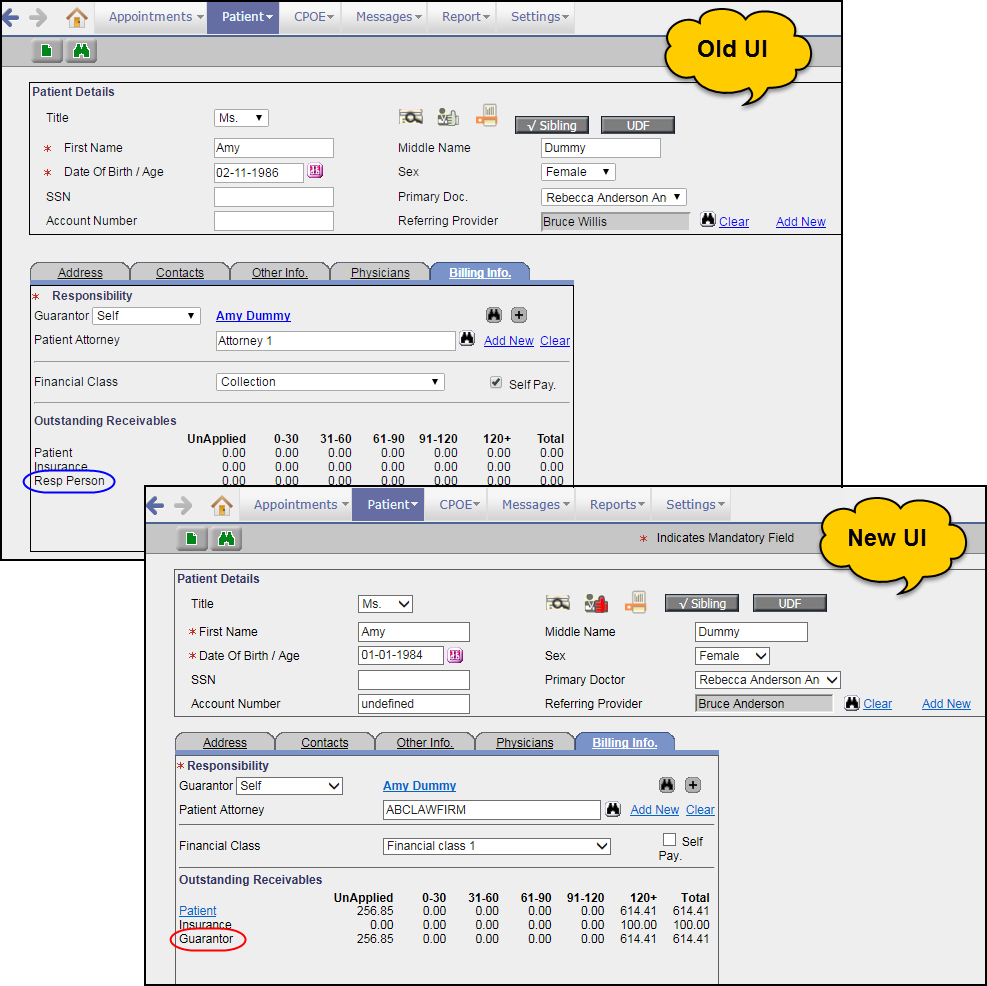
Similarly in Patient menu also, the Resp Person has been changed to Guarantor. Refer to figure 4.2-2
Figure 4.2-2: Resp Person label changed to Guarantor under Patient menu
Note:
All the respective properties and tags are not changed to the keyword, Guarantor. It still needs to be searched with the keyword, Responsible Person.
|
|
|
| 4.3 |
The ‘Patient’ label displays as hyperlink to invoke the Patient Statement |
| |
Navigation: Goto menu: Patient → click Register → click Billing Info. tab
Earlier there was no provision to view Patient Statement from the
Patient Registration screen.
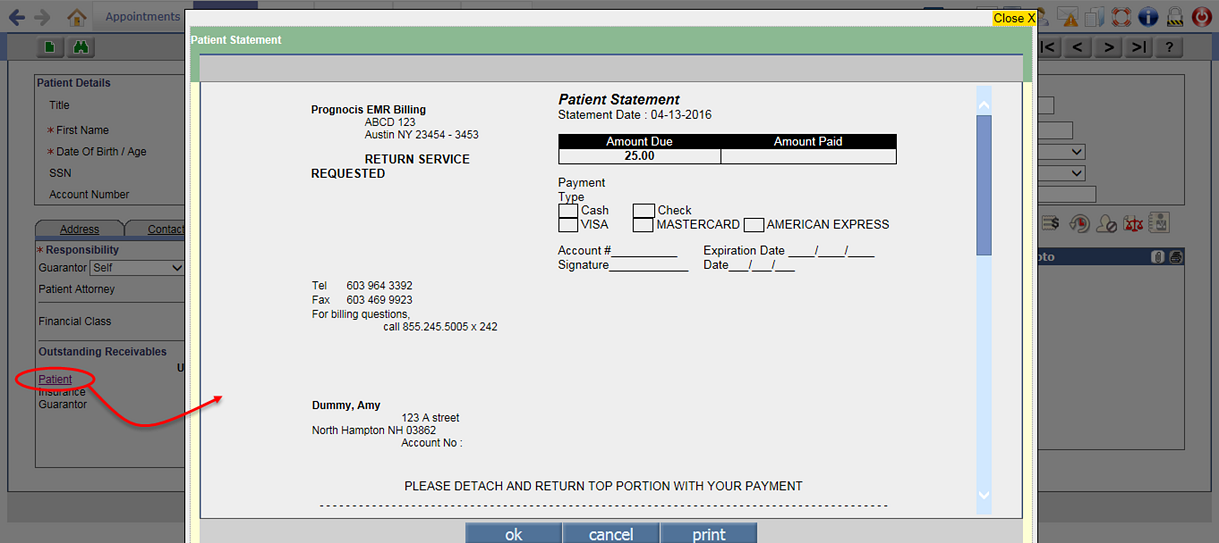
Now, the Patient label under
Outstanding Receivables section on
Patient Registration screen is displayed as hyperlink which on click invokes the Patient Statement. User also has a provision to print the Patient Statement by clicking the Print button on the Patient Statement popup. Refer to figure 4.3-1
Figure 4.3-1: Patient Statement on the Patient Registration screen
Note:
 Currently,
there is no access rights required to view the Patient Statement. Currently,
there is no access rights required to view the Patient Statement.
The template invoked to view Patient Statement is dependent on the property,
billing.ptstatement.template.
|
|
|
| 5. |
Patient – Encounter |
| 5.1 |
Order Management – Order Sheet with a new User Interface (UI) |
| |
Navigation: Goto Patient's
Encounter →
Encounter TOC →
Order Sheet
• Order Sheet UI has a new look and feel,
the creation and management of Orders (Lab/Radiology) is now
more efficient. Additionally, the concept of Consult and Procedure Orders has been introduced. Benefits of the new UI are as follows:
- maintain and track all your orders for the current encounter from a single screen with respect to Lab, Radiology, Consult, and Procedures.
- track and maintain the results of a referred Patient from the same screen.
- switch between individual screens of Orders is no more required. |
|
|
| 5.1.1 |
Comparison between the Old and the New UI (User Interface) |
| |
- The first change noticed, when the
Order Sheet link is clicked is that the screen takes up the whole monitor space i.e. the TOC menu is shrunk and to have the TOC available, a User is required to click on the
Expand TOC icon:

- The Prescription tab earlier available in the older Order Sheet screen has been removed.
- Action buttons such as
Create Order, Save, and
Reset are aligned to the right.
- The Add from Order Set icon:
 is not available on the new Order Sheet screen; and the
orderset button is now available as an option (and not as a button) in the newer screen. is not available on the new Order Sheet screen; and the
orderset button is now available as an option (and not as a button) in the newer screen.
Figure 5.1.1-1: Old Order Sheet screen
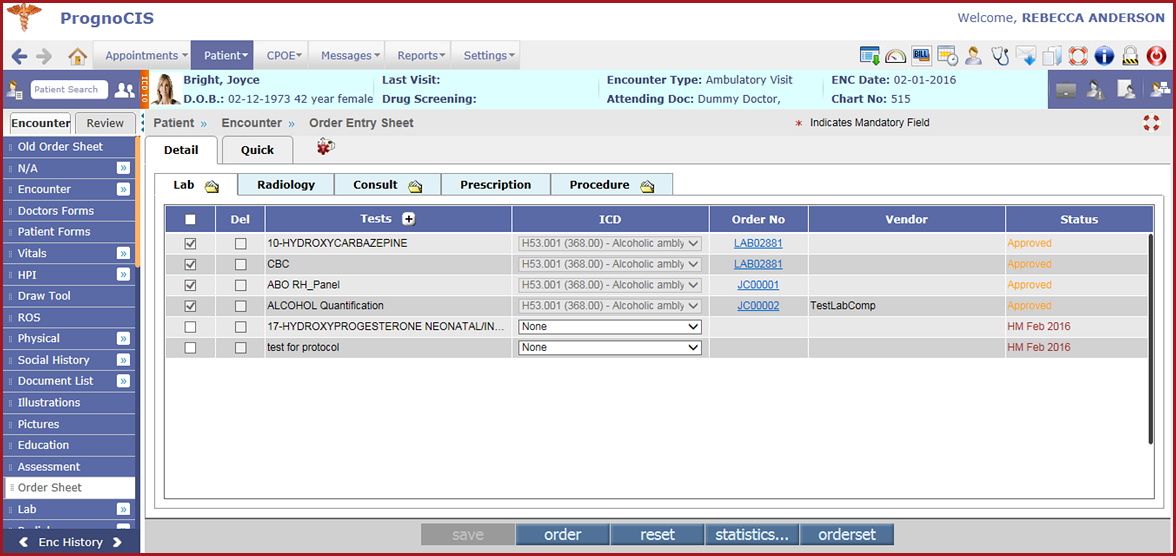
Figure 5.1.1-2: New Order Sheet screen
|
|
|
| 5.1.2 |
Introducing the new UI – the bifurcation of various panels |
| |
Navigation: Goto Patient's Encounter → Encounter TOC→ click Order Sheet
• The new Order Sheet UI has a totally new look and feel. Each and every element of the UI has been explained in the document for the User to quickly get acquainted.
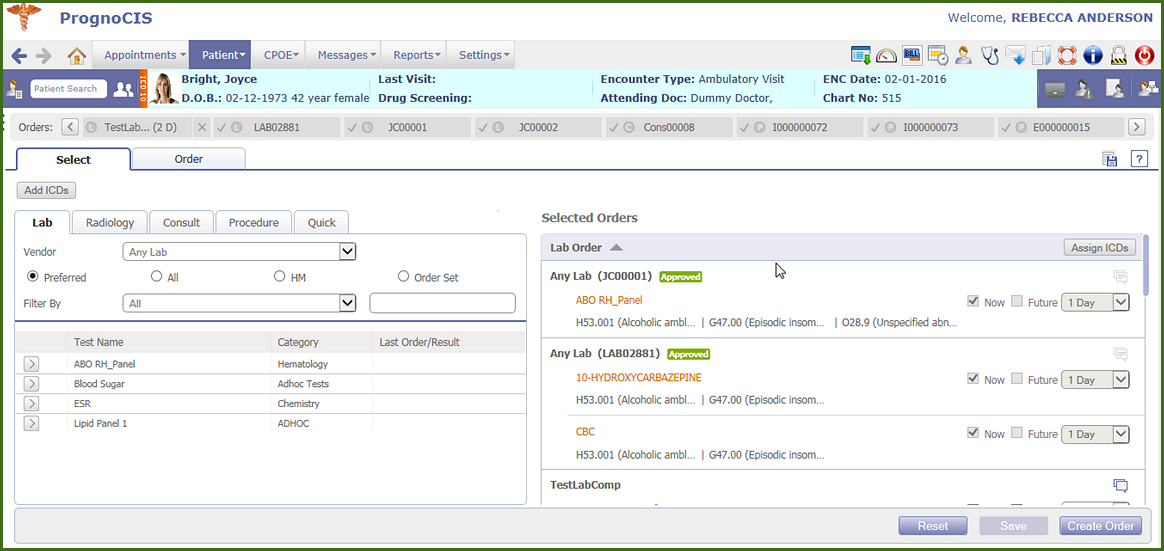
• Consider the new Order Sheet UI to be horizontally divided into three main panels. Refer to figure 5.1.2-1
Figure 5.1.2-1: UI divided into three panels for better understanding
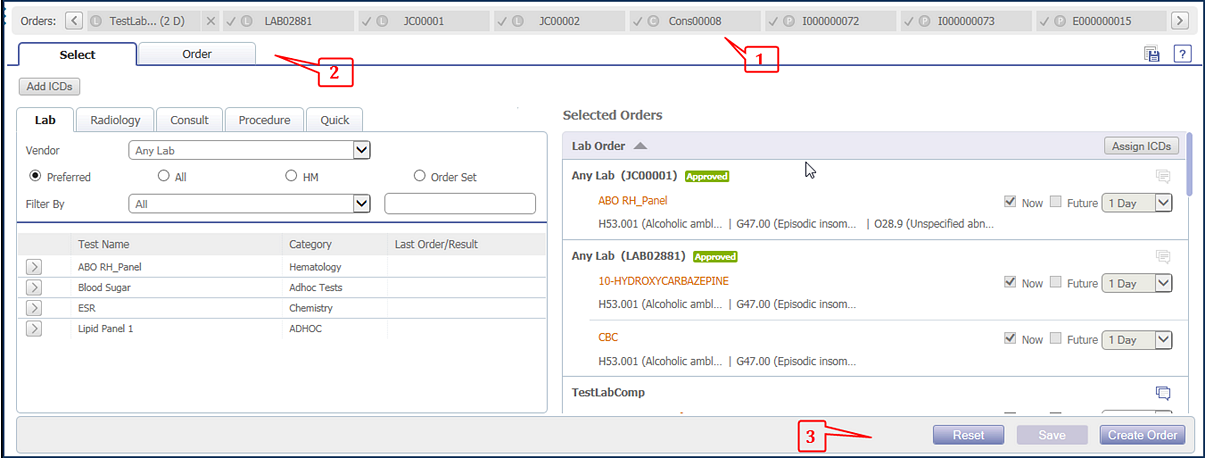
#1 Top Panel - It displays the list of Orders i.e. Lab/Radiology/Consult/Procedure of statuses, ‘To be Ordered' and ‘Ordered'.
See more
#2 Center Panel - It displays the
Select tab (to select various tests for Order) and
Order tab (displays created Order). To see more,
click here
Figure 5.1.2-2: The two tabs ‘Select' and ‘Order' on the Center Panel
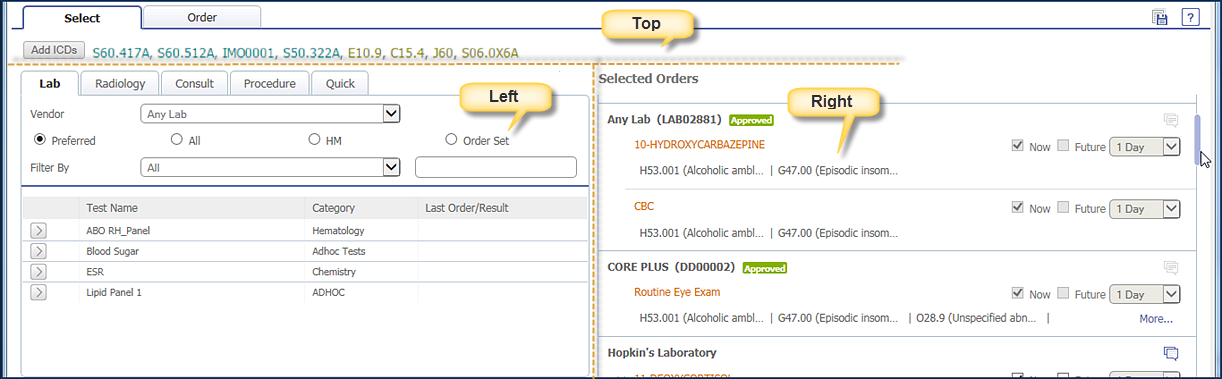
The Select tab is further divided into three sections, top; left; and right.
Refer to figure 5.1.2-3
Figure 5.1.2-3: Three sections of Select tab
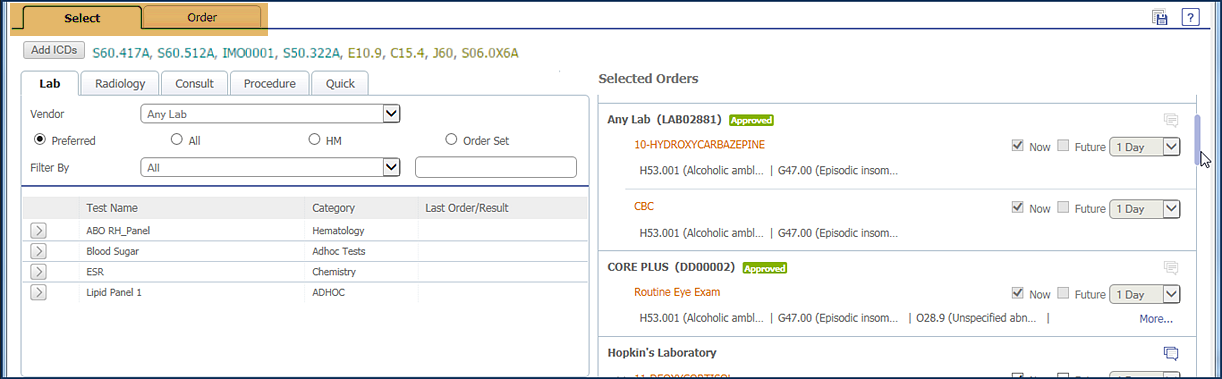
ICDs are associated to the Order using the
Add ICDs button on the Top section; the
Left section displays the respective tests which on click are transferred to the
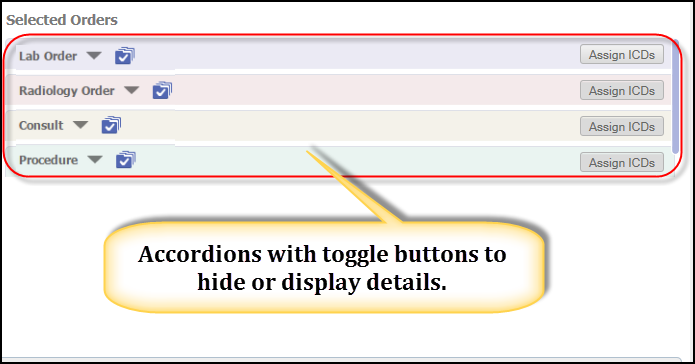
Right section (under the respective accordions of Lab/Radiology/Consult/Procedure
Refer to figure 5.1.2-4) and forms a consolidated list of Selected Orders that can be saved and created.
Figure 5.1.2-4: Accordions on the Right section of the Select tab
#3 Action buttons Panel
- It displays respective action buttons under respective tabs of Select and Order.
|
|
|
| 5.1.3 |
Accessibility |
| |
TOC → Order Sheet
Navigation: Goto Patient’s Encounter → Encounter TOC → Order Sheet
The availability of the Order Sheet menu option on Encounter TOC depends on the property, toc.menu.options.
The value, OS is required to be entered in the property.
Assessment → Order Sheet
Navigation: Goto Patient’s Encounter → Encounter TOC →
Assessment
The availability of the Order Sheet screen on Assessment screen depends on the properties,
assessment.hideordersheet.options and
toc.menu.options. The property,
assessment.hideordersheet.options has to be turned OFF and the value,
OS entered in the property,
toc.menu.options. If these conditions are fulfilled then the
Order Sheet button and the Rx
button are available on the Assessment screen. |
|
|
| 5.1.4 |
Access Rights for Order Sheet, Consult, and Procedure |
| |
Access rights have to be defined to User Roles for the Users who work on Order Sheet, Lab, Radiology, Consult, and Procedure Orders. For Lab and Radiology the previously defined User Roles are applied.
Following are the three different access rights that have to be defined individually for Consult and Procedure order; and Order Sheet.
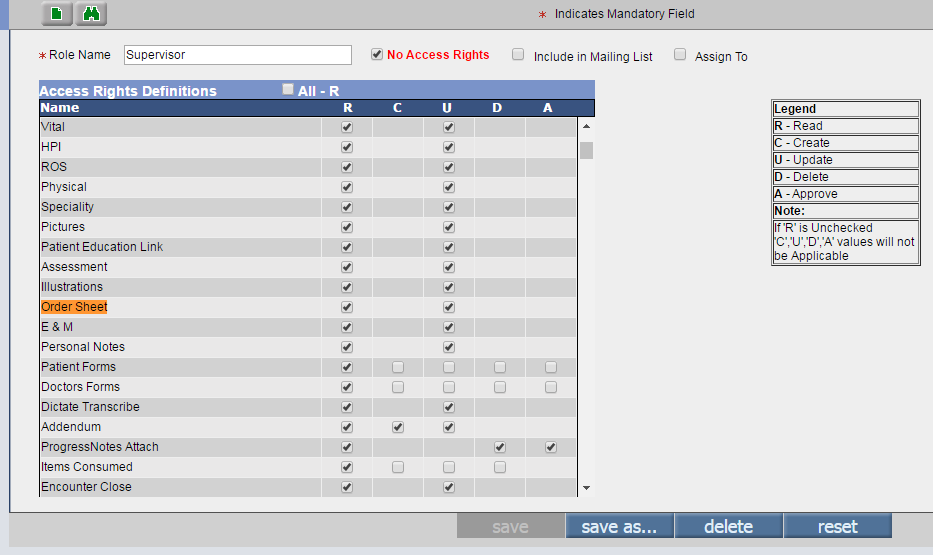
I. Access rights for Order Sheet
To view Order Sheet
via Encounter TOC (Goto Patient’s Encounter
→ Encounter TOC) access rights have to be defined for the User Role.
Goto menu: Settings
→ click Configuration
→ under Admin column; click Role
→ select the Order Sheet option under Patient Encounter section
→ define the access rights (Read/Update)
Refer to figure 5.1.4-1
Figure 5.1.4-1: Role Master displaying the access rights for displaying Order Sheet on TOC
II. Access rights for Consult/Procedure on Order Sheet
For Consult/Procedure screen, the rights are defined from the Role Master screen.
Goto menu: Settings
→ click Configuration
→ under Admin column, click Role
→ Consult/Procedure options under Configuration Workflow section
→ define the access rights (Read/Create/Update/Delete/Approve)
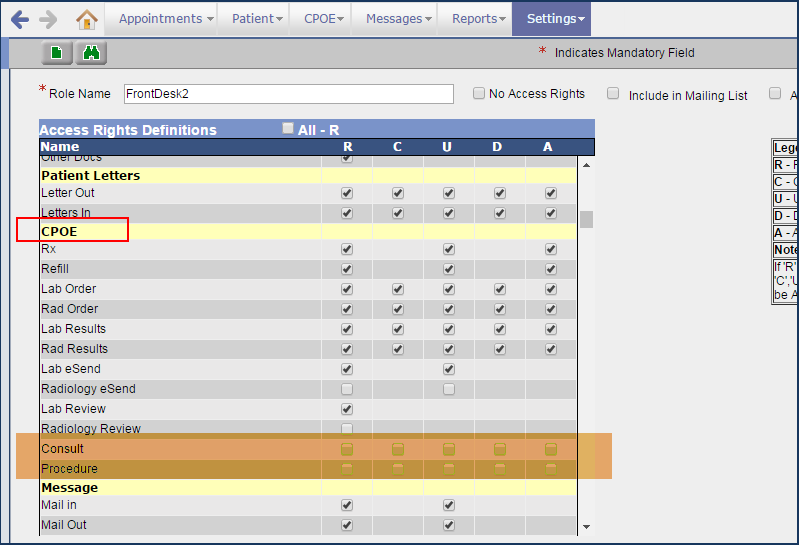
III. Access rights for Consult/Procedure on CPOE
A user should have the required access rights in order to read, create, update, delete, or update Consult or Procedure from CPOE menu.
Refer to the figure 5.1.4-2
Figure 5.1.4-2: Role Master displaying the access rights for the Consult and Procedure via CPOE menu
|
|
|
| 5.1.5 |
Lab/Radiology |
|
A) Create Lab/Radiology Order (via
Select Tab)
• On the Select tab, the top section displays all the ICDs that have been either added from the
Assessment screen (Dark Cyan colored ICDs) or added from the Lab/Radiology/Consult/Procedure Order (Olive colored ICDs); the sequence followed is assessment ICDs are displayed followed by non-Assessment ICDs of the current encounter.
Note: Assignment of Assessment and Non-Assessment ICDs to an Order is dependent on the newly added property,
order.assign.icds.rule The property, assign ICDs to the Lab/Radiology/Consult/Procedure test while creating respective order from either TOC menu, CPOE menu, or Order Sheet. Valid values are A, X, P, B, and N.
Where,
- A: all Assessment ICDs are assigned to tests automatically;
- X: all non-assessment ICDs are assigned to tests automatically;
- P: only the Primary Assessment ICD is assigned to test automatically;
- B: both Assessment and non-Assessment ICDs are assigned to test automatically;
- N: no ICDs are assigned to tests automatically, user has to manually assign ICDs to the tests.
By default, the property is set to A.
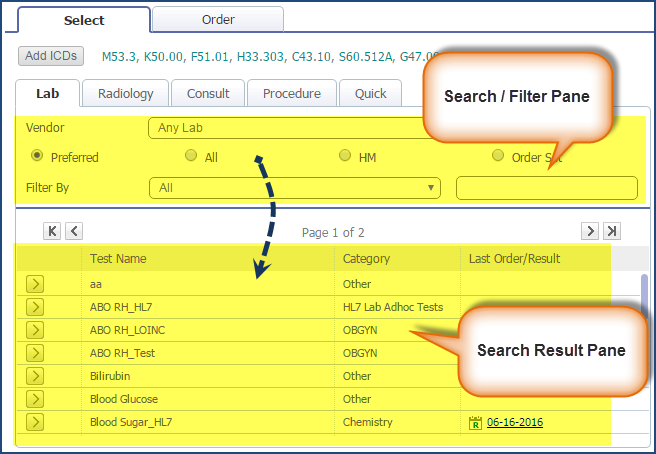
B) On the Lab/Radiology tab
The tabs are horizontally divided into a
search/filtering pane and the search result pane.
Refer to figure 5.1.5-1 Depending upon the parameter for Lab/Radiology selected the Lab/Radiology Tests is displayed. Refer to figure and the criteria to display tests on the display panel are as follows:
o Patient’s gender
o Vendor selected
o Filters applied
Figure 5.1.5-1: The Search pane and the Search Result Pane – division of individual tabs
• On display of the filtered list, User needs to select the required test(s) of Lab/Radiology by clicking on the individual
Select button:
 found on each test record. found on each test record.
• On click the test is transferred to the Right section and under the respective Lab/Radiology Vendor (as selected by the User) and within the Lab/Radiology accordion respectively.
• Parameters on the Lab/Radiology tabs:
Vendor – displays the list of (active) labs available. By default,
Any Lab is selected.
Note:
Depending upon the
Vendor selected from the Search or Filter pane, the respective
Vendor specific tests are displayed on the Search Result pane.
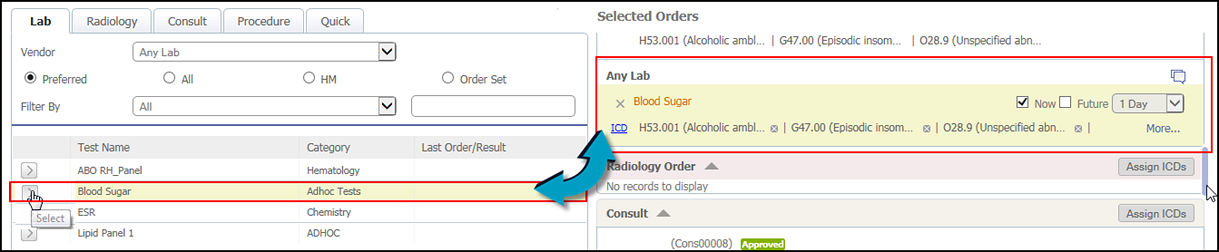
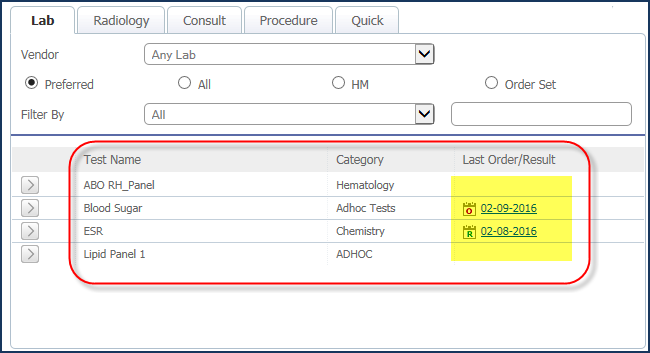
The Search Result pane on the left displays the result details in tabular format. The first column displays the
Select button:
which on click transfers the selected test to the Right side section Refer to figure
5.1.5-2
Figure 5.1.5-2: Click ‘Select’ to transfer and display details under Selected Orders section (i.e. Right side section)
Preferred – displays Encounter’s Attending Provider’s preferred list of Lab/Radiology tests (on the Display pane) followed by Clinic preferred list which are supported by the selected Vendor and Patient's Gender. The option remains selected by default only if there are tests available in the Preferred List.
All – displays active Lab/Radiology tests (on the Display pane) that are supported by Patient’s gender (male/female/both) and supported by the Vendor selected. The option remains selected by default only if there are no tests available in the Preferred List.
HM – displays Lab/Radiology tests (on the Display pane) which are (added) in the Health Maintenance with status as
Due and Tentative.
Note: There is a cut-off period considered with respect to the Due date. Cut-off period is calculated by adding the Encounter date to the No. of days configured in the property,
os.dueafter.days. Thus only when the Due date for a test on the HM screen is less than the cut-off date, is the test displayed.
For Example: If the Encounter date is 05-04-2016, the due date for a test on the Health Maintenance screen is 05-10-2016, and the cut-off period mentioned in the property,
os.dueafter.days is 7 then on schedule of that test, the test is displayed on the Order Sheet screen
since the date falls in between the Encounter date and the days mentioned in the property.
This is because 4 + 7 = 11 and 10 < 11.
Order Set – displays the Order set name, the tests which are included in that Order set, supported by Patient’s gender followed by Last Order/Result date. The Vendor drop-down list displays, ‘Any Lab’ as default selection (disabled) and the Filter By drop-down list option has ‘Order Set Name’ text displayed. Order Set option displays only of type ‘LB’ (Lab)/ ‘RL’ (Radiology) respectively.
Note:
For Order Set option, not every test has the select button; instead only the first test of the order has the select button which when clicked transfers and displays the entire details of all the tests on the right side section. Refer to figure
5.1.5-3
Figure 5.1.5-3:
Order Set selection button
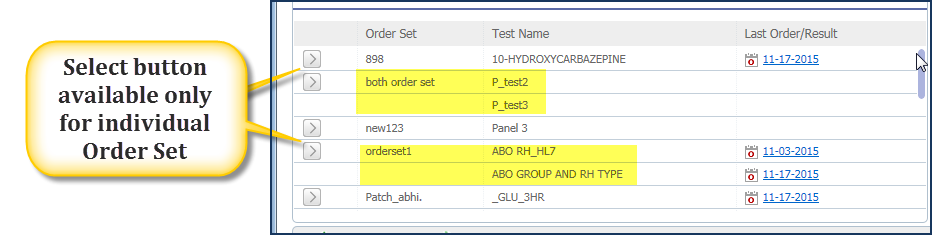
The columns displayed are the test name, its category and the Last Order (dates)/Result (received dates). The columns displayed on Lab/Radiology tabs are Test Name, Category, and Last Order/Result.
Under the Last Order/Result column, the date hyperlinks are displayed. These dates are either prefixed with the picture:
 or is prefixed with the picture: or is prefixed with the picture:
 indicating the date to be an Order date or a Result Received date. On click the hyperlink invokes the Order/Result popup respectively. Refer to figure
5.1.5-4 indicating the date to be an Order date or a Result Received date. On click the hyperlink invokes the Order/Result popup respectively. Refer to figure
5.1.5-4
Figure 5.1.5-4:
Differentiating icons for Orders and Result received
For example, if there is a Lab/Radiology Order dated 10th May with the status ‘Results Received’ and another Order dated 15th May with status ‘Ordered’ then even if results are received on 17th May, the Order dated 15th May is displayed as Last Order/Result.
For In-house Lab/Radiology Order, the Orders with statuses, ‘Entered’ or ‘Approved’ are also displayed on the Order Sheet screen as Last Order/Result.
Filter By - Following are the criteria available to filter tests: All, Panel, Test Name, Category, and LOINC Code. The adjacent field provides a full text based search that works in conjunction with the value selected on the
Filter By drop-down list.
• Lab/Radiology Order accordion - On the Right section, the Lab/Radiology accordion displays the details of the test such as Vendor Name, Order Number (if any), Order Status (if any), Test name, and assigned ICD details available in the Assessment for that encounter (if any) are displayed.
Refer to figure 5.1.5-5
Figure 5.1.5-5: Test
details as displayed on the Lab/Radiology Order accordion
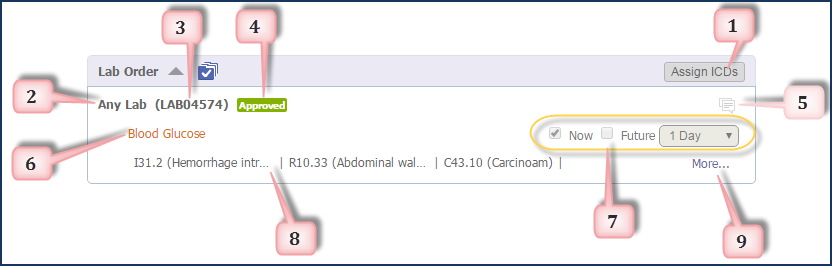
#1 Assign ICDs button: Assign ICDs button is available on each accordion. On click the Assign ICDs button invokes Test-ICD Mapping popup. All assessment ICDs and non-assessment ICDs are available for assignment. Refer to figure 5.1.5-6
Figure 5.1.5-6: Details of Test-ICD Mapping popup
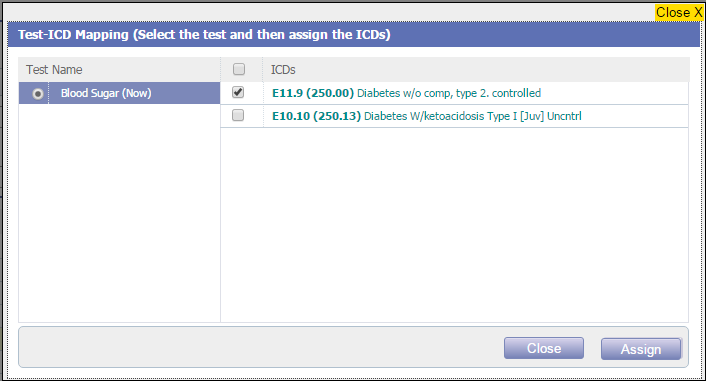
• ICDs selected and assigned are displayed along with the Test details.
• ICDs are allowed to be removed or reassigned from the same popup but only for tests with no status.
#2 Vendor Name: Name of the Vendor (selected from the
Vendor drop-down list) is displayed.
#3 Order Number: Order Number is displayed in the brackets if an Order is created for the Test.
#4 Status: Order status such as Entered, or Approved, or Ordered or Deleted is displayed. No Status is displayed for Tests whose order is saved in the Order sheet
but the order is yet to be created.
Note: Even tests that
are deleted in the current encounter are displayed with a ‘deleted’ status.
#5 Comments: The Comment icon:  invokes different popups for Lab and Radiology. Refer to figures 5.1.5-7
and 5.1.5-8 invokes different popups for Lab and Radiology. Refer to figures 5.1.5-7
and 5.1.5-8
Figure 5.1.5-7: For Lab
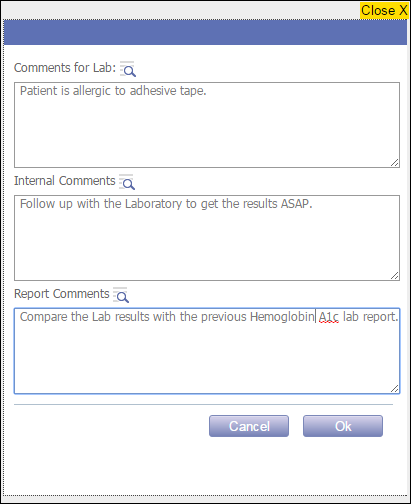
Note: The maximum character entry allowed in the Comments for Lab section is 1024; for Internal Comments and Report Comments sections are 300 each.
Figure 5.1.5-8: For Radiology
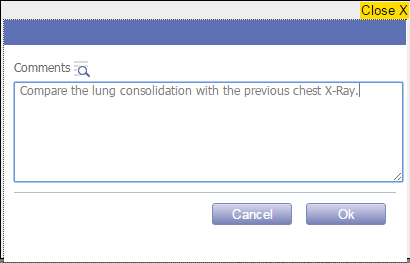
Note: The maximum character entry allowed in the Comments section is 1024 only.
 Hint: The Phrases search available on the comments popup is same as that was available in the existing or older Order Sheet. Hint: The Phrases search available on the comments popup is same as that was available in the existing or older Order Sheet.
#6 Test name: The test name is displayed.
#7 ‘Order When' info:
Now – The option when selected schedules the Order in the current moment.
Future – The option when selected enables its drop-down list to display future time duration in days; weeks; months; and year. Refer to figure 5.1.5-9
Figure 5.1.5-9: Options in Future dropdown list

Note: If the options, ‘Now' and ‘Future' are selected then system creates two orders, one for now and the other for future scheduled day.
#8 ICD link: on click the link invokes the popup,
ICD Mapping (Assign ICDs) and through the popup it is possible to change the assigned ICDs – the link is available only when an Order
has no status.
#9 More/Less link: The link is available only if all ICDs cannot be displayed in the space available to view/hide the associated ICD details.
#10 Action buttons:
• Save – On click updated details are saved.
• Create Order – On click the Order is created with status ‘Entered’ or ‘Approved’.
Note:
Once the Order is created, the Right Hand Section additionally displays Order status.
Only Users with access rights defined for Order Sheet are eligible for creating Orders; the
Create Order button displays disabled for Users without the appropriate access rights.
• Reset
– On click all unsaved changes are reverted.
Hint:
The Quick tab available on the Select tab also has provision to create
Lab/Radiology Orders. Please refer to Quick tab section for more details.
C) Lab/Radiology Order (via
Order Tab)
The only change in the Lab and Radiology Order screen is the new UI else the functionality and the working of both these screens are same as the existing Encounter TOC
→ Lab Order and Encounter TOC
→ Radiology Order respectively
Figure 5.1.5-10: Lab Order on Order Sheet
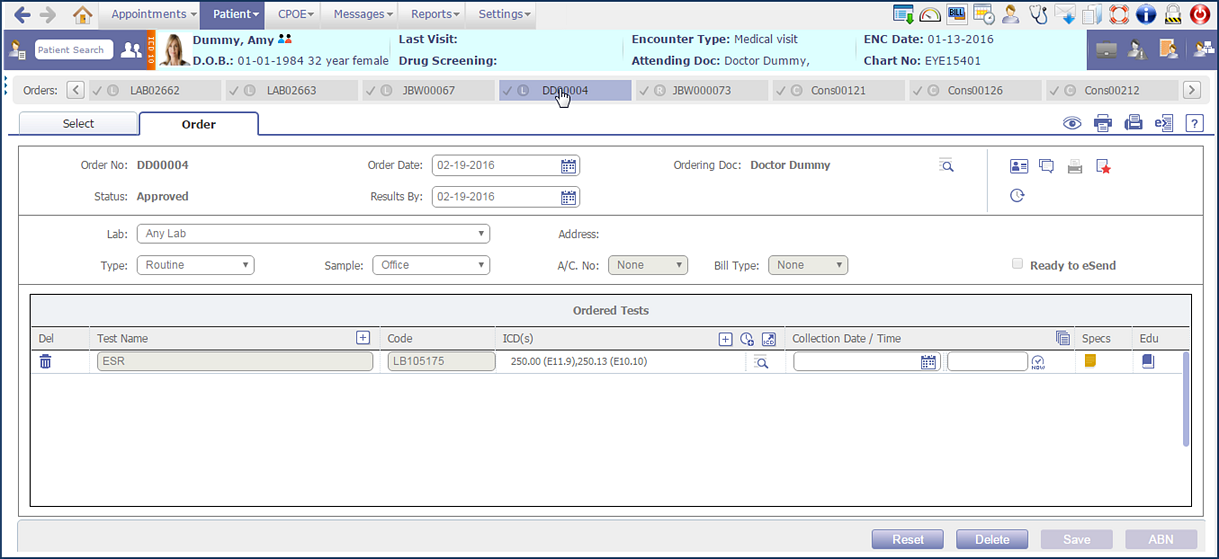
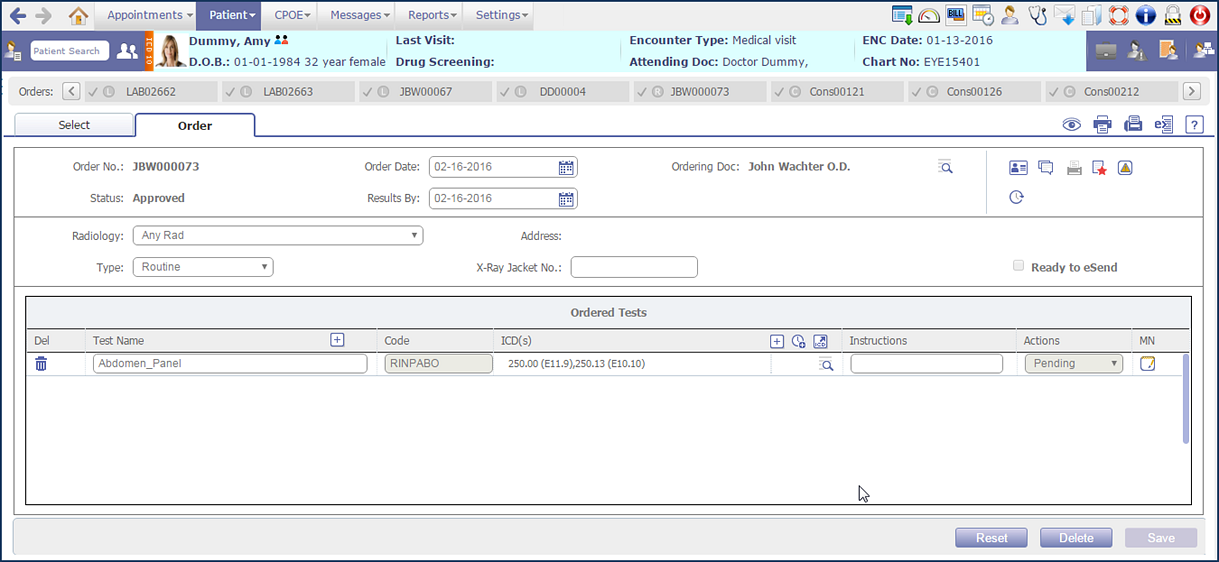
Figure 5.1.5-11:
Radiology Order on Order Sheet
Hint:
Lab and Radiology Orders are also available from CPOE
→ Lab/Radiology Order and from TOC
→ Lab/Radiology Order.
For Statuses and their significance Refer to table
Table 5.1.5-1:
Various Order Statuses
No. |
Status |
Significance |
1. |
Entered |
Order is created; the User has no approve rights. |
2. |
Approved |
Order has been approved; the User has the required approved rights. |
3. |
Ordered |
Order has been ordered via Print or Fax. |
4. |
Deleted |
The Order has been deleted. |
5. |
Results Received |
Results for the Order has been entered or attached but not all tests are entered. |
6. |
Complete-Results |
All Results for the Order are either entered or attached. |
7. |
Complete and Reviewed |
The Results for ALL tests have been answered and the Order has been reviewed. |
|
|
|
| 5.1.6 |
Consult Order |
|
A list of all consults that are displayed on the Order Sheet
→ Consult tab are added from the Consult Master (Goto menu: Settings
→ click Configuration
→ under Workflow column, click Consult).
A) Consult Master
The Consult Master screen has been updated with the newly added field,
Sex.
Refer to figure 5.1.6-1
Figure 5.1.6-1:
Addition of new field on the
Consult Master screen
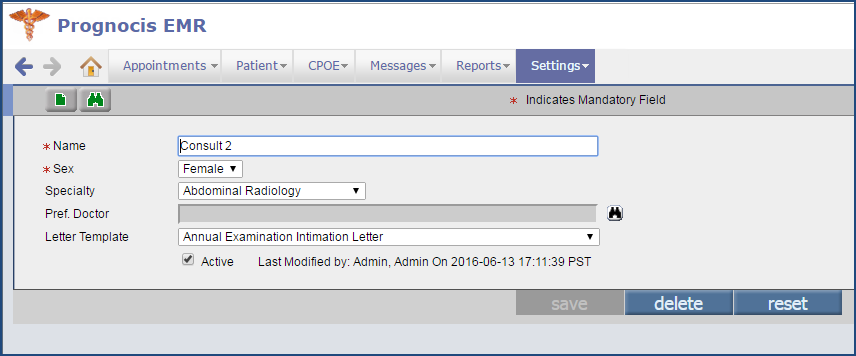
• The consult is defined based on Patient's gender, based on the value selected from the field: Sex, it is determined if the Consult is applicable either for a ‘Male' or a ‘Female' or for ‘Both' the genders.
• It is also required that while defining the Consult, the Physician's specialty is mentioned. On change of specialty from the Specialty field the list of preferred Physicians changes on the Pref. Doctor field.
• The Pref. Doctor drop-down list displays a list of referring Doctors with the specialty selected in the Specialty field. One of the referring Doctors can be selected to a default / preferred Doctor. During an encounter when a letter is to be selected for a Consult, if applicable, it is marked by default to the preferred Doctor. The user has the flexibility to change the referring Doctor before sending out the letter.
• The default Template to be used while generating a Consult letter is defined from the Letter Template drop-down list.
B) Create Consult Order (via Select
Tab)
Vendor – the drop-down list is Not Applicable for Consult tab
Preferred – the option is Not Applicable for Consult tab
All – the option displays active Consults tests (on the Display pane) that are supported by Patient’s gender (male/female/both).
HM – the option displays Consults tests (on the Display pane) which are added in the Health Maintenance with status as
Due and Tentative.
Note:
There is a cut-off period considered with respect to the Due date. Cut-off period is calculated by adding the Encounter date to the No. of days configured in the property,
os.dueafter.days Thus only when the Due date for a test on the HM screen is less than the cut-off date, is the test displayed.
Order Set – displays Order Sets only of type ‘CM’ (Consult) on the Consult tab.
Filter By – The criteria to filter and display tests on the Display panel
are All, Specialty, and Complaint.
• On a Consult tab, the
Consult Provider column is displayed instead of
Last Order/Result column (as on the Lab/Radiology tab).
If a Consult Provider has not been assigned to a Consult then
Assign Provider link is displayed, giving provision to the User add or assign a Consult Provider to the Consult.
Refer to figure 5.1.6-2
Figure 5.1.6-2: Assign Proivder link
as displayed on the Consult tab
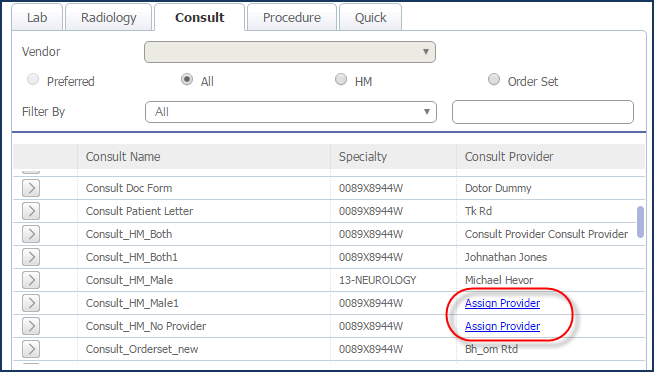
• On click the Assign Provider link invokes the
Consult Provider Search popup displaying list of Providers and on selection of a Provider, the Assign Provider link is replaced with the selected Provider Name.
• On display of the filtered list on the Search Result pane, the User needs to select the required test(s) of Consults by clicking on the individual Select button:
found on each test record.
• On click the test is transferred to the Right section and under the respective Consults Vendor (as selected by the User) and within the Consults accordion (on the right side) respectively.
C) Consult accordion
• On the right side, the Consult Order accordion displays the details of the test such as Consult Name, Consult Order Number (if available), Order Status (if any), Consult Provider name, reason for consult, and the assigned ICD details available in the Assessment for that encounter (if any). Refer to figure 5.1.6-3
Figure 5.1.6-3: Consult
accordion details
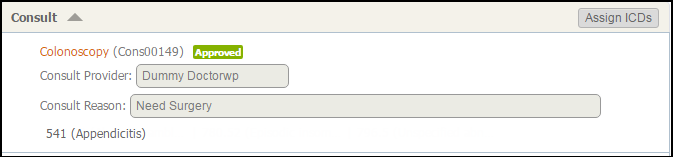
Note: Order Number is displayed only if an Order has been generated; it will not be present if the Order number is yet to be generated.
– ICD link: on click the link invokes the popup, ICD Mapping (Assign ICDs) and through the popup it is possible to change the assigned ICDs – the link is available only when an Order
has no status.
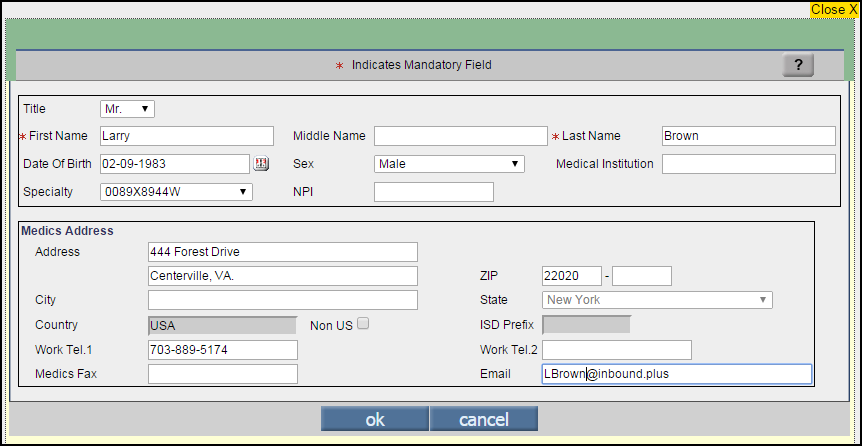
• There is a provision to change the Consult Provider name displayed on the Consult (only on Consult with no status). Refer to figure 5.1.6-4
Figure 5.1.6-4: Add or search Consult provider

Either Click the Consult Provider search icon:  to invoke Consult Provider search, and to select from an existing list Refer to figure or click [+] icon to add a new Consult Provider by entering the details. Refer to figure 5.1.6-5 to invoke Consult Provider search, and to select from an existing list Refer to figure or click [+] icon to add a new Consult Provider by entering the details. Refer to figure 5.1.6-5
Figure 5.1.6-5: Add new Consult provider
– Action buttons:
• Save – On click updated details are saved.
• Create Order – On click the Order is created.
Note:
Once the Order is created, the Right Hand Section additionally displays Order status.
Only Users with access rights defined for Order Sheet are eligible for creating Orders; the
Create Order button displays disabled for Users without the appropriate access rights.
• Reset
– On click all unsaved changes are reverted.
Hint:
The Quick tab available on the Select tab also has provision to create
Consult Orders. Please refer to Quick tab section for more details.
D) Consult Order (on Order tab)
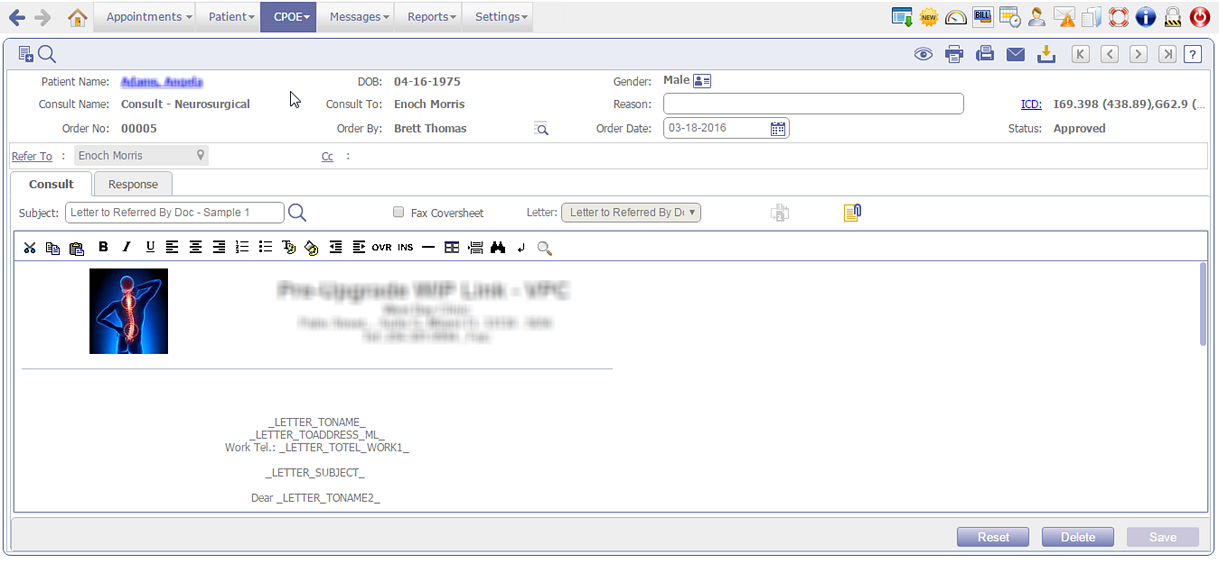
Consult Order UI is quite similar to existing Letters-Out screen. It has four sections as follows:
Figure 5.1.6-6: The Order tab displaying the Consult Order
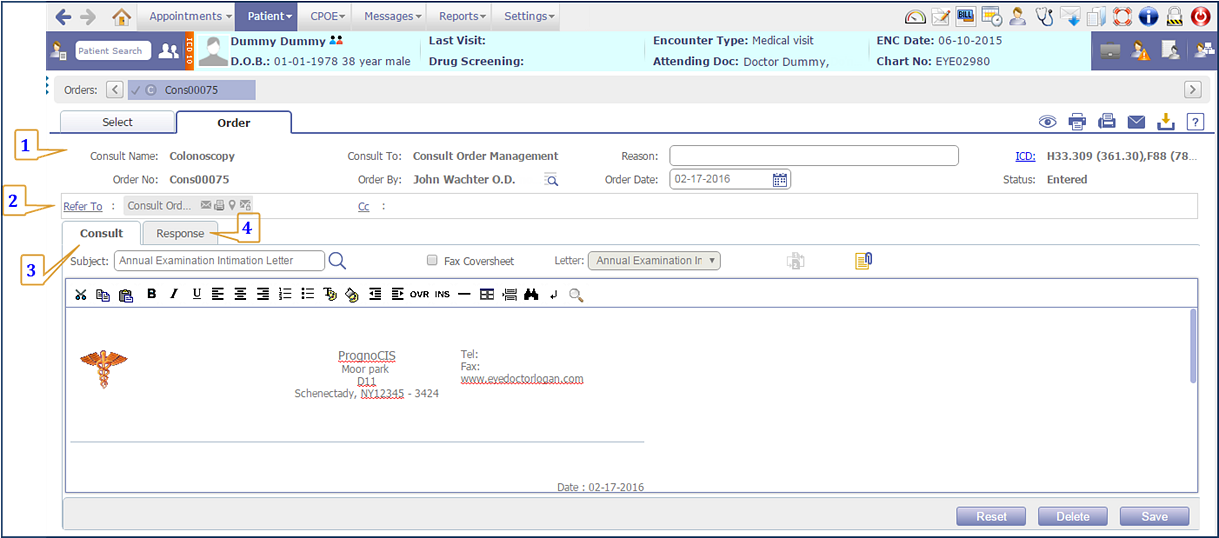
#1 Order details – displays the order details, the details are as entered in the Select tab. Only the Order By, Reason, ICD link, Order date fields in the section are editable. For Statuses and their significance, refer to table 5.1.6-1
#2 Refer to – allows the User to choose and add Referring Provider for the Patients. The section displays details such as name, telephone number, address, email address (if available), n2n email address (if available). The link, Refer To when clicked invokes the Consult Provider’s search popup
The CC: link invokes Medics search popup with the categories of types such as Medics; Address Book; Others; Surescript.
#3 Consult tab – Editable fields are Subject (only if the status is Entered or Approved); Fax Coversheet option; Attach (only if the status is Entered or Approved); and the text editor. The working and functioning of the Consult tab is similar to the as the existing functionality of Letters-Out, the text area displays the Letter Template HTML associated to the Consult master. It is possible to edit the Letter body only if the status of the Order is Entered or Approved.
The Attach icon, on click invokes Document List search to choose an attachment from.
#4 Response tab – the tab is enabled for Orders with status, ‘Ordered’, ‘Results Received’, and ‘Complete and Reviewed’. The Attachment button on the tab gives provision to attach Consult Response either from the Users computer or from the Document List. Refer to figure 5.1.6-7
Figure 5.1.6-7: Attachment button

Additionally, Consult Response is attached from three locations within PrognoCIS:
1. Menu: Messages
→ click Attach
2. Menu: Messages → click Scan
3. Menu: Messages → click Letters-In
Note: A new consult property, consult.result.consolidated.file.sequence defines the sequence in the Document List for type, Consult. On the Document list if Consult Order is available then Order is displayed and if the result is available then Consult response is displayed.
The order status becomes ‘Results received’ once the Consult Response attachment
is attached. It then enables the review icon, and once the Review comments are entered the Order status changes to ‘Complete & Reviewed’.
Refer to table 5.1.6-1
Table 5.1.6-1:
Various Order Statuses
No. |
Status |
Significance |
1. |
Entered |
Order is created; the User has no approve rights. |
2. |
Approved |
Order has been approved; the User has the required approved rights. |
3. |
Ordered |
Order has been ordered via Print or Fax. |
4. |
Deleted |
The Order has been deleted. |
5. |
Results Received |
Results for the Order has been entered or attached. |
6. |
Complete and Reviewed |
The Results have been answered and the Order has been reviewed. |
E) Provision to attach Consults Response through
'Attach Center' or 'Scan/Local Attach' screens
Received results of Consult Order is
attached either via 'Attach center' or 'Scan/Local Attach' screens.
Navigation: Goto menu: Messages
→ Attach Center Refer to figure 5.1.6-8
OR
Goto menu: Messages → Scan/Local Attach Refer to figure 5.1.6-9
Figure 5.1.6-8: On Attach screen, the Attach field displaying Consult and Procedure options
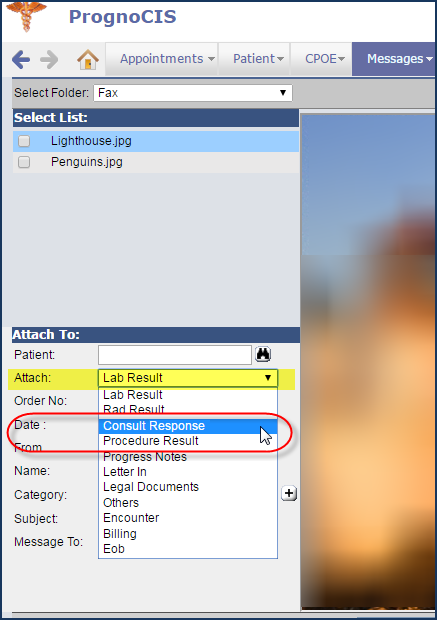
Figure 5.1.6-9: On Scan/Local Attach screen, the Attach field displaying Consult and Procedure options
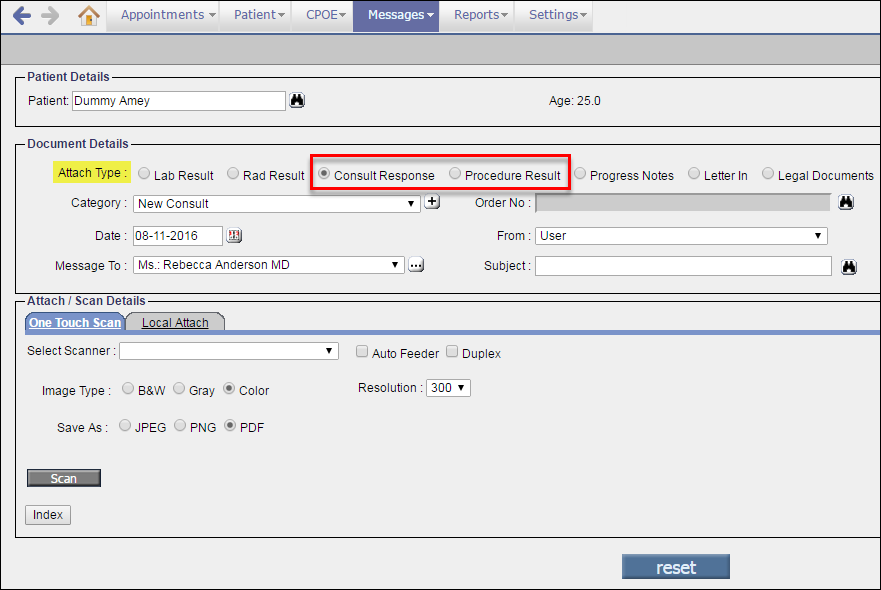
• Just as for Lab and Radiology attachments their specific categories are loaded in the Category drop-down list, similarly for Consult and Procedure their specific categories are loaded in the Category drop-down list on both the Attach Center and Scan/Local Attach screens.
Refer to figures 5.1.6-10 and 5.1.6-11
Figure 5.1.6-10: Attachment type Consult Response, displaying its respective Categories on ‘Attach Center’ screen

Figure 5.1.6-11: Attachment type Procedure Result, displaying its respective Categories on ‘Scan/Local Attach’ screen
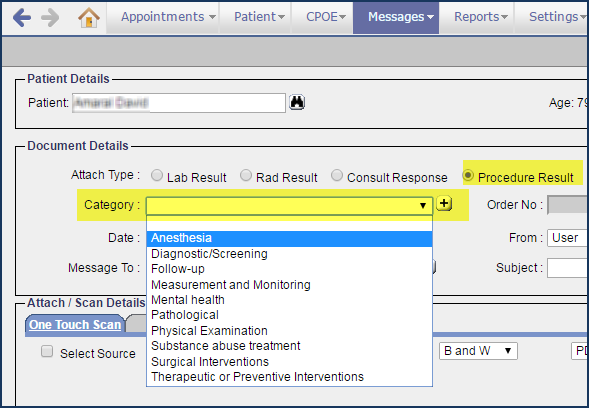
• These categories come in from respective Group Types (Goto menu: Setttings
→ Configuration
→ Group Types) of Consult (CO) and Procedure (PO).
Note: The Order No. search available on the Messages
→ Scan screen for Consult Response displays Consult Orders with statuses such as Ordered; Result Received only.
F) Provision to attach Consults through Patient
→ Letters-In
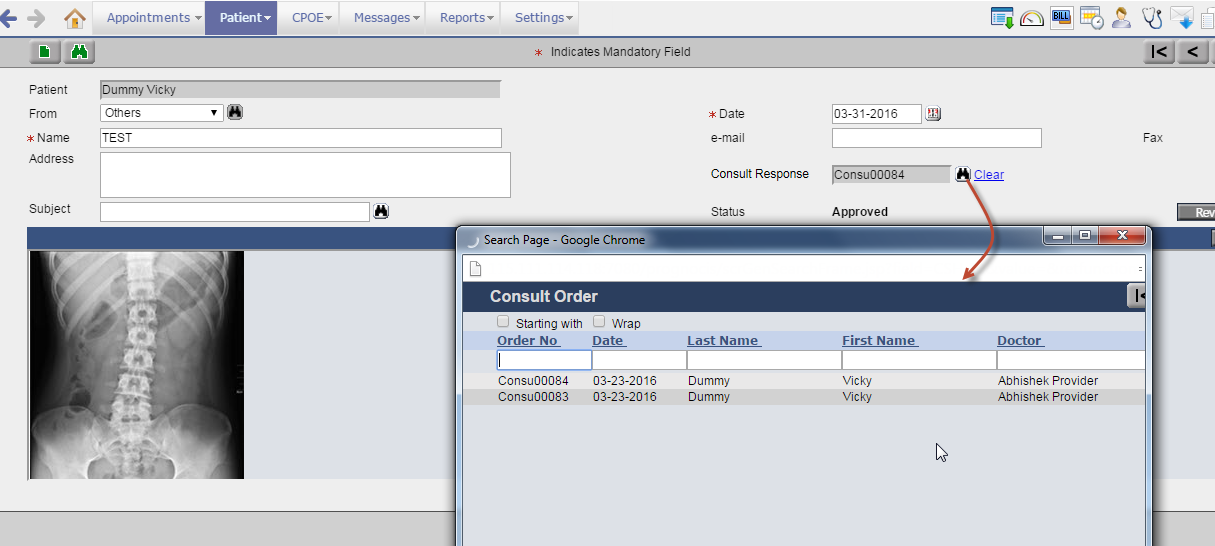
It is now possible to attach Consults via the Letters-In screen.
Navigation: Goto menu: Messages
→ Attach Center
On the Letters-In screen, a new field,
Consult Response has been added to associate a Patient’s
Consult Order with a letter; the field has a search icon which on click invokes the Consult Order search popup. Additionally, a
Clear link is provided that on click clears the selection from the
Consult Response field on the Letters-In screen.
Refer to figure 5.1.6-12
Figure 5.1.6-12: Consult Response associated to a Letters-In
|
|
|
| 5.1.7 |
Procedure Order |
|
Procedures to be scheduled for Patients are ordered via the Procedure tab. A list of Procedures is displayed on the Select tab.
From the current version, Procedures are categorized into types such as In-house (for procedures done within the clinic) and External (for procedures done in external clinic) the distinction is clear with the Type column displaying it as In-house or External.
Refer to figure 5.1.7-1
Figure 5.1.7-1: Two types of Procedures, In-house and External displayed
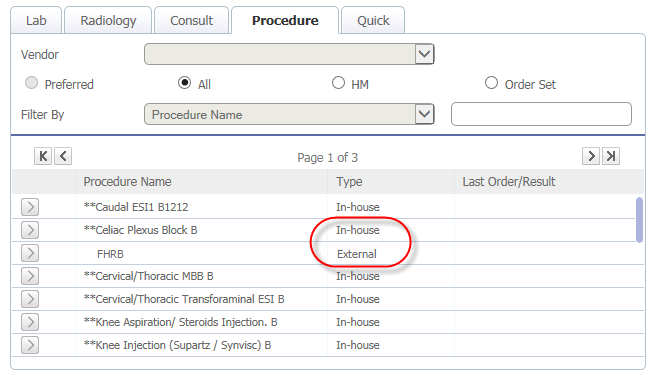
Note: The Procedure list displayed is Gender based i.e. for Male patients, Procedures defined specifically for male and the general procedures are displayed.
The lists of all Procedures that are displayed on the Procedure tab are added from the Procedure Master (Goto menu: Settings
→ click Configuration
→ under Workflow column, click Procedure)
A) Procedure Master
Navigation: Goto menu: Settings
→ click Configuration
→ under Workflow column, click Procedure
Procedure Master is a new screen introduced in the current version for defining any new procedures. Procedure Master UI has options,
In-house and External
to mark a Procedure as either In-house or External from the Procedure Master screen
Refer to figure 5.1.7-2 and 5.1.7-3
Figure 5.1.7-2: Procedure Master
- In-house

Figure 5.1.7-3: Procedure Master
- External
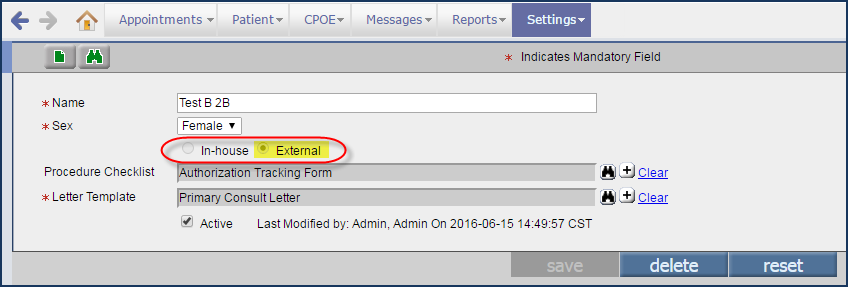
• On the Procedure Master screen, the
Sex field identifies if Procedure should be available for either Male or Female or for both genders.
• Depending upon the option selected
(In-house or External), the associated fields are displayed. For example, if
In-house is selected then fields such as
Procedure Checklist, Procedural Template, and Order Template are displayed and if
External is selected then the fields, Procedure Checklist and Letter Template are displayed.
Refer to figure 5.1.7-4
Figure 5.1.7-4: Categorization of Procedure depicted

Note: A Procedure once defined as either In-house or External, cannot be changed – the field remains disabled.
Definitions of templates:
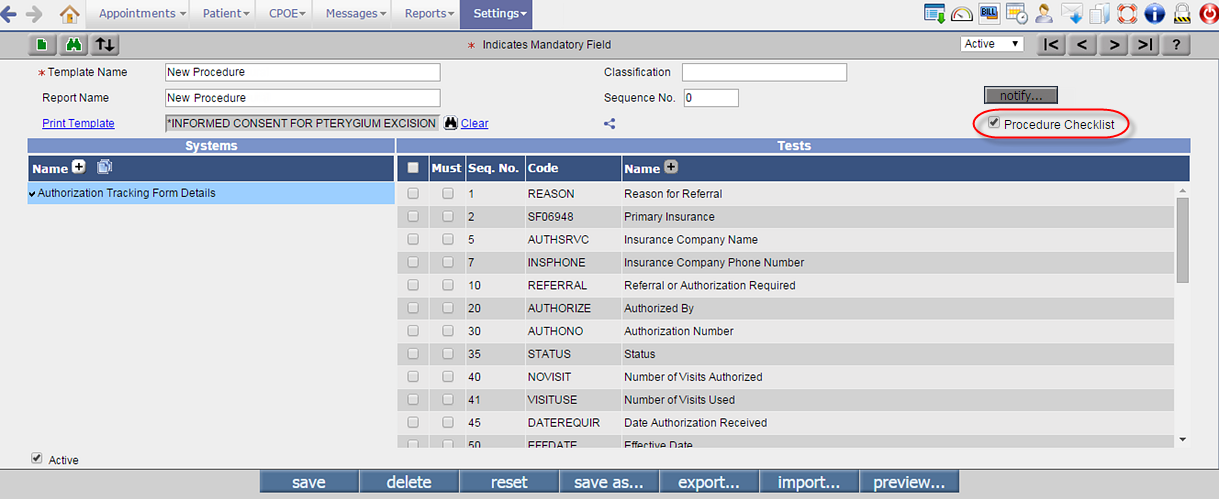
i. Procedure Checklist – Procedure
Checklist are basically Clinic Form templates that are marked as ‘Procedure
Checklist’.
A new option, Procedure
Checklist is now available on the Clinic Form template screen (Goto menu: Settings
→ Configuration
→ click Template under Clinic Forms column),
Refer to figure 5.1.7-5 the option when selected, marks that particular Clinic Form template as a Procedure
Checklist.
Figure 5.1.7-5: Procedure
Checklist option displayed on the Clinic Form template
Note:
A template once marked as
'Procedure Checklist' is NOT available for selection from the Clinic Form template search. You only have provision to add new
Procedure Checklist.
If a
Procedure Checklist is not selected then on Order Sheet the Checklist tab is disabled.
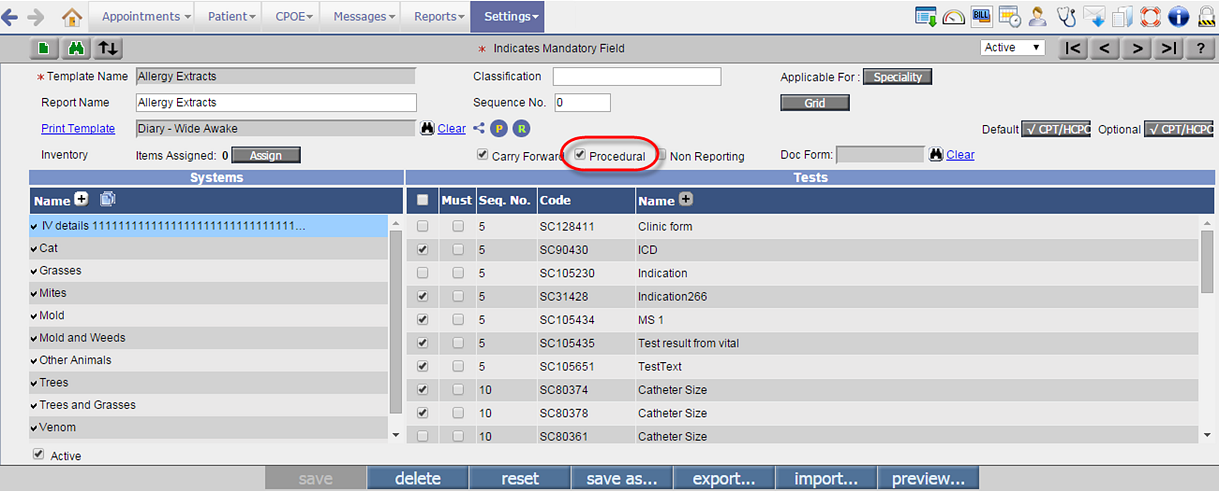
ii. Procedure Template – Procedure templates are Specialty templates that are marked as ‘Procedural’.
A Specialty template (Goto menu: Settings
→ Configuration
→ click Template under Specialty column ) when marked as ‘Procedural’ Refer to figure is categorized as a Procedural template and is available on the Procedural Template search found on the
Procedure Master screen.
Note: Procedural templates created via Specialty template are of type ‘In-house’, thus relevant only for In-house Procedures.
Figure 5.1.7-6: Specialty template being marked as Procedural template
iii. Order Template
(Default) – The ‘Order Template' (Default) is a template that is associated by default to every
In-house Procedure; you have the provision to replace it with any other relevant Order template. These templates are of type ‘Letters' and they are added from the Letters screen (Goto menu: Settings
→ click Configuration
→ under Output Templates, click Letters).
Characteristics of the default In-house Procedure Order Template:
i. Cannot be made Inactive.
ii. Cannot be deleted.
iii. Template name cannot be edited.
iv. Template
content is editable.
v. There is only one template available as default.
iv. Letter Template [Available only for
External Procedures] – The Letter template search displays templates of type ‘Letters' and added from the Letters screen (Goto menu: Settings
→ click Configuration
→ under Output Templates, click Letters).
B) Create Procedure Order (via Select tab)
Following are the fields on Procedure tab that are applicable to both In-house and External Procedure:
Vendor – the dropdown list is not Applicable for Procedure tab.
Preferred – the option is not Applicable for Procedure tab.
All – the option displays active Procedure tests (on the Display pane) that are supported by Patient's gender (male/female/both).
HM – the option displays Procedure tests (on the Display pane) which are added in the Health Maintenance with status as Due and Tentative.
Order Set – the option displays Order Sets only of type ‘PR' (Procedure) on the Procedure tab.
Filter By – User has the option to filter and view Procedures by Name. The Filter By drop-down list is not available for Procedures, but the filter text field is available to search based on characters entered for Procedure name.
I. In-house Procedure Order workflow via Order Sheet
• On the Select tab, User has to click the individual Select icon:
. On click, the Procedure test is selected and gets transferred to the Right hand side section under the Procedure accordion. Refer to figure 5.1.7-7
Figure 5.1.7-7: Procedure Order details as seen under the Procedure accordion
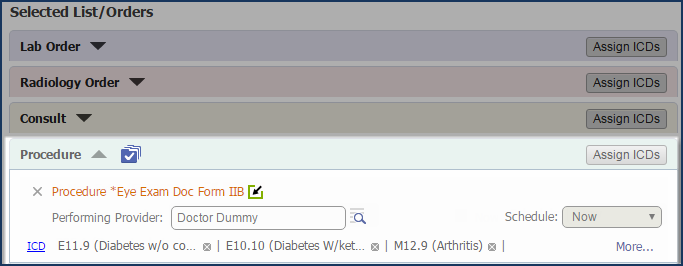
• Details displayed on the Procedure accordion are Procedure Name (non-editable);
• Procedure Type indicator icons:
 (indicating In-house Procedure);
• (Procedure) Performing Provider (is the Attending Provider by default and provision to select another is available via the Performing Provider search);
• Schedule (select Now or the required duration from the dropdown list of when the Procedure is to be done);
• The
ICD hyperlink, on click invokes the popup,
ICD Mapping (Assign ICDs) and through the popup it is possible to change the assigned ICDs – the link is available only when an Order has no status.
The More/Less link (available only if all ICDs cannot be displayed in the space available) to view/hide the associated ICD details.
• Once the tests are selected from the left side and the required details updated on the right side (if any), either click the
save button to save the details or click
Create Order button to create the Procedure Order.
• Following two actions take place once the Order is created:
i. Once the Order is created, the Right Hand Section additionally displays Order status.
Following table lists out the different Order Statuses and their significance.
Table 5.1.7-1:
Various Order Statuses
No. |
Status |
Significance |
1. |
Entered |
Order is created; the User has no approve rights. |
2. |
Approved |
Order has been approved; the User has the required approved rights. |
3. |
Ordered |
Order has been ordered via Print or Fax. |
4. |
Deleted |
The Order has been deleted. |
5. |
Results Received |
Results for the Order has been entered or attached. |
6. |
Complete and Reviewed |
The Results have been answered and the Order has been reviewed. |
Note:
Deleted tests/orders are shown in Red on Select tab.
ii. The Procedure created is seen on the
View Orders section with an indication of its duration as Now or Future on the immediate right of the Procedure Name. For example, for a Procedure that is scheduled for ‘Now’ has the indication ‘(N)’ and the Procedure scheduled for future (in days) is indicated with ‘< number of days >D’.
Refer to figure 5.1.7-8
Figure 5.1.7-8: Procedure Orders
scheduled for now and future

Note:
Future duration scheduled in Weeks has the indication, ‘(< number of weeks >
W)’, scheduled in Months has the indication ‘(< number of months >
M)’ and scheduled in years has the indication ‘(< number of years >
Y)'.
Only Users with access rights defined for Order Sheet are eligible
for creating Orders; the Create Order
button displays disabled for Users without the appropriate access
rights. For more details on Access Rights, Click here.
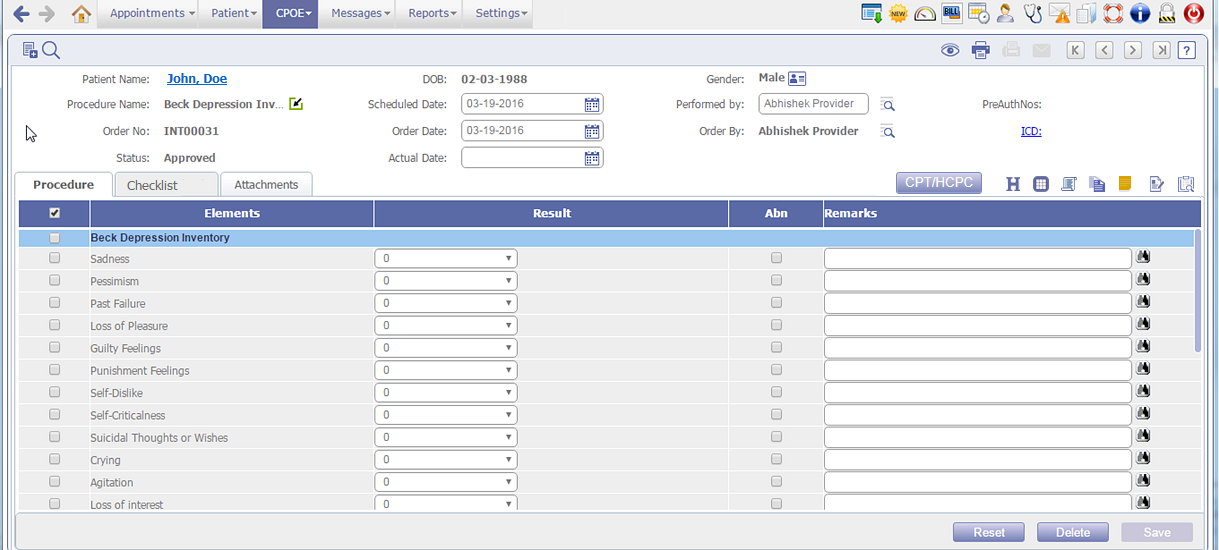
On Order tab (In-house Procedure)
Figure 5.1.7-9: UI of In-house Procedure Order
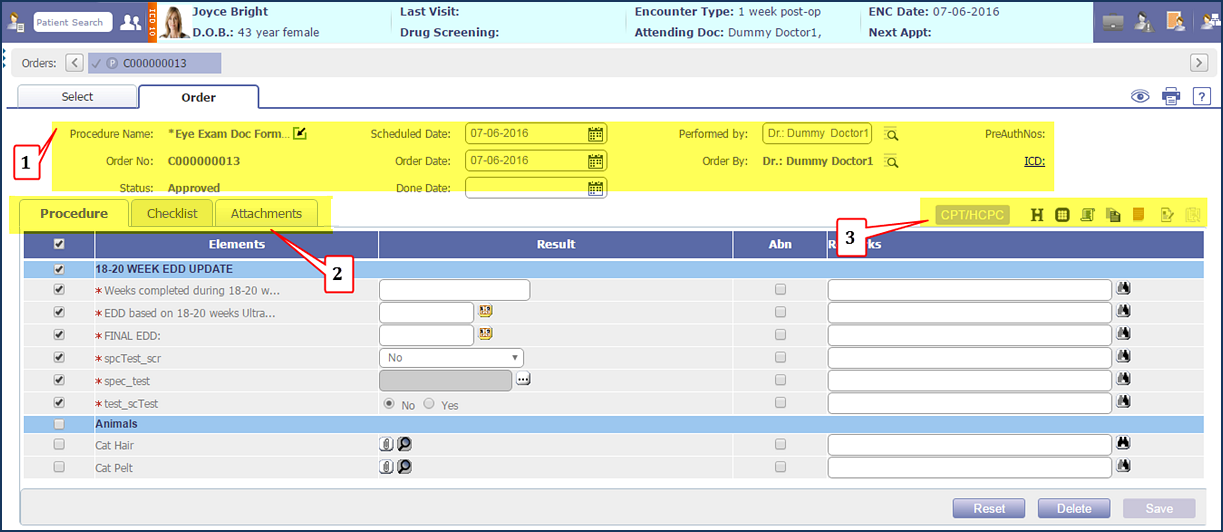
• The UI of Internal Order tab consists of:
#1: Order details with provision to enter results;
Note:
The Procedure Done Date, available on the In-house Procedure Order is in sync with the Done Date details on the Specialty screen (Goto patient’s Encounter à Encounter TOC à Specialty) and the Health Maintenance screen (Goto patient’s Encounter
→
Encounter TOC
→
Face Sheet
→ Health Maintenance).
#2: Tabs: Procedural; Checklist; and Attachments
- Procedure template displayed is the one associated to the Procedure in Procedure Master.
- Checklist tab is enabled for entering details only if the Procedure has a Procedure Checklist associated.
Note:
A Procedure Checklist form when filled and saved, does not impact the Order status i.e. there is no change in the Status of the Order.
- Attachments tab is available to attach Order Results either from device or Document List.
#3: Icons: Refer to following table for more details on individual icons.
Table 5.1.7-2:
List of Icons displaying on the
In-house
Procedure Order
No. |
Icon name |
Icon |
Description |
Icons on In-house Procedure Order |
1. |
copy |
 |
Copies from existing Procedures present in the Patient’s encounter. |
2. |
Notes |
 |
Enter notes. |
3. |
CPT/HCPC |
 |
View associated optional CPT/HCPC. |
4. |
Past ICD |
 |
View Patient’s past ICD. |
5. |
Face Sheet |
 |
View Patient’s Face Sheet. |
6. |
Document List |
 |
Views Document List. |
7. |
Review |
 |
Add review comments to the Order for the results received. |
8. |
Doctor Form |
 |
Views the associated Doctor Form. |
Note:
The
CPT/HCPC button is enabled if the Procedural template has optional CPT/HCPC assigned to it.
The
DocForm icon is enabled if the Procedural template has a doctor form associated with it.
• Order status changes from ‘Entered’/’Approved’ to ‘Results Received’ if Procedure form details is entered and saved, and also if any attachments are attached to the order form and saved on the
Attachment tab.
Note:
If NO Print template is associated to Procedure (from the Specialty Template Master screen) then the preview/print of In-house Procedure Order (with status, ‘Result Received’) is done using the default print template. The Default Print Template is also available from Specialty Template Master screen.
• Preview 
o Preview of Procedure Order
On Preview of Procedure Order (with statuses Entered/Approved/Ordered) the Procedure Order details is displayed followed by Procedure
Checklist details.
o Preview of Procedure Result
On Preview of Procedure Result (with status Result Received) the Procedure Order details is displayed followed by Attachments (if available) and then followed by Procedure
Checklist details (if Print template available).
• Print: Click print icon:
 to get print copy of the Order. to get print copy of the Order.
Hint:
The templates used are the Procedure Order Template (as selected in the Procedure Master) and Procedure
Checklist (assigned in Clinic Forms); if print template of Procedure Order is not defined then system considers the default template for preview and print. If the print template of Procedure
Checklist is not defined then the Procedure Checklist details are not displayed on preview and print.
No Fax or Email or Download options available for In-house Procedure.
The Quick tab available on the Select tab also has Provision to create
Procedure Orders. Please refer to Quick tab section for more details.
II. External Procedure Order workflow via Order Sheet
• On the Select tab, User has to click the individual Select icon:
. On click, the Procedure test is selected and gets transferred to the Right hand side section under the Procedure accordion. Refer to figure 5.1.7-10
Figure 5.1.7-10:
External Procedure Order details as seen under the Procedure accordion
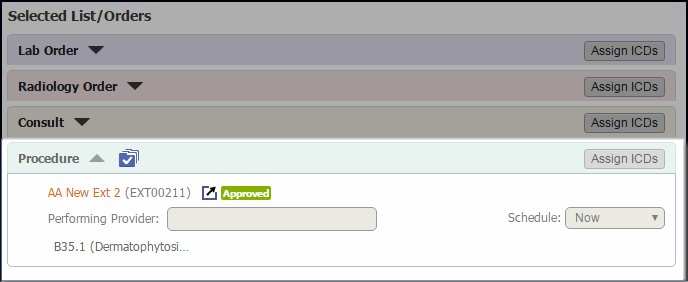
• Details displayed on the Procedure accordion are Procedure Name (non-editable);
• Procedure Type indicator icon:
 indicates External Procedure; indicates External Procedure;
• (Procedure) Performing Provider (is the Attending Provider by default and provision to select another is available via the Performing Provider search);
• Schedule (select Now or the required duration from the dropdown list of when the Procedure is to be done);
• The ICD hyperlink, on click invokes the popup,
ICD Mapping (Assign ICDs) and through the popup it is possible to change the assigned ICDs – the link is available only when an Order has no status.
The More/Less link (available only if all ICDs cannot be displayed in the space available) to view/hide the associated ICD details.
• Once the tests are selected from the left side and the required details updated on the right side (if any), either click the
save button to save the details or click
Create Order button to create the Procedure Order.
• Following two actions take place once the Order is created:
i. Once the Order is created, the Right Hand Section additionally displays Order status.
Following table lists out the different Order Statuses and their significance
Table 5.1.7-2:
Various Order Statuses
No. |
Status |
Significance |
1. |
Entered |
Order is created; the User has no approve rights. |
2. |
Approved |
Order has been approved; the User has the required approved rights. |
3. |
Ordered |
Order has been ordered via Print or Fax. |
4. |
Deleted |
The Order has been deleted. |
5. |
Results Received |
Results for the Order has been entered or attached. |
6. |
Complete and Reviewed |
The Results have been answered and the Order has been reviewed. |
Note:
Deleted tests/orders are shown in Red on Select tab.
ii. The Procedure created is seen on the
View Orders section with an indication of its duration as Now or Future on the immediate right of the Procedure Name. For example, for a Procedure that is scheduled for ‘Now’ has the indication ‘(N)’ and the Procedure scheduled for future (in days) is indicated with ‘< number of days >D’.
Refer to figure 5.1.7-11
Figure 5.1.7-11: Procedure Orders
scheduled for now and future
Note:
Future duration scheduled in Weeks has the indication, ‘(< number of weeks >
W)’, scheduled in Months has the indication ‘(< number of months >
M)’ and scheduled in years has the indication ‘(< number of years >
Y)'.
Only Users with access rights defined for Order Sheet are eligible
for creating Orders; the Create Order
button displays disabled for Users without the appropriate access
rights. For more details on Access Rights, Click here.
On Order tab (External Procedure)
• Once the Procedure Order is created the details are viewed from the Order tab.
Refer to figure 5.1.7-12
Figure 5.1.7-12: UI of
External Procedure Order
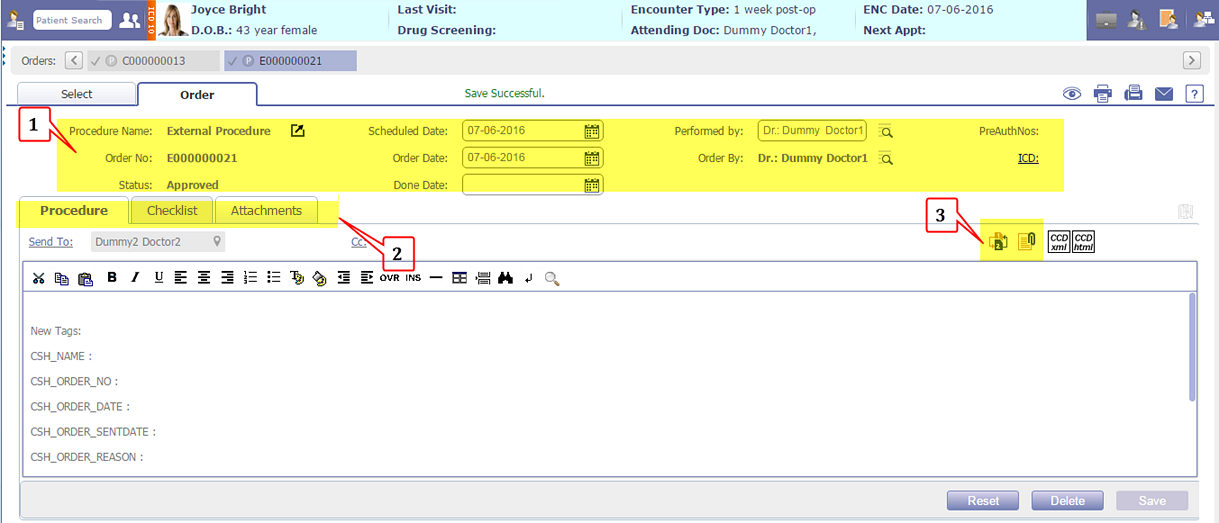
• The UI of External Order tab consists of:
#1: Order details with provision to enter results;
Note:
The Procedure Done Date, available on the In-house Procedure Order is in sync with the Done Date details on the Specialty screen (Goto patient’s Encounter
→
Encounter TOC
→
Specialty) and the Health Maintenance screen (Goto patient’s Encounter
→
Encounter TOC
→
Face Sheet
→
Health Maintenance).
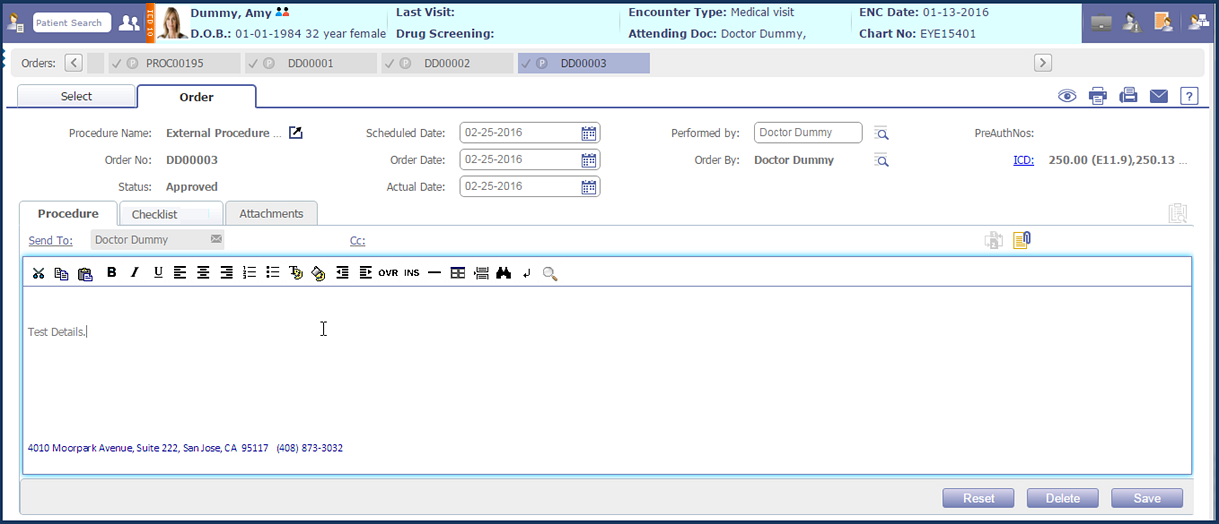
#2: Tabs: Procedure; Checklist; and Attachments
Procedure Tab: The text editor displayed is same as Letter-Out screen. The Attach icon on click invokes the Document List screen.
Refer to figure 5.1.7-13
Figure 5.1.7-13: External Procedure Order screen - similar to Letters-Out screen
Checklist tab is enabled for entering details only if the Procedure has a Procedure Checklist associated.
Note:
A Procedure Checklist form when filled and saved, does not impact the Order status i.e. there is no change in the Status of the Order.
Attachments tab is enabled once the External Order has been ordered; attachments are added either from device or Document List.
#3: Icons: Refer to following table for more details on individual icons.
Table 5.1.7-3:
List of Icons displaying on the
External
Procedure Order
No. |
Icon name |
Icon |
Description |
Icons on External Procedure Order |
1. |
Set Sequence |
 |
Set the sequence of documents attached. |
2. |
Attach Doc |
 |
Attach documents either from User’s device or the Document List. |
• Order status changes from ‘Entered’/’Approved’ to ‘Results Received’ if Procedure form details is entered and saved, and also if any attachments are attached to the order form and saved on the
Attachment tab.
Note:
If NO Print template is associated to Procedure (from the Specialty
Template Master screen) then the preview/print of In-house Procedure
Order (with status, ‘Result Received’) is done using the default print
template. The Default Print Template is also available from Specialty
Template Master screen.
The
Quick tab available on the Select tab also has Provision to create
Procedure Orders. Please refer to Quick tab
section for more details.
• Preview
o Preview of Procedure Order
On Preview of Procedure Order (with statuses Entered/Approved/Ordered) the Procedure Order details is displayed followed by Procedure
Checklist details.
o Preview of Procedure Result
On Preview of Procedure Result (with status Result Received) the Procedure Order details is displayed followed by Attachments (if available) and then followed by Procedure
Checklist details (if Print template available).
• Print: Click print icon:
to get print copy of the Order.
• Fax: Click fax icon:
 to send the Order as Fax. to send the Order as Fax.
• Email: Click email icon:
 to send Order as email. to send Order as email.
#Action buttons:
Save: On click updated details are saved.
Create Order: On click the order is created with status, ‘Entered’ or ‘Approved’.
Note:
Once the Order is created, the Right Hand Section additionally displays Order status.
Only Users with access rights defined for Order Sheet are eligible
for creating Orders; the Create Order
button displays disabled for Users without the appropriate access
rights. For more details on Access Rights, Click here.
Reset: On click all unsaved changes are reverted.
Hint:
The Quick tab available on the Select tab also has Provision to create
Procedure Orders. Please refer to Quick tab section for more details.
III. Procedure
Order workflow via TOC
→
Procedure
In addition to Order Sheet
→
Select tab, User has provision to create and enter Procedure results from the TOC
→ Procedure Order screen.
Procedure Orders from TOC
→
Procedure Order supports the concept of Order Encounter and
Result Encounter.
Conditions for an encounter to be considered as Order Encounter and Result Encounter:
 The Encounters wherein Orders are created and results are entered in are NOT same. The Encounters wherein Orders are created and results are entered in are NOT same.
The Encounter wherein Orders are created is currently closed before the associated results were entered in another Encounter.
If both these conditions are fulfilled then the Encounter wherein Order is created is the Order Encounter. And the Encounter wherein associated results were entered is the Result Encounter.
Consider the scenario, wherein a Patient has been diagnosed with a heart disease and a procedure for thrombolysis, has been recommended. The patient undergoes the procedure in the encounter. After the Patient’s visit, the current encounter is closed – this is Order Encounter. The next time that the Patient visits the physician clinic, the results for the test conducted in the earlier encounter is entered – this is Result Encounter.
Following are few scenarios or cases with respect to In-house Procedure Orders created from TOC
→
Procedure Order:
a. Procedure created, performed, and results entered in the same Encounter
In one encounter, if a Procedure Order was created for a patient, the Procedure performed and results entered in the same Encounter then on close of Encounter the results are associated to the same encounter of the Patient.
b. Procedure created in one Encounter
→
Encounter closed and procedure performed in another encounter with results entered
Consider a scenario, in an encounter (Enc 1), a Procedure Order for the procedure, thrombolysis was created and performed and the
encounter closed.
On a later date, in another open Encounter (Enc 2) the results were entered from TOC
→ Procedure Order then results are associated with Enc 2 and NOT Enc 1. Enc 2 becomes Result encounter for procedure order “thrombolysis” ordered in Enc 1.
Note:
If ordering encounter is CLOSED and if the same procedure (thrombolysis) was already ordered or result entered for any other Order then on click of save, a popup is displayed to select any other encounter.
Procedure orders with order date greater than or equals to current encounter date then also a popup is displayed to we ask to select any other encounter select any other encounter.
c. Procedure created in one Encounter
→
Encounter closed
→
Results entered via CPOE
Consider a scenario, in an encounter (Enc 1), a Procedure Order was created and procedure performed and the
encounter was closed. From CPOE
→
Procedure
→
the same Order (created in Enc 1 - a closed encounter) is opened.
Note, Results are allowed to be entered, only if Order’s status is either Approved; Ordered; or Result Received. Once the results are entered then on save, Select/Create Encounter popup is displayed (only if Order encounter is CLOSED).
Refer to figure 5.1.7-14
Figure 5.1.7-14:
Select/Create Encounter popup
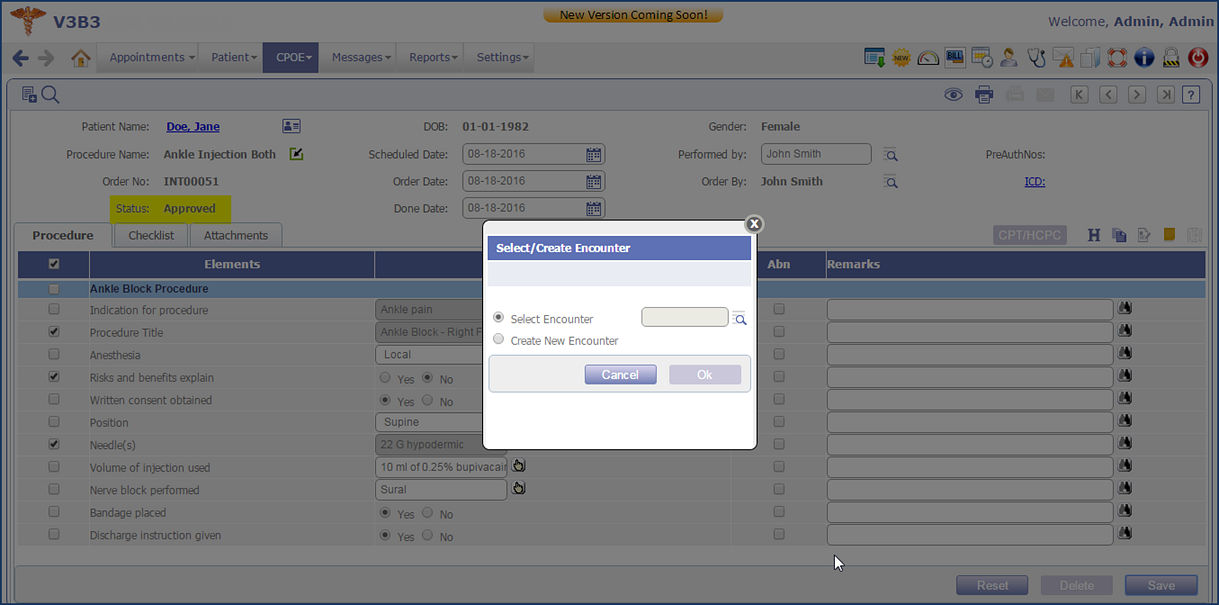
Now, two cases needs to be considered,
Case I: Patient has open encounter(s) present
If open encounter(s) are present for the Patient then User is expected to select the option,
Select Encounter and click on the search icon:
 to invoke a list of these open encounters and choose one encounter from the list and enter results for the Procedure Order.
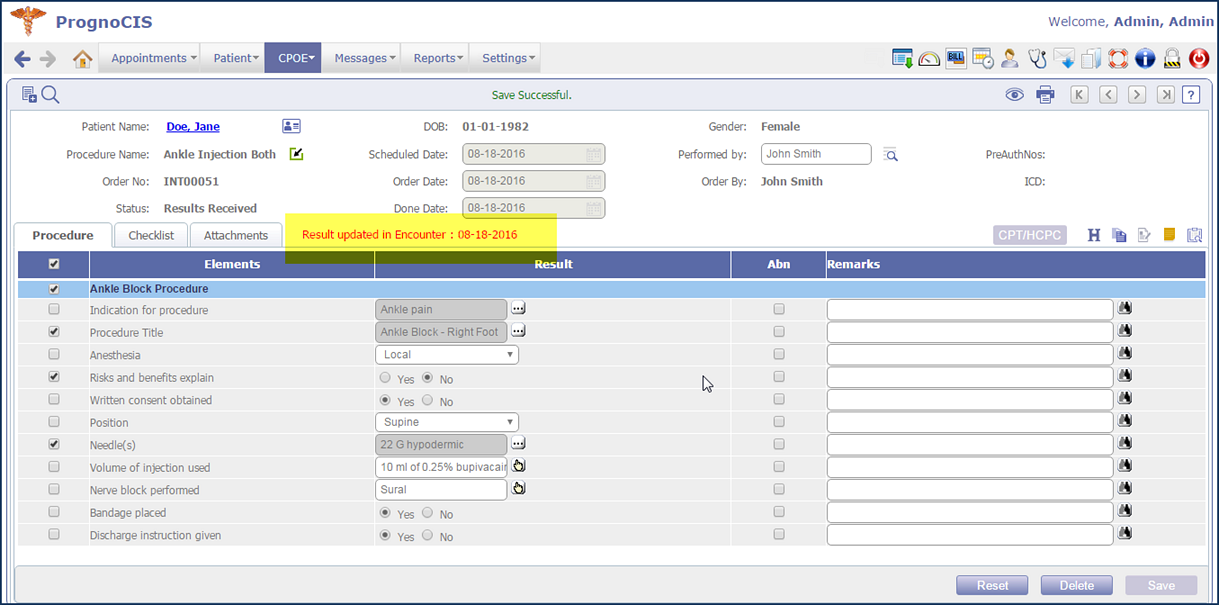
Case II: Patient has NO open encounter(s) present
If no open encounter(s) are present for the Patient then User is expected to select the option,
Create New Encounter and the system navigates to the Order in a new encounter and the Order is marked in red, with information –
Result updated in Encounter < date of encounter >. Refer to figure
5.1.7-15
Figure 5.1.7-15:
Create New Encounter with Results information displayed in Red
Note:
The new encounter created is of Todays date and all the data of the Ordering Encounter is copied. Details such as Attending Provider; Supervising Provider; Rendering Provider; Encounter Type; Attending Clinical Staff; Referred by Provider (if any); Appointment Location; Case No. (if any); Primary Insurance; Secondary Insurance; and Reason of encounter among others.
Hint:
1. Following conditions are considered while displaying details on the search Encounter popup invoked on click of the search icon:
If ordering encounter is CLOSED and the same procedure was already ordered/result entered, in any other encounter then such encounter is not shown in the select encounter search list.
Encounters with encounter date greater than or equals to order date AND OPEN encounters are only shown.
2. Status of test is updated as DONE in
Result encounter .
3. If an Order has been created and attachments are attached to the Order then the status changes to Result Received. But note that the Result Encounter is yet to be updated - Result encounter gets updated only if User enters results in tests or enter notes.
4. Once Result encounter is CLOSED, user cannot modify the information related to test and notes. Though user can change the attachments or enter the information in Checklist tab.
C) The Procedure option on the Protocol Master screen displays In-house and External procedures created via Procedure Master
Navigation: Goto menu: Setttings
→ Configuration
→ Protocol
→ select option, Procedure
→ click [+]
The Procedure search that is invoked on click of the Add More Tests button: [+] displays the Procedure Orders (In-house as well as External) created from the Procedure Master (Goto menu: Settings
→ Configuration
→ Procedure) from the current version – earlier the search displayed Specialty templates that are ‘marked’ as Procedure.
D) Provision to attach Procedure Results through Attach/Scan Center
Received results of Procedure Order is
attached either via Attach center or Scan/Local Attach.
Navigation: Goto menu: Messages
→ Attach Center Refer to figure 5.1.7-16
OR
Goto menu: Messages → Scan/Local Attach
Refer to figure 5.1.7-17
Figure 5.1.7-16: Consult
Response and Procedure Result on Attach Center
Figure 5.1.7-17: Consult
Response and Procedure Result on Scan/Local Attach
Note:
The Order No. search for In-house Procedure result displays Procedure Orders with statuses, ‘A’ – Approved; ‘O’ – Ordered; and R - ‘Result Received’.
The Order No. search for External Procedure result displays Procedure Orders with statuses, ‘O’ – Ordered, and R - ‘Result Received’ only.
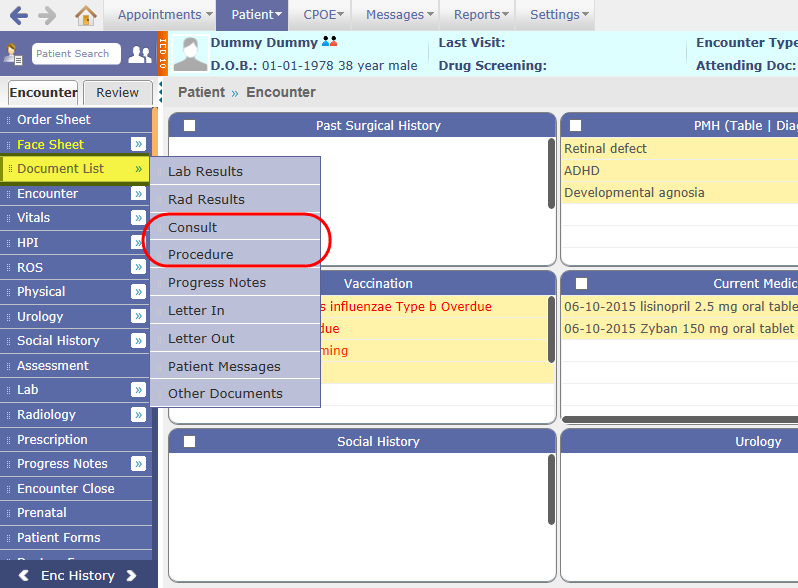
E) Consult and Procedure submenu now available on Document List menu as well as on the screen
• There is now provision to add
Consult and Procedure
as sub-menu under Document List menu on the Encounter TOC tab and
Review TOC Tab. Refer to figure The display of these sub-menus are subjected to the assignment of values CRA (for Consult) and PRA (for Procedure) in the property,
doclist.submenu.options. Refer to figure 5.1.7-18
Figure 5.1.7-18: Document List menu on Encounter TOC displaying Consult and Procedure as sub-menus
• On the Document List screen, for Document type, ‘Consult Order’/’Procedure Order’ the details
cannot be edited through Edit Details button whereas the details are allowed to be edited for type, ‘Consult Response’/’Procedure Result’.
Note:
The display of document type, Consult and Procedure on the Document List screen is dependent on the values CRA (for Consult) and PRA (for Procedure) assigned to the property,
review.doclist.types.
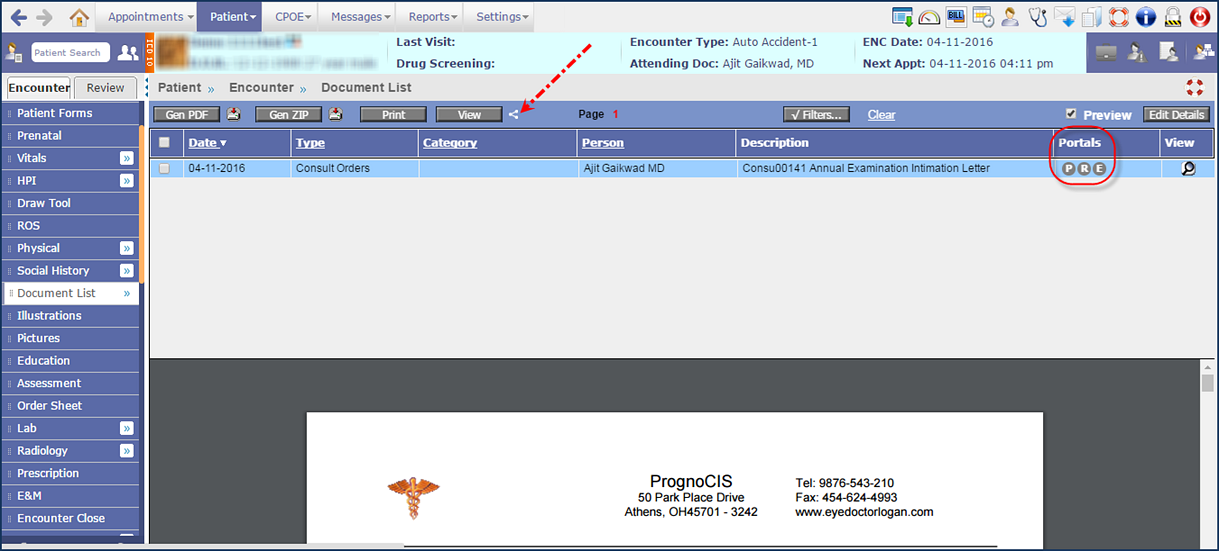
• A new Share icon:
 and a new column, Portals has been provided on the Document List screen to share the required document on the respective Patient, Referring Doc, and Employer Portals.
For more details, Click here. and a new column, Portals has been provided on the Document List screen to share the required document on the respective Patient, Referring Doc, and Employer Portals.
For more details, Click here.
Figure 5.1.7-19: Sharing Consult and Procedure documents on portal
• Similarly, for document type, Procedure a new Share icon:
and a new column, Portals has been provided on the Document List screen to share the required document on the respective Patient, Referring Doc, and Employer Portals.
The button, Edit Details is available for on the document type, Procedure wherein the category for the Procedure Results could be defined.
|
|
|
| 5.1.8 |
Quick Tab |
| |
Tests of all type (i.e. LB, RL, CM, PR, and
additionally OS) are displayed in a common list, thus creating a one-point entry to select and Order tests.
The tests of type, Order Sheet or
OS are defined from the existing Order Set Master screen
which now has a new UI (Goto menu: Settings
→ click Configuration
→ under Workflow column, click Order Set)
Refer to screen 5.1.8-1
Figure 5.1.8-1: Order set
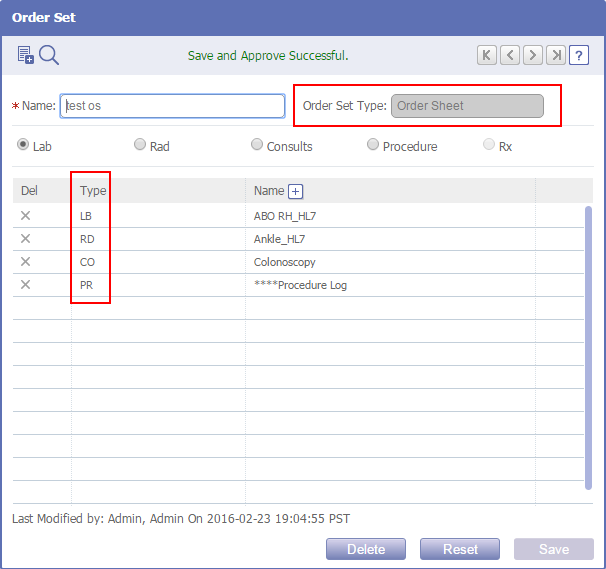
Note:
If tests belonging to an Order Set are gender based then these tests are displayed based on the gender of the Patient. For example, for a male patient, only Male tests are displayed.
Tests added from Quick tab on the left to the right side are displayed under the respective category of accordion e.g. Lab tests under Lab Order; Radiology tests under Radiology Order etc.
Lab/Radiology tests added from Quick tab on the left to the right side are displayed under vendor, ‘Any Lab’ or ‘Any Rad’ automatically.
|
|
|
| 5.1.9 |
CPOE menu now also includes Consult and Procedure |
| |
Refer to figure 5.1.9-1
Figure 5.1.9-1: CPOE menu displaying Consult and Procedure
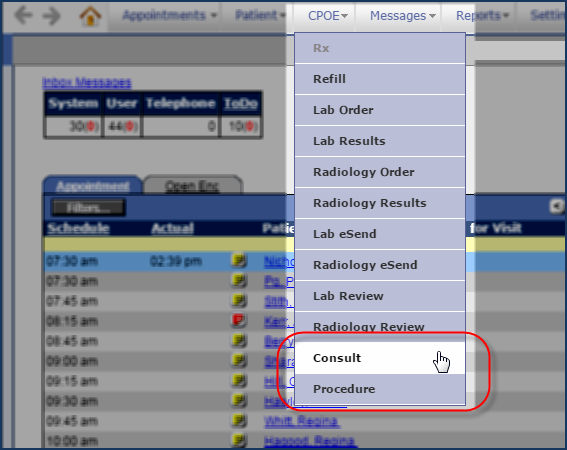
Navigation: Goto menu: CPOE
→ click Consult Refer to figure 5.1.9-2
Figure 5.1.9-2: CPOE Consult screen
And
Goto menu: CPOE → click Procedure Refer to figure 5.1.9-3
Figure 5.1.9-3: CPOE Procedure screen
Note:
When new Consult is added from CPOE
→ Consult, the consult is attached to the Patient's latest OPEN encounter. However if all encounters are CLOSED then the consult is attached to the Face Sheet encounter (FS).
|
|
|
| 5.1.10 |
Provision to maintain Audit Trail of CPOE
→ Consult and Procedure |
| |
The number of times CPOE
→ Consult and Procedure Orders are read; created; updated; deleted; and approved is audited. The Audit Trail screen (Goto menu: Settings
→ Configuration
→ Audit Trail) now has additionally two events under the CPOE section.
Refer to figure 5.1.10-1
Figure 5.1.10-1: Consult and Procedure in Audit Trail
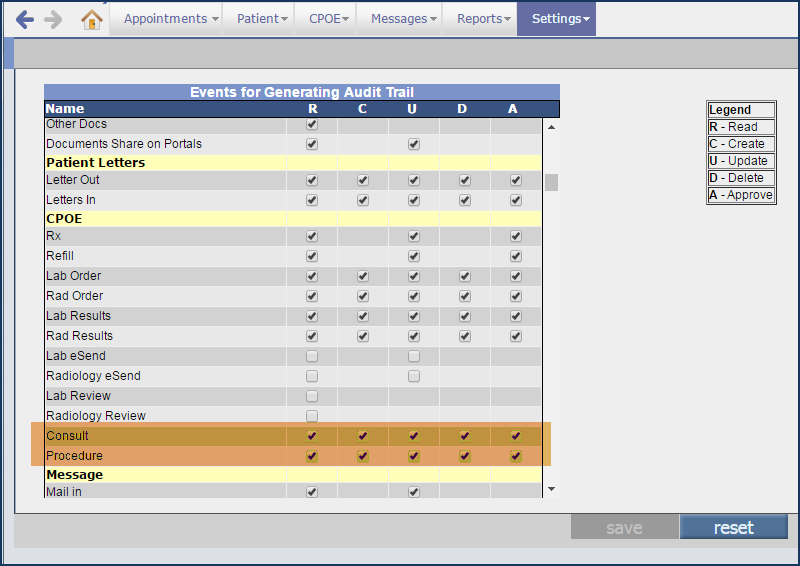
Similarly tracking of events for Consult and Procedures has been added for sections, Group Types; and Configuration Workflow.
|
|
|
| 5.1.11 |
Order created in Order Sheet is tracked in Health Maintenance |
| |
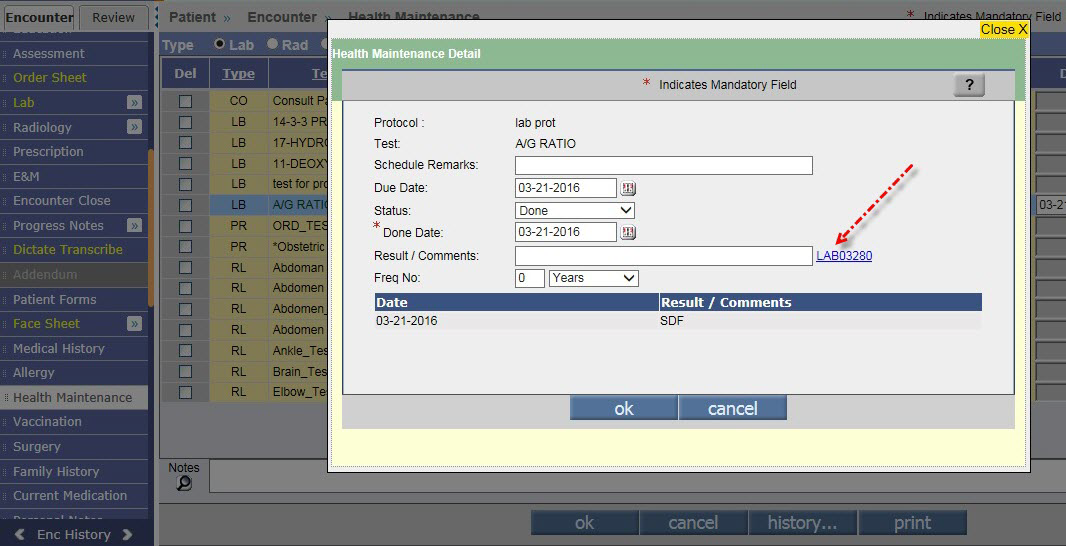
• If an ordered Lab or Radiology or, Consult or Procedure is already present in the Patient's Health Maintenance with the status ‘Result Received' then on the HM screen under the column, Result a hyperlink of the Order No. is displayed; on click it displays the test result details. Refer to figure 5.1.11-1
Figure 5.1.11-1: Lab result on Health Maintenance screen
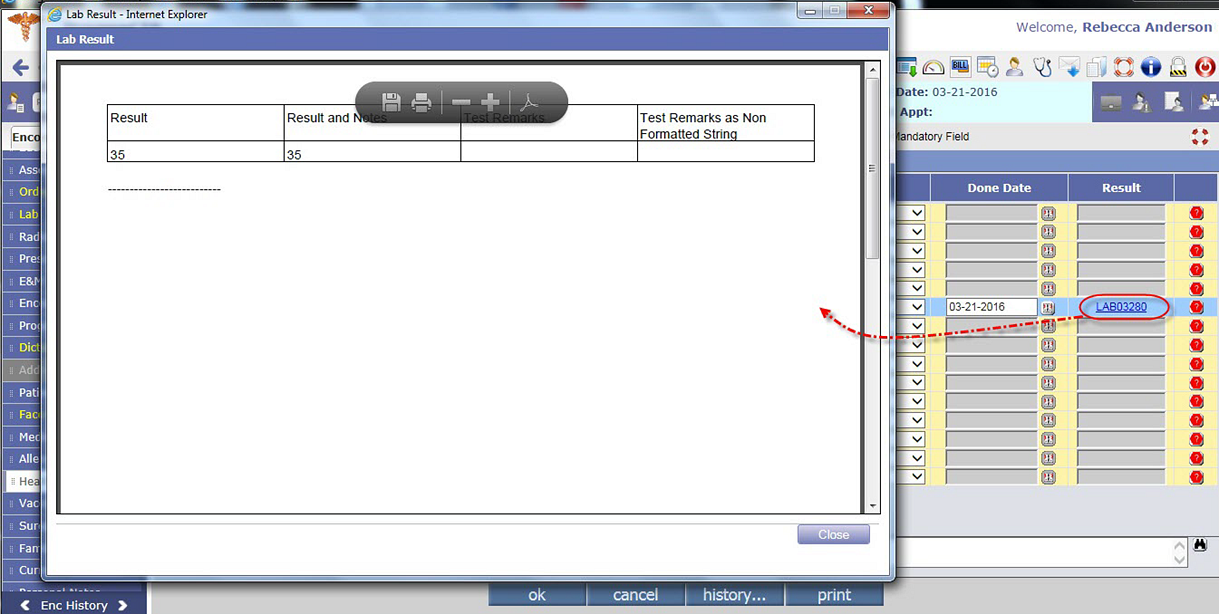
Note: The results for Lab, Radiology, Consult, Procedure if present in the entered state then once the Order is created, it is replaced with the hyperlink.
• Also, on the Done Details popup, the
Order No. hyperlink is displayed next to the Result/Comments field; on click it displays the Test Result details. Refer to figure 5.1.11-2
Figure 5.1.11-2: Order No. hyperlink is displayed next to the Result/Comments field
• Results coming in from Lab or Radiology or, Consult or Procedure are also displayed on the Health Maintenance cell of the Face Sheet.
Note: The Process Status that is displayed on the Home Screen under the
Visit Status column now additionally also includes the status of all the orders that are created from Order Sheet and are ‘In process’.
|
|
|
| 5.1.12 |
Order statuses for the Orders created in the current encounter is also available on Encounter Close screen |
| |
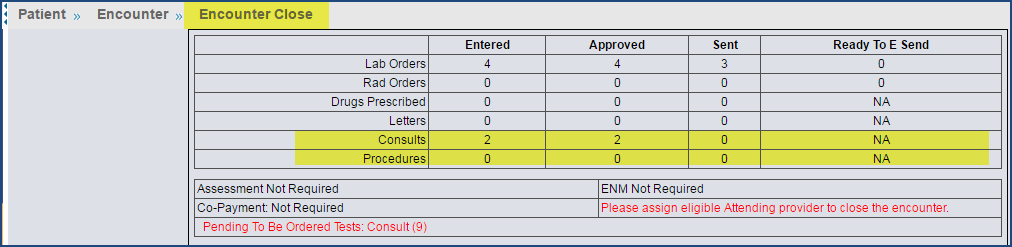
The statuses of the Orders (Consult/Procedure) available in the current encounter is updated and displayed on the Encounter Close screen.
Refer to figure 5.1.12-1
Figure 5.1.12-1: Encounter Close screen displaying the statuses of the Consult and Procedure Order that are created in the current encounter
|
|
|
| 5.2 |
Health Maintenance screen has provision to add Notes and Phrases |
| |
Navigation: Goto Patient's Encounter → Encounter TOC → click Health Maintenance
OR
Goto Patient's Encounter → Encounter TOC → click Face Sheet → click Health Maintenance
• Users now have a provision to add notes for Health Maintenance from the newly provided Notes section in the Health Maintenance screen. Refer to figure 5.2-1
Figure 5.2-1: Notes section on Health Maintenance screen
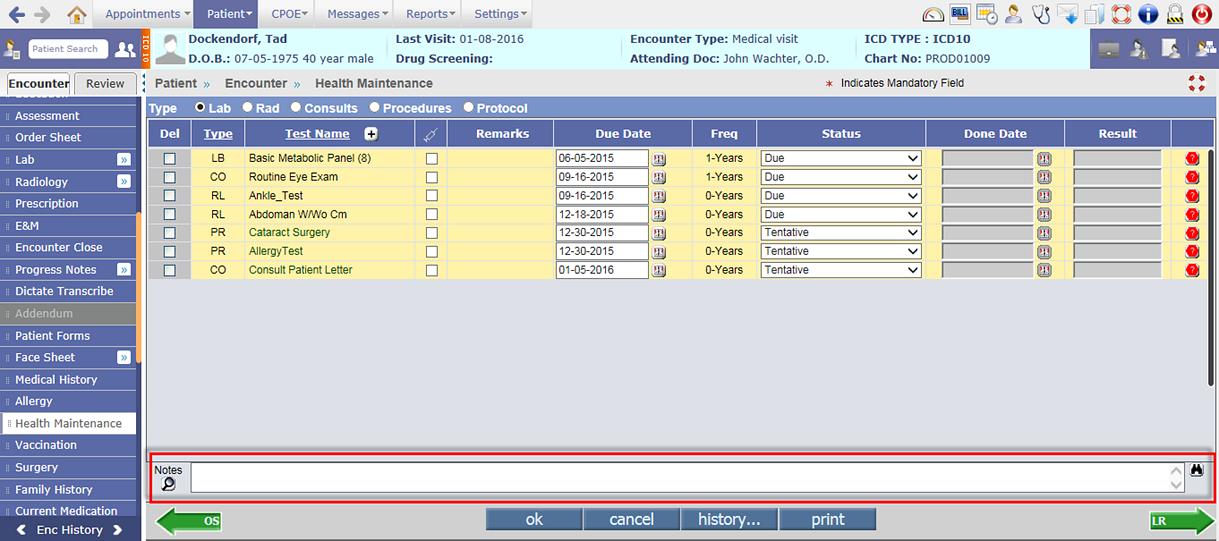
• A newly added tag,
[ENC_FSS_PHS_HM_NOTES] enables the display of Health Maintenance notes in the Notes field.
• Also, a new list of Phrases has been added for Health Maintenance. To select any of these Phrases, click on the Insert Phrases icon:  , provided in the Notes section. , provided in the Notes section.
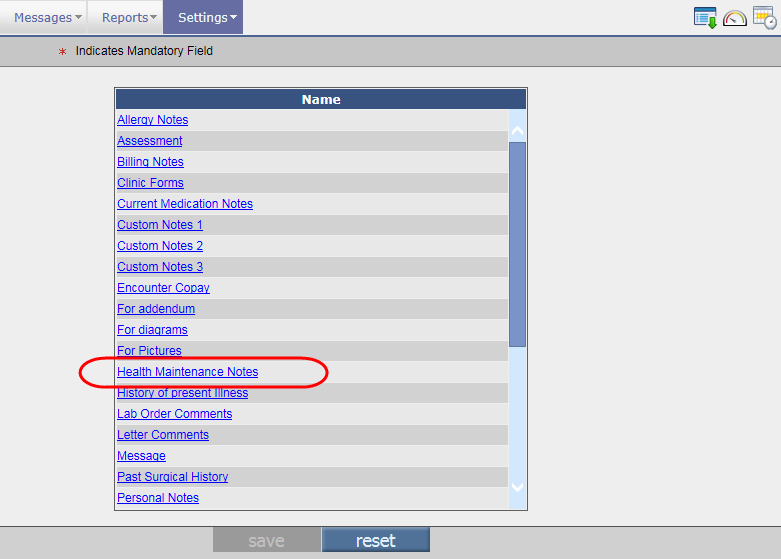
• Users can even add new phrases to the list from a newly added category, Health Maintenance Notes in the Phrases Types Master screen (Goto menu Settings → click Configuration → under Groups column, click Phrases Types). Refer to figure 5.2-2
Figure 5.2-2: Health Maintenance Notes category in Phrases Types Master screen
• Even on Dictate Transcribe screen (Goto: Patient’s Encounter → Encounter TOC → click Dictate Transcribe),
Users now have a provision to add the Health Maintenance Notes. Refer to figure 5.2-3
Figure 5.2-3: Health Maintenance Notes on Dictate Transcribe screen

 Limitation: The entered note will be applicable for all the Health Maintenance tests and not for any specific selected test. Limitation: The entered note will be applicable for all the Health Maintenance tests and not for any specific selected test.
|
|
|
| 5.3 |
Scrubber Checks available on Assessment screen and Doctor Form to avoid Claims being rejected for incorrect code entries |
| |
• CMS records almost 10% of claim rejection due to entry of incorrect diagnostic codes. Such rejections can be avoided if you have Scrubber Checks implemented on the Assessment screen.
• Depending upon checks being implemented, on the Assessment screen you’d now view alerts of type,
- Warning (System displays the alerts but allows you to continue further)
- Error (System displays the alerts and does not allow you to continue further until the error is rectified)
- Update (System alerts displays the and with no further notice, auto corrects the problem) – ONLY PrognoCIS implementers are required to apply this function
• The scrubber checks are defined from the newly added Scrubber Checks Master screen invoked via Scrubber Checks link (Goto menu: Settings → click Configuration → under Workflow column, click Scrubber Checks).
Note: The display of Scrubber Checks link depends on the property, assessment.use.scrubber.checks.
********************Information for Implementers********************
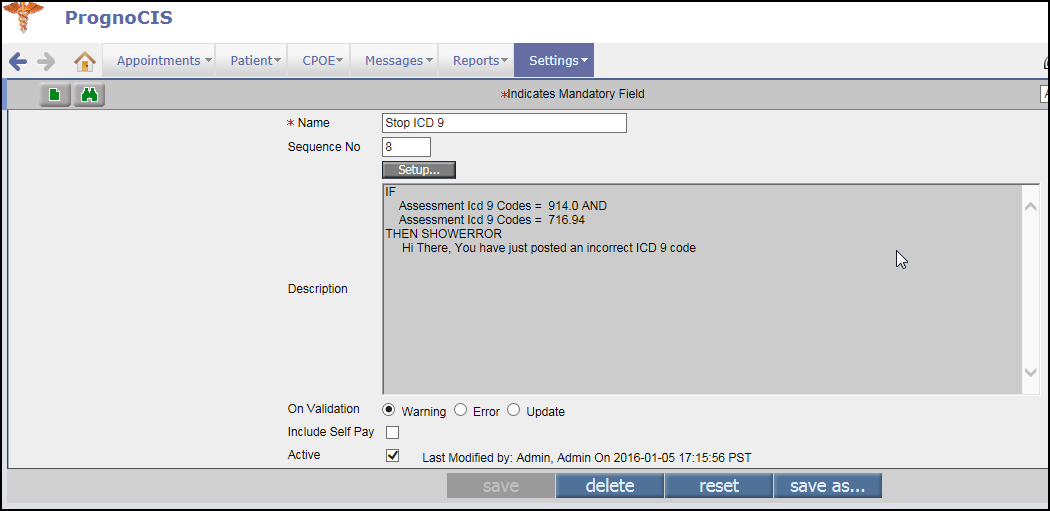
Configurations of Scrubber Checks are done from the Scrubber Check Master screen. Refer to figure 5.3-1
Figure 5.3-1: Scrubber Checks Master screen
********************Scrubber Checks Master screen explained********************
- The New icon:
 on click, opens a new and unsaved Scrubber Checks form. on click, opens a new and unsaved Scrubber Checks form.
OR
- The Search icon:
 on click opens a popup to search and open an existing Scrubber Checks form. on click opens a popup to search and open an existing Scrubber Checks form.
- Name: The new Scrubber Checks form’s name is defined here.
- Sequence No.: Enter a sequence number for the Scrubber Checks that would define its position on the Search (Scrubber Checks).
For example if a Scrubber Check A is given the sequence number of 7 and another Scrubber Check B is given the sequence number of 5 then on the Search popup Scrubber Check B is displayed before Scrubber Check A.
- Setup: On click the button opens the Add Scrubber Checks Conditions popup to define conditions for the working of your scrubber checks. Refer to figure 5.3-2
Figure 5.3-2: Add Scrubber Checks Conditions popup
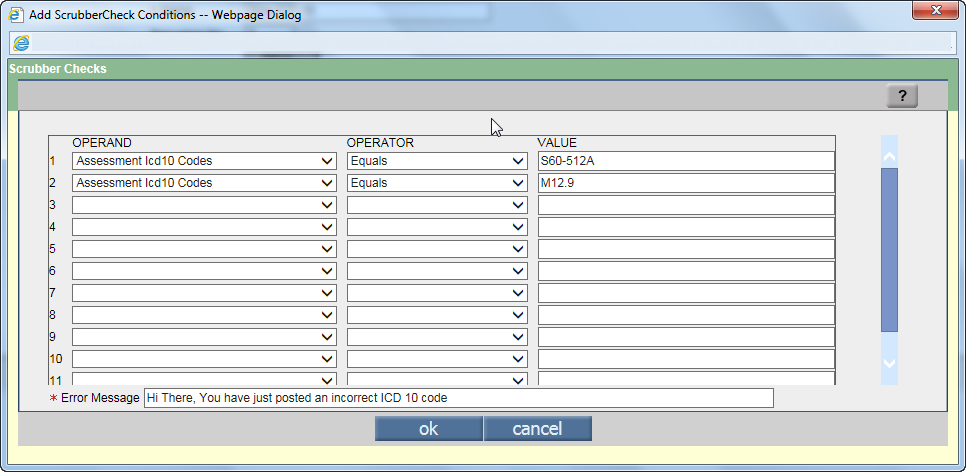
********************The ‘Add Scrubber Check Conditions’ popup explained********************
The functionality of Scrubber Checks conditions works on the mathematical concept of expressions. Just as a simple mathematical expression consists of Operand(s), Operator(s), and Result, similarly on the popup there are three columns titled: OPERAND, OPERATOR, and VALUE. For example, If OPERAND (Assessment ICD 10 codes) OPERATOR (EQUALS) VALUE (M12.9) then display Message, “Hi There, you have just posted an incorrect ICD 10 code.” in the field, Error Message. Refer to figure 5.3-2
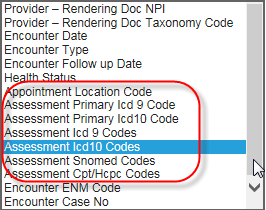
5.1 OPERAND: The column consists of drop-down list of pre-defined conditional statements. Select Assessment based conditional statements to define the scrubber check. Refer to figure Refer to figure 5.3-3
Figure 5.3-3: OPERAND drop-down details
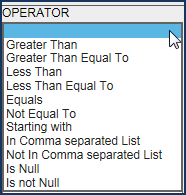
5.2 OPERATOR: The column consists of drop-down list of pre-defined operators. Select the appropriate operator to define the scrubber check. Refer to figure 5.3-4
Figure 5.3-3: OPERATOR drop-down details
5.3 VALUE: A free text field where you are expected to enter the exact value to be compared.
5.4 Error Message/SQL: Depending on the type of validation (either Warning or Error or Update) you need to either enter a message (for Warning and Error) or SQL query (for Update). The message entered is displayed on the Assessment screen when the configured conditions are met.
5.5 Click ok to set the conditions for the Scrubber Check.
OR
Click cancel to discard the configured conditions.
- Description: The configured conditions are displayed for a better understanding. To edit the same, you need to click Setup and do the changes.
- On Validation: As explained earlier, select the appropriate validation that has to be displayed on the Assessment screen. For example,
- Warning (System alerts but allows you to continue further).
- Error (System alerts and does not allow you to continue further until the error is rectified).
- Update (System alerts and with no further notice, auto corrects the problem). ONLY PrognoCIS Implementers are allowed to use this function
- Include Self Pay: Usage is for billing purpose only.
- Active: Select the option to keep the scrubber check in active mode and to be available in the Scrubber Checks search.
- save: click to save the Scrubber Checks.
- delete: click to delete the Scrubber Checks.
- reset: click to revert any unsaved changes.
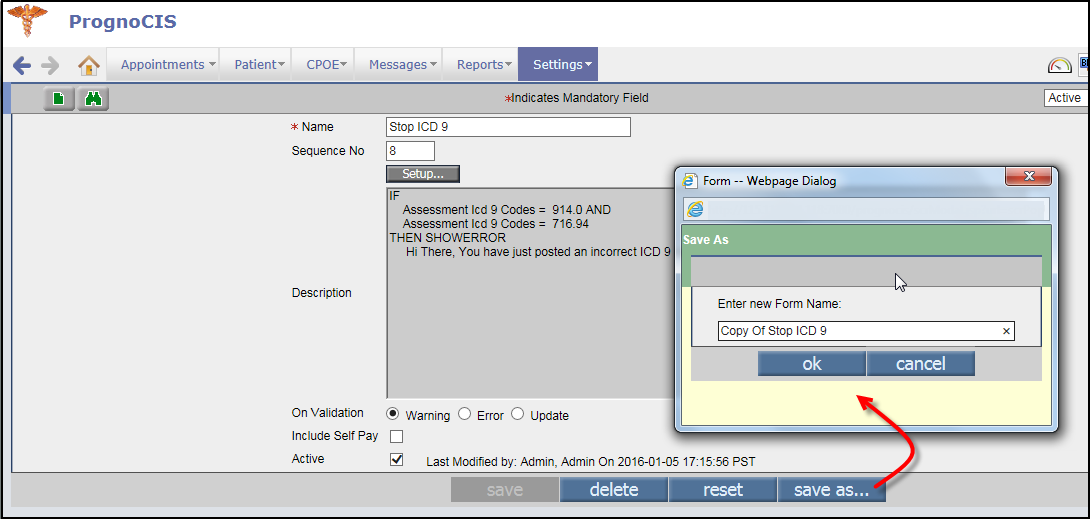
- save as: click to save the current Scrubber Check with a different name and same configuration. In other words, it creates the copy of the current Scrubber Check with a different name. Refer to figure 5.3-4
Figure 5.3-4: Save as Scrubber Check
********************Scrubber checks also available on Doctor Form ********************
Similarly, Scrubber checks are applicable on Doctor Form if the form has been designed with the process, EMR Scrubber Checks option selected. Refer to figure 5.3-5
Figure 5.3-5: Doctor Form displaying the option under the Process search popup
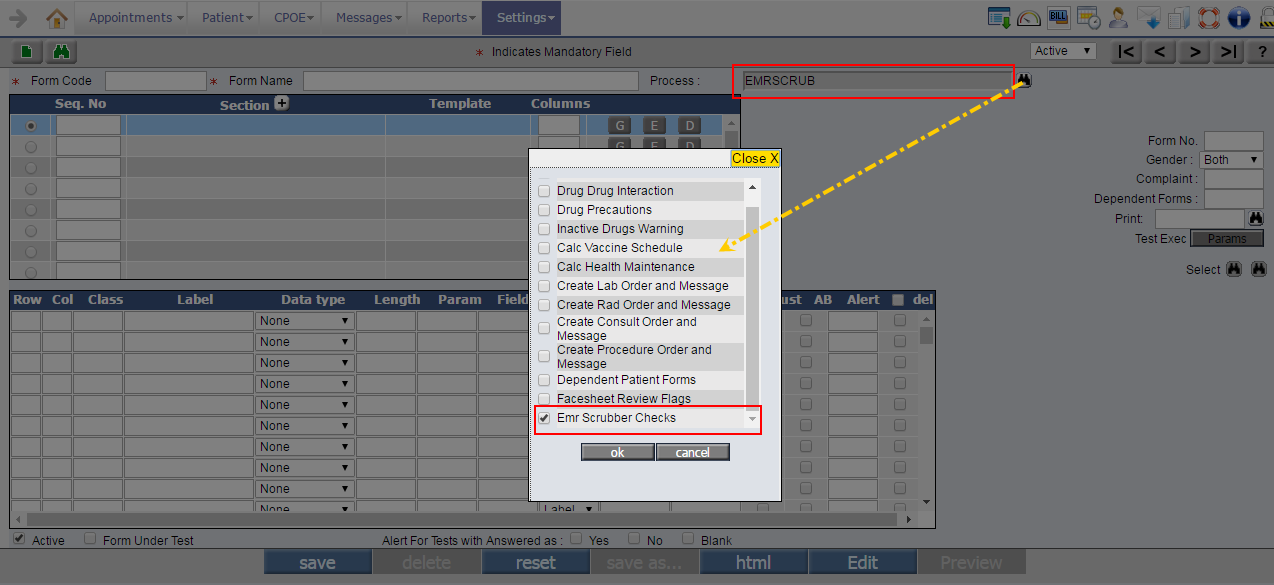
When the respective doctor form is used from Encounter TOC then on save the Scrubber checks are invoked.
. |
|
|
| 5.4 |
Lab and Radiology result values are now displayed up to the last decimal place without being cut off |
| |
Earlier, when Lab or Radiology results were
imported in PrognoCIS with decimal values, they were cut off up to two decimal places for display purpose. Now the values are printed as received, i.e. the decimals up to the last place is displayed as received on print. Refer to figure 5.4-1
Figure 5.4-1: Lab result with entire decimal value
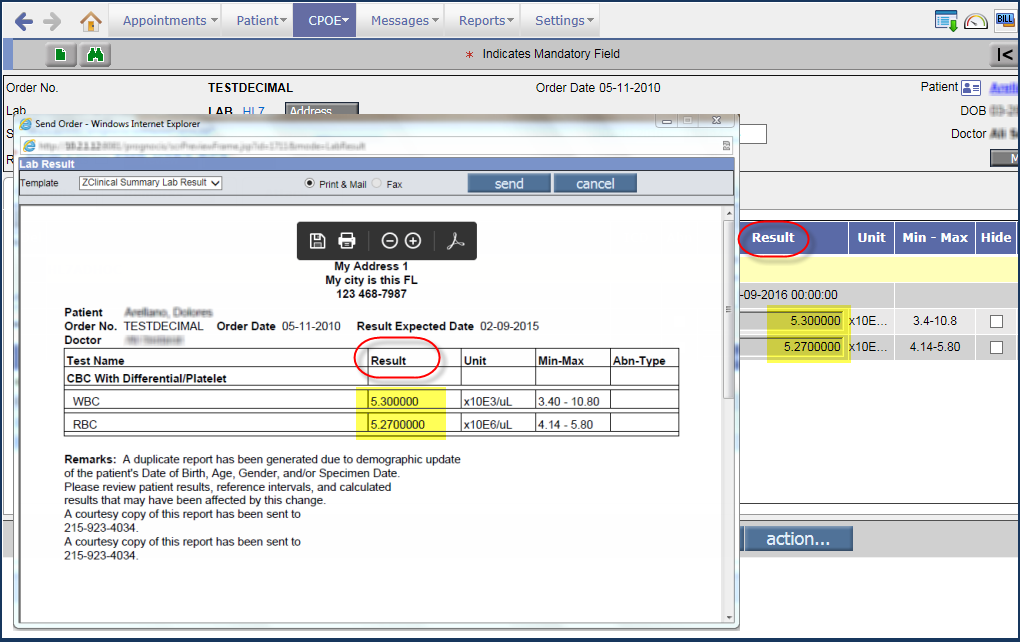
|
|
|
| 5.5 |
Copying or auto-copying of the Assessment ICD and CPT/HCPC codes, Goals, and Notes (in the Notes tab) to the next encounter is now configurable |
| |
Navigation: Goto menu: Settings → click Configuration → under Users column, click Specialty
From Specialty Master screen, a provision has been given to the User to configure if the
Assessment ICD codes, CPT/HCPC codes,
Goals, and Notes (in Notes tab) present in the
Assessment screen are to be copied manually or auto-copied or not to be copied to the next encounter.
In the Specialty Master screen, following additional four new fields have been added, Refer to figure 5.5-1
• Assessment ICD
• Assessment CPT/HCPC
• Assessment Goals
• Assessment Notes
Figure 5.5-1: Additional fields on Specialty Master screen
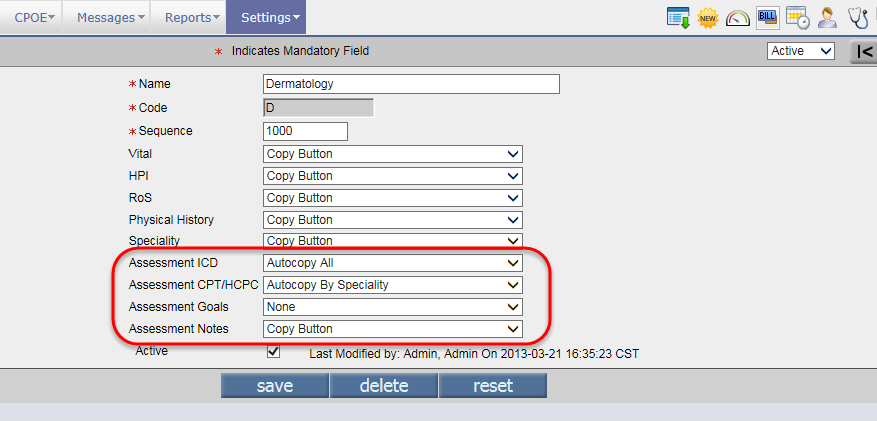
All these fields consist of a dropdown list with following options to define a method of copying Assessment ICD codes, CPT/HCPC codes, Goals, and Notes:
Options |
Description |
| Autocopy All |
If selected then on start of an encounter, all the respective assessment ICD codes, CPT/HCPC codes, Goals, and Notes (in Notes tab) of Assessment screen from the previous visit encounter are automatically copied. The copy button is also available on the Assessment screen
to enable User to copy codes from individual past encounters. |
| Autocopy By Specialty |
If selected on start of an encounter, all the respective assessment ICD codes, CPT/HCPC codes, Goals, and Notes (in Notes tab) of Assessment screen from the previous visit encounter
with same specialty are automatically copied. The copy button is also available on the Assessment screen. |
| Copy button |
If selected then only on click of copy button present on the Assessment screen, the respective
Assessment ICD, CPT/HCPC, Goals, and Notes (in Notes tab) of the Assessment screen are copied. |
| None |
If selected then the copy and auto-copy features are disabled. Also, the copy button is not available on the Assessment screen. |
Note: During copy or auto-copy functionality, the Assessment Notes and Plan notes (under ICD tab) of the Assessment screen are NOT considered.
 Setup:
At the time of version upgrade if the property, assessment.autocopy had no value assigned (the property is obsolete in
Denali) then on the Specialty Master screen in the upgraded version of PrognoCIS: Setup:
At the time of version upgrade if the property, assessment.autocopy had no value assigned (the property is obsolete in
Denali) then on the Specialty Master screen in the upgraded version of PrognoCIS:
- The respective Assessment fields such as Assessment ICD, Assessment CPT/HCPC, Assessment Goals, and Assessment Notes field has the value ‘None’ selected as default.
- If the property has a specific value such as I or C or G then the respective fields on the Specialty Master screen has the value
Autocopy All as a default selection. For example, if the property has the ‘I’ value assigned to it then on the Specialty Master screen, the Assessment ICD
field has the value
Autocopy All as its default selection;
- If the values entered are in a combination of ‘S’ then the respective fields on the Specialty Master screen has the default value selected as
Autocopy Specialty. For example, if the property has the ‘IS’ value assigned to it then on the Specialty Master screen, the Assessment ICD
field has the value
Autocopy Specialty as its default selection.
|
|
|
| 5.6 |
The CPT/HCPC of State provided vaccines will no longer be transferred to the Patient's Assessment |
| |
The CPT/HCPC of Vaccines that are marked as ‘State Provided' on the Vaccine Master screen will NOT be transferred to the Patient's assessment
screen, thus ensuring that it is not billed in the Claims. |
|
|
| 5.7 |
Provision to share document on Portals from the Document List screen |
| |
Navigation: Goto Patient's Encounter → Encounter TOC → click Document List
OR
Goto Patient's Encounter → Review TOC → click Document List
• PrognoCIS now provides the facility to share documents from Clinic on
Portals such as Patient, Referring Doc, and Employer Portals. A new Share icon: has been provided on the Document List screen to share the required document on the respective Patient, Referring Doc, and Employer Portals.
• To share any document, click on the required document record; click on the Share icon: ; and turn ON the required Portals
from the available options of, Patient Portal, Ref Doc Portal, and/or Employer Portal displayed on the Select Portal popup. Refer to figure 5.7-1
Figure 5.7-1: Select Portal popup
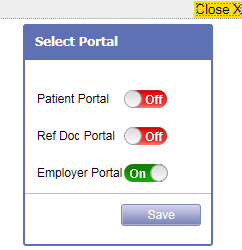
• Once any document from the Document List screen is shared on the Portal then the icon consisting of letters:  (for Patient Portal), (for Patient Portal),  (for Referring Doc Portal), and (for Referring Doc Portal), and  (for Employer Portal)
are enabled and displayed under the Portals column
indicating that the document has been shared on the respective Portal(s). Refer to figure 5.7-2 (for Employer Portal)
are enabled and displayed under the Portals column
indicating that the document has been shared on the respective Portal(s). Refer to figure 5.7-2
Figure 5.7-2: Portals column the Document List screen
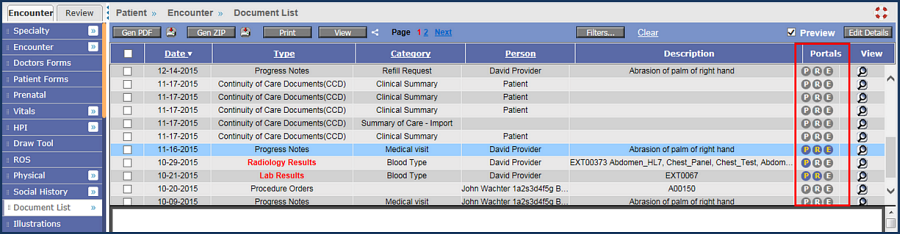
Note: If
none of the Portals are ON for the Patient then the Portals column is NOT displayed on the Document List screen.
• To unshare a document that is already shared, select the document and click on the Share icon: ; and then turn OFF the respective Portal.
• Following table describes the Documents Types that are available for sharing on Portals:
No. |
Document Type |
Available (✓)
OR
Not Available (x) |
Condition of availability
(if applicable) |
| 1. |
Lab Result |
|
a. As the individual Lab Result screen is present in Patient
Portal and Referring doc portal, the Lab results are going to get automatically shared on that screen depending on the value of property, pp.testresult.beforereview.
b. Depending on the option selected from the Portal dropdown list on Lab Tests Master screen (Goto menu: Settings → click Configuration) and Hide checkbox on the Lab Result screen, the document would be available for sharing on Portals. |
| 2. |
Radiology Result |
|
a. As the individual Radiology Result screen is present in Patient Portal and Referring doc Portal, the Radiology results are going to get shared automatically on that screen depending on the value of property, pp.testresult.beforereview.
b. Depending on the option selected from the Portal dropdown list on Radiology Tests Master screen (Goto menu: Settings → click Configuration) and Hide checkbox on the Radiology Result screen, the document would be available for sharing on Portals.
|
| 3. |
Patient Messages |
|
None |
| 4. |
Letters-In |
|
None |
| 5. |
Letters-Out |
|
Available only when the status of the Letters-Out is sent. |
| 6. |
Progress Notes |
|
Available only after the close of encounter. |
| 7. |
Legal Documents |
|
The Legal documents shared from the Document List screen will be available on both the submenus, Legal Documents and Clinic Shared Documents of Portal.
Note:
Once the Legal document is signed or attached, it is automatically shared on the Legal Documents submenu of Portal(s). |
| 8. |
Other Documents |
|
None |
| 9. |
Old Progress Notes |
|
None |
| 10. |
Encounter Attachments |
|
None |
| 11. |
Clinic Forms |
|
None |
| 12. |
Procedure Forms |
|
Available only after the close of encounter.
Note:
The Share button is also available on Specialty master screen. If any template is shared from the Specialty master screen and that template is used in an encounter then the respective template is automatically shared on the Portal(s). Once the template is shared, the respective Portal(s) icon displays highlighted on the Document List screen of that Patient.
|
| 13. |
Billing Attachments |
|
None |
| 14. |
Progress Notes Report |
|
Available only after the close of encounter. |
| 15. |
Clinical Messages (N2N Inwards) |
|
None |
| 16. |
Denied Refill Request |
|
None |
| 17. |
Consult |
|
Available only when the status of the Consult is Complete and Reviewed. |
| 18. |
Procedure |
|
Available only when the status of the Procedure is Complete and Reviewed. |
| 19. |
Portal Attachment |
|
None |
• Also, three new options, Patient Portal, Referring Doc Portal, and Employer Portal have been added under Documents Available on Portal/s section on the Apply Filters popup (click on Filters button on Document List screen) to filter and display all the documents that are shared on respective Portals, when selected. Refer to figure 5.7-3
Figure 5.7-3: Apply Filters popup
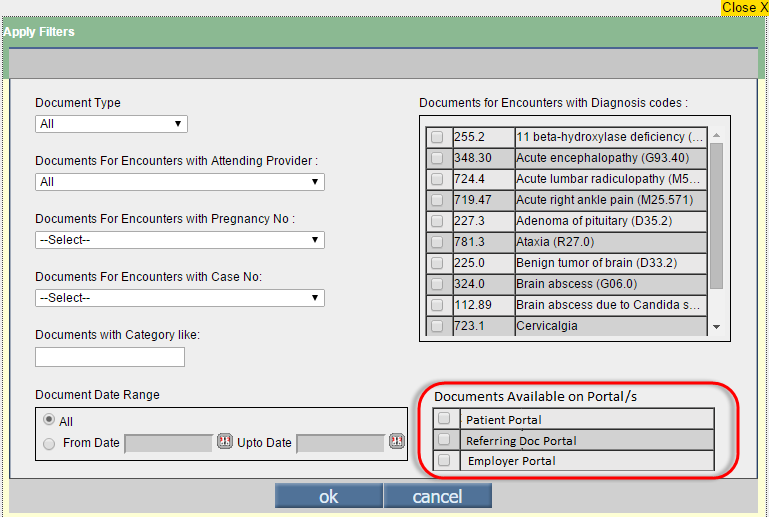
• A new role, ShareOnPortals has been added. Only the User assigned with this role will have an access to Share icon: on the Document List screen and share documents on Portals.
On Patient/Referring Doc Portal
• A new menu, Clinic Shared Documents with icon:  has been added in the Patient and Referring Doc Portals to display all the documents shared by a Clinic. Refer to figure 5.7-4 has been added in the Patient and Referring Doc Portals to display all the documents shared by a Clinic. Refer to figure 5.7-4
Figure 5.7-4: Clinic Shared Documents screen
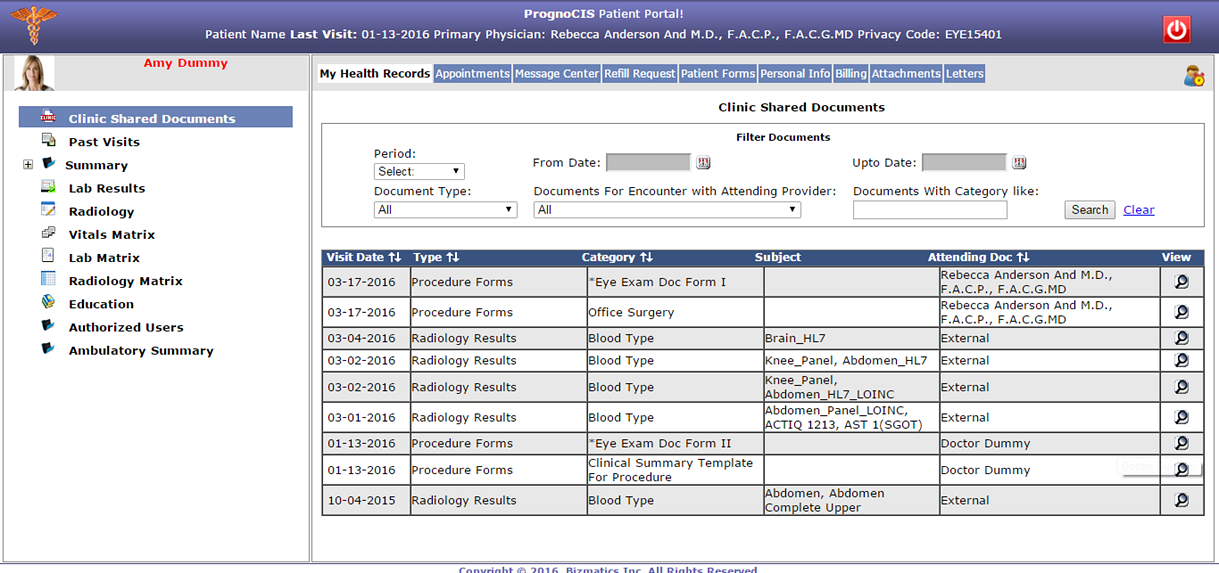
• The Clinic Shared Documents menu is available only if the properties governing the Portal tabs consist of the value, ‘CSD’.
For example, if the property, rdp.tab01.options consists of the property value, ‘CSD’ then the Clinic Shared Documents menu will be available under tab 01 on the Ref Doc Portal and if the property, pp.tab02.options consists of the property value, ‘CSD’ then the Clinic Shared Documents menu will be available under tab 02 on the Patient Portal.
• The Clinic Shared Documents screen displays the following information:
Column |
Description |
| Date |
Displays the document date. |
| Type |
Displays the type of the document. |
| Category |
Displays the category of the document. |
| Subject |
Displays the entered subject of the document. |
| Attending Doc |
Displays the Patient’s Attending Doctor. |
| View |
On click of zoom icon:  , the document is displayed. , the document is displayed. |
• When the document is viewed, the documents popup additionally displays the information such as Patient’s name, Date, Category, and Subject. Also, print and close buttons are displayed to print the document and close the Documents popup.
• Patient/Referring Doc also has a provision to filter the shared documents by Period, Date Range, Document Type, Category, and Attending Doctor. To clear the filter and view all the shared documents, the Clear link is available next to the Search button.
• On Referring Doc Portal, the Letters submenu is now merged with Clinic Documents and the Letters submenu is now changed to Clinic Shared Documents.
• Also, on Patient Portal and Referring Doc Portal, the attached and signed legal Docs displayed in Legal Docs submenu are now available in the Clinic Shared Documents submenu as well.
Hint:
Documents such as Procedure Forms, Progress Notes and Progress Notes Report are available for sharing ONLY after close of the Encounter.
|
|
|
| 5.8 |
Pagination has been provided on the Document List screen |
| |
Navigation: Goto Patient's Encounter → Encounter TOC → click Document List
Pagination has been provided on the Document List screen to navigate to the list of documents present. Each page displays maximum 25 records of the documents. Refer to figure 5.8-1
Figure 5.8-1: Pagination on Document List screen
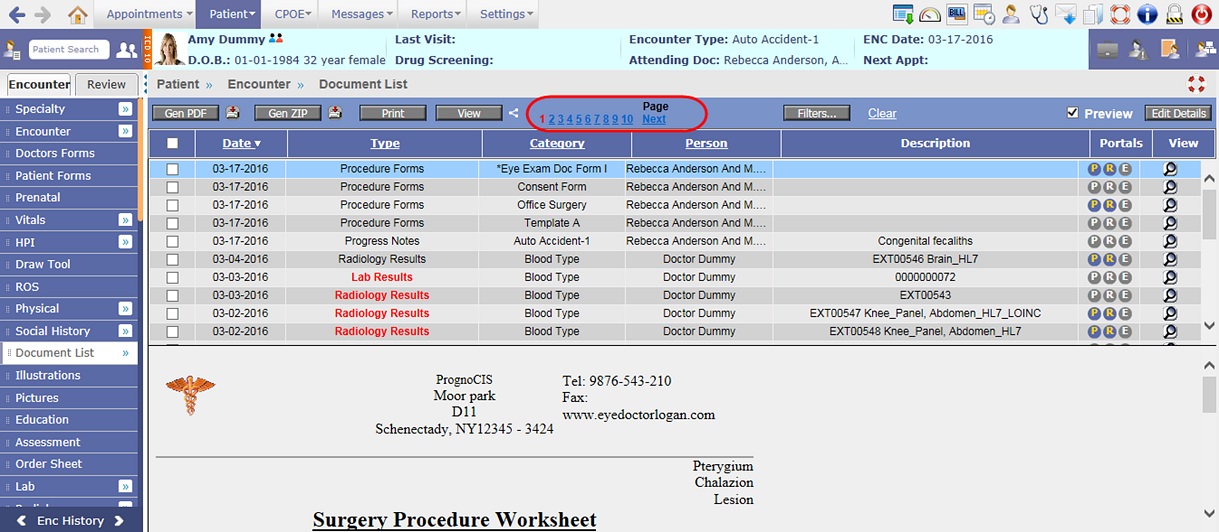 |
|
|
| 5.9 |
Claim filing code (of a Patient’s Primary Insurance) is preferred over Encounter Type code in the transfer of CPT/HCPC charge codes to the Patient’s Assessment |
| |
Navigation: Goto Patient's Encounter
→ Encounter TOC
→
Assessment →
CPT/HCPC tab
• The CPT/HCPC codes to Assessment are transferred via various sources and different Insurances have different preferences for charge codes
• PrognoCIS has provision to mark a test as either Government or Non-Government or Both i.e. BNG from
various templates and tests like Specialty, Lab Tests, Rad Tests, etc.
• Under this provision, a charge code relevant to a Government Insurance is defined with BNG value as ‘Govt’ and the ones that are not relevant to any Government Insurances are defined with BNG value as ‘Non-Govt’, thus it is possible to configure a single test as either Government or Non-Government according to the requirement of Insurances (i.e. Medicare and Other Insurance Company). When the requirement of Government Insurances and Other Insurances for a charge code is same then the test is defined with the BNG value as ‘Both’.
Refer to figure 5.9-1
Figure 5.9-1: BNG value
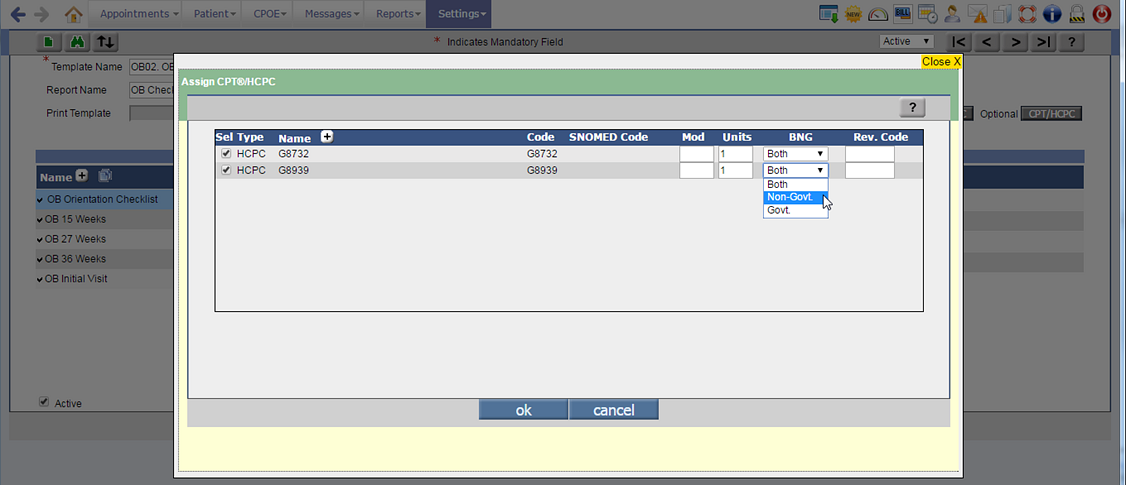
• Earlier, depending upon the BNG value, only the associated Encounter Type marked as ‘Medicare’ was preferred while transferring CPT/HCPC charge codes to the Patient’s assessment details.
Now, from the current version, the
Claim filing code of a Patient’s Primary Insurance is preferred for consideration first and it is only in case of Patient’s Primary Insurance not being available is the earlier functionality of Encounter Type marked as ‘Medicare’ considered.
• Consider the following cases,
Case I: If a Patient’s Primary Insurance associated to the patient’s Encounter has a Claim Filing code selected as either ‘MA-Medicare Part A’ or ‘MB - Medicare Part B’ then on save of the test/template, the CPT/HCPC codes that have the BNG value as ‘Both’ and ‘Govt’ will be considered for transfer to Assessment.
Case II: If a Patient’s Primary Insurance associated to the patient’s Encounter has a Claim Filing code selected for Insurances such as Commercial, BCBS, Workers Comp, Medicaid, etc., then on save of the test/template, the CPT/HCPC codes that have the BNG value as ‘Both’ and ‘Non-Govt’ will be considered for transfer to Assessment.
• Consider the following table,
Claim Filing Code |
BNG |
Transfer to Assessment |
Medicaid |
Both |
|
Medicaid |
Non-Govt |
|
Medicaid |
Govt |
|
Medicare |
Both |
|
Medicare |
Non-Govt |
|
Medicare |
Govt |
|
Hint:
Following is the listing of various sources of transfer of Charge Codes to Assessment:
Specialty Template – Mandatory + Optional
Specialty Test
Specialty Test option
All Test options – Multi-select: HPI, ROS, Physical, Social History
In-house Drugs
In-house Lab tests that are marked as ‘C’ i.e. Client
In-house Radiology Tests
Vaccines
|
|
|
| 5.10 |
Provision to view Past ICD codes on the HPI screen |
| |
Navigation: Goto Patient's Encounter → Encounter TOC → click HPI
A new Past ICD icon:  has been added on the HPI screen to view a list of all the Past ICD codes associated to an encounter. Refer to figure
5.13-1 has been added on the HPI screen to view a list of all the Past ICD codes associated to an encounter. Refer to figure
5.13-1
Also, the following buttons on the HPI screen have been now replaced by the new icons:
Figure 5.10-1: New icons on the HPI screen
 |
|
|
| 5.11 |
Start Encounter UI (User Interface) fields and Edit Encounter UI fields are now in sync |
| |
Navigation: Goto Patient's Encounter → Encounter TOC → point to Encounter → click Start New/Edit Existing
Earlier there were discrepancies observed with respect to the fields present and their labels in both Start and Edit Encounter screens. Now changes have been made to bring both the fields in sync with each other. Refer to the following to know about the changes done in both the screens
I. Changes done On the Start New Encounter screen
1. The field label, ‘Referred by Doc’ has been changed to ‘Referred by Provider’. Refer to figure 5.11-1
Figure 5.11-1: Fields of Start New Encounter screen displayed
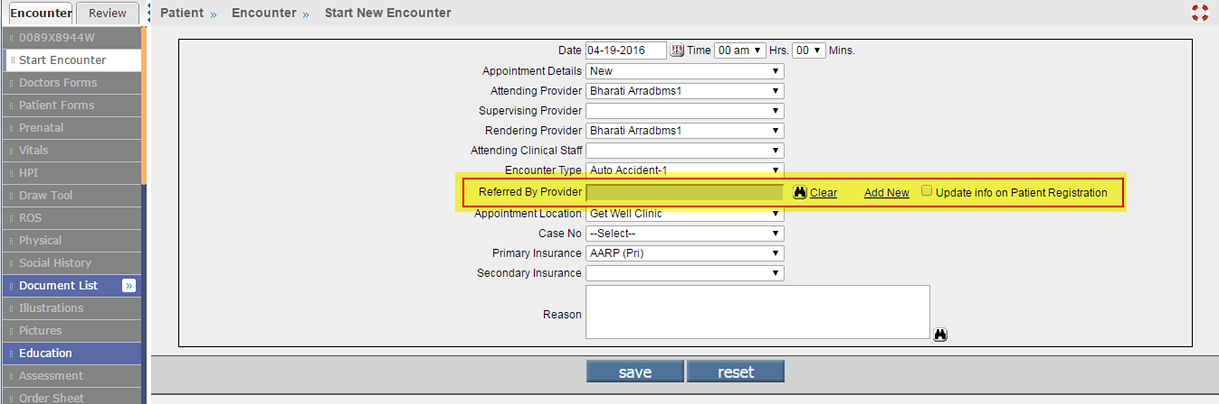
II. Changes done On the Edit Existing Encounter screen
1. The field label, ’Enc Referring Provider’ is now changed to ‘Referred By Provider’. Refer to figure 5.11-2 Also,
- The field additionally has a search icon which on click displays the search to select an existing Referring Provider (added from RefDoctor Master screen);
- The Clear link next to the search icon on click clears the value entered in the field, Referred By Provider.
- The link, Add New on click invokes a popup that allows the User to add a new Referring Provider directly.
- The option, Update info on Patient Registration screen when selected, syncs the Provider information as available in the Patient's registration screen to the field.
Figure 5.11-2: Edit Existing Encounter screen

2. The field, Refer to Provider now additionally has a search icon which on click displays the search to select an existing Referring Provider; the link, Clear displaying next to the search icon on click clears the value entered in the field; the link, Add New on click invokes a popup that also allows the User to add a new Referring Provider directly.
3. The field, Reason earlier available only on the ‘Start New Encounter’ screen is now available on the ‘Edit Existing Encounter’ screen. There is provision to either directly enter the reason for (edit of) Encounter or The Reason field has a binocular search which on click invokes the Complaints search popup, the selected complaints get added directly to the ‘Reason’ field.
Hint: A property, earlier available as enc.close.DateAttDoc.Editable is now changed to encounter.attdoc.enabled. |
|
|
| 5.12 |
Provision to automatically copy Prescriptions of previous Encounter to the current Encounter |
| |
• It is now possible to
have the drugs prescribed in the current encounter to be automatically copied
from the previous Encounter, thus saving the Provider's time
and effort to re-enter or add the drugs again in the current Prescription. The feature is property dependent, i.e. if the newly added property, rx.autocopy.lastenc.drugs is turned ON then the prescription of the last encounter is copied to the prescription of the current encounter.
For example,
Consider that the property, rx.autocopy.lastenc.drugs is turned ON. In
a Patient's visit encounter - Enc A, the provider has prescribed for the patient five drugs.
On close of Enc A and start of next visit encounter - Enc B, the prescription details of the previous encounter - Enc A is copied to the prescription of Enc B, i.e. All the five drugs of Enc A prescription is copied to Enc B prescription. • In a scenario wherein, the previous encounter is a zero duration encounter
(i.e. encounter type is zero duration) such as Refill Request - RR and Surescript Refill
- SR then the prescription of such an encounter is ignored and the prescription from the encounter prior to the zero duration encounter is copied over to the prescription of the current encounter.
For example,
Consider that the property, rx.autocopy.lastenc.drugs is turned ON. In the first
patient's visit encounter - Enc A, the Provider has prescribed five drugs for the Patient.
The provider started a next encounter - Enc B, a Refill Request encounter - where the patient has got a refill of two drugs from the
last prescription. In the next Patient's visit encounter - Enc C, the prescription of Enc B is ignored and the system copies the
Enc A's prescription (of five drugs) directly on to the prescription of Enc C.
Note:
For a Refill Request encounter there is a separate property,
rx.requestrefill.showlastrx to auto copy drugs from the previous visit Encounter to the current Refill Request encounter.
If a Refill Request encounter is started then the drug will not be auto copied from the previous visit Encounter to the current Refill Request encounter.
It is important that the pre-existing property,
rx.requestrefill.showlastrx which copies the drugs of the last Refill encounter be turned OFF.
Hint:
The State Level Drug DEA class is recomputed considering Provider's State code.
Prescription from a deleted encounter is not copied.
In case there is no prescription prescribed in the immediate previous encounter then
nothing is copied to the current encounter.
• Following table gives information on which Prescription details are copied and which are not:
Prescription Field |
Auto Copy applicable |
Pharmacy |
|
Drug (Name) |
|
Strength |
|
Dosage |
|
Frequency |
|
PRN |
|
Days |
|
Bulk |
|
Refills |
|
Direction |
|
Reason |
|
Pharmacy Notes |
|
Substitute |
|
Long Term |
|
Fill Date |
|
Diagnosis |
|
No. of Units |
|
Valid Upto |
|
Eligibility |
|
Formulary |
|
Note: Eligibility
and Formulary displayed as fetched in the current encounter. The Fill Date displayed is the current encounter date.. |
|
|
| 5.13 |
Drug Info popup now supports Print Preview in PDF format |
| |
Navigation: Goto Patient's Encounter
→ Encounter TOC
→ Prescription
→
click on the Drug Info icon:
 →
Drug Info popup →
Drug Info popup
Earlier, the print preview generated on the Drug Info popup used to generate the preview in a HTML file format. Now, the preview is generated in a PDF file format
Note: Depending on the property,
allow.directprint.druginfo a click on the print button either sends the PDF file generated directly to the User’s default printer for print or the popup for Printer selection is displayed.
|
|
|
| 5.14 |
eRx summary popup on the Prescription screen now also displays the validation related error messages |
| |
Navigation: Goto Patient's Encounter
→ Encounter TOC
→
Prescription
On the Prescription screen, the
eRx Summary popup displays the Summary information. If there were any Prescription details that were not entered or any validation related error occurring then System displayed an alert for each such error. A User ended up clicking multiple times on these alerts to close them.
Now, in order to avoid multiple clicks of these kinds, the eRx Summary popup displays a list of such validation related error messages together on the same screen. User is required to go through them and make the changes so that the missing information is provided and/or incorrect data entered is rectified.
Refer to figure 5.14-1
Once all the messages are acted on, the
eRx Summary popup displays the regular eRx Summary information.
Figure 5.14-1: eRx Summary popup displaying the validation error message
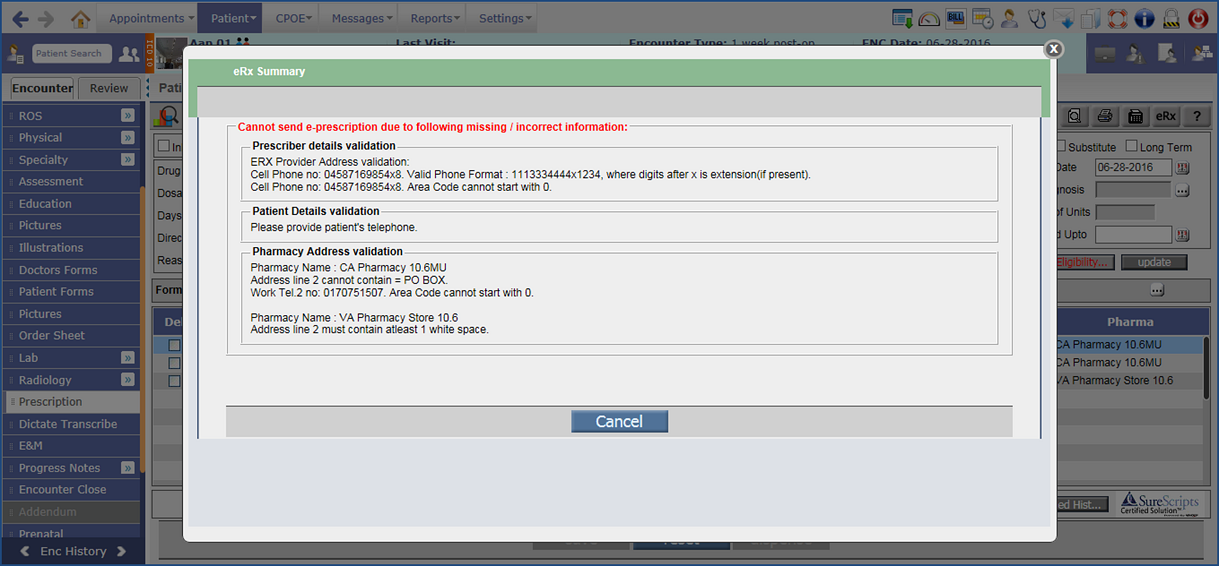 |
|
|
| 5.15 |
On Encounter TOC, Lab and Radiology now display as individual menus with their respective sub-menus clubbed together |
| |
Navigation: Goto Patient's Encounter
→ Encounter TOC
On Encounter TOC, Lab and Radiology now display as individual menus with their respective sub-menus clubbed together.
Refer to figure 5.15-1
Figure 5.15-1: Comparison of old and new UIs
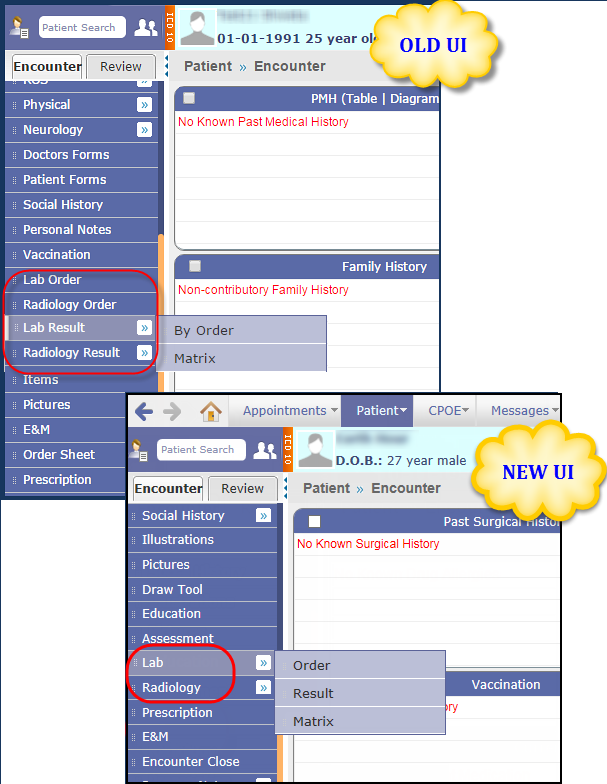 |
|
|
| 6. |
Patient – Letters-Out |
| 6.1 |
Letters-Out ‘To’ drop down list has 43 options to choose from |
| |
Following is the list of options now available in 'To' dropdown list on the Letters-Out screen and displayed only under the conditions mentioned:
Note: All these conditions are applicable for the current encounter.
Table 6.1-1: List of options on Letters-Out screen
No. |
Value displayed is the prefix displayed followed by the name |
Conditions to display these values are all applied for Current Encounter |
1. |
Referring Provider: |
i. If Billing module is ON then the name of Referring Provider at the Billing end is displayed.
ii. If Billing module is NOT ON then name of the Referring Provider of the current encounter at EMR end is displayed.
Note: In case system is not able to pick the value from the patient’s current encounter then the value is picked from patient’s registration details. |
2. |
Refer to Provider: |
Visible if there is a Refer to
Provider set from Edit Encounter screen. |
3. |
Patient: |
The currently selected name of the Patient, this is a default value that is displayed in the drop-down list. |
4. |
Others: |
No change as such. |
5. |
Employer: |
Visible if the Employer details has been entered for the Patient (via menu: Patient → click Register → click the Contacts tab→ Employer and relative fields) then the value is displayed on the To drop-down list.
Note: Employer name could either be selected from the search or be added manually. |
6. |
Primary Insurance: |
Visible if Patient’s Primary Insurance details are available on Insurance popup. |
7. |
Secondary Insurance: |
Visible if Patient’s Secondary Insurance details are available on Insurance popup. |
8. |
Tertiary Insurance: |
Visible if Patient’s Tertiary Insurance details are available on Insurance popup. |
9. |
Emergency Contact: |
Visible if the patient’s Emergency contact details have been entered in the system (i.e. on Patient Registration screen → section: Emergency Contact Details). |
10. |
Spouse/ Legal Guardian: |
Visible if any of the patient’s relation details have entered in the system (from Patient Registration screen → section: Spouse/Parent/Legal Guardian details). |
11. |
Subscriber Primary Insurance: |
Visible if the name of the policy holder or Subscriber of Patient’s Primary Insurance is other than self as entered in the system via the Insurance popup. |
12. |
Subscriber Secondary Insurance: |
Visible if the name of the policy holder or Subscriber of Patient’s Secondary Insurance is other than self as entered in the system via the Insurance popup. |
14. |
Primary Care Physician 1: |
Visible if the name of the first Primary Care Physician has been entered from Physician tab on the Patient Registration screen. |
15. |
Primary Care Physician 2: |
Visible if the name of the second Primary Care Physician has been entered from Physician tab on the Patient Registration screen. |
16. |
Primary Care Physician 3: |
Visible if the name of the third Primary Care Physician has been entered from Physician tab on the Patient Registration screen. |
17. |
Primary Care Physician 4: |
Visible if the name of the fourth Primary Care Physician has been entered from Physician tab on the Patient Registration screen. |
18. |
Primary Care Physician 5: |
Visible if the name of the fifth Primary Care Physician has been entered from Physician tab on the Patient Registration screen. |
19. |
Guarantor: |
Visible if the patient’s
Guarantor entered is NOT equal to self. Guarantor is added from the Billing tab on Patient Registration screen. |
20. |
Primary Insurance Attorney: |
Visible if the Primary Insurance of the Patient has the Attorney details entered from the Insurance popup. |
21. |
Secondary Insurance Attorney: |
Visible if the Secondary Insurance of the Patient has the Attorney details entered from the Insurance popup. |
23. |
Primary Insurance Adjustor: |
Visible if the Primary Insurance of the Patient has the Adjustor details entered from the Insurance popup. |
24. |
Secondary Insurance Adjustor: |
Visible if the Secondary Insurance of the Patient has the Adjustor details entered from the Insurance popup. |
26. |
Patient Attorney: |
Visible if patient’s attorney’s name has been entered in the Billing Info tab on the Patient Registration screen. |
Related to Case Management |
27. |
Patient Adjustor: |
Visible if Patient Adjustor’s name is entered in any Case associated to the patient from the Case Management popup. |
28. |
Case Manager 1: |
Visible if the first Case Manager’s name has been added from Case Management popup. |
29. |
Case Manager 2: |
Visible if the second Case Manager’s name has been added from Case Management popup. |
30. |
Case Manager 3: |
Visible if the third Case Manager’s name has been added from Case Management popup. |
| |
31. |
Rendering Doc (Billing): |
Visible if Billing module is ON and Rendering Doctor’s details is available with Patient’s Claim details. |
32. |
Attending Doc (Billing): |
Visible if Billing module is ON and Attending Doctor’s details is available on the Patient’s Registration screen. |
33. |
Operating Doctor: |
Visible if Billing module is ON and the UB04 form details have Operating Doctor’s name or details entered. |
34. |
Operating Assistant Doctor 1: |
Visible if Billing module is ON and the UB04 form details have the first Operating Assistant Doctor’s name or details entered. |
35. |
Operating Assistant Doctor2: |
Visible if Billing module is ON and the UB04 form details have the second Operating Assistant Doctor’s name or details entered. |
36. |
Case Insurance Company: |
Visible if a case is present for the patient and if Insurance has been assigned to this case from the ‘Insurance/Employer/Patient’ Section on the Case Management popup. |
37. |
Case Insurance Attorney: |
Visible if an Attorney has been assigned for the case from the Case Management popup. |
38. |
Case Insurance Adjustor: |
Visible if an Adjustor’s detail has been entered for the Insurance in the case from the Case Management popup. |
39. |
Case Patient Attorney: |
Visible if an Attorney has been assigned for the patient from the Case Management popup. |
40. |
Case Patient Adjustor: |
Visible if an Adjustor’s detail has been entered for the patient in the case from the Case Management popup. |
| |
41. |
Collection Agency: |
Visible if a Claim has been sent to a collection agency. |
42. |
Encounter Case Employer: |
Visible if a case has been assigned specifically to an Encounter via Edit Encounter. |
43. |
Encounter Case Employer Job: |
Visible if Employer Job has been associated to a case from the Insurance popup. |
44. |
Claim Case Employer: |
Visible if Claim has a case associated and the Employer details have been entered for the case. |
45. |
Claim TPA (Third Party Agency): |
Visible on process of Claim having Employer details and also the third-party agency details associated (from the Employer’s TPA Master screen). |
46. |
Claim Employer TPA Contact: |
Visible if the associated TPA agency has a contact person’s name entered in records. |
|
|
|
| 7. |
Patient – Clinic Forms |
| 7.1 |
Changes done on Clinic Form screen |
| |
Navigation: Goto menu: Patient → click Clinic Form
i. The label of the Name hyperlink is changed to Patient and instead of hyperlink, a search icon: has been provided which on click invokes the Patient Search popup.
ii. The Insurance link is replaced with the Insurance icon: followed by the text, Ins. Refer to figure 7.1-1
Figure 7.1-1: Changes on Clinic Form screen
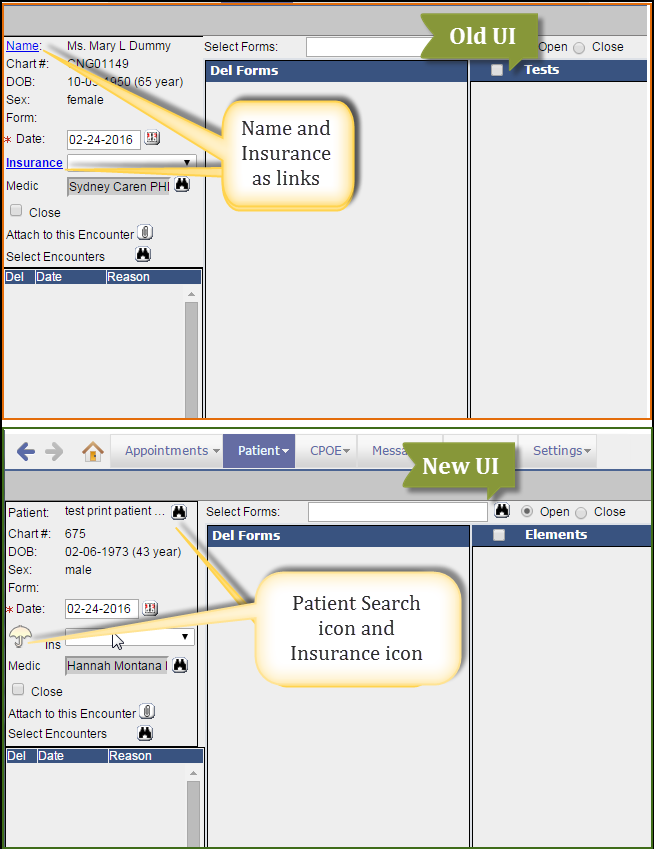 |
|
|
| 8. |
Messages |
| 8.1 |
The ‘Medics’ label is changed to ‘Users’ on the Messages → Compose screen |
| |
Navigation: Goto menu:
Messages →
Compose
The Medics label on the Message compose screen has been now changed to Users. Refer to figure 8.1-1
Figure 8.1-1: Comparison between the new and old UI depicting the change in labels

|
|
|
| 8.2 |
The Calendar on the Messages → Attach Center and Scan/Local Attach back dates to 50 year only |
| |
Navigation: Goto menu:
Messages →
Attach Center and Scan/Local Attach
Earlier the Calendar dates on the Messageà Attach Center and Scan/Local Attach could go back till 150 years. Now, the Calendar dates for all the types of Attachment i.e. Lab Result, Rad Result, Consult Response, Procedure Result, Progress Notes, Letter In, Legal Documents, Other, Encounter, Billing, and EOB back dates to 50 years only.
|
|
|
| 9. |
CPOE |
| 9.1 |
The ‘Medics’ label is changed to ‘Users’ on the Lab/Rad Task popup |
| |
Navigation: Goto menu: CPOE → Lab/Radiology Results → click on action button → Lab/Rad Task popup
OR
Goto: Patient's Encounter → Encounter TOC → Lab/Radiology Result → click on action button → Lab/Rad Task popup
OR
Goto menu: CPOE →
Lab/Radiology Review →
from the right pane, click on Assign a Task
The Medics label on the Lab/Rad Task popup
and Lab/Radiology Review screen has been now changed to Users. Refer to figure 9.1-1
Figure 9.1-1: Medics label changed to Users on the Lab Task popup
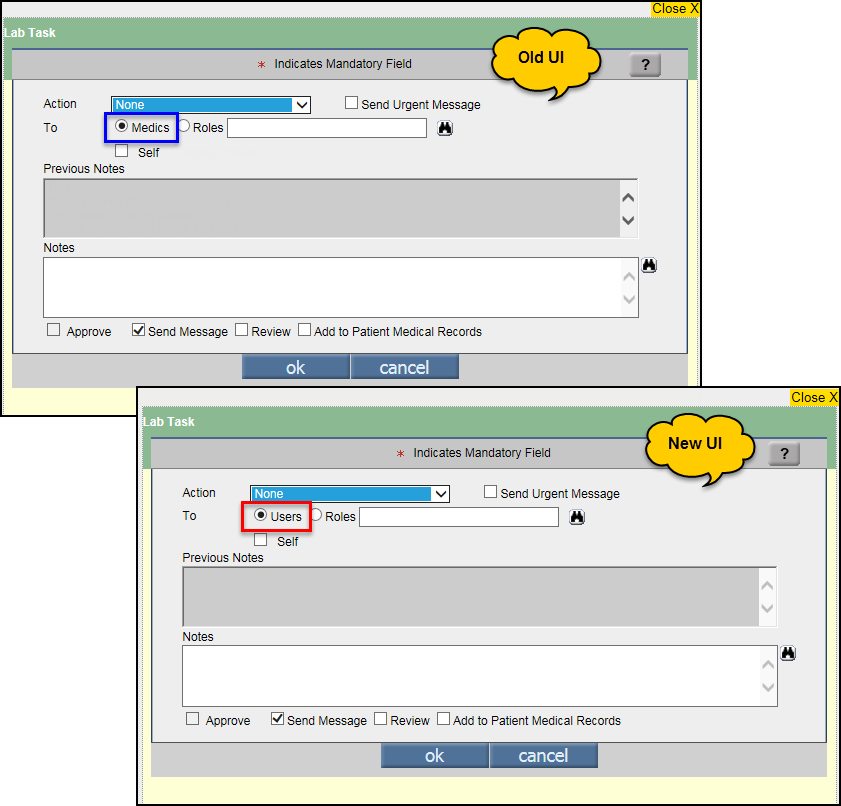
Note: The action button is available only for the Lab/Radiology Results with following statuses:
Result Received
Result Received & Reviewed
Complete
Complete & Reviewed
|
|
|
| 10. |
Reports |
| 10.1 |
New UI for Reports such as Tabular, Patient, Encounter, Mis Graph, Meaningful Use, and Appointment Report |
| |
• Reports such as Tabular, Patient, Encounter, Mis Graph, Meaningful Use, and Appointment Report (available under Appointment menu) now display a new UI. Earlier the details were displayed individually on their popups, now instead of a popup the details are displayed as a screen.
• The changes are explained with respect to Tabular report screen and Tabular Report Design Master screen. Also, take note that references to the Tabular Report UI or screen is for Goto menu: Reports → click Tabular and references such as Tabular Report Design is for Goto menu: Settings → click Configuration → under Report Design column, click Tabular.
• Earlier workflow included a User to configure the report parameters on the report popup (e.g. Goto menu: Reports → click Tabular) Refer to figure 10.1-1 and on click of ok the respective report got generated and displayed on the report screen. Thus every time to view the report again with any change in parameter configured, the User was required to invoke the report popup again explicitly.
Figure 10.1-1: Older Tabular Report UI
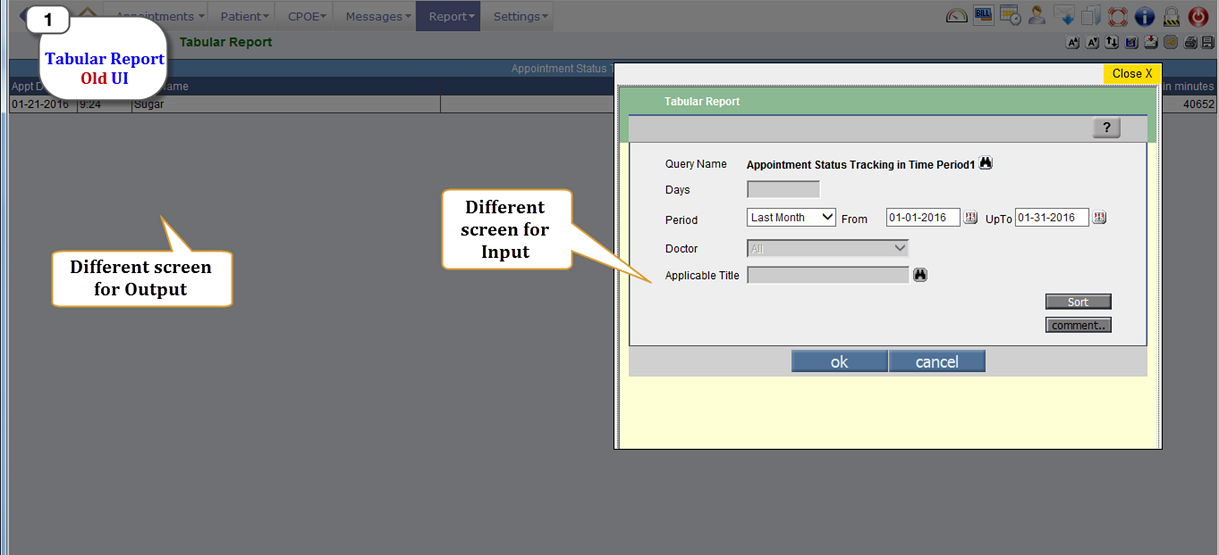
• Now, the screens are horizontally divided such that the input information and the output information both are displayed on the same screen, on the click of GO button thus making it easier to view the reports multiple times. Refer to figure 10.1-2
Figure 10.1-2: The new UI for Tabular Report screen displays both input and output on the same screen
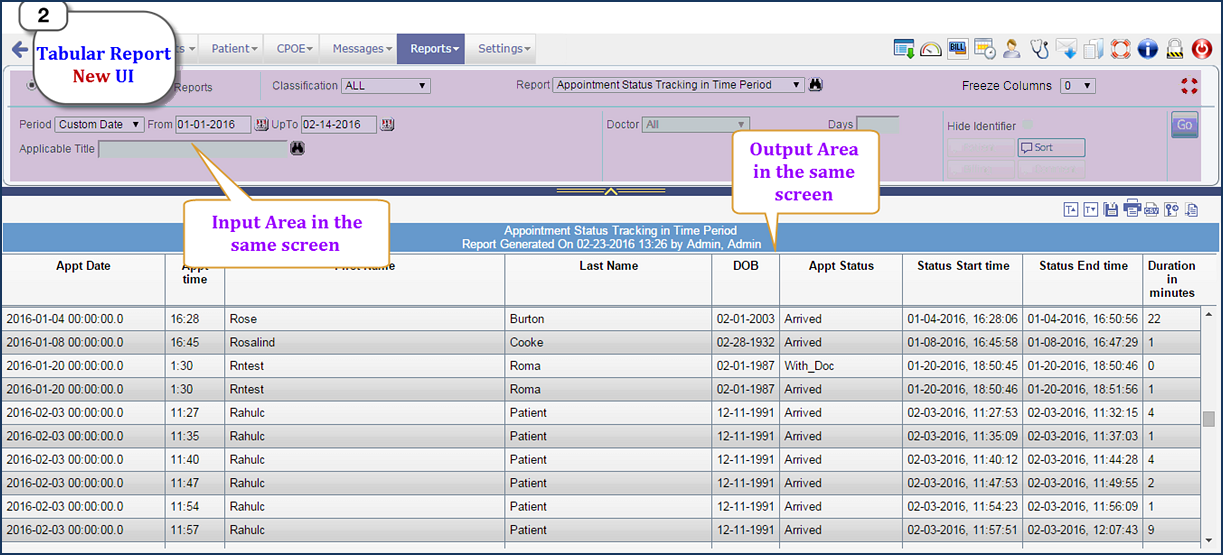
Note:
There is an addition of Freeze Columns drop-down list on the new UI of Tabular Report; depending on the value selected, the columns on the report are frozen such that the vertical scroll does not affect its viewing. For example, 1 – freezes one column on the report; 2 – freezes two columns on the report; 3 – freezes three columns on the report; and 0 – freezes none of the columns on the report.
Information for Implementers:
The Tabular Report Design and Meaningful Use Design screens both have similar enhancements implemented which are required to be understood by the implementation team for easier implementation.
NEW CHANGES ON REPORT DESIGN SCREEN OF TABULAR REPORT
 Tip: Please note, the changes have been explained keeping Tabular Report Design screen as example, similar changes is also available on the Meaningful Use Design screen as well. Tip: Please note, the changes have been explained keeping Tabular Report Design screen as example, similar changes is also available on the Meaningful Use Design screen as well.
1. Hide Report: The option, Hide Report when selected keeps the report hidden from the Search popup of Tabular Report (Report à Tabular). User can use the option for UI Report (reports that are displayed on specific PrognoCIS UI - such as Employer Master).
To use Tabular Report in Employer Master,
i. Set the property, billing.emp.account.sections with the value TABREP:< REPORT CODE > where REPORT CODE is the actual code of the report.
ii. Design the tabular report with keywords such as [THIS_Employer].
2. SQL field: The SQL field on the Tabular Report Design screen, now additionally has a zoom button which on clicked invokes Edit SQL popup. A User has provision to edit the SQL query from here and NOT directly from the SQL field. On the Edit SQL popup, there is a multi-select icon: […] called Report Keywords which on click invokes the Report Keywords popup. Refer to figures 10.1-3 and 10.1-4.
Figure 10.1-3: Edit SQL popup invoked on click on the zoom SQL icon
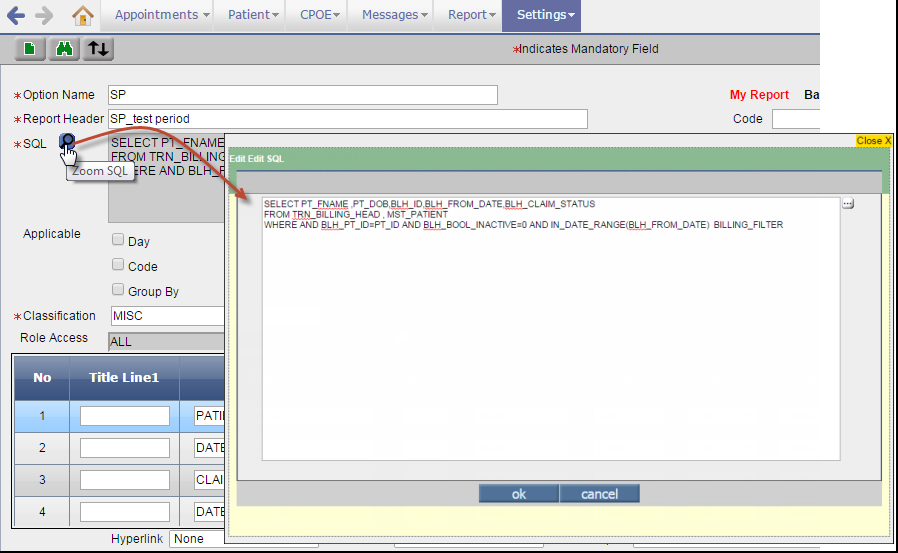
Figure 10.1-4: Edit SQL popup has provision for Users to edit SQL queries
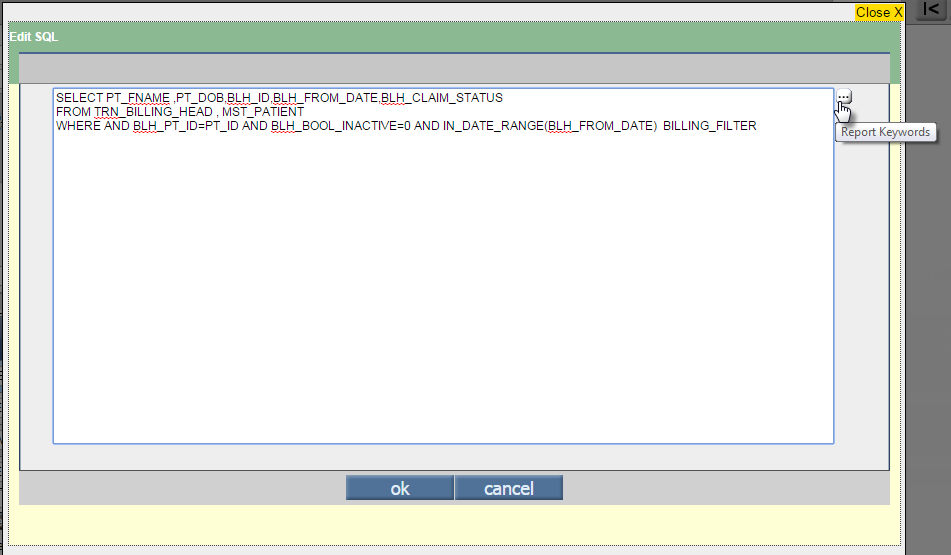
The Report Keywords popup displays list of keywords that are actually tags and are replaced with values before the SQL query is executed. Refer to figure 10.1-5
Figure 10.1-5: Keywords popup displaying relevant tags for selection
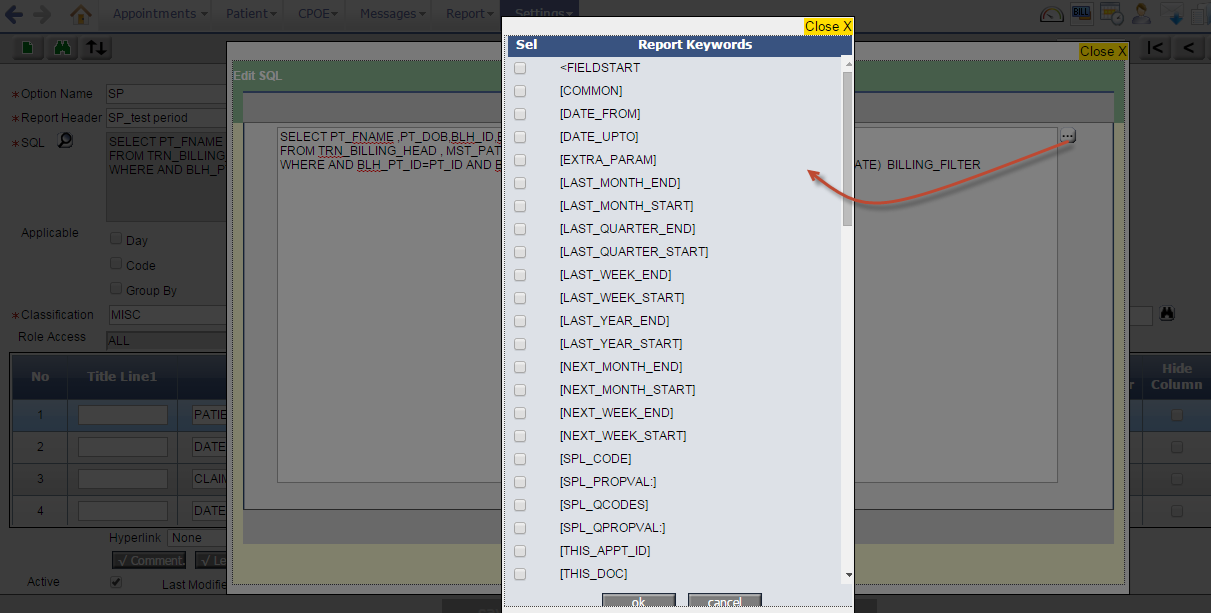
Note:
The Edit SQL popup is also invoked by double clicking directly on the SQL field.
The maximum character limit on the SQL field is 7000.
The YEAR_MONTH()
keyword is applicable for Mis Graph only. However, if a User wants to
use YEAR_MONTH()
keyword in Tabular Report then its data type should be set as
Text instead of
Date.
3. Applicable section: The option(s) selected from the ‘Applicable’ section, are directly available on the Report (Goto menu: Reports → click Tabular).
The UI of the Applicable section is changed, for comparison between the two UIs, Refer to figure 10.1-6
Figure 10.1-6: Comparison between the earlier and current UIs of Applicable section
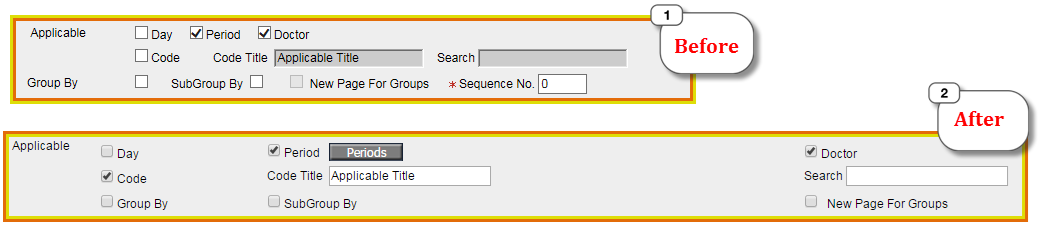
i. Period – A new button, Periods has been added which when clicked invokes a popup giving User a List of time duration to choose from. The values selected are displayed as values under the Period drop-down menu on the tabular report screen. Refer to figure 10.1-7
Figure 10.1-7: List of time periods available to choose from
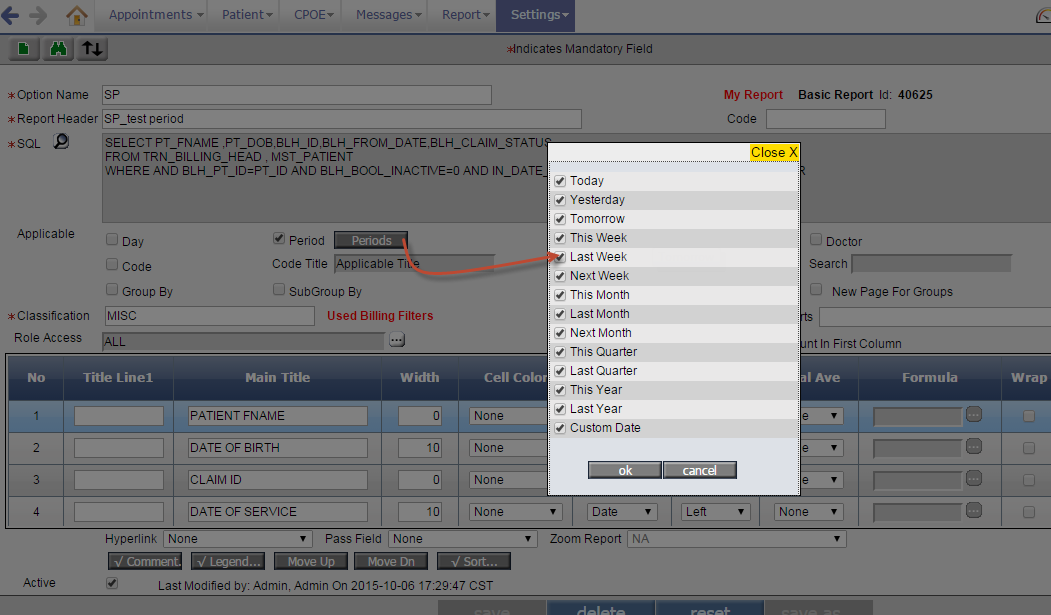
ii. Doctor – The option when checked displays the Doctor list as a drop-down list on Tabular Report screen.
iii. Code – The option when checked enables the fields: Code Title and Search to enter Report label and provide a specific search on the report if required.
a. Code Title –If the option is checked then User (from menu: Reports → click Tabular) has provision to enter label for the Tabular Report).
b. Search – depending upon the keyword entered the respective search is provided for the User on menu: Report → click Tabular else if left as blank then a blank text field is displayed that gives provision to the User to enter relevant value against the Code title to be displayed in the report. The value entered is incorporated at the time the report is executed.
For example, if the Code Title is ‘Insurance’ and the Search field has the keyword INSURANCE then tabular report generated has the Report title as ‘Insurance’ and an Insurance search are displayed.
Refer to Appendix, 3.2 List of SQL Keywords supported for more details on the list of keywords that are applicable for the Search field.
iv. Group by – If the report is designed to be grouped by then the first value is highlighted to indicate the group. Refer to figure 10.1-8 Figure 10.1-8: Group by
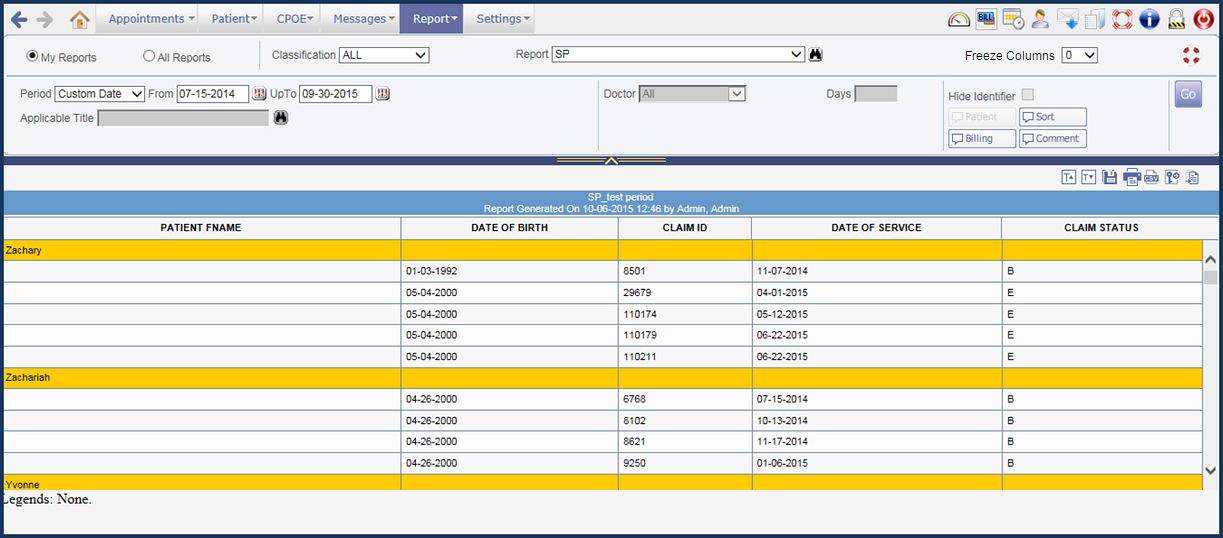
v. Sub Group by – If the report is designed to be grouped by as well as sub-grouped by then both the information is displayed with two different color coding; the Group By information is in darker color code whereas the sub-group by is in lighter color code. Refer to figure 10.1-9
Figure 10.1-9: Sub Group by
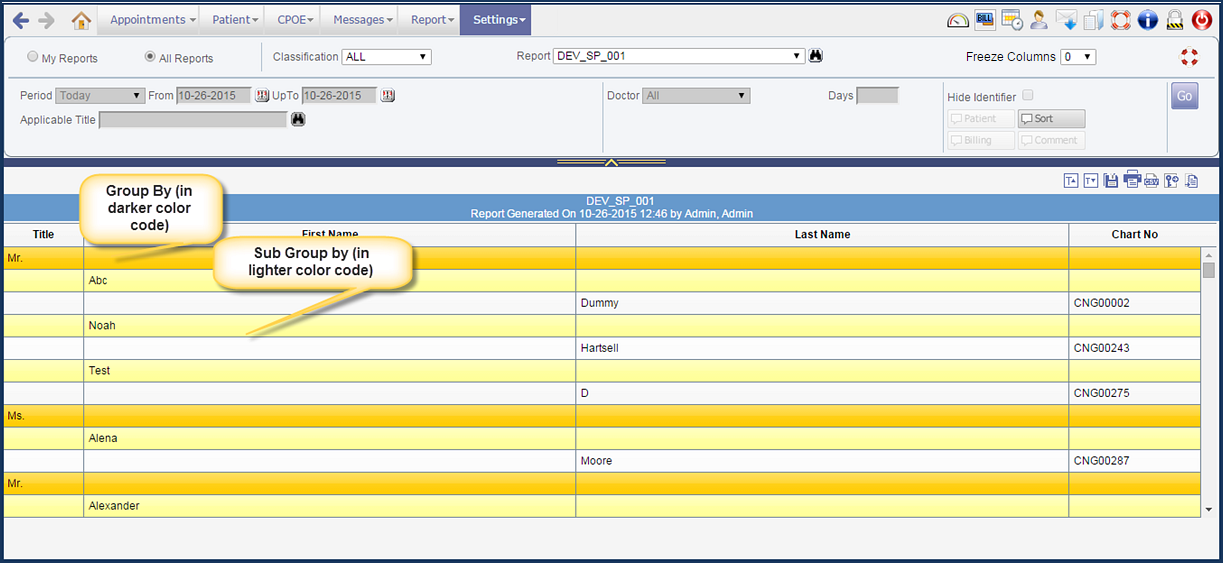
vi. Classification – If the filter, PATIENT_FILTER is used in the SQL then the text, ‘Used Patient filter’ is displayed next to Classification field on Tabular Report Design screen. Refer to figure 10.1-10
Figure 10.1-10: Classification
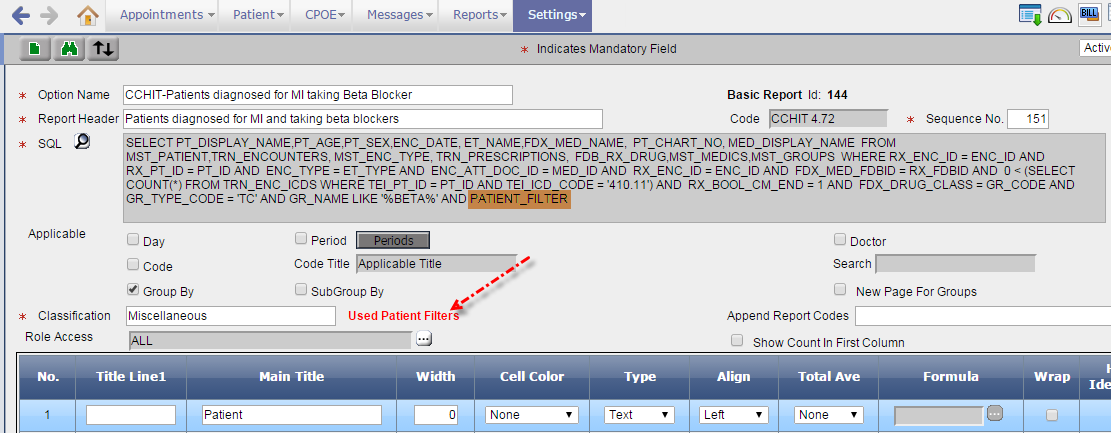
vii. Append Reports Codes – User has provision to ‘search’ and append report(s) to the current report being designed. Refer to figure 10.1-11
Figure 10.1-11: Append Reports
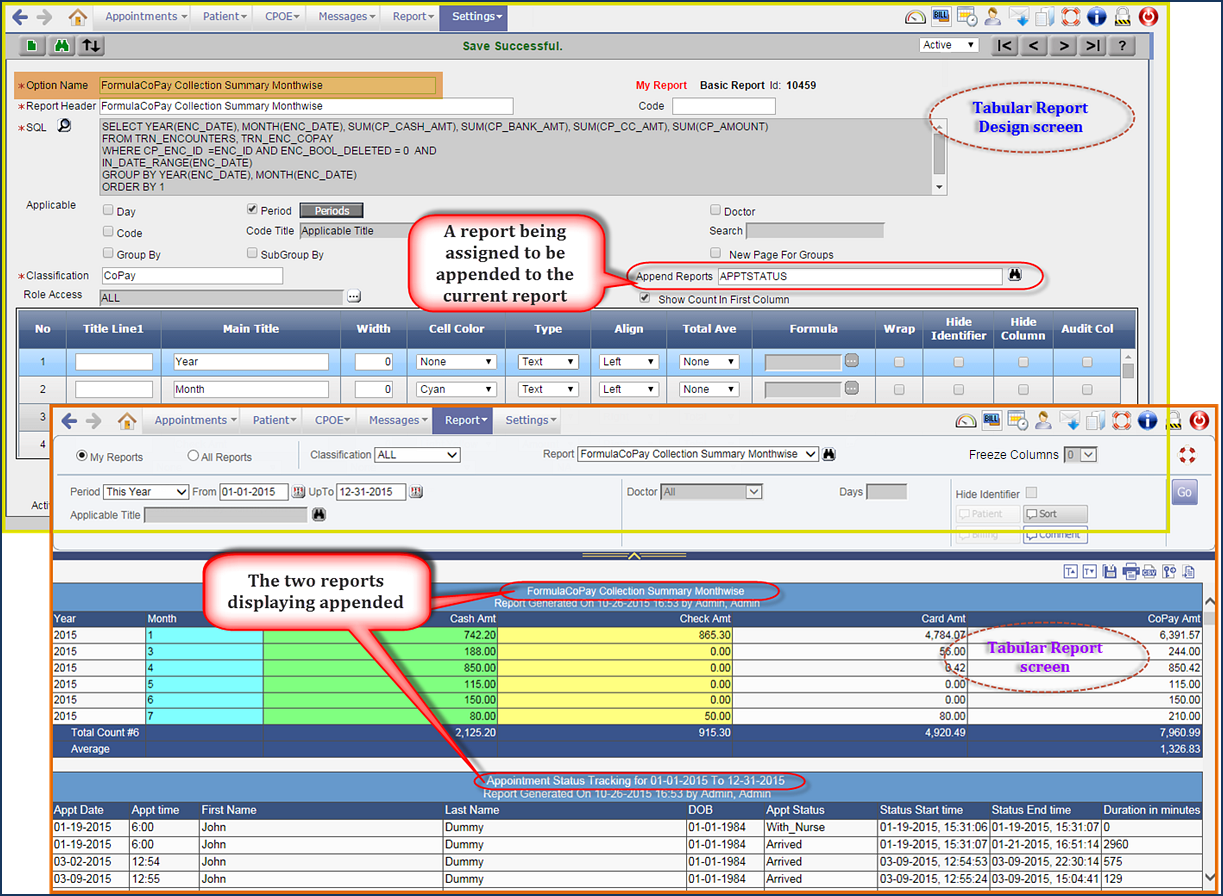
Note: The Append Reports Code search popup allows selection of 10 reports codes at a time. These selected codes are added to the Append Reports Code field on tabular report design screen.
The number of codes added to the Append Reports Code field decides the number of reports that get appended. The field supports a maximum of 250 characters and only the complete codes that fit within 250 characters are considered for Append. For example, if the last code that is added, goes beyond the 250 characters then it is not considered for append.
viii. Role Access – The field label, ‘Access to role’ has been relabeled to ‘Role Access’.
Only Roles that are selected from the Role Access popup have access to the report.
The multi-select button, […] invokes the Access Roles popup. The value ALL is displayed in the Role Access field if the Check All option on the Role Access popup is selected.
ix. Show Count in First Column – If the option is selected in combination with the option, GroupBy then the group specific count as well as the total record count is displayed. Refer to figure 10.1-12
Figure 10.1-12: Group count and Total count displayed on selection of the options, Group By and Show Count In First Column
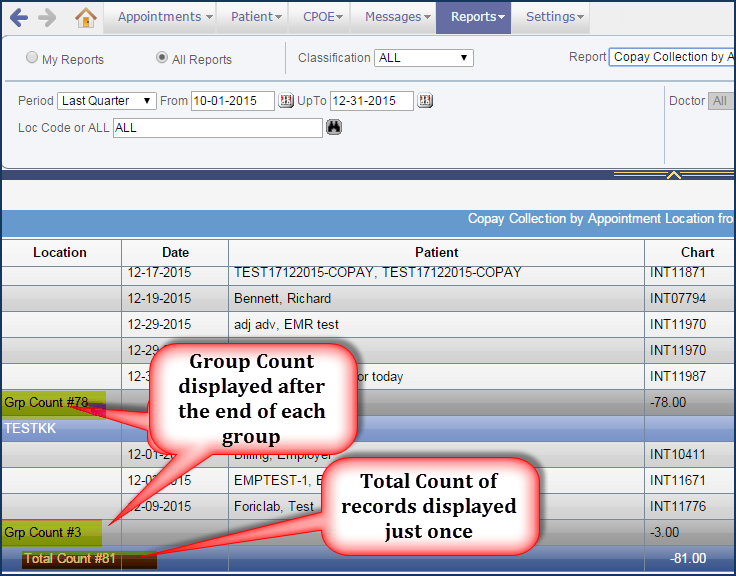
Note: While designing the report it must be ensured that at least one numeric or amount type of column is present.
x. No. – The earlier label of Sr. No. (Short form for Serial Number) is now changed to No.
xi. Title Line 1 and Main Title – It is the report title and the individual column names in the report respectively. Refer to the figure
10.1-13
Figure 10.1-13: Display of the report title and all the columns as designed from the Masters
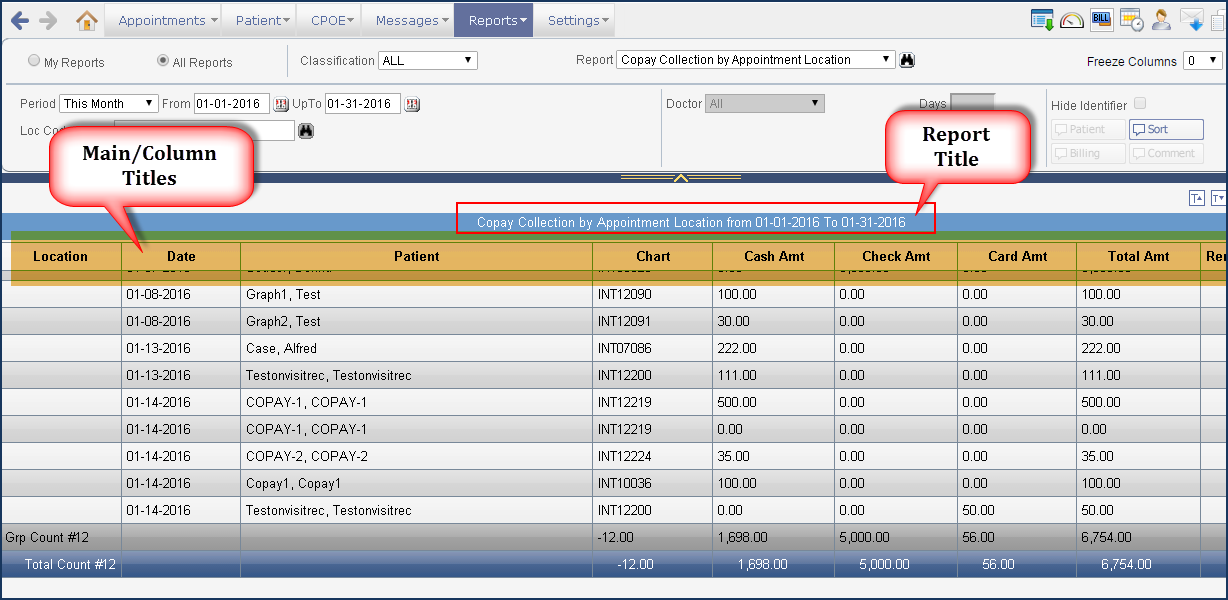
Note: Keywords such as Date or DOS, Count or *, Amount or AMR or $, when used in the Title 1 field of design mode, then on tab-out the rest of the column parameters is auto-filled. Consider the following:
If Title 1 has either of the keywords Date or DOS then on tab-out following are the values displayed by the respective columns:
Width: 10
Align: Left (0)
Type: DATE
Total Ave: NONE (0)
If Title 1 has either of the keywords Amount or AMR or $ then on tab-out following are the values displayed by the respective columns:
Width: 10
Align: Right (2)
Type: AMOUNT
Total Ave: If it is NONE then set it as Total.
If Title 1 has either of the keywords Count or * then on tab-out following are the values displayed by the respective columns:
Width: 10
Align: Right (2)
Type: NUMBER
Total Ave: If it is NONE then set it as Total
xii. Following figures illustrate how the configuration and implementation of the following fields, Width; Cell Color; Type; Align are done. Refer to figures 10.1-14, 15, and 16
Figure 10.1-14: A report before configurations are implemented
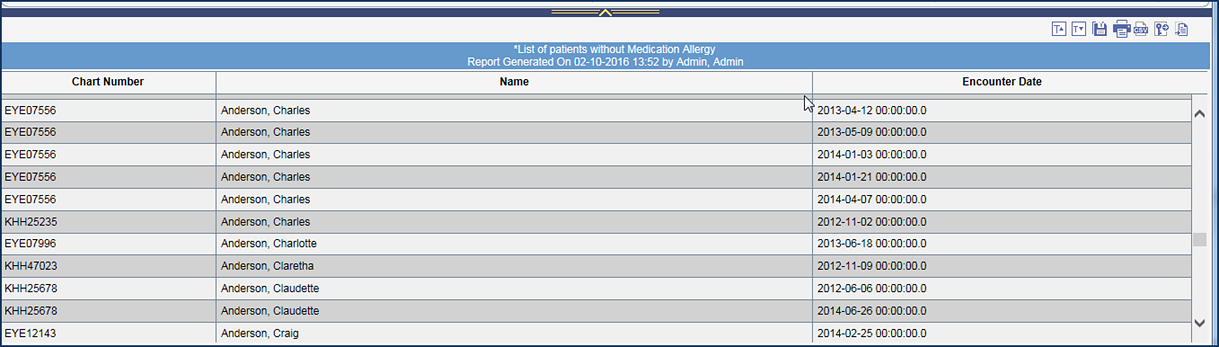
Figure 10.1-15: The report being designed and configured from the Report Design Master

Figure 10.1-16: The tabular report after configurations are implemented
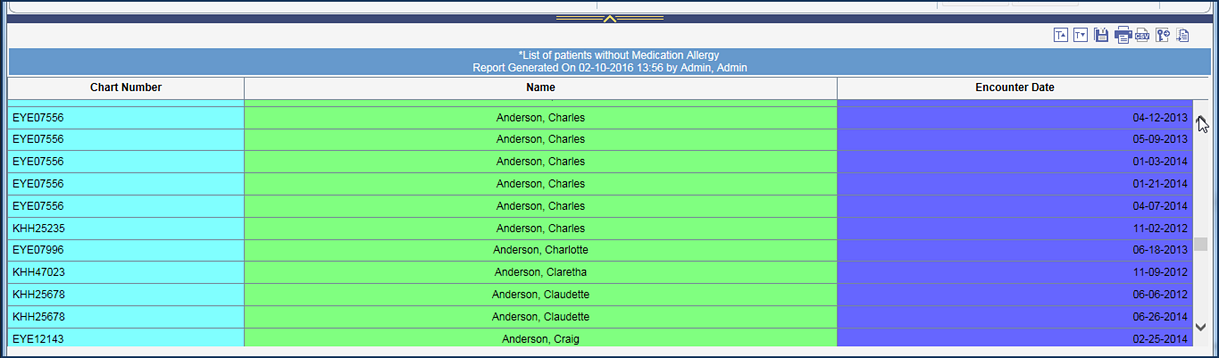
xiii. Total Ave – Select The Total and/or Average you need to compute from the drop-down list. Refer to figure
10.1-17
Figure 10.1-17: Total Ave
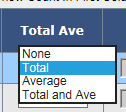
xiv. Formulas – A read-only field with a multi-select button […] which is enabled only if the type selected is either Amount or Number. On click a Formula popup is invoked, Refer to figure 10.1-18
Figure 10.1-18: The ‘Formula’ popup
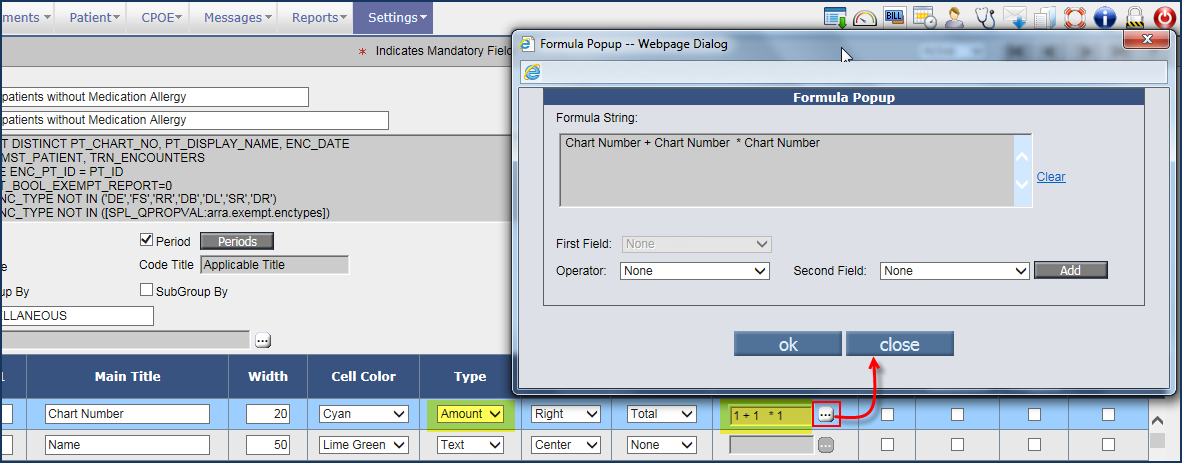
A formula is defined to computing value. The values selected from the First Field, Operator, and Second Field on click of Add is transferred to the Formula String field. On click of ok the formula is deciphered in mathematical expression and displayed on the Formula field.
Note: The First Field is disabled after the addition of the Formula String after that only the Operator and the Second Field value is allowed to be changed.
xv. Wrap – The option when selected provides the ‘Text Wrap’ functionality to the column selected i.e. data in the cell wraps to fit the column width.
xvi. Hide Identifier – The option when selected provides the option, Hide Identifier on the Tabular Report; on selection, XXXXX is displayed instead of the Report Data.
Note: The Hide Identifier is applicable only for type, Text.
xvii. Hide Column – The option when selected provides the option, Hide column on the Tabular Report; on selection, the entire column beyond the current column remains hidden.
xviii. Audit Col – The option when selected provides the option, Audit Col on the Tabular Report; on selection, the audit trail is invoked.
xix. The Active option and Last Modified by information has been shifted at the bottom of the screen.
Hint: The Comments are not displayed on print of Tabular Report; the Legend is available on screen and on print. |
|
|
| 10.2 |
Provision to display matrix of recommended vaccines as well in the Output templates |
| |
Navigation: Goto menu: Reports → click Encounter
Earlier the matrix of only required vaccines used to display in the Certificate for Immunization form. These required vaccines codes were defined in the property, vaccination.codes.forschools and the following tags used to display matrix of those required vaccines in the Encounter Output templates:
• ENC_FST_VAC_DONEALL_SCHOOL
• LASTENC_FST_VAC_DONEALL_SCHOOL
• PT_FST_VAC_DONEALL_SCHOOL
Now along with required vaccines, the matrix of recommended vaccines as well is displayed in the Certificate for Immunization form. Therefore, a new property, vaccination.codes.forschools2 has been added to define recommended vaccine codes and following new tags have been added to display matrix of those recommended vaccines in the EncounterOutput templates:
• ENC_FST_VAC_DONEALL_SCHOOL2
• LASTENC_FST_VAC_DONEALL_SCHOOL2
• PT_FST_VAC_DONEALL_SCHOOL2
|
|
|
| 10.3 |
Supervising Provider column added on the Review Encounter Report screen |
| |
Navigation: Goto menu: Reports
→ click Review Encounter
A new column, Supervising Provider has been added on the Review Encounter Report screen that displays the Supervising Provider name for the encounter.
Refer to figure 10.3-1
Figure 10.3-1: Newly added Supervising Provider column

|
|
|
| 10.4 |
Two new Tabular reports, ‘PQRS Report’ and ‘Last Login for given Clinic user’ have been provided |
| |
Navigation: Goto menu: Reports
→ click
Tabular
The following two new Tabular reports have been additionally provided in Denali:
| Report name |
Report code |
| PQRS Report - Pass Percentage |
PQRS |
| Last Login for Given Clinic user |
LASTLOGIN |
i. PQRS Report – Pass Percentage
This report displays the PQRS related criteria and its value for the selected Doctor. Following are the criteria:
• Number of Medicare Encounters
• Total no of encounters
• Percentage of Medicare Encounters (%)
• Number of encounters with PQRS data
• Percentage of encounters with PQRS data (%)
ii. Last Login for Given Clinic user
This report displays the last login details such as First Name, Last Name, User ID, and Last Login date and timestamp of the User that is selected in the Select User search.
|
|
|
| 11. |
Settings |
| 11.1 |
Property to automatically save details (Autosave) in PrognoCIS has been enhanced |
| |
Earlier when you made any changes or entered any details in PrognoCIS then to automatically save such details or display confirmation message was dependent on a property, prognocis.dontshow.confirm.
Now the property, prognocis.dontshow.confirm has been made obsolete and instead a new property, prognocis.autosave.rule has been added. The property has following three values in a dropdown list:
• CONFIRM
• IGNORE
• AUTOSAVE
CASE I: If the property value is set to ‘CONFIRM’ then whenever you make any changes and navigate to another screen in PrognoCIS, a confirmation message to whether save the changes or not is displayed.
CASE II: If the property value is set to ‘IGNORE’ then a confirmation message is NOT displayed and the changes made are not saved.
CASE III: If the property value is set to ‘AUTOSAVE’ then whenever you make any changes and navigates to another screen in PrognoCIS, a confirmation message is NOT displayed and the changes made are automatically saved.
Note:
The change in the property value is reflected only in the new session of PrognoCIS i.e. you have to logout of PrognoCIS and login again.
By default the property value is ‘CONFIRM’.
Workflow arrows are independent of the property value i.e. navigating through Workflow arrows automatically saves the data, irrespective of the value set in the property and proceeds to the next screen.
Limitation: The auto save functionality is not applicable if User navigates from one menu screen to another. For example, if a User makes some changes on Letters-Out screen (Goto menu: Patient → click Letters-Out) and then navigates to the Consult screen (Goto menu: CPOE → click Consult) without saving these changes, then NO prompt is displayed for saving the details. In such a case, the value assigned to the property, prognocis.autosave.rule is not considered. Thus it is recommended that User saves the details before navigating from one menu to another.
Setup:
Property, prognocis.dontshow.confirm
has become obsolete in the current version whereas a new property,
prognocis.autosave.rule
introduced for including additional functions. Thus, at the time of Version
Upgrade if the property,
prognocis.dontshow.confirm
had the value Y (in the earlier version) then new property,
prognocis.autosave.rule
would be by default set as AUTOSAVE else if set as N then the new property,
prognocis.autosave.rule
by default is set as CONFIRM. |
|
|
| 11.2 |
Provision to display Clinic ID in Output Templates |
| |
The Clinic ID displayed on About PrognoCIS popup (from the Menu bar, click the Info icon:  → Clinic Information section) is now available to print on the Output Templates. A new tag, CL_ID has been added to print the respective Clinic ID in Output Templates. → Clinic Information section) is now available to print on the Output Templates. A new tag, CL_ID has been added to print the respective Clinic ID in Output Templates.
|
|
|
| 11.3 |
Claims are generated for zero duration encounters as well |
| |
Navigation: Goto menu: Settings → click Configuration → under Clinic column, click Enc Types
Earlier for Zero duration encounters, the claims were not generating. Now, for all the encounters irrespective of its duration, the claims would be generated. However, if there are any zero duration encounters with Claim Type as No Claim (on Enc Types Master) then the claims for those encounters will not be generated.
|
|
|
| 11.4 |
Provision to make a copy of Test Exec templates’ Systems |
| |
• A new icon, Copy of System:  is provided on each of the Test Exec (i.e. Vitals, HPI, ROS, Physical, Specialty, and Clinic Forms) template screens (Goto menu: Settings → click Configuration) to facilitate copying of the selected system along with all its tests. is provided on each of the Test Exec (i.e. Vitals, HPI, ROS, Physical, Specialty, and Clinic Forms) template screens (Goto menu: Settings → click Configuration) to facilitate copying of the selected system along with all its tests.
• On click of the icon invokes the System Copy popup. Refer to figure 11.4-1
Figure 11.4-1: System Copy popup displayed
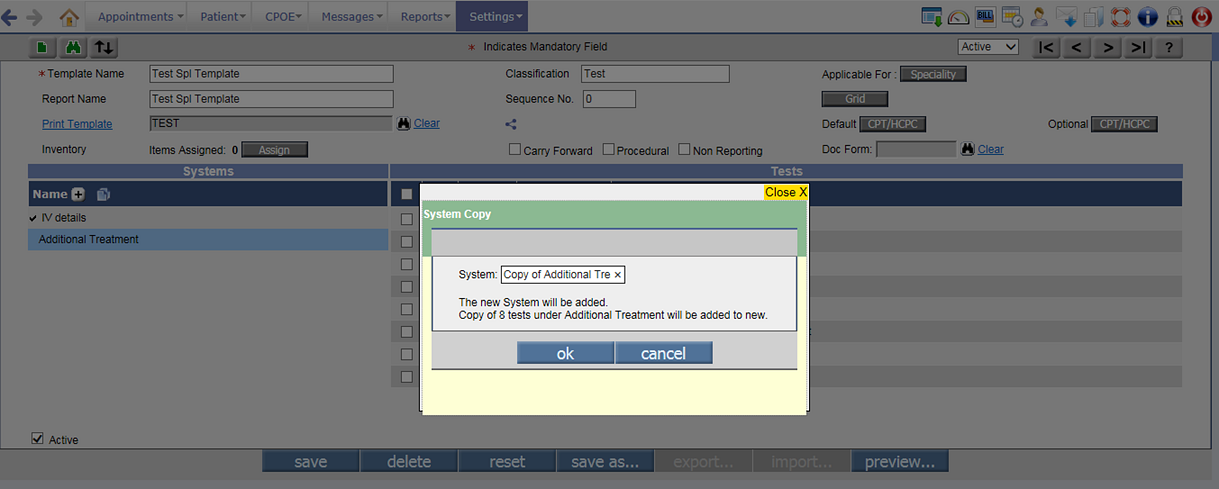
• A new System name is defined from the System field and additionally a User is informed with the display of help text of the system being copied along with the number of tests that would be copied.
Note: By default the text, “Copy of < name of the system >” is displayed within the System field which is configurable. |
|
|
| 11.5 |
UI of Property Help screens have been enhanced with User friendly elements |
| |
• Users who have access and provision to make changes to PrognoCIS properties now have the ease of using various elements such as drop-down list, selection of options, slide bar, and color picker where information is entered without having to enter details.
• The properties by itself are now color-coded to distinguish the ‘admin’ related properties (in red) from that of general properties (in black). Admin defined properties are only visible to the User logged in as ‘admin’.
Navigation: Goto menu: Settings → click Configuration → under Admin column, click Properties
1. Text
A User is required to enter text values.
Sample Help text: Enter the specific text value to be assigned to the property.
Example property: assessment.followup.mailto
2. Number
A Text field defined with specific range. If the number entered by the User is out of predefined range then an alert is displayed. Refer to figure
11.5-1
Figure 11.5-1: Number Property value

Sample Help text: Enter number value to be assigned to the property.
Note: An alert is displayed if the entered value is incorrect or does not fall in a specific range.
Example property: encounter.count.for.processnqf
3. Boolean
Users have options to either select ON (Yes) or OFF (No) on the slide bar. Refer to figure 11.5-2
Figure 11.5-2: Boolean Property value
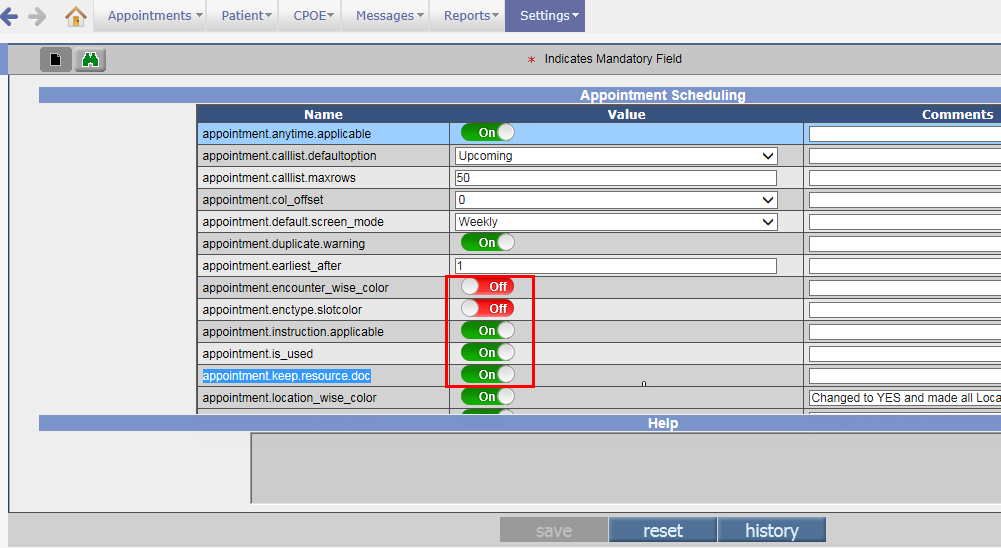
Sample Help text: Turn ON the property to else turn it OFF to .
Example property: appointment.keep.resource.doc
4. Color picker
For properties that take in color code as value, a simple color picker has been provided. On click, a simple color picker popup displaying the color palette is displayed; on selection of a color, it’s HEX (Hexadecimal) code is displayed in a text field which is non-editable and a color tile displays the respective color. Refer to figure
11.5-3
Figure 11.5-3: Color Property value
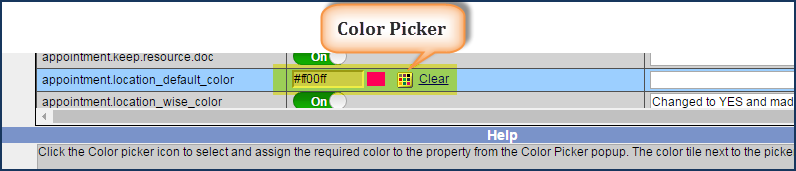
Sample Help text: Click the Color picker icon to select the required color from the Color Picker popup.
Example property: appointment.location_default_color
5. Charset
Users have options to select multiple characters or single digit numbers using multiple checkboxes. Refer to figure
11.5-4
Figure 11.5-4: Charset Property value
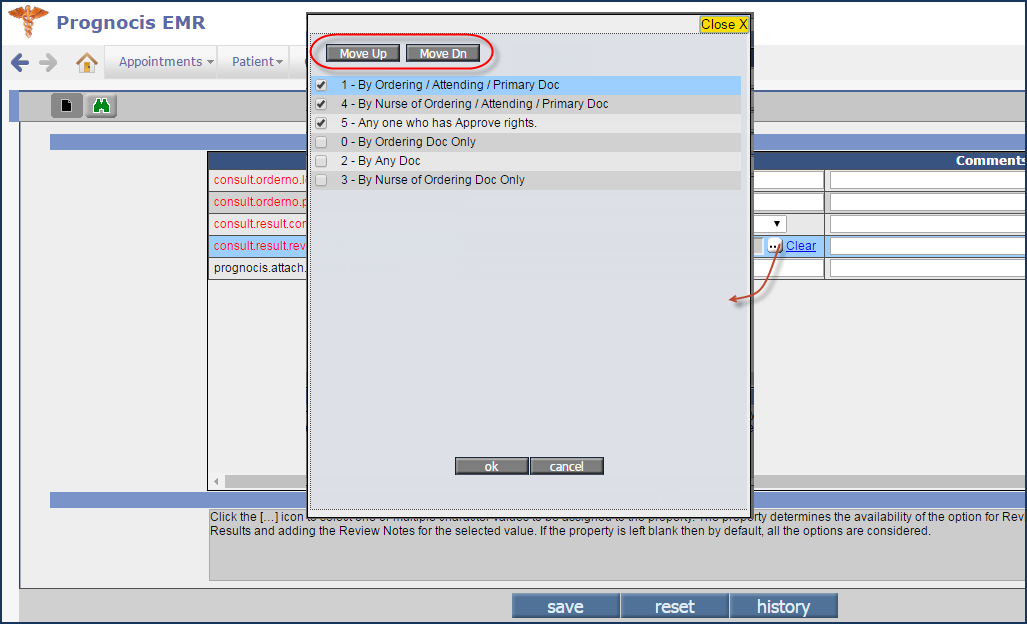
Sample Help text: Click the […] icon to select one or multiple character values to be assigned to the property. To set the sequence, select the value and click Move Up or Move Dn button to move the selected value one step up or down respectively.
Example property: consult.result.reviewed.by
6. List Box
Users have an option to select a single value from the drop-down list. Refer to figure
11.5-5
Figure 11.5-5: Listbox Property value

Sample Help text: Click the dropdown list to select any one appropriate value to be assigned to the property.
Example property: appointment.calllist.defaultoption
7. Valset
The values are a list of words and Users have options to select multiple values using multiple checkboxes. Refer to figure
11.5-6
Figure 11.5-6: Valset Property value
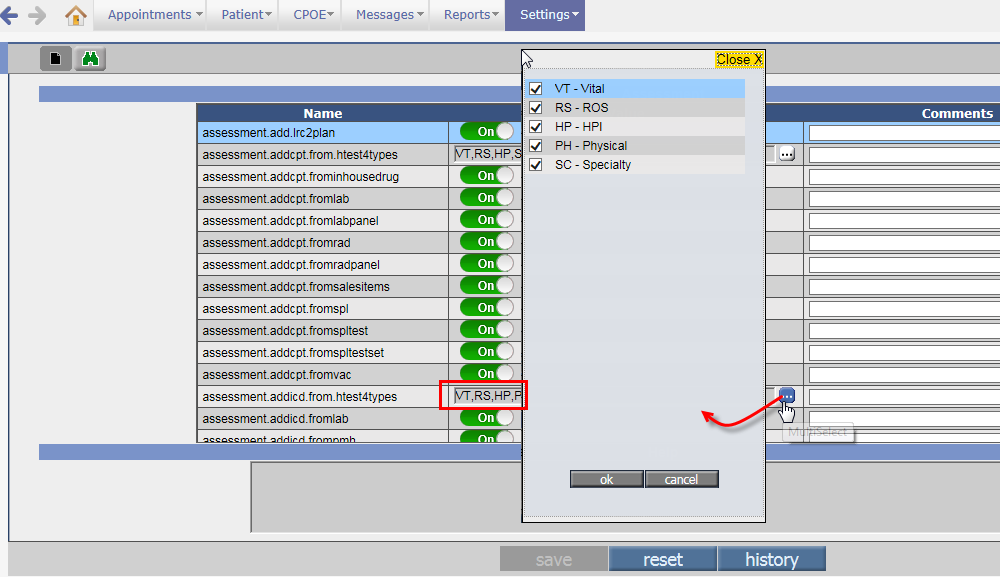
Sample Help text: Click the […] icon to select one or multiple values to be assigned to the property from the available list.
Example property: assessment.addicd.from.htest4types 8. MValSet
Properties requiring a sequence to be defined are provided with Move Up and Move Dn buttons on the value set popup. Refer to figure
11.5-7
Figure 11.5-7: MValset Property value
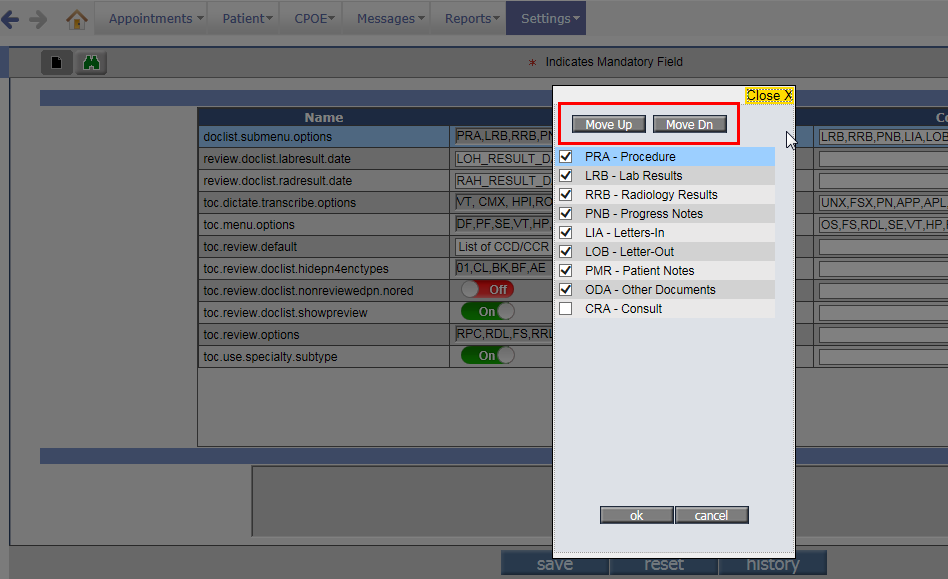
Sample Help text: Click the […] icon to select multiple values and set sequence of these values; To set the sequence, select the value and click Move Up or Move Down button to move the selected value one step up or down respectively.
Example property: doclist.submenu.options
9. Special
Specifically designed for Supported Events, the search icon on click invokes a special Supported Events popup, selected Supported Events get assigned to the property. Refer to figure
11.5-8
Figure 11.5-8: Special Property value
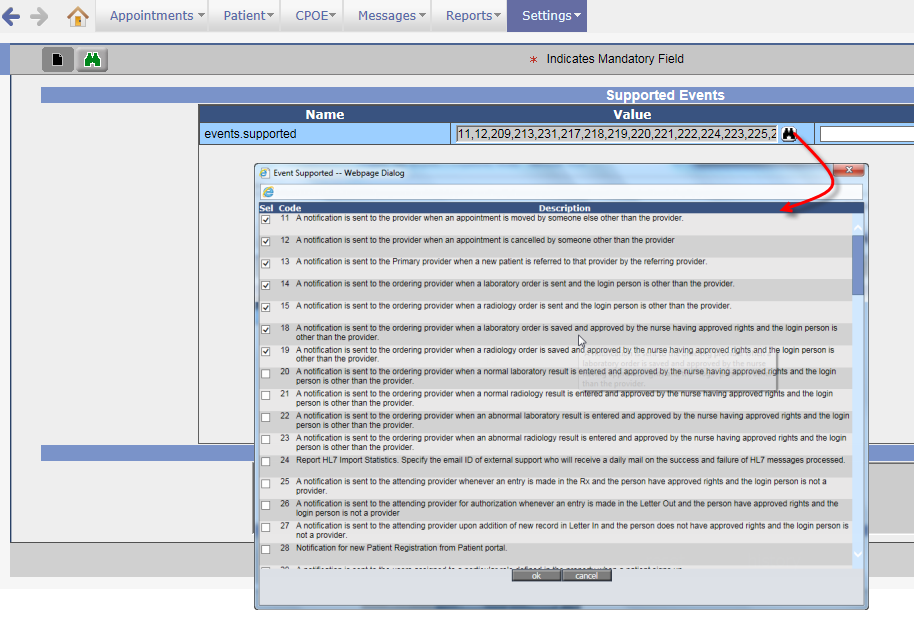
Sample Help text: Click the search icon to select and assign relevant events to the property from the Supported Events popup.
Example property: events.supported
10. Search
The search icon invokes relative search popup allowing a User to select a single value. The selected value is displayed in the grayed text field. Refer to figure
11.5-9
Figure 11.5-9: Search Property value
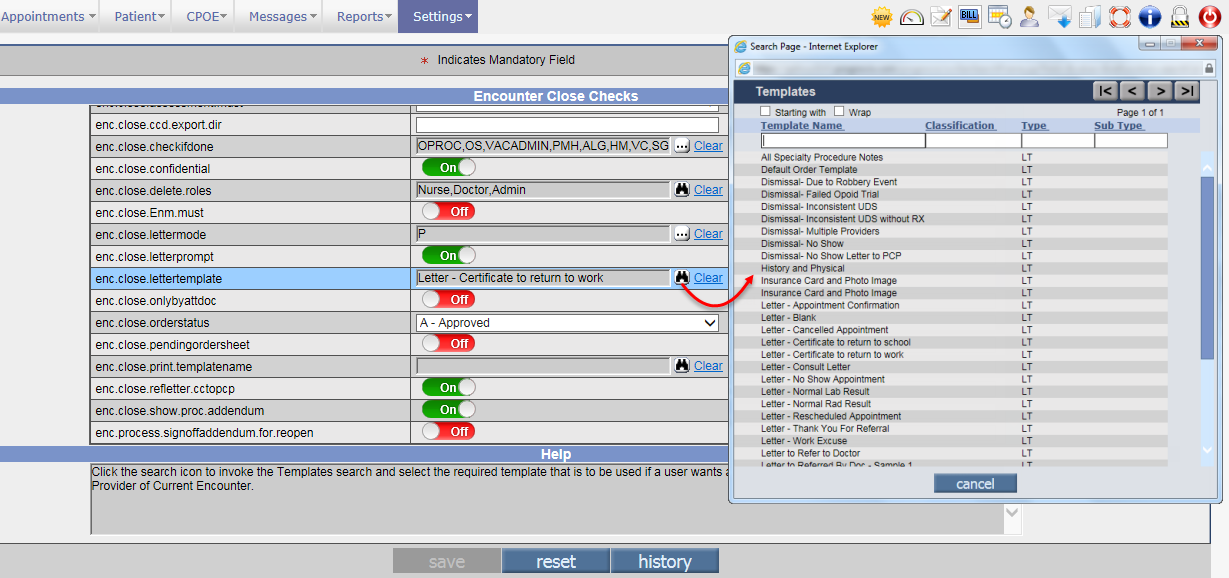
Sample Help text: Click the search icon to invoke the respective parameter’s search and select the required value(s) to be assigned to the property.
Example property: ledger2.exception.cpt.codes
11. Section
Various search sections are available throughout PrognoCIS, these section properties are clubbed together and on selection of a single search section its associated properties are now displayed together in a single popup, which is invoked via […] icon. Refer to figure
11.5-10
Figure 11.5-10: Section Property value
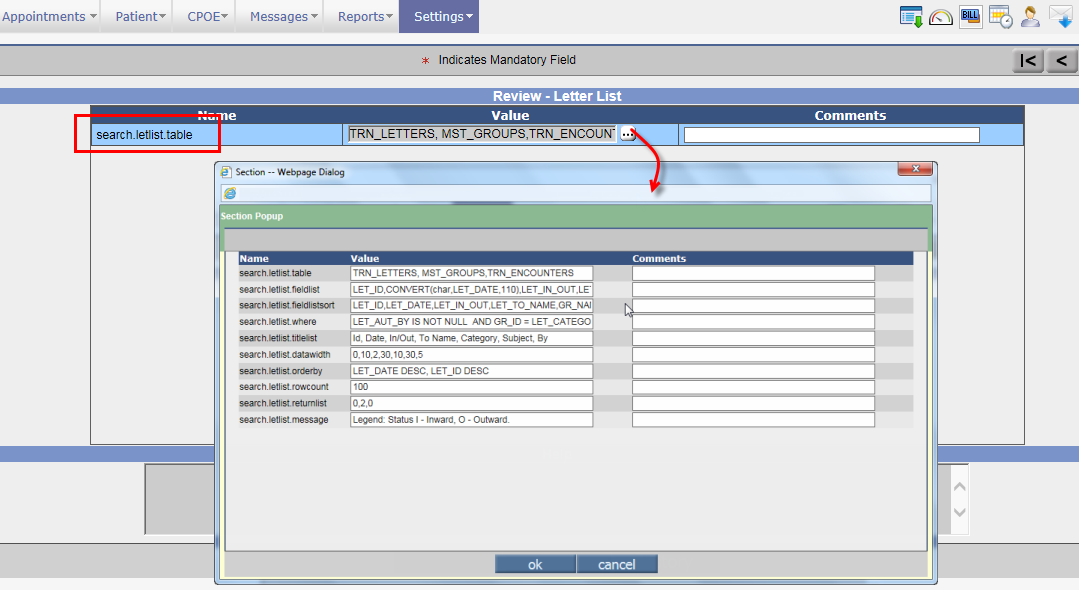
Sample Help text: click the […] icon to invoke a Section popup that displays a list of all the relative search properties available for modifications.
Example property: search.letlist.table
12. Date
A calendar icon along with a Clear link is displayed. On click of calendar icon, a calendar popup is displayed and the selected date is displayed in mm-dd-yyyy format. Refer to figure
11.5-11
Figure 11.5-11: Date Property value
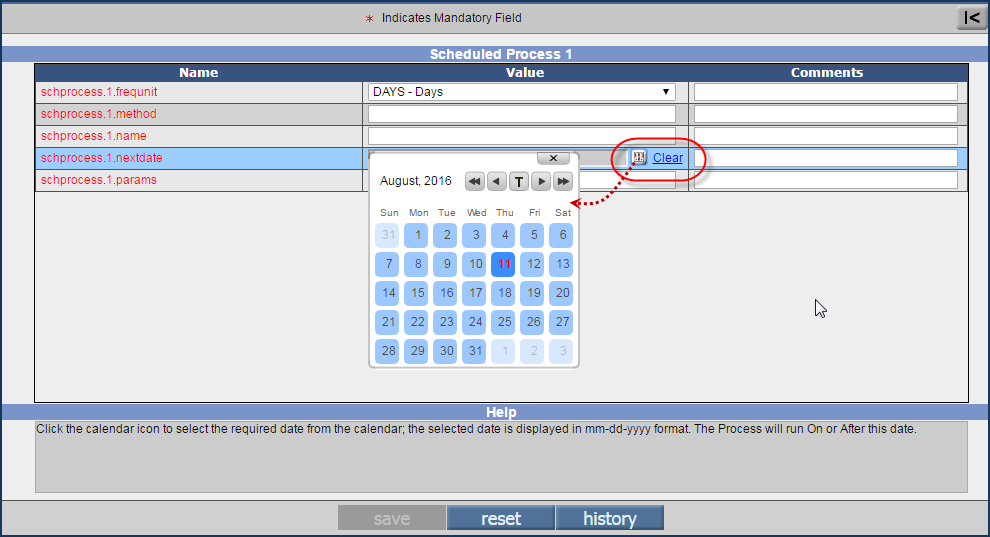
Sample Help text: Click the calendar icon to select the required date from the calendar; the selected date is displayed in mm-dd-yyyy format.
Example property: billing.lock.period.upto.date
|
|
|
| 11.6 |
Two new Master screens, ‘Org Provider’ and ‘Ref Org’ added |
| |
With the addition of two new Master screens, you have provision to
define Organization or any individual in that Organization and Referring
Organizations. These two new Master screens are added under the column, Users (earlier labeled as ‘Medics’, Refer to Change of labels on the Role Master screen for more help) and these are:
1. Org Provider Master screen. Refer to figure 11.6-1
2. Ref Org Master screen. Refer to figure 11.6-2
Figure 11.6-1: Org Provider Master UI

Figure 11.6-2: Ref Org Master UI
 The Organizations registered from the Org Provider Master screen are considered as Medics of type, ZE and Organizations registered from the Ref Org Master screen are considered as Medics of type, ZR. |
|
|
| 11.7 |
Change of labels on the Master screen |
| |
Navigation: Goto menu: Settings
→ click Configuration
i. The ‘Medics’ column is now relabeled as ‘Users’.
The existing Medics column is now relabeled as ‘Users’, as the column now additionally has varied information covered other than just Medics. Refer to figure
11.7-1
Figure 11.7-1: Medics column label change

ii. The Label of ‘Admin Staff ’ link has been changed to ‘Office Staff’. Refer to figure 11.7-2
Figure 11.7-2: Admin link label change
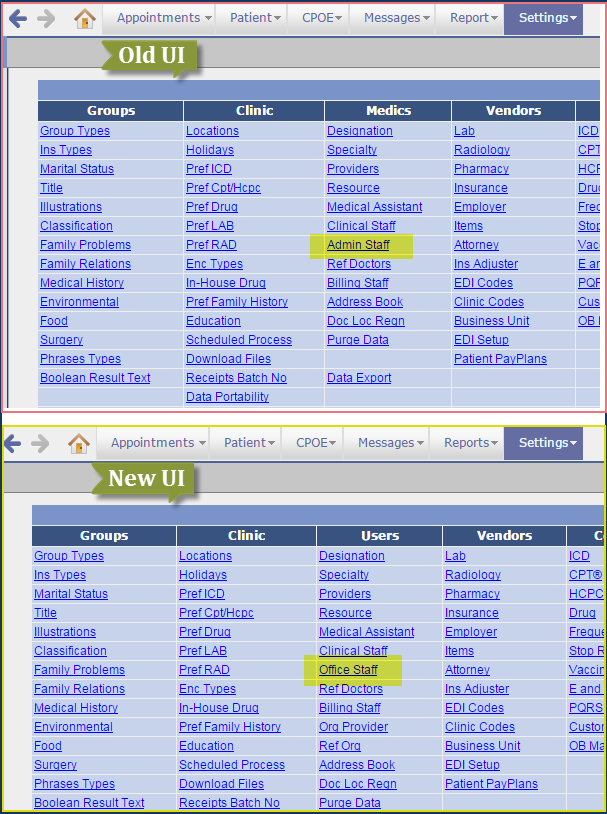
iii. On Specialty template screen, the ‘Facesheet’ label is changed to ‘Carry Forward’ Refer to figure 11.7-3
Figure 11.7-3: Facesheet label change
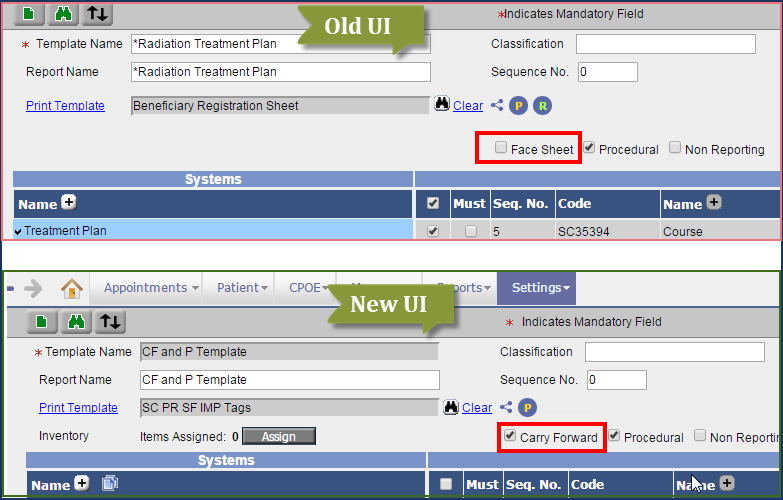
iv. On Test Execution specialty templates, the ‘Mandatory’ CPT/HCPC label is changed to ‘Default’ CPT/HCPC. Refer to figure 11.7-4
Figure 11.7-4: Mandatory CPT/HCPC label change
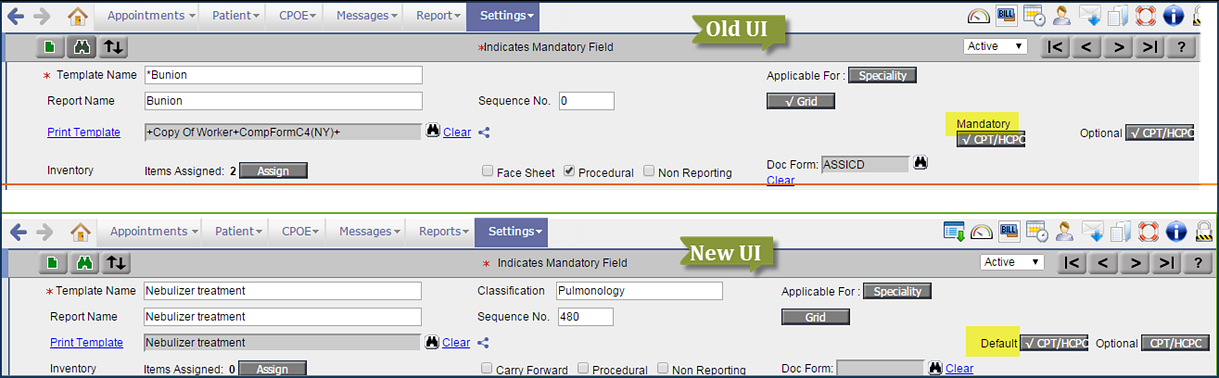 |
|
|
| 11.8 |
Change of labels on the Role Master screen |
| |
Navigation: Goto menu: Settings → click Configuration → under Admin column, click Role
i. The Configuration Medics label has been changed to User Configuration. Also, the Admin Staff label has been changed to Office Staff. Refer to figure
11.8-1
Figure 11.8-1: Configuration Medics and Admin Staff label change
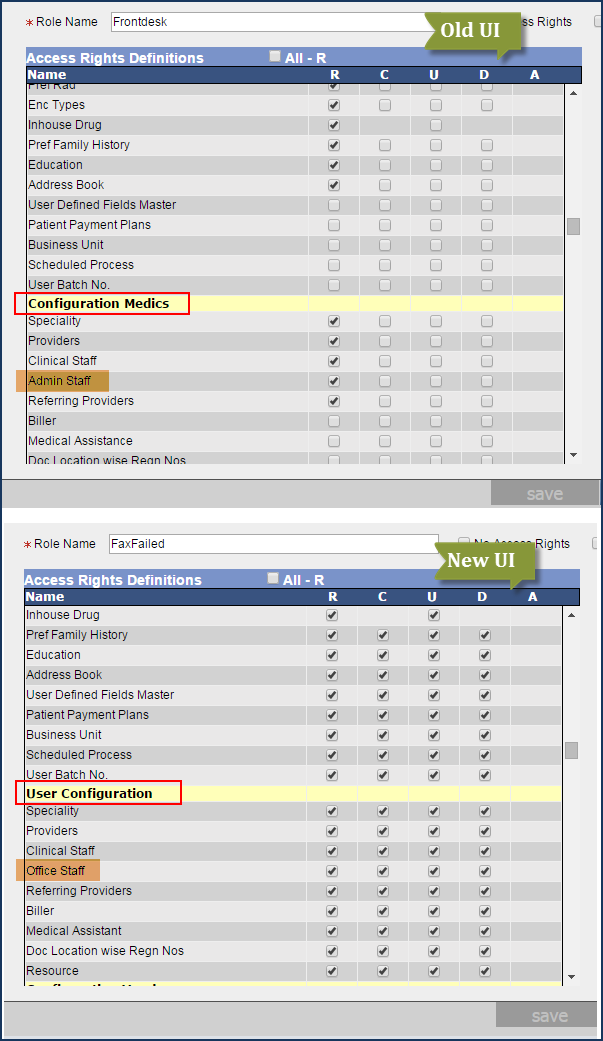
ii. Change of label from ‘Medical Assistance’ to ‘Medical Assistant’ Refer to figure 11.8-2
Figure 11.8-2: Medical Assistance label change
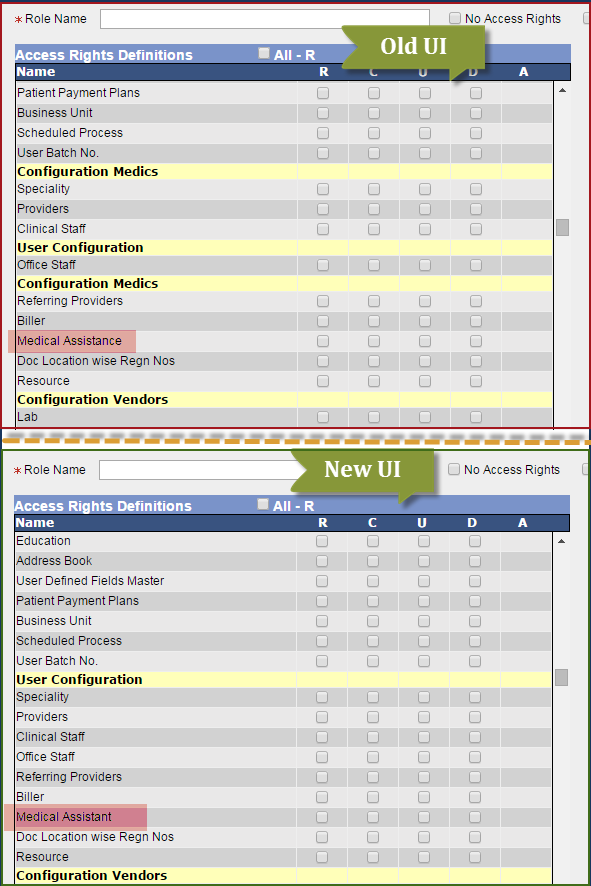 |
|
|
| 11.9 |
Few sections on Doctor Form and Patient Form relating to Vaccination have been removed |
| |
Few of the Doctor Form sections related to Vaccination are no more available on the Doctor Form Master or Design screen.
1. Sections removed on Doctor Form design are:
i. Vaccine Administer
ii. No Known Vaccination
iii. Vaccination History
2. Sections removed on Patient Form design are:
i. No Known Vaccination
ii. Vaccination History
|
|
|
| 11.10 |
Deletion of CPTs and HCPCs from their respective Master screen is condition based |
| |
Navigation: Goto menu: Settings → click Configuration → under Codes/Drugs column, click CPT link → Clinical Procedure Tests search popup is invoked → select an existing code for deletion
OR
Goto menu: Settings → click Configuration → under Codes/Drugs column, click HCPC link → Healthcare Common Procedure Codes search popup is invoked → select an existing code for deletion
Now there are conditions added to avoid important and associated CPT/HCPC codes from getting deleted. If any of the conditions are met, then that particular CPT/HCPC code is not allowed to be deleted.
I. CPTs from the CPT Master cannot be deleted under following conditions:
1. If the CPT to be deleted is a Non Standard with Custom Code.
2. If the CPT to be deleted is a Standard Code.
3. If the CPT to be deleted is used in Preferred.
4. If the CPT to be deleted is used in Assessment.
5. If the CPT to be deleted is used as Charge Code in Claims.
6. If the CPT to be deleted is used as a Child Code in Claims.
7. If the CPT to be deleted is used in UB04 Claims
Note:
As an exception, custom CPTs are allowed to be deleted even if used in Assessment.
II. HCPCs from the HCPC Master cannot be deleted under following conditions:
1. If the HCPC to be deleted is a Non Standard with Custom Code.
2. If the HCPC to be deleted is a Standard Code.
3. If the HCPC to be deleted is used in Preferred.
4. If the HCPC to be deleted is used in Assessment.
5. If the HCPC to be deleted is used as Charge Code in Claims.
Note:
As an exception, custom HCPCs are allowed to be deleted even if used in Assessment.
|
|
|
| 11.11 |
Provision to set sequence of the Complaints from the Complaints Master screen |
| |
Navigation: Goto menu: Settings→ Configuration→ under Workflow column, click Complaints
Earlier, the Complaints on the Complaints popup used to display alphabetically and there was no provision for a User to set the sequence of those Complaints.
Now, a new field, Sequence has been added on the Complaints Master screen to set the sequence of the Complaints displayed on the Complaints search popup. Refer to figure 11.11-1
Figure 11.11-1: Sequence field on the Complaints Master screen
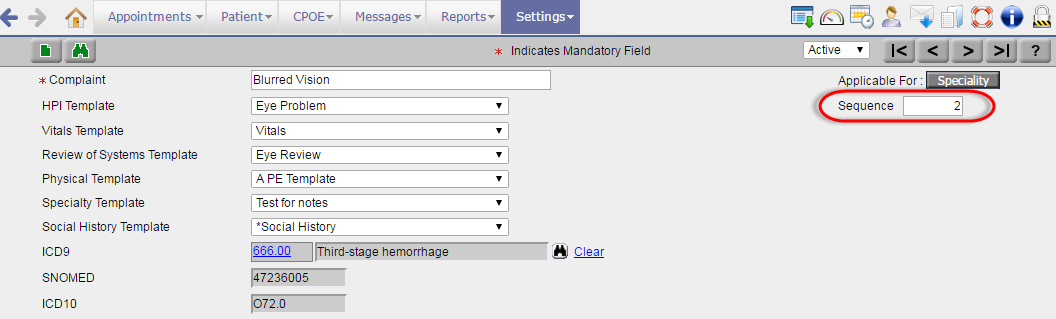 |
|
|
| 11.12 |
New changes on Report design screen of Mis Graph |
| |
Information for Implementers:
The Mis Graph Report Design screen changes are similar to the Tabular Report Design screen changes.
Navigation: Goto menu:
Reports→ Click
Mis Graph
On the Graph Master screen
(Goto menu: Settings → click Configuration → under Report Design column, click Graph), a new section, Graph Settings has been added that help in configuring multi-series graphs.
Fields under Graph Settings:
To plot a Mis graph following parameters need to be configured:
Amount 1 Label - the value entered defines the title for the first element in the graph. The color picker icon, Select Color:  next to the field, defines the color for the first element. next to the field, defines the color for the first element.
Amount 2 Label - the value entered defines the title for the second element in the graph. The color picker icon, Select Color: next to the field, defines the color for the second element.
X-Axis Title - defines the Title to be displayed for the X-axis.
Y-Axis Title - defines the Title to be displayed for the Y-axis.
Note: The character limit for the length of the titles displayed on X-Axis and Y-Axis is 50.
Figure 11.12-1: Report Design - Graph Master screen
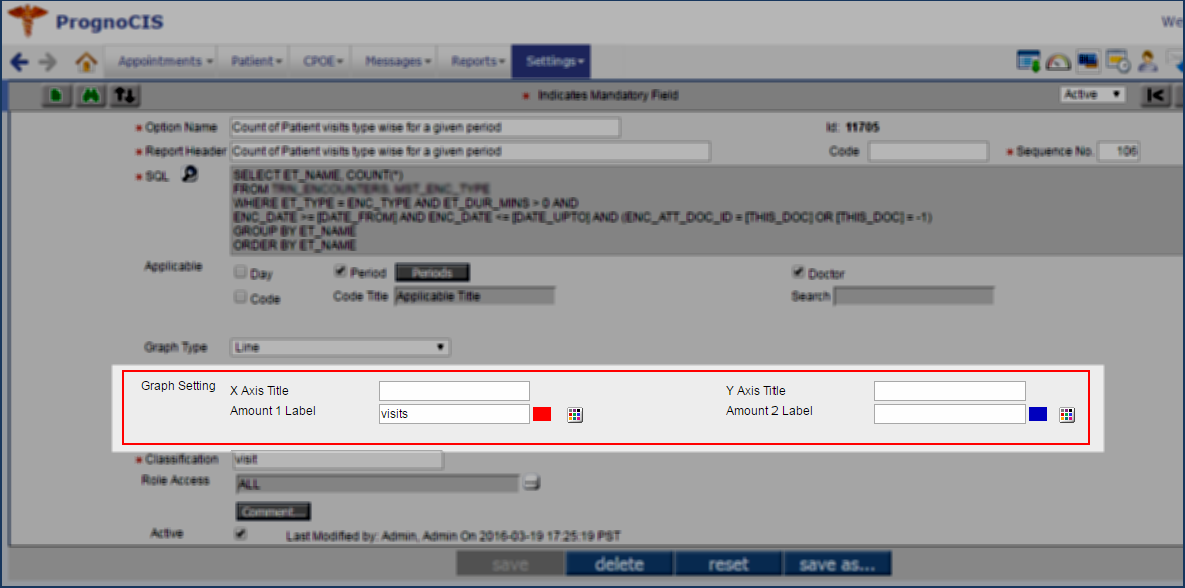
Hint:
To create multi-series graphs, It is required that along with the Amount 2 Title, Amount 2 Color a third Column is defined in the SQL script.
If user specifies title only for Amount 1 then there should be minimum of 2 columns in the select condition of the SQL script.
Append Reports is not available on the Graph Master screen.
|
|
|
| 11.13 |
Provision to create a new role based on the existing role’s access right definitions |
| |
Navigation: Goto menu:
Settings→
Configuration →
under Admin column, click
Role
A new button,
save as has been provided on the
Role Master screen to save the defined access rights of the existing role with a new role name.
Refer to figure 11.13-1
Figure 11.13-1:
Save as button on the Role Master screen

|
|
|
| 11.14 |
Provision to import Tests from xls (MS Excel) file attachment |
| |
Navigation: Goto menu:
Settings→
Configuration →
click on Elements link of Social Hist/Vitals/HPI/Specialty/Clinic Forms
AND
Goto menu:
Settings→
Configuration →
click on Bullets link of ROS/Physical
AND
Goto menu:
Settings→
Configuration →
click on Tests link of Lab/Radiology
A new button,
importXls has been added on the Test Exec Master screens to import tests from any xls
(MS Excel) file that has been attached.
Refer to figure 11.14-1
Figure 11.14-1:
importXls button
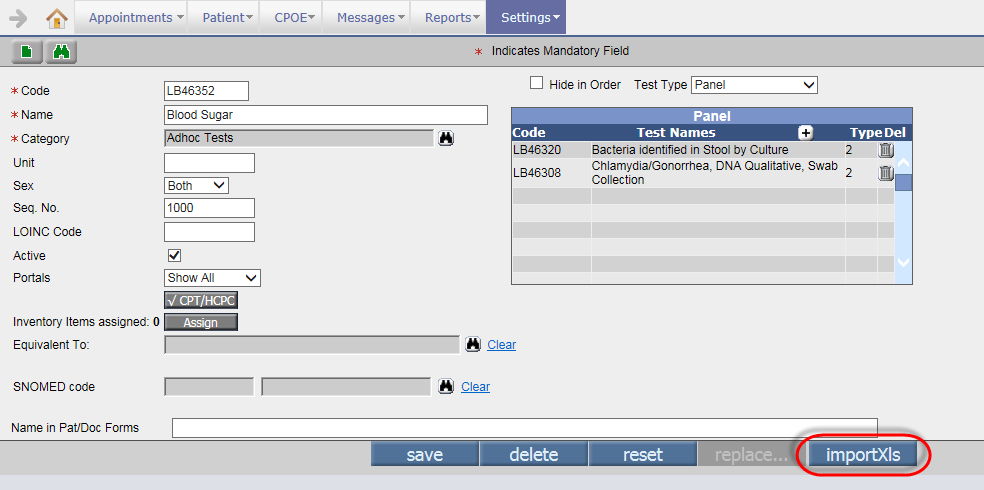
Note: The button,
importXls is available only through Admin login.
|
|
|
| 11.15 |
A new Role, ‘TemplateHtmlEdit’ has been added to allow editing the HTML of a Template |
| |
Navigation: Goto menu:
Settings→
Configuration →
under Admin column, click Role Refer to figure 11.15-1
Figure 11.15-1:
TemplateHtmlEdit role
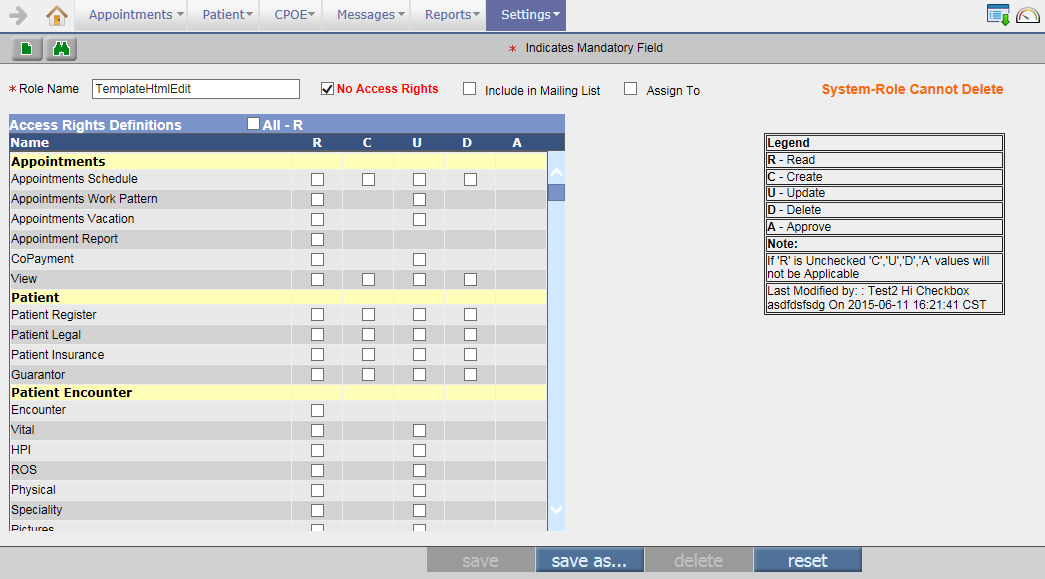
A new Role,
TemplateHtmlEdit has been added to allow a User to edit the HTML of any Template. Only if a User has the
TemplateHtmlEdit role assigned, he/she will get the rights to edit a Template. The
Normal View and HTML View options are then available on all the Text editor of PrognoCIS for that User to edit the HTML.
Refer to figure 11.15-2 However, if the role is not assigned to a User then no options are displayed on the Text editor and by default the Normal view is displayed.
Figure 11.15-2:
Normal View and HTML View options displaying on the Text editor
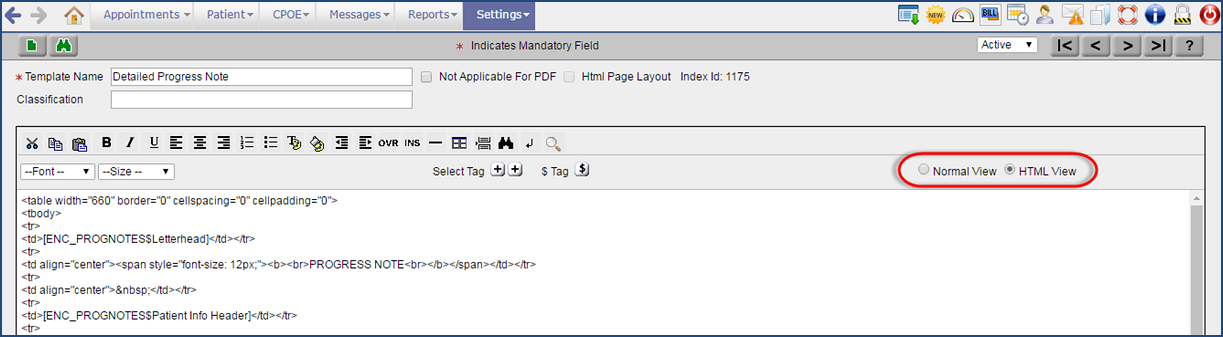
|
|
|
| 11.16 |
The labels of Test Exec – Specialty sections on the Patient/Doctor Form Master screen have been changed |
| |
Navigation: Goto menu:
Settings→
Configuration →
under Report Design column, click Patient Forms/Doctor Forms
The labels of sections,
Test Exec – Specialty Tests and
Test Exec – Specialty Procedures have been changed to
Test Exec – Specialty Template Tests and
Test Exec – Specialty Templates respectively.
Refer to figure 11.16-1
Figure 11.16-1:
Label changes of Test Exec - Specialty sections on Patient/Doctor Form Master screen
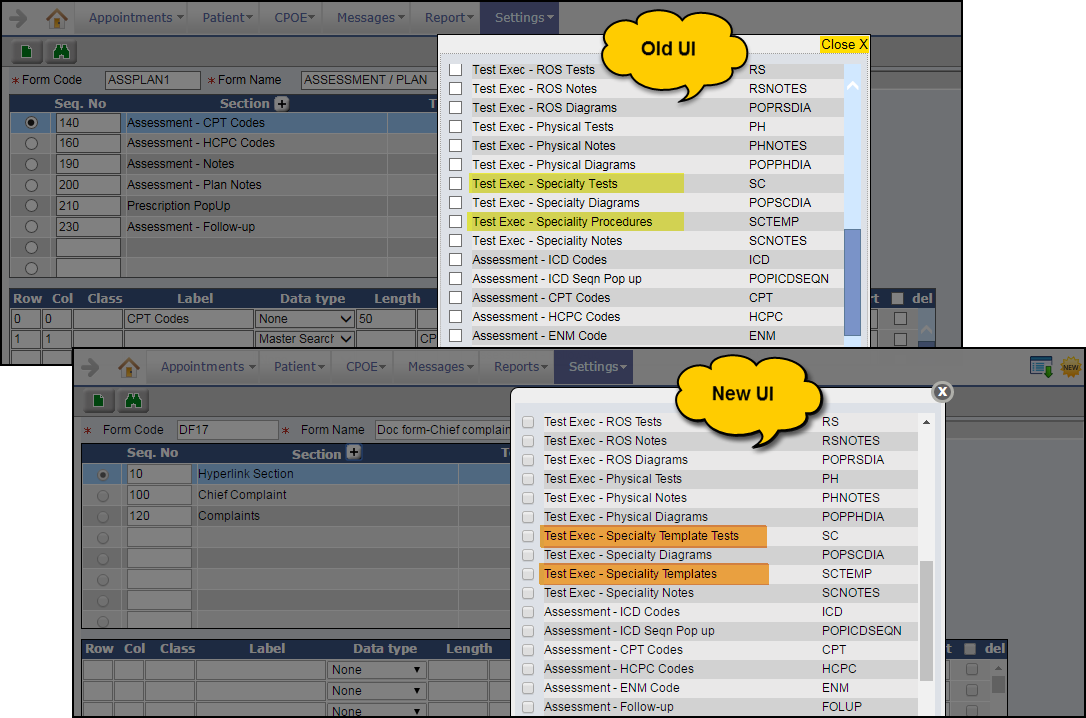
|
|
|
| 11.17 |
The HL7 PropFiles Master has been removed |
| |
Navigation: Goto menu:
Settings→
Configuration
The HL7PropFiles Master has been now removed from PrognoCIS and hence the
HL7PropFiles link under Admin column will not be available for a User.
|
|
|
| 11.18 |
Protocol Master now invokes Procedure Master search instead of Specialty Templates search |
| |
Navigation: Goto menu:
Settings→
Configuration→
Protocol→
select Procedure Type option
The Procedure Order search has now replaced the earlier Specialty Templates search (templates that are marked as Procedure and associated with a print template) on the Protocol Master screen.
|
|
|
| 12. |
Miscellaneous |
| 12.1 |
Added Color Picker in multiple screens of PrognoCIS |
| |
In all over PrognoCIS, the new Color Picker icon: has been added.
Earlier the Color Picker was available only on the following screens:
• Pictures (Patient’s Encounter → Encounter TOC → click Pictures)
• Illustrations (Patient’s Encounter → Encounter TOC → click Illustrations)
Now the Color Picker is also available on the following screens:
• Graph Master
Navigation: Goto menu: Settings → click Configuration → under Report Design column, click Graph
In the Graph Master screen, two Color Pickers to select the color scheme for
Amount 1 Label and Amount 2 Label have been added. These Color Pickers are available within a new section named, Graph Setting. The default colors for the Amount 1 Label and Amount 2 Label of graph are Red and Blue respectively. Refer to figure
12.1-1
Figure 12.1-1: Color picker on Graph Master screen
Note: For Pie graph, Color Pickers are not applicable.
• Enc Types Master
Navigation: Goto menu: Settings → click Configuration → under Clinic column, click Enc Types
In the Enc Types Master screen, the Color Picker has been provided for the Appointment Color field to select color of the Appointment for that particular Encounter Type. Refer to figure 12.1-2
Figure 12.1-2: Color picker on Enc Types Master screen
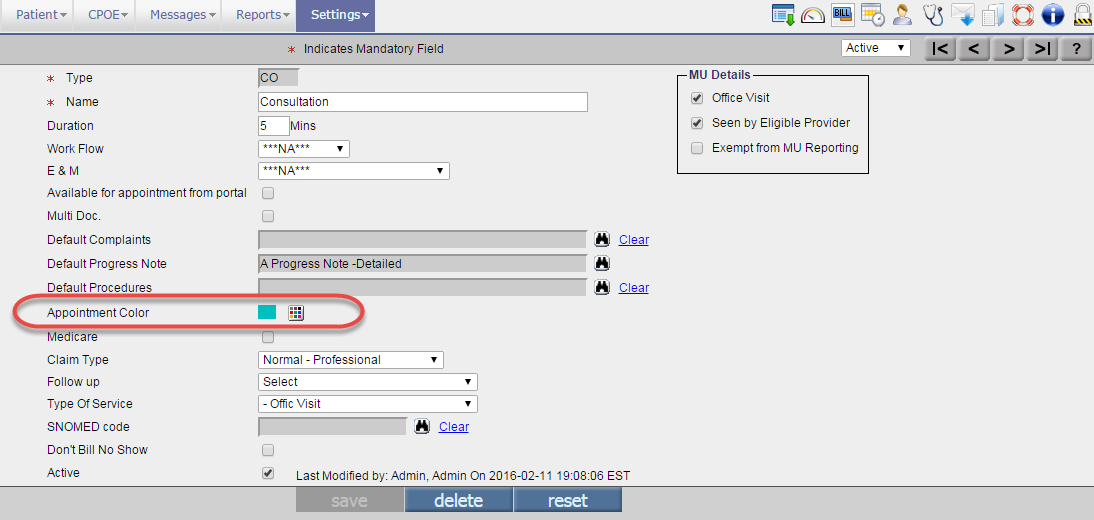
• Locations Master
Navigation: Goto menu: Settings → click Configuration → under Clinic column, click Locations
In the Location Master screen, the Color Picker has been provided for the Location Color field to select color of that Location. Refer to figure 12.1-3
Figure 12.1-3: Color picker on Locations Master screen
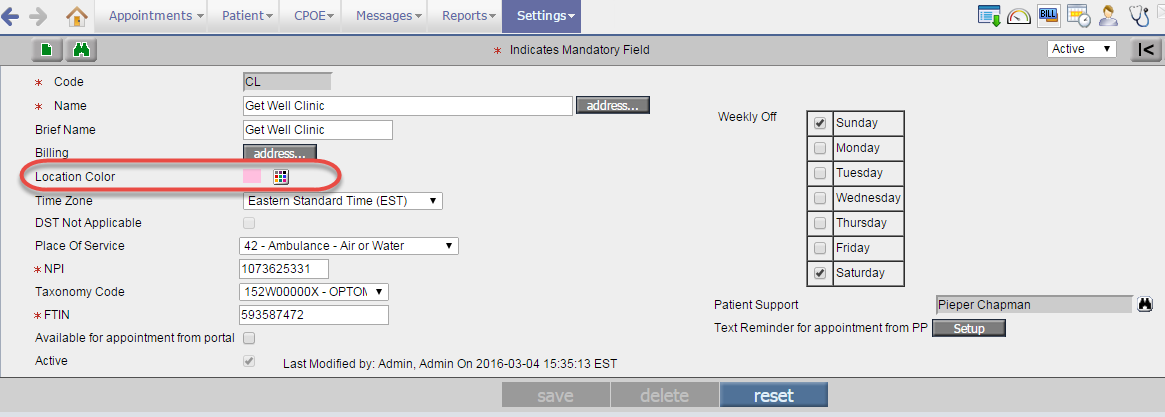
• Properties Master
Navigation: Goto menu: Settings → click Configuration → under Admin column, click Properties
Earlier to set any color for a property, you had to enter Hex color code in its property value. For example, to set Red color, the Hex color code: #e31212 had to be entered in the property value. Now, Color Picker has been provided for such properties to easily choose a required color scheme. Refer to figure 12.1-4
Figure 12.1-4: Color picker on Properties Master screen
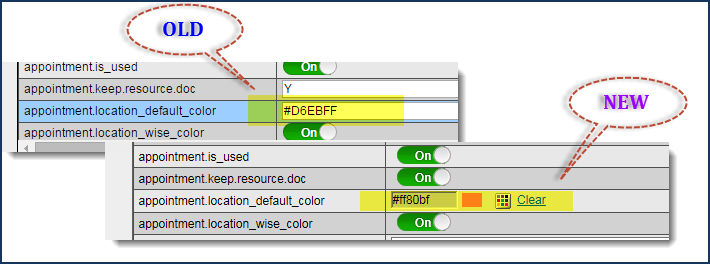 |
|
|
| 12.2 |
Provider’s Work Pattern is now prepopulated (For Internal Use) |
| |
Earlier the Provider’s Work Pattern used to populate on the go. Now, the Provider’s Work Pattern is prepopulated and thus the performance of Appointment Schedule screen is enhanced.
A new weekly process, computeWorkPatternForNextXdays() has been added at the backend to compute the Provider’s Work Pattern for the number of days mentioned in the process. If the number of days is not mentioned in the process then the Provider’s Work Pattern is computed for the next 60 days by default.
Note for PrognoCIS TSG: Do not set the value more than 100 for this process. |
|
|
| 12.3 |
‘Attach’ and ‘Scan’ under Messages menu are relabeled |
| |
i. The label of Attach under Messages menu is now changed to Attach Center. Refer to figure
12.3-1
Figure 12.3-1: Attach sub-menu label change
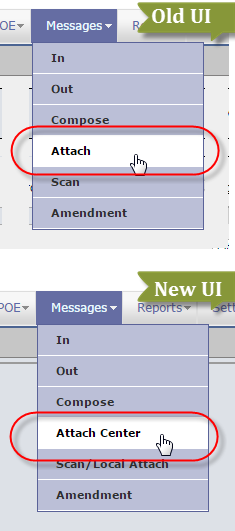
ii. The label of Scan under Messages menu is now changed to Scan/Local Attach. Refer to figure
12.3-2
Figure 12.3-2: Scan sub-menu label change
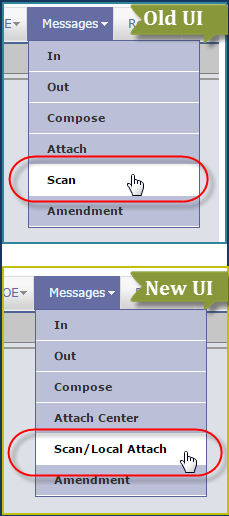 |
|
|
| 12.4 |
Report Menu label is changed to ‘Reports’ |
| |
Navigation: Goto menu: Report
The menu label of Report is changed to ‘Reports’. Refer to figures 12.4-1 and 12.4-2
Figure 12.4-1: Old UI of Report menu

Figure 12.4-2: New UI of Reports menu
 |
|
|
| 12.5 |
Graph UIs in PrognoCIS now has a new look and feel |
| |
Graph UIs in PrognoCIS now have a new look and feel due to change in the set of supported libraries. These new libraries support in plotting interactive graphs. There is a noticeable change in the look and feel of the graphs seen.
Consider the examples of the Lab Matrix and Mis Graph screens with a difference in older and the newer UIs respectively.
Example 1: Lab Matrix screen
Navigation: Goto Patient Encounter
→ Encounter TOC
→ point to Lab
→ click Matrix
Figure 12.5-1:
Old UI of Lab Matrix
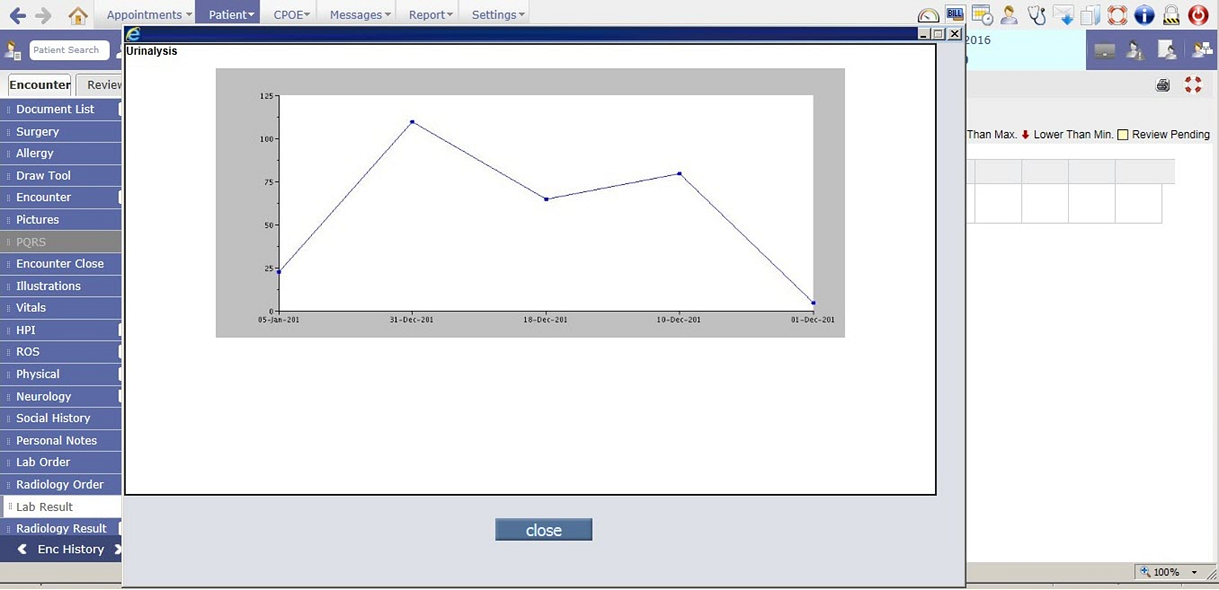
Figure 12.5-2:
New UI of Lab Matrix
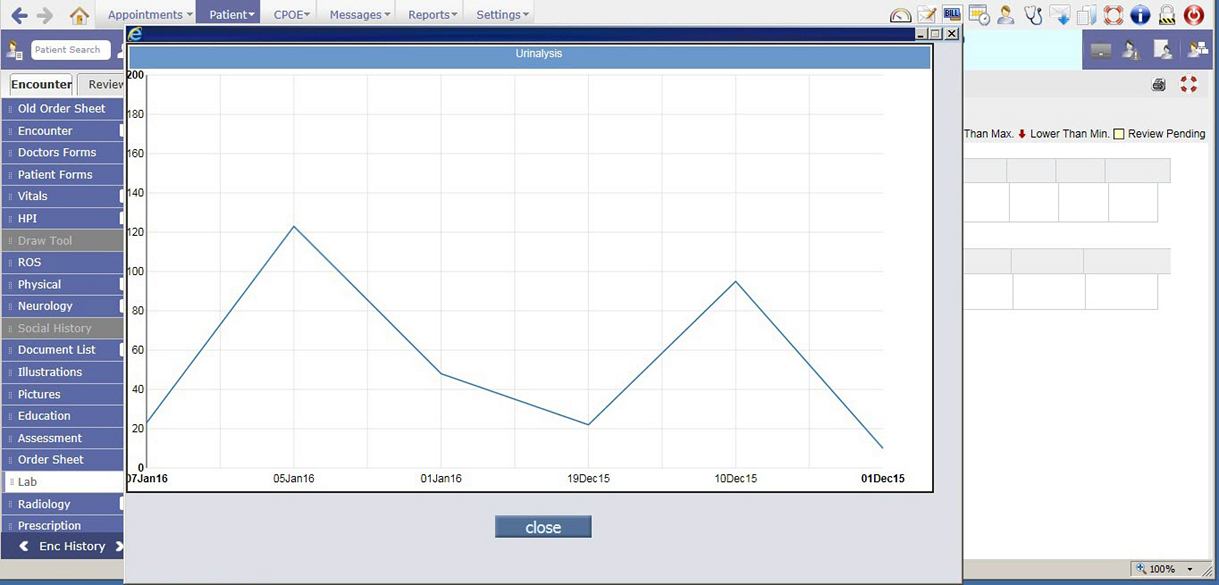
Example 2: Mis Graph
Navigation: Goto
menu Reports
→
click Mis Graph
Figure 12.5-3:
Old UI of Mis Graph displaying a sample pie graph, ‘Count of Patient visits type wise for a given period'
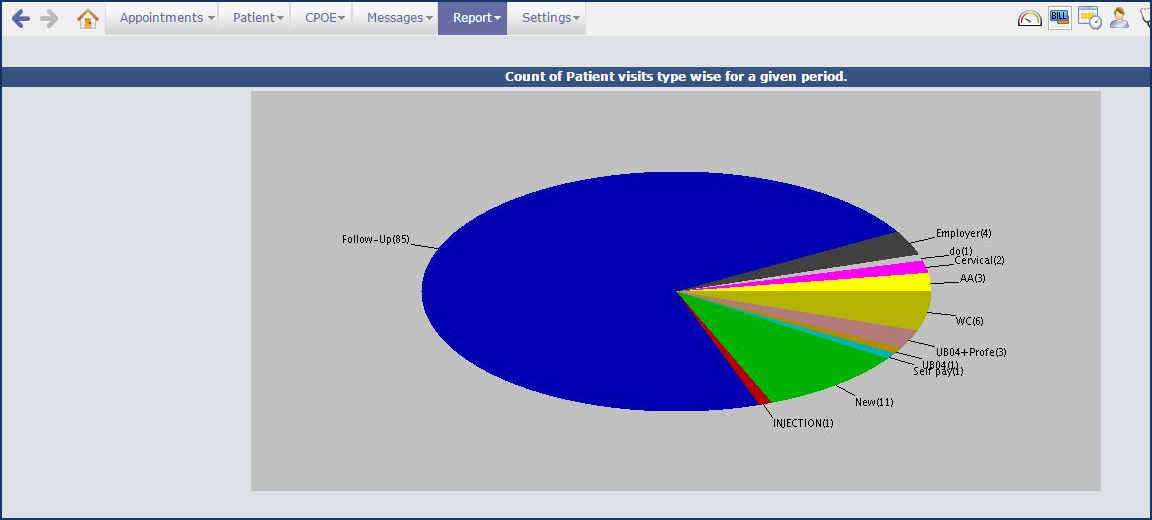
Figure 12.5-4:
New UI of Mis Graph displaying the same sample pie graph, ‘Count of Patient visits type wise for a given period'
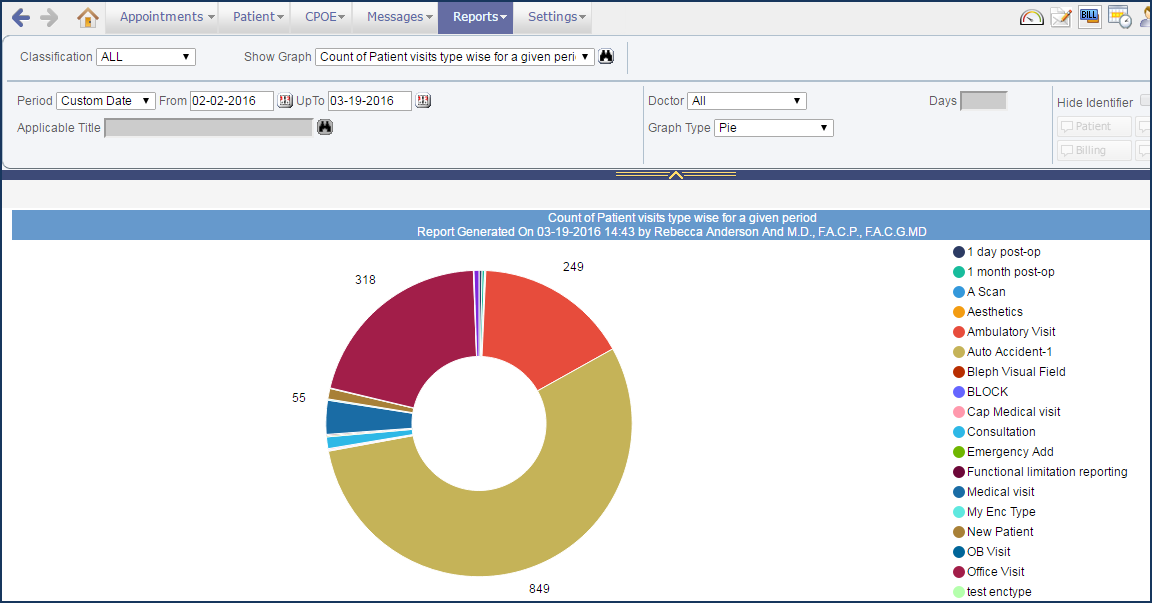
Note: The older libraries are no longer used.
|
|
|
| 12.6 |
List of newly added tags in Denali |
| |
Following is the list of newly added tags in
Denali:
Table 12.6-1: List of newly added tags
No. |
Tag |
Description |
Patient Tags |
1. |
PT_CLINICFORMS$ |
Displays a list of Clinic Forms used for a Patient based on the following tag’s extension values:
A – For All Clinic Forms
O – For Open Clinic Forms
C – For Closed Clinic Forms |
2. |
PT_FSS_PHS_HM_NOTES |
Displays Patient’s Health Maintenance notes. |
3. |
PT_FST_VAC_DONEALL_SCHOOL2 |
Displays the matrix of a Patient’s recommended vaccinations. |
Encounter Tags |
4. |
ENC_FST_VAC_DONEALL_SCHOOL2 |
Displays the matrix of recommended vaccinations present in current encounter. |
5. |
ENC_ATTENDING__NURSE$ |
Displays the details of the current encounter’s Attending Nurse. |
6. |
ENC_FSS_PHS_HM_NOTES |
Displays the Health Maintenance notes of the current Encounter. |
7. |
ENC_TEST_MEDIC$ |
Displays the Medics details for the entered Test code (which has Result Type as Master Search and Value as MEDICS) in the Template of current encounter.
The tag’s extension value is, < Test code >^< Medics tag >
|
8. |
ENC_CLINICFORMS |
Displays the list of Clinic Forms used in the current encounter. |
9. |
ENC_ORDERSHEET__PROCEDURE |
Displays details of all the Procedure ordered from the Ordersheet screen in the current encounter. |
Last Encounter Tags |
10. |
LASTENC_FST_VAC_DONEALL_SCHOOL2 |
Displays the matrix of recommended vaccinations present in the last encounter. |
11. |
LASTENC_ATTENDING__NURSE$ |
Displays the details of last encounter’s Attending Nurse. |
12. |
LASTENC_FSS_PHS_HM_NOTES |
Displays the Health Maintenance notes of the last Encounter. |
13. |
LASTENC_TEST_MEDIC$ |
Displays the Medics details for the entered Test code (which has Result Type as Master Search and Value as MEDICS) in the Template of last encounter.
The tag’s extension value is, < Test code >^< Medics tag >
|
14. |
LASTENC_CLINICFORMS |
Displays a list of Clinic Forms used in the last encounter. |
15. |
LASTENC_ORDERSHEET__PROCEDURE |
Displays details of all the Procedure ordered from the Ordersheet screen in the last encounter. |
Clinic Tags |
16. |
CL_ID |
Prints the Clinic ID displayed on the About PrognoCIS popup (from the Menu bar, click the Info icon: → Clinic Information section) in the Output template. |
Procedure Tags |
17. |
PROH_NAME_PROCEDURE |
Displays the Procedure name. |
18. |
PROH_NAME_PREPROCEDURAL |
Displays the assigned Pre Procedural Template name. |
19. |
PROH_NAME_PROCEDURAL |
Displays the assigned Procedural Template name. |
20. |
PROH_ORDER_NO |
Displays the Procedure Order number. |
21. |
PROH_ORDER_DATE |
Displays the Procedure Order date. |
22. |
PROH_ORDER_SCHEDULEDDATE |
Displays the scheduled date of Procedure Order. |
23. |
PROH_ORDER_SENTDATE |
Displays the sent date of the Procedure Order. |
24. |
PROH_ORDER_BYDOC$ |
Displays the details of Ordering doc for Procedure. |
25. |
PROH_ORDER_TODOC$ |
Displays the details of the Doctor to whom the Procedure Order is sent. |
26. |
PROH_ORDER_TOCC |
Displays the details of the Doctor to whom the Procedure Order is sent in CC. |
27. |
PROH_ORDER_ICDCODES |
Displays the ICD codes assigned to the Procedure Order. |
28. |
PROH_ORDER_ICDNAMES |
Displays the ICD codes along with its description that has been assigned to the Procedure Order. |
29. |
PROH_PROCEDURE_CPTHCPC$ |
Displays list of CPT/HCPC codes of the Procedure Template.
Permitted values after $ are:
C - Code
N - Name
U - Unit
M - Modifier
|
30. |
PROH_ORDER_PREAUTHNOS |
Displays the Pre-auth numbers assigned to the Procedure Order. |
31. |
PROH_ORDER_INSURANCE |
Displays the Insurance name if the Procedure Order has pre-auth number assigned. |
32. |
PROH_RESULT_PERFORMDATE |
Displays the Performed date of a Procedure Result. |
33. |
PROH_RESULT_PERFORMBY |
Displays the details of a Doctor who performed the Procedure Result. |
34. |
PROH_RESULT_PERFORMBY$ |
Displays the details of a Doctor who is present in PrognoCIS and has performed the Procedure Result. |
35. |
PROH_PROCEDURE_NOTES |
Displays the Notes of Procedure Template. |
36. |
PROH_PROCEDURE_RESULT |
Displays the Test Results of Procedure Template. |
37. |
PROH_PREPROCEDURAL_NOTES |
Displays the Notes of Pre Procedural Template. |
38. |
PROH_PREPROCEDURAL_RESULT |
Displays the Test Results of Pre Procedural Template. |
39. |
PROH_REVIEW__NOTES |
Displays the Review notes of the Procedure. |
Lab Order Header Tags |
40. |
LOH_ASSIGNED__ICDS910 |
Displays the ICD9 and ICD10 codes assigned to a Lab Order in the following format:
• ICD9(ICD10) in ICD9 encounter
• ICD10(ICD9) in ICD10 encounter
|
41. |
LOH_ASSIGNED__ICDS910$ |
Displays the ICD9 and ICD10 code of a specific serial number assigned to a Lab Order. Specify the serial number in the tag’s extension. |
Radiology Order Header Tags |
42. |
RAH_ASSIGNED__ICDS910 |
Displays the ICD9 and ICD10 codes assigned to a Radiology Order in the following format:
• ICD9(ICD10) in ICD9 encounter
• ICD10(ICD9) in ICD10 encounter |
43. |
RAH_ASSIGNED__ICDS910$ |
Displays the ICD9 and ICD10 code of a specific serial number assigned to a Radiology Order. Specify the serial number in the tag’s extension. |
Lab Order Details Tags |
44. |
LOD_ICD910__CODE |
Displays the ICD9 and ICD10 codes assigned to a Lab Order. |
45. |
LOD_ICD910__CODENAME |
Displays the ICD9 and ICD10 codes along with its description that has been assigned to a Lab Order. |
Radiology Order Details Tags |
46. |
RAD_ICD910__CODE |
Displays the ICD9 and ICD10 codes assigned to a Radiology Order. |
47. |
RAD_ICD910__CODENAME |
Displays the ICD9 and ICD10 codes along with its description that has been assigned to a Radiology Order. |
Consult Letter Tags (To be entered manually) |
48. |
_LETTER_CSH_NAME |
Displays the Consult name. |
49. |
_LETTER_CSH_ORDER_NO |
Displays the Consult Order number. |
50. |
_LETTER_CSH_ORDER_DATE |
Displays the Consult Order date. |
51. |
_LETTER_CSH_ORDER_SENTDATE |
Displays the sent date of the Consult Order. |
52. |
_LETTER_CSH_ORDER_BYDOC_NAME |
Displays the name of the Ordering doc for Consult. |
53. |
_LETTER_CSH_ORDER_TODOC_NAME |
Displays the name of a Doctor to whom the Consult Order is sent. |
54. |
_LETTER_CSH_ORDER_BYDOC_ADD |
Displays the Consult’s Ordering doc address. |
55. |
_LETTER_CSH_ORDER_TODOC_ADD |
Displays the address of a Doctor to whom the Consult Order is sent. |
56. |
_LETTER_CSH_ORDER_TOCC |
Displays the details of a Doctor to whom the Consult Order is sent in CC. |
57. |
_LETTER_CSH_ORDER_REASON |
Displays the Consult Order’s reason. |
58. |
_LETTER_CSH_ORDER_ICDCODES |
Displays the ICD codes assigned to the Consult Order. |
59. |
_LETTER_CSH_ORDER_ICDCODENAMES |
Displays the ICD codes along with its description assigned to the Consult Order. |
60. |
_LETTER_CSH_RESULT__DATE |
Displays the Consult’s Result date. |
61. |
_LETTER_CSH_REVIEW__NOTES |
Displays the Consult Response’s review notes. |
External Procedure Letter Tags (To be entered manually) |
62. |
_LETTER_PROH_NAME_PROCEDURE |
Displays the Procedure’s name. |
63. |
_LETTER_PROH_NAME_PREPROCEDURAL |
Displays the assigned Pre Procedural’s Template name. |
64. |
_LETTER_PROH_NAME_PROCEDURAL |
Displays the assigned Procedural’s Template name. |
65. |
_LETTER_PROH_ORDER_NO |
Displays the Procedure Order number. |
66. |
_LETTER_PROH_ORDER_DATE |
Displays the Procedure Order date. |
67. |
_LETTER_PROH_ORDER_SCHEDULEDDATE |
Displays the scheduled date of the Procedure Order. |
68. |
_LETTER_PROH_ORDER_SENTDATE |
Displays the sent date of the Procedure Order. |
69. |
_LETTER_PROH_ORDER_BYDOC_NAME |
Displays the name of the Ordering doc for Procedure. |
70. |
_LETTER_PROH_ORDER_BYDOC_ADD |
Displays the address of the Ordering doc for Procedure. |
71. |
_LETTER_PROH_ORDER_TODOC_NAME |
Displays the name of the Doctor to whom the Procedure Order is sent. |
72. |
_LETTER_PROH_ORDER_TODOC_ADD |
Displays the address of the Doctor to whom the Procedure Order is sent. |
73. |
_LETTER_PROH_ORDER_TOCC |
Displays the details of the Doctor to whom the Procedure Order is sent in CC. |
74. |
_LETTER_PROH_ORDER_ICDCODES |
Displays the ICD codes assigned to the Procedure Order. |
75. |
_LETTER_PROH_ORDER_ICDCODENAMES |
Displays the ICD codes along with its description that has been assigned to the Procedure Order. |
76. |
_LETTER_PROH_ORDER_PREAUTHNOS |
Displays the Pre-auth numbers assigned to the Procedure Order. |
77. |
_LETTER_PROH_ORDER_INSURANCE |
Displays the Insurance name if the Procedure Order has been assigned the pre-auth number. |
|
|
|
| 12.7 |
List of newly defined properties in Denali |
| |
Following is the list of newly defined properties Denali:
Table 12.7-1: List of newly defined properties
No. |
Property Tag |
Help |
1. |
prognocis.dbanalysis.password |
Enter the text that is to be made as the password for DB Analysis. If left blank then default password is considered. |
2. |
icd.drilldownsearch.locations |
Enter the comma separated values of locations codes to display ICD Drill Down search feature in a multi-location environment. If left as blank then older search is available.
Note: The property is specific to Doctor Form only. |
3. |
prognocis.autosave.rule |
If set to 'AUTOSAVE' then confirmation popup is NOT displayed and any changes made are automatically saved. If set to 'CONFIRM' then Confirmation popup is displayed and User is prompted to either save or not save the details. If set to 'IGNORE' then confirmation popup is NOT displayed and any changes made are ignored (not saved).
Note: Changes to this property are not reflected unless a User logs out of PrognoCIS. |
4. |
assessment.use.scrubber.checks |
If the property is turned ON then the Scrubber Checks link is available in menu: Settings
→ Configuration
→ under Workflow column for defining the conditions and if these conditions are met then a popup is displayed on the Assessment screen. If the property is turned OFF then neither the Scrubber Checks link is available nor is the popup displayed on the Assessment screen. |
5. |
interface.process.notworking.mailto |
Enter the email ID of the person who should receive an email in case the process does not work due to technical reasons. |
6. |
order.assign.icds.rule |
Select any one appropriate value to assign ICDs to the Lab/Rad/Consult/Procedure test. If A is selected then all Assessment ICDs are assigned to tests automatically; if X is selected then all non-assessment ICDs are assigned to tests automatically; if P is selected then only the Primary Assessment ICD is assigned to test automatically; if B is selected then both Assessment and non-Assessment ICDs are assigned to test automatically; and if N is selected then no ICDs are assigned to tests automatically, user has to manually assign ICDs to the tests. The default value of the property is A. |
7. |
medics.name.format.RS |
Defines the format for Display Name of Resource. Use TLFMIQ with separators. (Title/Last/First/Middle/Initial/Qualification). This property is not for end User, it is for Support or Implementer. After changing this property either each record of existing Resource need to be saved explicitly to take the changed effect in display name or run the process, SetMedicsDisplayName to set the display name for all existing Resource display names. |
8. |
vaccination.codes.forschools2 |
Select the Vaccine codes that are recommended by schools. The selected Vaccines are displayed in a matrix on the Encounter Output templates. |
9. |
search.consultrefdoc.table |
Database table name. |
10. |
consult.orderno.prefix |
Enter the prefix to be Used for Consult Order Number Generation. Special characters in prefix are: YY for calendar Year, MM for Month number, DR for initial of Ordering doctor and LOC for Ordering Docs Location Code. |
11. |
consult.orderno.length |
Enter the number of digits of Generated Serial Number used in Consult Order Number Generation. This does not include the Prefix. The total length including the prefix should not exceed 10 characters. |
12. |
consult.result.consolidated.file.sequence |
Select the sequence in which the
Consult Response should be displayed as consolidated file. The valid values are L (L: Letter in attachments) or A (A: Result Attachment) or LA to indicate Letters in attachments followed by Result Attachment (if any) or AL to indicate
Consult Response Attachment followed by Letter in attachments respectively. The default value is blank. |
13. |
prognocis.attach.consult.maxdays |
Enter the maximum number of days for which the Consult
Response should be available for attachment from Message
→ Attach Center/Scan and Patient
→ Letters-In screens. The default value of the property is 90 days. |
14. |
consult.result.reviewed.by |
Select one or multiple character values to be assigned to the property that determines the Users who can review the Consult Response and add Review Notes for the same. If the property is left blank then by default, all the values are considered. |
15. |
procedure.orderno.length |
Enter the number of digits of Generated Serial Number used in External Procedure Order Number Generation. This does not include the Prefix. The total length including the prefix should not exceed nine characters. |
16. |
procedure.orderno.prefix |
Enter the prefix to be Used for Procedure Order Number Generation. Special characters in prefix are: YY for calendar Year, MM for Month number, DR for initial of Ordering doctor and LOC for Ordering Docs Location Code. |
17. |
procedure.ext_orderno.length |
Enter the number of digits of Generated Serial Number used in External Procedure Order Number Generation. This does not include the Prefix. The total length including the prefix should not exceed nine characters. |
18. |
procedure.ext_orderno.prefix |
Enter the prefix to be Used for External Procedure Order Number Generation. Special characters in prefix are: YY for calendar Year, MM for Month number, DR for initial of Ordering doctor and LOC for Ordering Docs Location Code. |
19. |
procedure.result.reviewed.by |
Select one or multiple character values to be assigned to the property that determines the Users who can review the Procedure Results and add Review Notes for the same. If the property is left blank then by default, all the values are considered. |
20. |
prognocis.attach.procedure.maxdays |
Enter the maximum number of days for which the Procedure results should be available for attachment from Message
→ Attach Center/Scan and Patient
→ Letters-In screens. The default value of the property is 90 days. |
21. |
consult.doctor.fullaccess |
Turn ON the property to allow access to all Consults for Users having the User role as Doctor else turn it OFF to allow access only to the respective Primary Provider, Attending Provider, and Ordering Provider. |
22. |
consult.nurse.fullaccess |
Turn ON the property to allow access to all Consults for Clinical Staff having the User role as Nurse else turn it OFF to allow access only to Clinical Staff assigned to Primary Provider(s) and/or Attending Provider, and/or Ordering Provider. |
23. |
procedure.doctor.fullaccess |
Turn ON the property to allow access to all Procedures for Users having the User role as Doctor else turn it OFF to allow access only to the respective Primary Provider, Attending Provider, and Ordering Provider. |
24. |
procedure.nurse.fullaccess |
Turn ON the property to allow access to all Procedures for Clinical Staff having the User role as Nurse else turn it OFF to allow access only to Clinical Staff assigned to Primary Provider(s) and/or Attending Provider, and/or Ordering Provider. |
25. |
search.procedure.table |
Database table name. |
26. |
search.consultordattfax.table |
Database table name. |
27. |
search.procedureordattfax.table |
Database table name. |
28. |
search.proctemplate.table |
Database table name. |
29. |
search.emprefund.table |
Database table name. |
30. |
search.copyptproclist.table |
Database table name. |
31. |
search.interface.table |
Database table name. |
32. |
search.spltemp.table |
Database table name. |
33. |
search.propTemplate.table |
Database table name. |
34. |
search.proptestcodes.table |
Database table name. |
35. |
search.proprole.table |
Database table name. |
36. |
search.consultorder.table |
Database table name. |
37. |
search.procedureorder.table |
Database table name. |
38. |
search.cpencdateinfo.table |
Database table name. |
39. |
search.vendors2.table |
Database table name. |
System level properties that are now configurable for Admin |
40. |
medics.udf.support |
Turn ON the property to support the User defined Fields in Medics Master else turn it OFF. |
41. |
patient.udf.support |
Turn ON the property to support the User defined Fields in Patient Master else turn it OFF. |
42. |
udf.encounter.tbl1 |
Enter the title for Encounter User Defined Fields Table 1. |
43. |
udf.encounter.tbl2 |
Enter the title for Encounter User Defined Fields Table 2. |
44. |
udf.encounter.tbl3 |
Enter the title for Encounter User Defined Fields Table 3. |
45. |
udf.encounter.tbl4 |
Enter the title for Encounter User Defined Fields Table 4. |
46. |
udf.encounter.tbl5 |
Enter the title for Encounter User Defined Fields Table 5. |
47. |
udf.supported.types |
Select one or multiple values to be assigned to the property that determines the supported User Defined Field Types. |
|
|
|
| 12.8 |
List of newly added/updated icons in Denali |
| |
Following is the list of
newly added/updated icons in Denali:
Table 12.8-1: List of
newly added/updated icons
No. |
Icon name |
Old icon
(if applicable) |
New icon |
Description |
1. |
Refresh |
|
|
Available on the Progress Notes and Appointment Scheduler screens. It refreshes the respective screen. |
2. |
Patient Info |
|
|
Available on Letters-Out screen and Order Sheet screen. It displays the Patient’s demographic details. |
3. |
Patient Appointment History |
|
|
Available on Appointment Schedule popup. It displays the Appointment history of the selected Patient. |
4. |
Expand TOC |
NA |
|
Available on the Order Sheet screen. It is used to avail the Encounter TOC. |
5. |
NA |
NA |
|
Available on the Order Sheet screen. It indicates that there are data present in the respective accordion. |
6. |
Order date |
NA |
|
Available on the Order Sheet screen (Goto: Patient’s Encounter
→ Encounter TOCà Order Sheet
→ Last Order/Result column for the Lab/Radiology). It indicates the Last Order date of the Lab/Radiology Order. |
7. |
Result date |
NA |
|
Available on the Order Sheet screen (Goto: Patient’s Encounter
→ Encounter TOC
→ Order Sheetà Last Order/Result column for the Lab/Radiology). It indicates the Last Result date of the Lab/Radiology Order. |
8. |
Comments |
|
|
Available on the Order Sheet screen. It invokes a popup to enter or display comments for the Lab/Radiology Order. |
9. |
Search |
|
|
Available on the Order Sheet screen. It invokes the search popup. |
10. |
Delete |
|
|
Available on the Order Sheet screen. It deletes the respective Lab/Radiology test. |
11. |
Calendar |
|
|
Available on the Order Sheet screen. It invokes the calendar. |
12. |
Add Past ICD Code |
|
|
Available on the Order Sheet screen. It invokes the Past ICD code search popup for the Lab/Radiology Order. |
13. |
Assign ICDs to all test(s) |
|
|
Available on the Order Sheet screen. It invokes the Assign ICD code popup for the Lab/Radiology Order. |
14. |
Now |
|
|
Available on the Order Sheet screen. It populates the current date and time for the Lab/Radiology Order. |
15. |
Label Print |
|
|
Available on the Order Sheet screen. It prints the label for Lab/Radiology Order. |
16. |
Collection Details |
|
|
Available on the Order Sheet screen. It displays the collection details of the Lab/Radiology Order. |
17. |
Required Data |
|
|
Available on the Order Sheet screen. It displays the required data of the Lab/Radiology Order. |
18. |
Recurrence |
|
|
Available on the Order Sheet screen. It is used to set the recursive pattern of the Lab/Radiology Order. |
19. |
Sample Specs |
|
|
Available on the Order Sheet screen. It displays the comments for the respective Lab test. |
20. |
Education |
|
|
Available on the Order Sheet screen. It displays the education material for the respective Lab test. |
21. |
Test Alert |
|
|
Available on the Order Sheet screen. It displays the alert for the respective Radiology test. |
22. |
Medical Necessity Notes |
|
|
Available on the Order Sheet screen. It displays the notes for the respective Radiology test. |
23. |
Preview |
|
|
Available on the Order Sheet screen. It is used to preview the respective Lab/Radiology/Consult/Procedure Order. |
24. |
Print |
|
|
Available on the Order Sheet screen. It is used to print the respective Lab/Radiology/Consult/Procedure Order. |
25. |
Fax |
|
|
Available on the Order Sheet screen. It is used to fax the respective Lab/Radiology/Consult Order. |
26. |
eSend |
|
|
Available on the Order Sheet screen. It is used to eSend the respective Lab/Radiology Order. |
27. |
Email |
NA |
|
Available on the Order Sheet screen. It is used to email the respective Consult Order. |
28. |
Download |
NA |
|
Available on the Order Sheet screen. It is used to download the respective Consult Order. |
29. |
Attachment |
NA |
|
Available on the Order Sheet screen. It is used to attach document to the respective Consult Order. |
30. |
Set Sequence |
NA |
|
Available on the Order Sheet screen. It is used to set sequence of the attached document in the respective Consult Order. |
31. |
CPT/HCPC |
NA |
|
Available on the Order Sheet screen. It displays the optional CPT/HCPC associated to the respective Procedure Order. |
32. |
Past ICD |
NA |
|
Available on the Order Sheet (for Procedure Order) and HPI screens. It displays the past ICD codes associated to the respective encounter. |
33. |
Copy |
|
|
Available on the Order Sheet (for Procedure Order) and HPI screens. It is used to copy the respective Procedure/HPI from the existing encounters. |
34. |
Face Sheet |
NA |
|
Available on the Order Sheet (for Procedure Order). It is used to view the Patient’s Face Sheet. |
35. |
Document List |
NA |
|
Available on the Order Sheet (for Procedure Order). It is used to view the Patient’s Document List. |
36. |
Doctor Form |
NA |
|
Available on the Order Sheet (for Procedure Order). It is used to view the associated Doctor Form. |
37. |
Review |
NA |
|
Available on the Order Sheet (for Procedure Order). It is used to Add review comments to the Procedure Order for the results received. |
38. |
Share |
NA |
|
Available on the Document List screen. It is used to share the respective document on the Portal(s). |
39. |
Copy of System |
NA |
|
Available on each of the Test Exec (i.e. Vitals, HPI, ROS, Physical, Specialty, and Clinic Forms) template screens (Goto menu: Settings
→ click Configuration) to facilitate copying of the selected system along with all its tests. |
40. |
Color Picker |
NA |
|
Available on Pictures, Illustrations, Graph Master, Enc Types Master, Locations Master, and Properties. It is used to set the color for the respective element. |
41. |
Increase Font |
|
|
Available on the Reports. It is used to increase the font size of the Report. |
42. |
Decrease Font |
|
|
Available on the Reports. It is used to decrease the font size of the Report. |
43. |
Save as |
|
|
Available on the Reports. It is used to save the Report with different name. |
44. |
Export CSV XML |
|
|
Available on the Reports. It is used to export the CSV XML. |
45. |
SHA Key for CSV Report |
|
|
Available on the Reports. It is used to generate the SHA Key for CSV Report. |
46. |
Save Sample |
|
|
Available on the Reports. It is used to save the report as sample. |
|
|
|
| 12.9 |
List of Supported Events added for Consult and Procedure in Denali |
| |
Following is the list of newly added Supported Events for Consult and Procedure in Denali:
Table 12.9-1: List of newly added Supported Events
No. |
Supported Event |
Description |
For Consult |
1. |
217 |
A notification is sent to the Ordering Provider when a Consult Order is saved and approved
from Order Sheet or CPOE by the
Nurse having approved rights and the login person is other than the Provider. |
2. |
218 |
An alert is sent to the Ordering Provider when a Consult Order is saved
from Order Sheet or CPOE by the
Nurse and she does not have approved rights and the login person is other than the
Provider. |
3. |
219 |
A notification is sent to the Ordering Provider when a Consult Order is sent
from Order Sheet or CPOE and the login person is other than the
Provider. |
4. |
220 |
A notification is sent to the Ordering Provider when a Consult Response
is attached from Order Sheet or CPOE (Consult Response tab) by a Nurse having approved rights and the login person is other than the Provider. |
5. |
221 |
An alert is sent to the Ordering Provider when a Consult Response
is attached from from Order Sheet or CPOE (Consult Response tab) by a Nurse who does not have approved rights and the login person is other than the Provider. |
6. |
222 |
An alert message is sent to the Ordering Provider when a file is attached to a Consult Response from
Message Attach center/Message Scan/Letter In. |
7. |
224 |
An alert is sent to the sender of fax, if fax sent Failed for Consult. |
For Procedure |
8. |
223 |
An alert message is sent to the Ordering Provider when a file is attached to a
Procedure Result from Message Attach center/Message Scan. |
9. |
225 |
A notification is sent to the Ordering Provider when a Procedure
Order is saved from Order Sheet, CPOE, or TOC > Procedure and approved by the Nurse having approved rights and the login person is other than the
Provider. |
10. |
226 |
An alert is sent to the Ordering Provider when a Procedure Order is saved from Order Sheet, CPOE, or TOC > Procedure by the
Nurse and she does not have approved rights and the login person is other than the
Provider. |
11. |
227 |
A notification is sent to the Ordering Provider when a Procedure
Order is sent from Order Sheet, CPOE, or TOC > Procedure and the login person is other than the Provider. |
12. |
228 |
A notification is sent to the Ordering Provider when a Procedure Result is entered and approved
from Order Sheet, CPOE, or TOC > Procedure by the
Nurse having approved rights and the login person is other than the Provider. |
13. |
229 |
An alert is sent to the Ordering Provider when a Procedure Result is saved
from Order Sheet, CPOE, or TOC > Procedure by the
Nurse and she does not have approved rights and the login person is other than the
Provider. |
14. |
230 |
An alert is sent to the sender of fax, if fax sent Failed for External Procedure. |
|
|
|
| 12.10 |
List of obsolete tags in Denali |
| |
Following is the list of obsolete tags in Denali:
Table 12.10-1: List of obsolete tags
No. |
Tag |
1. |
PT_CASEMGMT |
2. |
PT_CASEMGMT_CASENO |
3. |
PT_CASEMGMT_INJURYDT |
4. |
PT_CASEMGMT_INJURYPLACE |
5. |
PT_CASEMGMT_BODYPART |
6. |
PT_CASEMGMT_DISABILITY |
7. |
PT_CASEMGMT_WCAB |
8. |
PT_CASEMGMT_QME |
9. |
PT_CASEMGMT_LIEN |
|
|
|
| 12.11 |
List of obsolete properties in Denali |
| |
Following is the list of obsolete properties in Denali:
Table 12.11-1: List of obsolete properties
No. |
Property |
1. |
assessment.autocopy |
2. |
assessment.cpt.copy |
3. |
assessment.cpt.useonly.pref |
4. |
assessment.goals.copy |
5. |
assessment.icd.copy |
6. |
assessment.notes.copy |
7. |
CCD.export.show.sections |
8. |
enc.close.remain.onclosescreen |
9. |
encounter.addnew.apptdoctor.sameaslogindoctor |
10. |
hl7.export.appointment.filename |
11. |
hl7.export.appt |
12. |
hl7.export.appt.backup |
13. |
hl7.export.charge.filename |
14. |
hl7.export.lab.order.filename |
15. |
hl7.export.patient |
16. |
hl7.export.patient.backup |
17. |
hl7.export.patient.filename |
18. |
hl7.export.rad.order.filename |
19. |
hl7.export.vacc.usewebservice |
20. |
hl7.import.appt |
21. |
hl7.import.appt.backup |
22. |
hl7.import.appt.patient.chartnorule |
23. |
hl7.import.appt.patient.searchpriority |
24. |
hl7.import.lab.result.filename |
25. |
hl7.import.labresult |
26. |
hl7.import.labresult.backup |
27. |
hl7.import.labresult.patient.chartnorule |
28. |
hl7.import.labresult.patient.searchpriority |
29. |
hl7.import.patient |
30. |
hl7.import.patient.backup |
31. |
hl7.import.patient.chartnorule |
32. |
hl7.import.patient.filename |
33. |
hl7.import.rad.result.filename |
34. |
hl7.log.export |
35. |
hl7.log.folder.life |
36. |
hl7.log.import |
37. |
hl7.patient.searchpriority |
38. |
hl7.status.complete |
39. |
home.max.days |
40. |
ipaq.facesheet.cell_ALG |
41. |
ipaq.facesheet.cell_count |
42. |
ipaq.facesheet.cell_CURRMED |
43. |
ipaq.facesheet.cell_FAMHST |
44. |
ipaq.facesheet.cell_HM |
45. |
ipaq.facesheet.cell_PERSNOTES |
46. |
ipaq.facesheet.cell_PRBLST |
47. |
ipaq.facesheet.cell_SGR |
48. |
ipaq.facesheet.cell_SOCHST |
49. |
ipaq.facesheet.cell_SPECIALNOTES |
50. |
ipaq.facesheet.cell_VACC |
51. |
login.expression.applicablefor |
52. |
login.language |
53. |
login.types |
54. |
mail.appt.followup.message |
55. |
mail.appt.phs.message |
56. |
mail.appt.resch.message |
57. |
mail.appt.tentative.message |
58. |
mail.appt.upcomingappt.message |
59. |
mail.appt.vac.message |
60. |
mail.birthdate.message |
61. |
mail.birthdate.subject |
62. |
mail.greetings.subject |
63. |
mail.login.message |
64. |
mail.login.subject |
65. |
nqf.0421.no.phexam.med.code |
66. |
nqf.0421.no.phexam.pat.code |
67. |
nqf.0421.no.phexam.sys.code |
68. |
os.orderset.use |
69. |
os.populate.preftest |
70. |
os.processorder.fromrx |
71. |
os.send.unchecked |
72. |
patient.ssn.mask4print |
73. |
portal.doctorband.tag.r2.c3 |
74. |
portal.patientband.tag.r2.c3 |
75. |
portal.facesheet.cell_ALG |
76. |
portal.facesheet.cell_count |
77. |
portal.facesheet.cell_CURRMED |
78. |
portal.facesheet.cell_FAMHST |
79. |
portal.facesheet.cell_PHS |
80. |
portal.facesheet.cell_PRBLST |
81. |
portal.facesheet.cell_SGR |
82. |
portal.facesheet.cell_SOCHST |
83. |
portal.facesheet.cell_VACC |
84. |
prc.order.max_rows |
85. |
prognocis.dontshow.confirm |
86. |
prognocis.schprocess.count |
87. |
report.tabular.maxlistsize |
88. |
rx.stateLicenseNumber.medicsids |
89. |
schprocess.1.active |
90. |
schprocess.1.freqnum |
91. |
schprocess.2.active |
92. |
schprocess.2.freqnum |
93. |
schprocess.3.active |
94. |
schprocess.3.freqnum |
95. |
schprocess.4.active |
96. |
schprocess.4.freqnum |
97. |
schprocess.5.active |
98. |
schprocess.5.freqnum |
99. |
show.spellcheck.4PNLT |
100. |
specialty.copy.abnormal |
101. |
specialty.copy.carryforward |
102. |
test.hl7.add.inactive |
103. |
vaccination.schedule.from.upto |
104. |
vaccination.show.from.upto |
|
|
|