
Denali 3.1 Build No: 1
![]()
EMR Release Notes
Table of Contents
Important Note: Denali is the latest version of PrognoCIS and is supported with Compatibility View Settings OFF for IE 11 browser.
2.1 Demographics related changes done on Patient Registration screen
2.2 Provision to add Implanted Devices record
2.2.4 Implementation in PrognoCIS
2.2.5 On Patient Registration screen
2.2.7 On TOC à Implanted Device(s)
2.2.8 Tags related to Implanted Devices
3.1 Provision to change, cancel, and fill prescribed Rx on the Prescription screen
3.2 Provision to add Family History Problems based on SNOMED codes
3.3 Provision to provide Education material based on Patient’s preferred language
3.4 Provision to import the Immunization History and Forecast from Registry
3.5 Newer version of CCD is now available with UI changes
3.6 The Adverse Event type of Allergy is now imported from CCD..
3.7 Provided NQF definitions for all 26 measures as per 2017 performance period
3.8 A new column, Problem Control has been added on the Past Medical History screen
3.10 A new field, TOC Visit Status has been provided on the Edit Existing Encounter screen
4.1 Provision to send new Continuity of Care Document and Referral Notes (CCD) from PrognoCIS
4.2 Provided a new checkbox, ‘SOC Req’ on the Letters-Out screen
5.1 A new sub-menu has been provided to record the Patient’s care plan
6.1 New MU and QPP reports provided for 2017 performance period.
6.2 Provided QRDA1 and QRDA3 reports as per 2017 performance period.
6.3 User can export the QRDA1 and QRDA3 reports
6.4 Patient and Additional filters are now available for QRDA1 and QRDA3 reports
6.5 Actions such as activating/deactivating User and assigning/removing User role is now audited
6.6 The action of Export/Download is now audited in the Audit Trail Report
7.1 The UI of MU/QPP Settings popup has been changed
7.2 Provision given to export the NAMCS Health Care Survey type of CCD from PrognoCIS
7.3 Provision given to import the QRDA1 file into PrognoCIS
7.4 NQF measure is calculated for the imported QRDA1 file
7.5 Provision to set multiple parameters for the Patient Data export
7.6 Enhancements related to Clinical Decision Support (CDS) feature
7.7 Provision to associate LOINC code to the Social History Test Result values
7.8 Provision to send Syndromic Surveillance messages as per MU3
8.1 Label changes done in PrognoCIS
8.2 List of newly added Properties in PrognoCIS
8.3 List of newly added tags in PrognoCIS
Important Note: Denali is the latest version of PrognoCIS and is supported with Compatibility View Settings OFF for IE 11 browser.
Following are the browsers with version numbers that are supported by PrognoCIS Denali:
|
Browser |
Version |
|
Internet Explorer |
11 |
|
Safari |
9.1 |
|
Chrome |
45 and above |
|
Mac OS |
OS X EI Capitan |
|
iPhone iOS |
6 and above |
|
iPad iOS |
9 and above |
|
Android OS |
4.1 Jelly Bean and above |
![]() Note: IE and Chrome
browsers are supported on
Windows 7 and above.
Note: IE and Chrome
browsers are supported on
Windows 7 and above.
1 Introduction
· The release notes describe the various new features and enhancements carried out in the new version, PrognoCISTM Denali Build 1 with the specifications and UI details wherever applicable.
· ‘User’ mentioned in the document is any PrognoCISTM User within their permissible rights assigned to their role.
· The term, ‘System’ and ‘application’ are being interchangeably used to refer to PrognoCISTM application.
· Patient information within images is not real or at times may be blurred to safeguard Clinic information.
2 Patient – Register
2.1 Demographics related changes done on Patient Registration screen
Gender related changes:
Navigation Goto menu Patient à Register
· An additional option, Unknown has been provided in the Sex dropdown list. Refer to figure 1
Figure 2.1-1: ‘Unknown’ option in Sex dropdown list
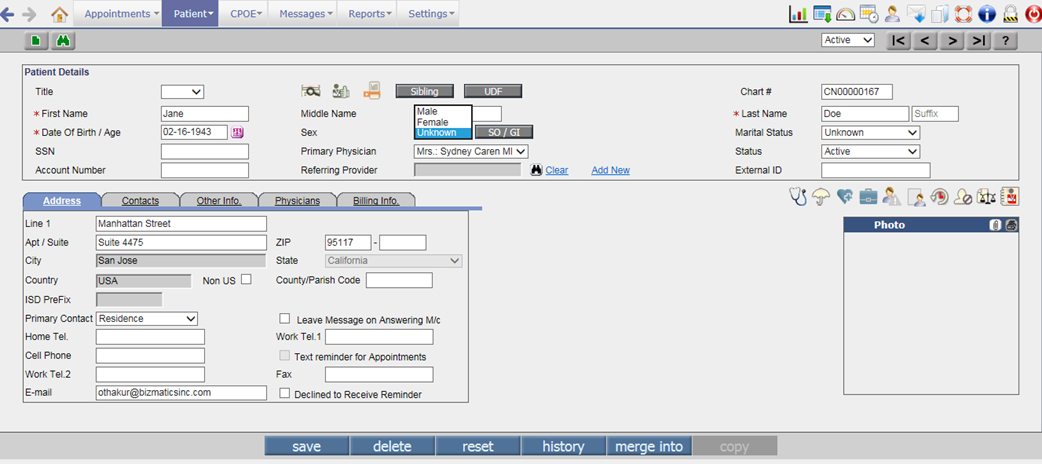
![]() Note: User cannot set Unknown option as default value
for Sex field on the Patient registration screen.
Note: User cannot set Unknown option as default value
for Sex field on the Patient registration screen.
· A new button, SO/GI has been added next to Sex dropdown list on the Patient Registration screen. From SO/GI button, a User has provision to enter the Patient’s Sexual Orientation and Gender Identity details. Refer to figure 2
Figure 2.1-2: Patient SO/GI Details popup
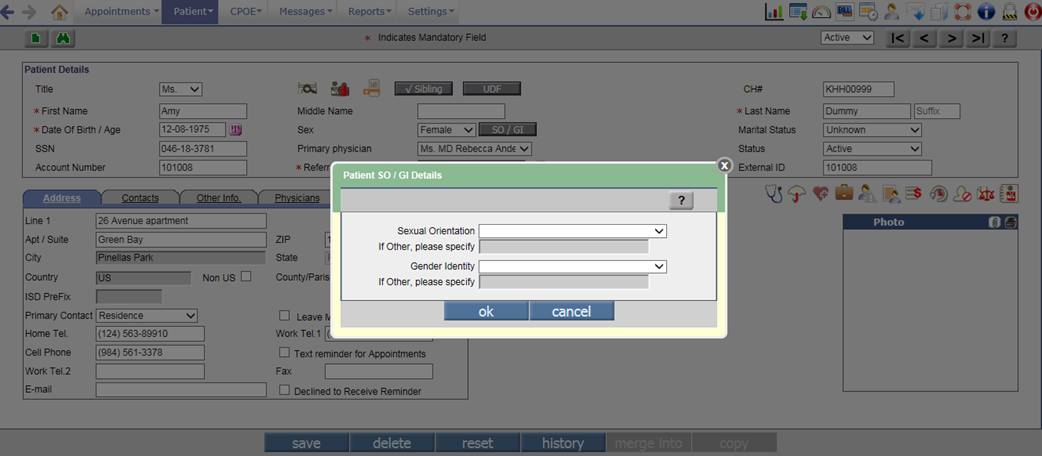
· The Patient SO/GI Details popup that is invoked on click of SO/GI button consist of two dropdown lists, Sexual Orientation and Gender Identity. Both dropdown lists have fixed set of values with SNOMED code assigned to it that is sent in CCD. Following is the list of values with its respective SNOMED codes:
|
Sexual Orientation |
|
|
Value |
SNOMED Code |
|
Straight or Heterosexual |
20430005 |
|
Lesbian, Gay, or Homosexual |
38628009 |
|
Bisexual |
42035005 |
|
Other |
OTH |
|
Not Known |
UNK |
|
Chose not to disclose |
ASKU |
|
Gender Identity |
|
|
Value |
SNOMED Code |
|
Male |
446151000124109 |
|
Female |
446141000124107 |
|
Female-to-Male (FTM) |
407377005 |
|
Transgender Male |
407377005 |
|
Trans Man |
407377005 |
|
Male-to-Female (MTF) |
407376001 |
|
Transgender Female |
407376001 |
|
Trans Woman |
407376001 |
|
Genderqueer, neither exclusively male nor female |
446131000124102 |
|
Other |
OTH |
|
Chose not to disclose |
ASKU |
· When the Other option is selected for Sexual Orientation or Gender Identity, the If Other, please specify field displays enable for a User to enter other required Sexual Orientation and Gender Identity details. In case, a User doesn’t specify other details then on click of ok button, an alert, “Please specify other Sexual Orientation and Gender Identity.” is displayed. The maximum character limit for If Other, please specify field is 50.
· If any or both the fields on Patient SO/GI Details popup are left blank then on click of ok button, a confirmation message, “You have not added Sexual Orientation / Gender Identity details. Do you want to add it now?” is displayed. Refer to figure 3
Figure 2.1-3: Confirmation message if the Patient SO/GI details are not added
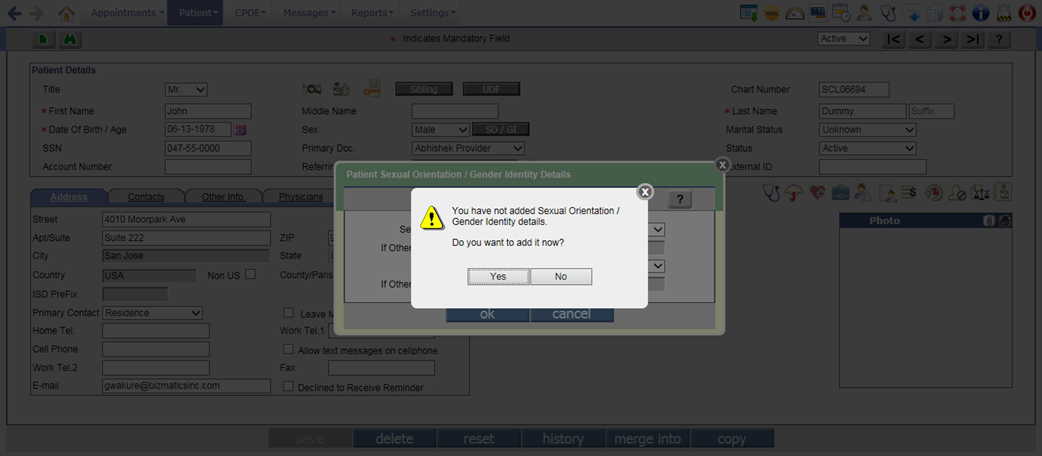
· On click of Yes button, the Patient SO/GI Details popup keeps displaying for a User to enter the respective details; whereas on click of No button, the Patient SO/GI Details popup is closed.
· Once the SO/GI details are added when a User saves the Patient record, the checkmark is displayed on the SO/GI button indicating that the respective details are present.
· The following new tags have been added to display its respective details:
|
Tag |
Description |
|
PT_SEXUAL__ORIENTATION_CODE |
Displays the code of Patient’s Sexual Orientation. |
|
PT_SEXUAL__ORIENTATION_NAME |
Displays the Patient’s Sexual Orientation. |
|
PT_GENDER__IDENTITY_CODE |
Displays the code of Patient’s Gender Identity. |
|
PT_GENDER__IDENTITY_NAME |
Displays the Patient’s Gender Identity. |
Provision to add suffix to a Patient’s name:
· A new text field, Suffix has been added beside the Patient’s Last Name field to add suffix for the Patient’s first name. It is a non-mandatory field. Refer to figure 4
Figure 2.1-4: Suffix field on the Patient Registration screen
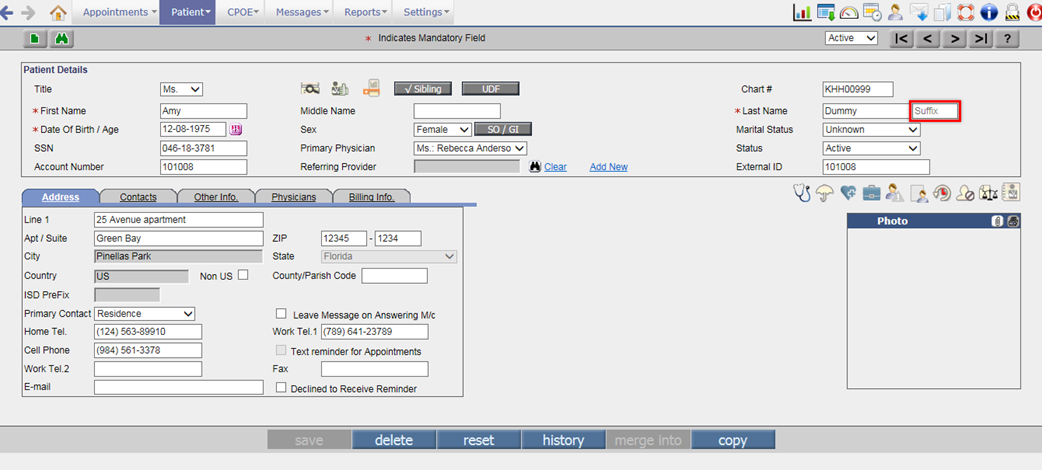
· The suffix is always displayed in first caps and the maximum number of characters allowed in the field is 10.
· A User would need to set the value, S in the property, patient.name.format for showing Suffix in the Patient Display name. Depending on the sequence set for the suffix value in the property, it is displayed in the respective format.
![]() Note: The suffix value, S is appended with comma and
space to the existing value set in the property, patient.name.format.
Note: The suffix value, S is appended with comma and
space to the existing value set in the property, patient.name.format.
· The tag, PT_NAME_SUFFIX would print the Patient’s name along with suffix.
Preferred Language related changes:
Navigation Goto menu Patient à Registerà Other Info tab
· Earlier a User could select only one Preferred Language from the Pref Language field on the Patient Registration screen. Now, a User has provision to add multiple communication languages for a Patient; set ability and proficiency of those added languages.
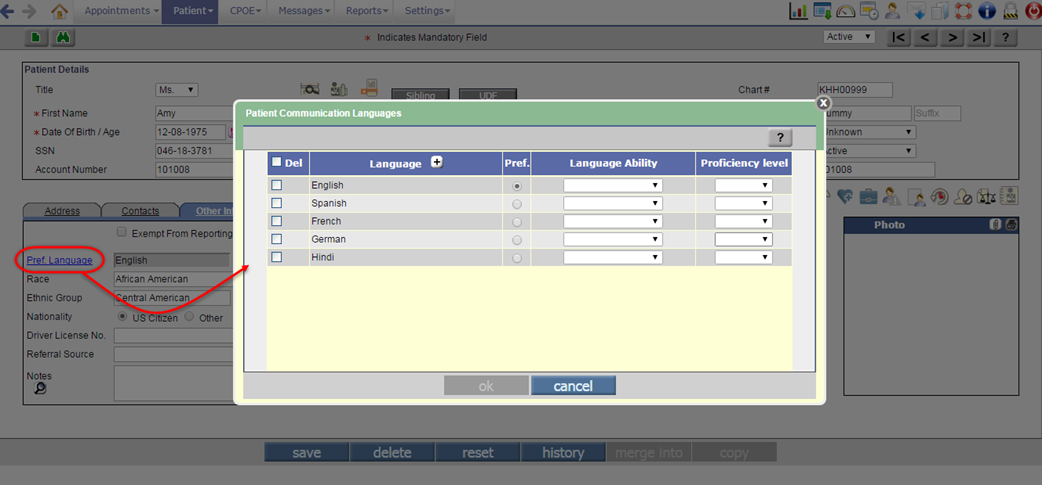
· The Pref Language search field has been now changed to hyperlink to invoke a popup namely, Patient Communication Languages. Refer to figure 5 and 6
Figure 2.1-5: ‘Pref Language’ hyperlink to add preferred language
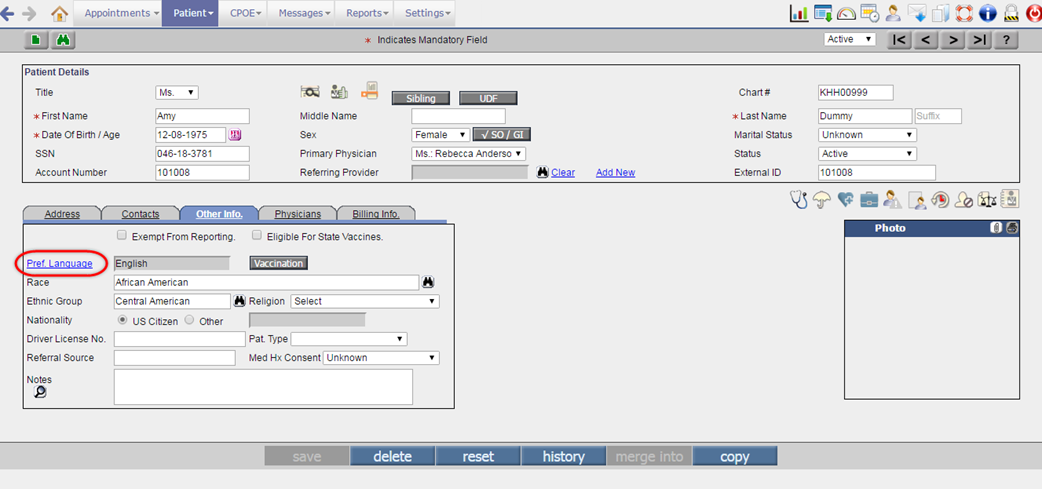
Figure 2.1-6: Patient Communication Languages popup
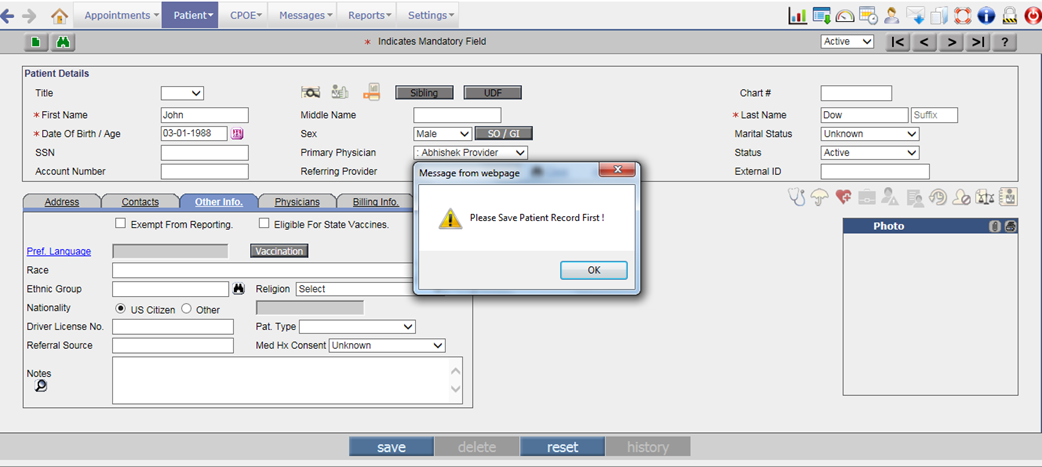
· While adding a new Patient record, a User has to save the details first to invoke the Patient Communication Languages popup. If a User clicks on the Pref Language hyperlink without saving the Patient record then an alert, “Please save Patient record first” is displayed. Refer to figure 7
Figure 2.1-7: Alert displayed when a User clicks on Pref Language hyperlink without saving the new Patient record
· The Patient Communication Languages popup consists of the following columns:
|
Column name |
Description |
|
Del |
Select the checkbox to delete the respective language from the list. |
|
Language |
Displays the selected language(s). Click on Add Language [+] button to add the Patient’s communication language(s). |
|
Pref |
Select any one option to make the required language as a Preferred Language. |
|
Language Ability |
Select the ability of a Patient to express or receive the respective language. Following are the values available for the Language Ability: Expressed Signed · Expressed Spoken · Expressed Written · Received Signed · Received Spoken · Received Written Where, Signed indicates that the Patient knows or understands that sign language; Spoken indicates that the Patient can speak or understand that spoken language; and Written indicates that the Patient can write or read that language. |
|
Proficiency Level |
Select the proficiency level of respective language. Following are the values available for proficiency: Excellent Fair Good Poor |
Figure 2.1-8: Communication languages added on Patient Communication Languages popup
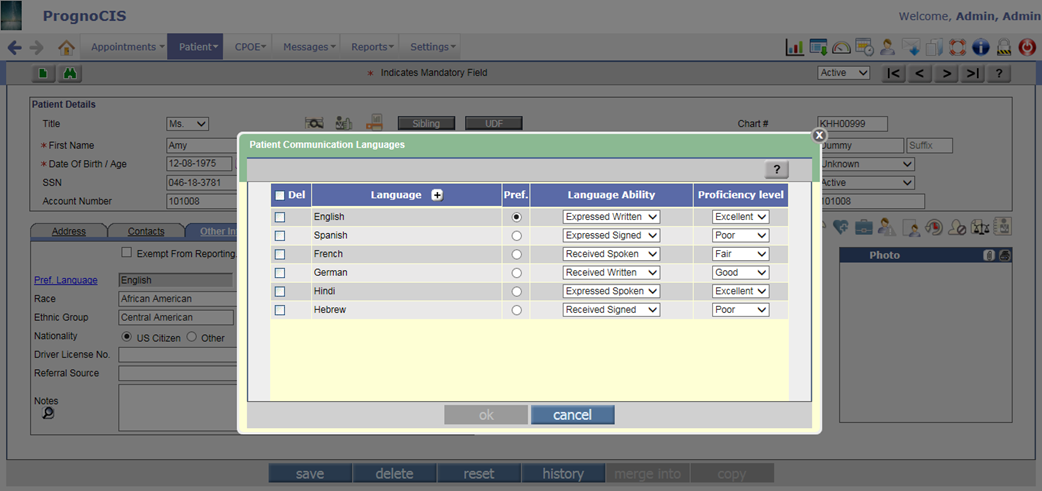
· While adding communication language, maximum 10 number of selection is allowed at a time. By default the first selected language is set as Preferred and always displayed on the top of the list.
![]() Note: The system will not allow User to add duplicate
language in list.
Note: The system will not allow User to add duplicate
language in list.
· A User is not allowed to delete the Preferred Language unless any one language from the list is set as Preferred. In case, if there are no other languages in the list then deletion of Preferred Language is allowed.
![]() Note: If the Del
checkbox is selected then all the selected languages including Preferred
Language are deleted.
Note: If the Del
checkbox is selected then all the selected languages including Preferred
Language are deleted.
· If a User selects Declined to specify (with code: ASKU) from the Language search popup and there are other selected languages in the list then on click of ok button on the Patient Communication Languages popup, a confirmation message, “You chose to select, 'Declined to specify' but there are other languages in your list. Choose 'Yes' to remove these other languages and add 'Declined to specify'. Choose 'No' to remove 'Declined to specify' and retain existing languages.” is displayed.
Figure 2.1-9: Alert displaying if Declined to specify language is selected from languages list
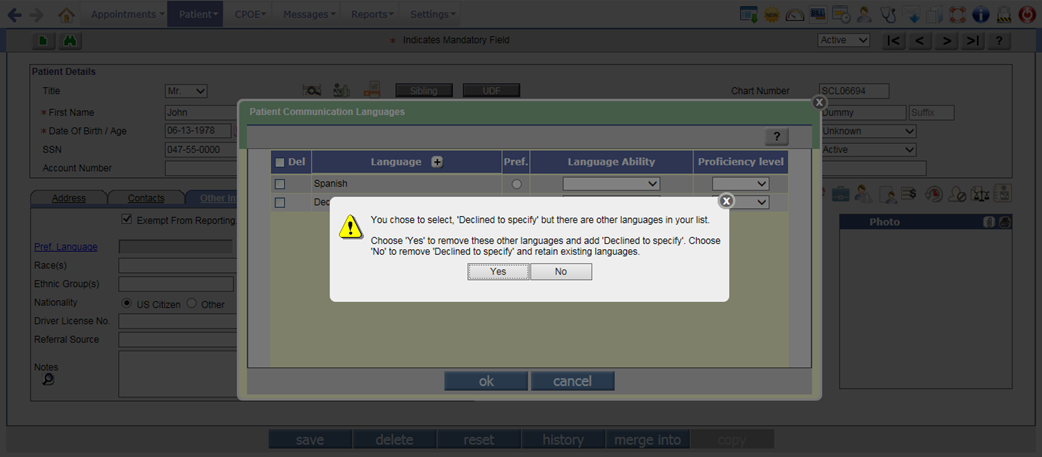
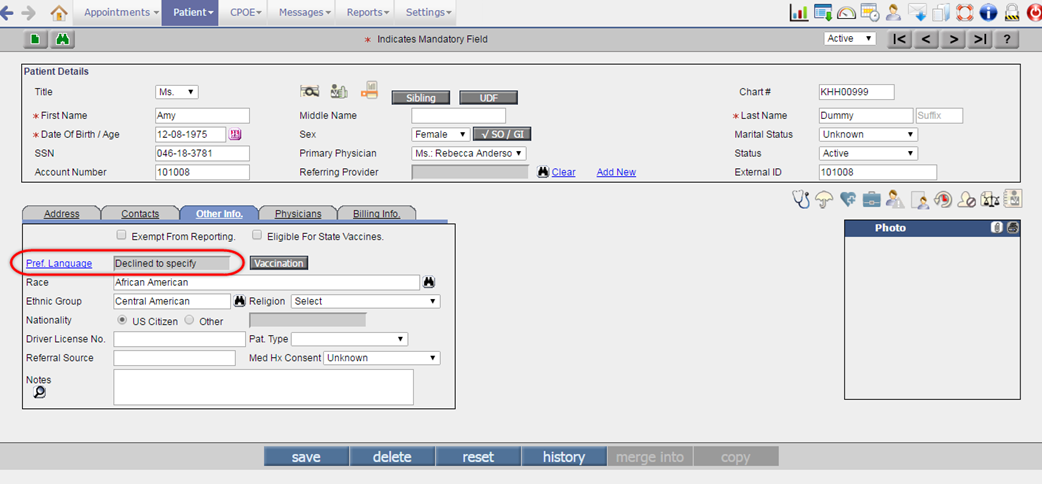
· On click of Yes button, the system removes all languages from the list and sets Declined to specify as Preferred Language. Whereas on click of No button, the system keeps all the selected languages and removes the Declined to specify Language.
Figure 2.1-10: Declined to specify as Preferred Language
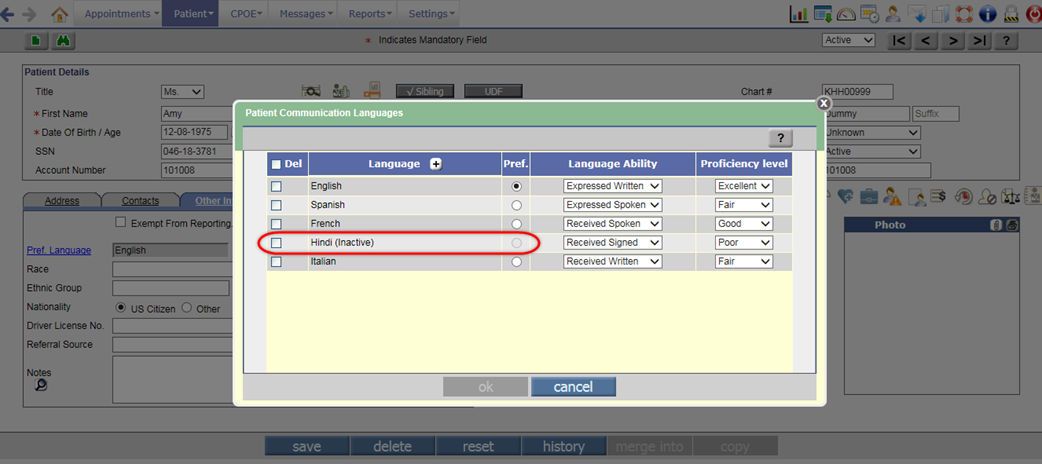
· If any Language from the already selected communication is made inactive then on the Patient Communication Languages popup, the text, ‘inactive’ is displayed in round brackets () beside that language. Also, the Pref option is displayed disabled; thus restricting a User from making such inactive communication language as Preferred.
Figure 2.1-10: Inactive language on Patient Communication Languages popup
· The tag, PT_COMMUNICATION__LANGUAGES$ prints the Patient Communication Language’s details. Following are the tag’s extension:
Ø N – Name
Ø C – Code
Ø A – Ability
Ø P – Proficiency
![]() Note: If Declined to Specify
is selected from the Language search then the tag would print the respective
language as Declined to Specify only.
Note: If Declined to Specify
is selected from the Language search then the tag would print the respective
language as Declined to Specify only.
Changes related to Ethnic Group
· Earlier a User could select only one Ethnic Group for a Patient whereas now multiple Ethnic Group selection is allowed. All the selected Ethnic Groups are displayed in the Ethnic Group field in the order of selection.
Figure 2.1-11: Multiple selected Ethnic Group
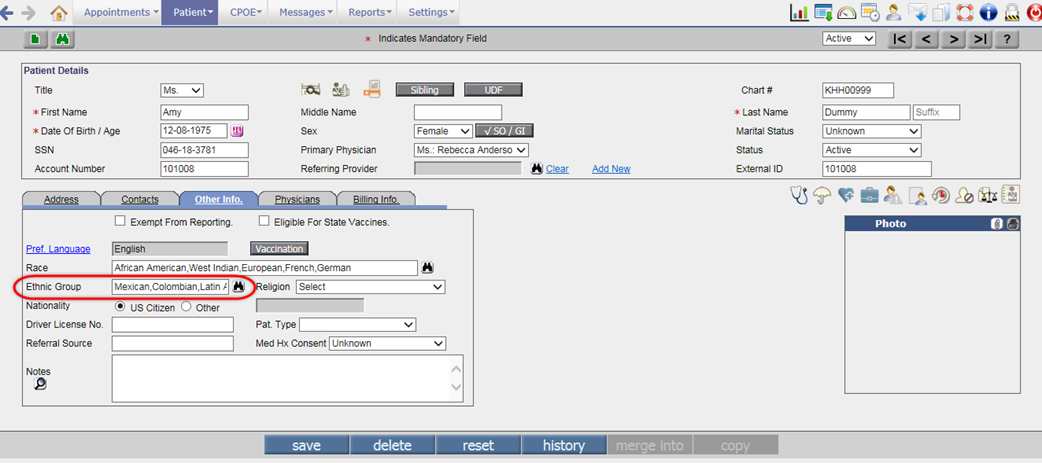
· The tag, PT_ETHNICGRP now prints all the selected Ethnic Groups of the Patient.
Changes on Patient Registration screen
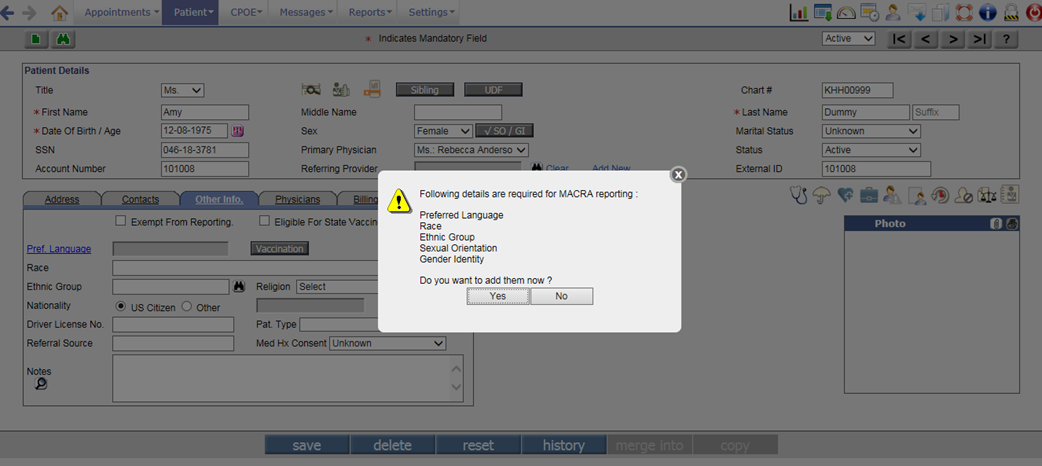
· If a User has not entered any of the details such as Preferred Language, Race, Ethnic Group, Sexual Orientation, and Gender Identity then on save of Patient Registration screen, the following alert is displayed:
“Following recommended details have not been entered:
Preferred Language
Race(s)
Ethnic Group(s)
Sexual Orientation
Gender Identity
Do you want to add them now?”
Figure 2.1-12: Alert on Patient Registration screen
· When the copy button is used to create a copy of selected Patient, the Patient’s communication languages are copied to the newly created patient.
Changes on Sibling Management popup
· As the Language field displays only the Preferred Language, the Language field has been relabeled to Preferred Language.
Figure 2.1-13: Preferred Language on Sibling popup
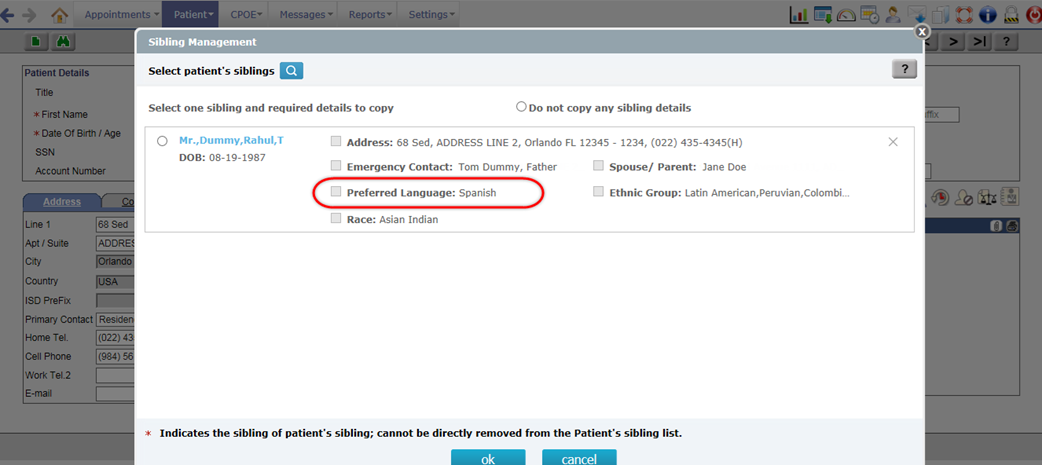
· Though Sibling’s Communication languages are not displayed on the Sibling Management popup, all the communication languages of a Sibling are copied to Patient.
![]() Note:
Note:
v If Patient and Sibling have different Communication languages selected then on copy, the Patient’s existing communication languages are overwritten by the Sibling’s Communication languages.
v If the Sibling’s details are blank then on copy, the Patient’s details are not overwritten.
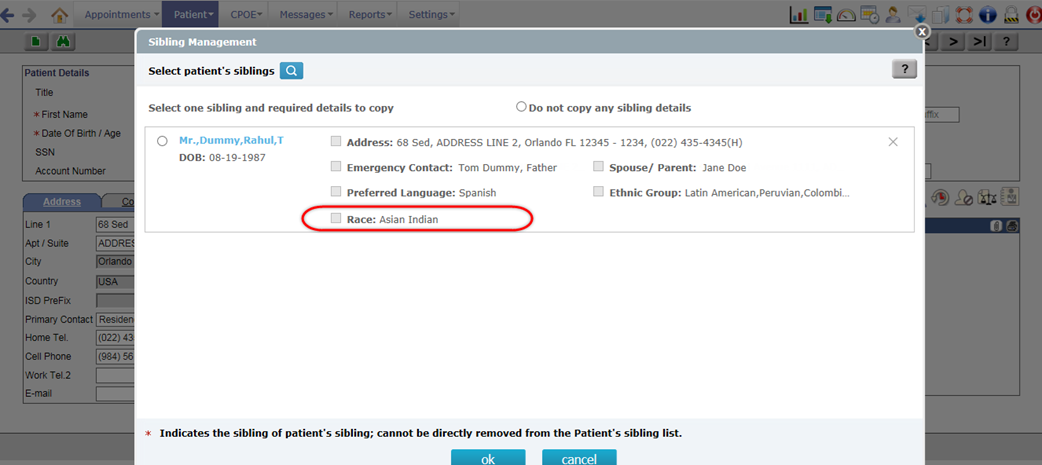
· The Race field is now available below the Preferred Language field. The Race field would now display all the selected Race of a Sibling.
Figure 2.1-14: Race on Sibling popup
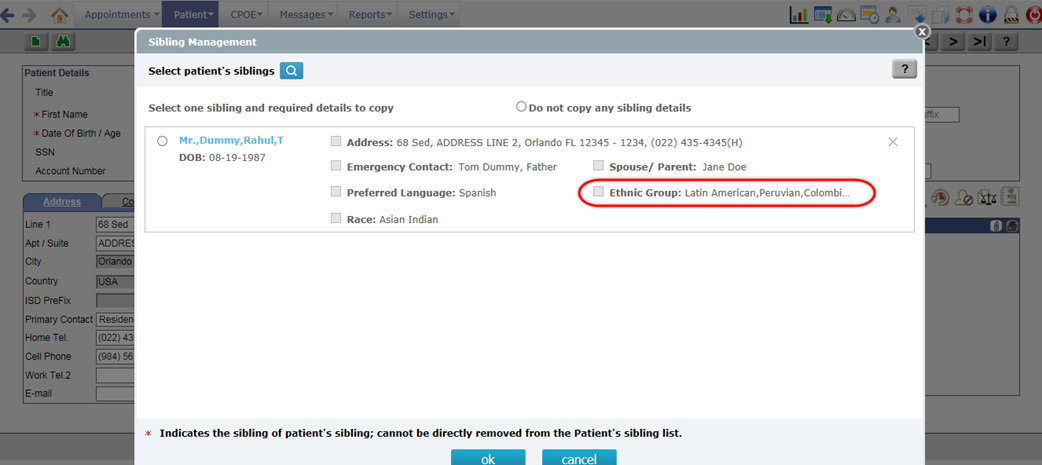
· The Ethnicity field has been relabeled to Ethnic Group. This field would now display all the selected Ethnic Group of a Sibling.
Figure 2.1-15: Ethnic Group on Sibling popup
Changes on Patient/Referring Doc/iPhone App
· An additional value, Unknown is available for selection in Sex field of both, Sign up and Basic Details screens.
Figure 2.1-16: Unknown option in Sex field of Patient Portal Sign up screen
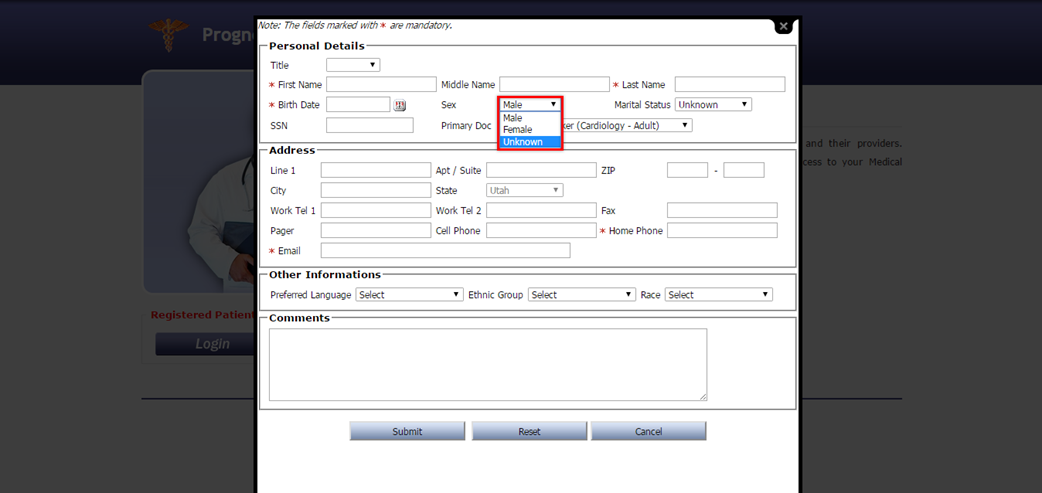
Figure 2.1-17: Unknown option in Sex field of Patient Portal Basic Details screen

· The first selected Ethnic Group and Race on the Patient Registration screen are displayed in the Ethnic Group and Race fields of Basic Details screens.
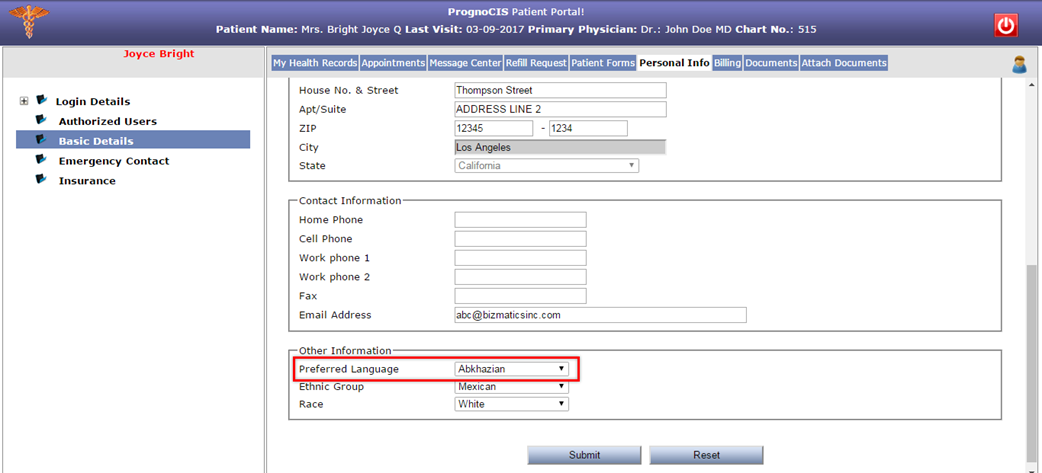
· The Language field has been relabeled to Preferred Language as only preferred language is displayed on Sign up and Basic Details screens.
Figure 2.1-18: Preferred Language on Sign up screen
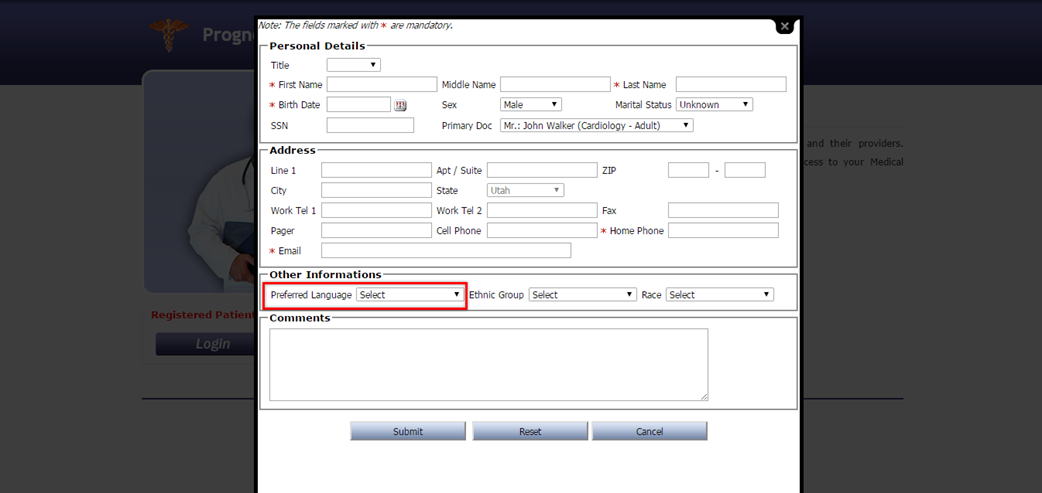
Figure 2.1-19: Preferred Language on Basic Details screen
2.2 Provision to add Implanted Devices record
What are implanted devices and the significance of presence of its UDI (Unique Device Identifier)?
· Implants are basically medical devices that are manufactured to replace a missing biological structure, support a damaged biological structure, or enhance an existing biological structure. There are various types of implants such as artificial hips, heart pacemakers, breast implants, spine screws, rods and artificial Discs; knees, coronary stents etc.
· While providing patient care it is important for a Physician to be aware of Patients having any such medically implanted devices present inside the body. The information of the same will help in providing an informed care to the Patients and avoid planning of any risk prone procedures.
· A UDI is a Unique numeric or alphanumeric Device Identifier assigned to each device product. Typically, an UDI comprises of two parts, the device identifier, which identifies the product and the labeler (device labelers), and the production identifier (lot, batch, serial number, or date). PrognoCIS has the ability to parse the information contained in the implanted devices if the UDI is readily available with the User (obtained from Patients). Further in the document we learn the concept and implementation of the feature with respect to Implanted Device’s UDIs.
2.2.1 Concept
· The feature is basically dependent on the Device Identifier number or the Unique Device Identifier number associated with the device implanted in a Patient to fetch, store, and display the device details.
![]() Note: If a User enters the Device Identifier number then only partial information
is fetched. For example, under the ‘Parsed
Identifiers from UDI’ section except for the Issuing Agency all the other information such
as Lot Number; Serial Number; Date of Manufacture; and Date of Expiry are not
fetched.
Note: If a User enters the Device Identifier number then only partial information
is fetched. For example, under the ‘Parsed
Identifiers from UDI’ section except for the Issuing Agency all the other information such
as Lot Number; Serial Number; Date of Manufacture; and Date of Expiry are not
fetched.
· The number when validated in PrognoCIS undergoes parsing from a third-party web service and further fetching of details from various sources such as the 1) centralized repository maintained by GUDID to fetch among others the brand name; version number; company name, and MRI safety information of the device, and 2) by requesting a separate web service calls to the UMLS (Unified Medical Language System) and fetch the appropriate SNOMED CT of the device.
2.2.2 UDI
A UDI is a Unique Device Identifier assigned to each device product. Typically, an UDI comprises of two parts, the device identifier, which identifies the product and the device labeler, and the production identifier (lot, batch, serial number, or date). PrognoCIS has the ability to parse the information contained in the implanted devices through its available UDI. Typically, Patient provides the UDI information to a Physician.
· Formats
Following are the examples of valid and invalid UDIs:
Valid UDIs:
(01)08717648200274(11)141231(17)150707(10)A213B1(21)1234
(01)00857334004286(17)161231(21)A789
Invalid UDIs:
(01)08717648200274(11)141231(17)XXXXXX(10)A213B1(21)1234
X is not numeric; only numbers are allowed for the expiration date
2.2.3 Issuing Agencies of UDI
There are three organizations that are accredited by US FDA (Food and Drug Administration) as UDI issuing agencies:
1. GS1
2. HIBCC (Health Industry Business Communications Council)
3. ICCBBA (International Council for Commonality in Blood Banking Automation)
Each of these issuing agencies has a Unique Device Identifier (UDI) format that was reviewed and approved by FDA as part of its process for accrediting issuing agencies.
PrognoCIS supports entering of Device details either on the basis of Device Identifier (DI) alone or the UDI as a whole. The Issuing Agencies have specific delimiters to identify DI from a UDI string. Following table gives an idea of these delimiters – information that helps in knowing which part of the string is a DI.
Table: Respective data delimiter used to identify DI by the respective Issuing Agency
|
No. |
Issuing Agency |
Data Delimiter for Device Identifier (DI) |
|
1. |
GS1 |
(01) |
|
2. |
HIBCC |
+ |
|
3. |
ICCBBA |
=/ or =) |
2.2.4 Implementation in PrognoCIS
The feature of Implanted Device(s) has been implemented in three different screens of PrognoCIS. Following are the navigation paths for the same:
Navigation
- Goto menu: Patient à Register à click
Implanted Device(s) icon:
 to invoke Implanted Device popup
 - Goto: Patient Encounter TOC à Face Sheet à click Implanted Device(s) cell to view details
- Goto: Patient Encounter TOC à click Implanted Device(s) link on TOC to open the Implanted Device screen
2.2.5 On Patient Registration screen
Navigation Goto menu: Patient à Register
A new Implanted Device icon:
![]() has been provided on the Patient Register screen next
to the Insurance icon. A click on the icon would invoke the Implanted Device popup which is an entry
point to enter details of Patient’s implanted device(s) into PrognoCIS. Refer
to figure
has been provided on the Patient Register screen next
to the Insurance icon. A click on the icon would invoke the Implanted Device popup which is an entry
point to enter details of Patient’s implanted device(s) into PrognoCIS. Refer
to figure
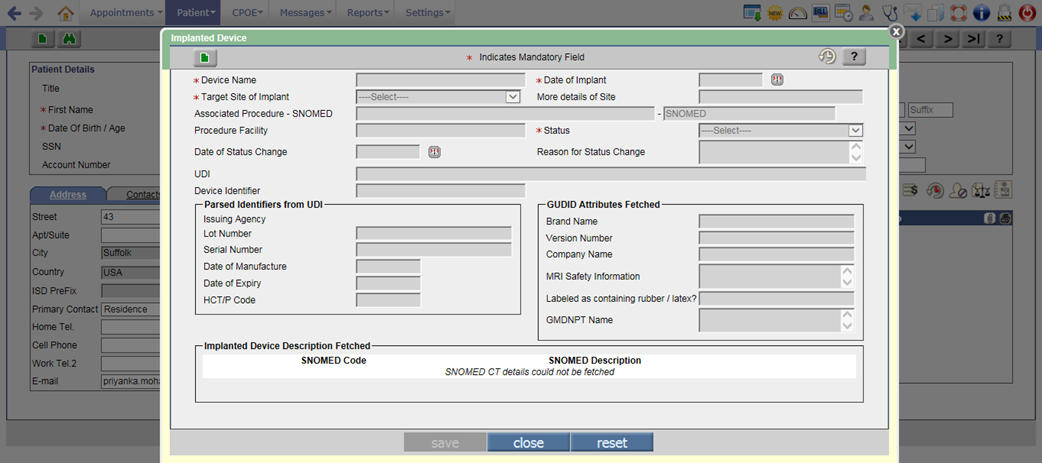
Figure 2.2-1: UI of Implanted Device popup
- User is required to click Add button:
 to enter a new record of Implanted Device for the Patient. After
clicking on Add button, a popup is displayed where User needs to enter
either the entire UDI or just the Device Identifier in the text field and
click on get details
button to fetch the information regarding that entered UDI or Device
Identifier.
to enter a new record of Implanted Device for the Patient. After
clicking on Add button, a popup is displayed where User needs to enter
either the entire UDI or just the Device Identifier in the text field and
click on get details
button to fetch the information regarding that entered UDI or Device
Identifier.
Figure 2.2-2: Text area to enter the UDI or Device Identifier

- Once the string entered is validated, internally the third-party web service is invoked and the parsed responses are displayed appropriately in the various read-only fields of the Implanted Device(s) popup. Refer to figure 4.1-1 However, if the entered UDI or Device Identifier is invalid then the error message, “Please enter valid UDI or Device Identifier” is displayed.
Figure 2.2-3: Different highlighters used to distinguished the various sections on UI where the parsed values are appropriately displayed

- #1 and #2 are fetched after the entered UDI is parsed; #3 details are fetched from the GUDID (Global Unique Device Identification Database) database. The GUDID is a database administered by the FDA and serves as a reference catalog for every device with an identifier; #4 displays the implanted device description along with its appropriate SNOMED code.
- Certain mandatory fields such as Device name, Target Site of Implant, Date of Implant, and Status has to be entered manually by a User.
Figure 2.2-4: Implanted device details
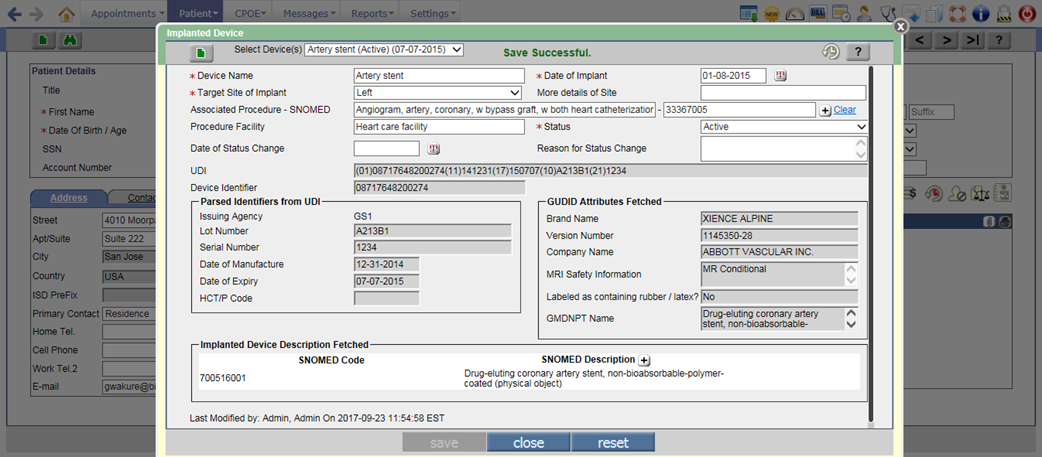
- Following is the description of all the fields that a User needs to enter:
Device Name: It is the name of the implanted device.
Date of Implant: It is the date when the device was implanted in the Patient.
![]() Note:
The Date of Implant should be
between the range of fetched Date of Manufacture
and Date of Expiry.
Note:
The Date of Implant should be
between the range of fetched Date of Manufacture
and Date of Expiry.
Target Site of Implant: Select the site such as Left, Medial, Posterior, or Right where the device is implanted.
More details of Site: It is a text field to enter more details about the site.
Associated Procedure – SNOMED: click on [+] button to enter the SNOMED code related to the associated Procedure.
Procedure Facility: It is a text field to enter about the Procedure Facility.
Status: It is to select the status of the implanted device. Following are the statuses available:
· Active – The device is still inside the Patient’s body.
· Inactive – The device is no more in the Patient’s body.
· Erroneous – The record is added mistakenly.
· Duplicative – The record is duplicate.
Date of Status Change: It is to select the date when the status of the implanted device was changed.
Reason for Status Change: It is to enter the reason for changing the status of implanted device.
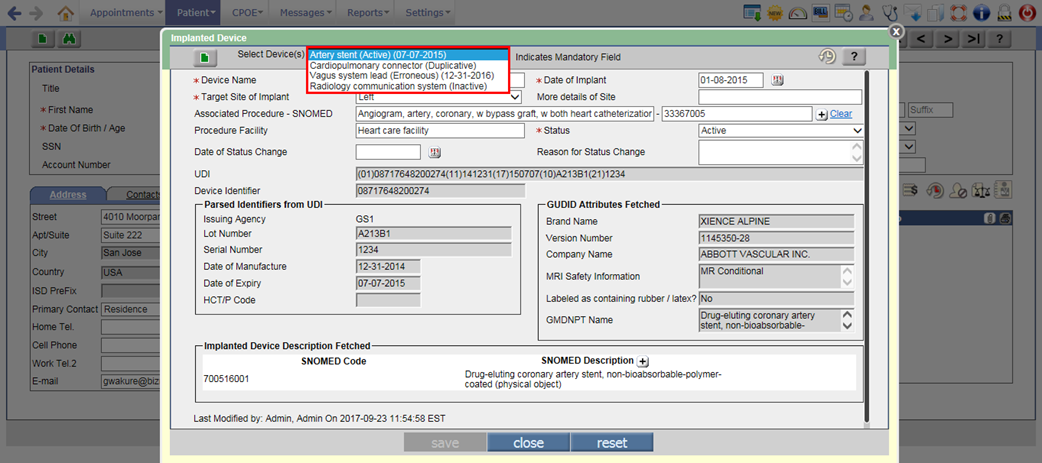
- If there are multiple devices added for a Patient then on the Implanted Device popup, they are displayed under Select Device(s) dropdown list. This dropdown list displays the Device name, Status, and Date of expiry. At the top of the list, the active device with latest date of implant is displayed followed by the Erroneous and Duplicate devices. The Inactive devices would be displayed at the last in the list.
![]() Note:
If the Date of expiry is not
present for any device then only Device name and Status would be displayed in
the Select Device(s) dropdown list
Note:
If the Date of expiry is not
present for any device then only Device name and Status would be displayed in
the Select Device(s) dropdown list
Figure 2.2-5: Implanted device list
- Once the implanted
device’s details are saved, the Implanted Device icon:
changes to
 indicating that the Patient has implanted device information
added.
indicating that the Patient has implanted device information
added.
2.2.6 On Face Sheet
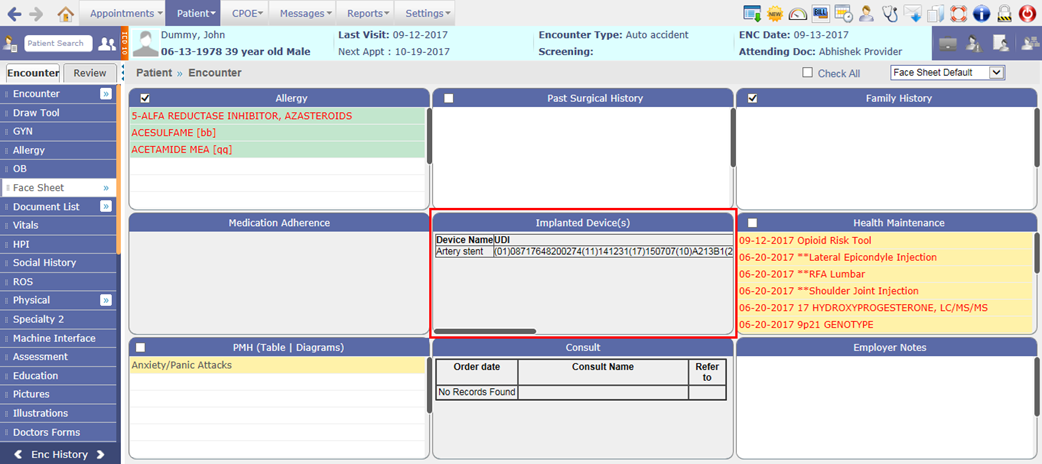
The details such as Device name, UDI, Description, Status, Implant date and Expiry date of Patient’s active implanted devices are displayed on the Face Sheet cell. The Implanted Device(s) cell will be available only if the Facesheet Layout property such as facesheet.0.cell_1 is updated with the value, DEVICES and a record of Patient’s implanted device is added in PrognoCIS.
Figure 2.2-6: Implanted device Face Sheet cell
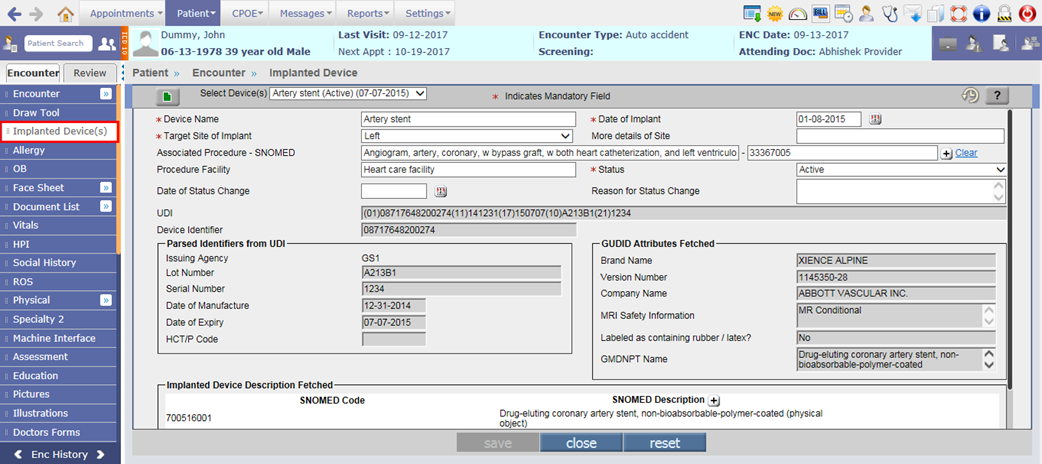
2.2.7 On TOC à Implanted Device(s)
A new option, Implanted Device(s) has been provided on the Encounter TOC to invoke the Implanted Device screen. To have Implanted Device(s) on patient’s encounter TOC, User needs to set the value, ID in the property, toc.menu.option.
Figure 2.2-7: Implanted Devices(s) screen invoked via Encounter TOC menu
![]() Hint: The functioning of the feature is same from which ever
location it is accessed.
Hint: The functioning of the feature is same from which ever
location it is accessed.
2.2.8 Tags related to Implanted Devices
The following three new tags have been provided to display the Patient’s Implanted Device details on the Output Template:
|
Tag |
Description |
|
[PT_IMPLANTDEVICE_TBL$] |
It displays the Active Implanted Device(s) details in tabular format. |
|
[PT_IMPLANTDEVICE_LINE$] |
It displays each Active Implanted Device details in per line. |
|
[PT_IMPLANTDEVICE_PARA$] |
It displays all the Active Implanted Device details in one paragraph. |
Following are the extensions for Line and Para tags only:
· A - Status of Device
· B - Brand Name
· C - Company Name
· D - Implant Date
· E - Expiry Date
· F - Procedure Facility
· H - HCT/P Code
· I - Device Identifier only
· L - Lot Number
· M - Manufacture Date
· N - Device Name
· P - More Details of Site
· R - MRI Safety Information
· S - Serial Number
· T - Target Site
· U - Complete UDI value
· V - Version
· W - Latex Warning
· 1 - Procedure SNOMED Code
· 2 - Procedure Name
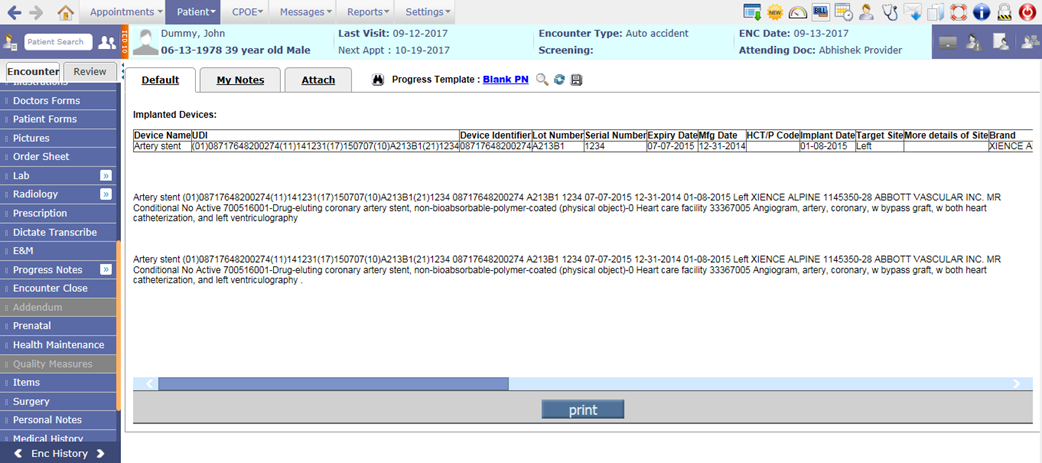
Figure 2.2-8: Active Implanted device details on Progress Notes
3 Patient – Encounter
3.1 Provision to change, cancel, and fill prescribed Rx on the Prescription screen
Navigation Goto: Patient’s encounterà Encounter TOCà Prescription
Rx change
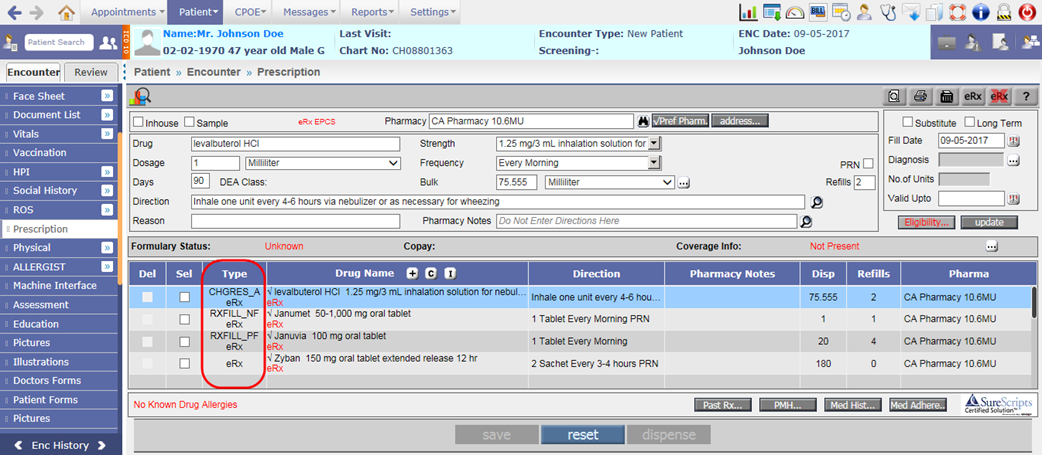
· Rx change feature refers to the prescription change from Surescripts Pharmacy to the Provider of PrognoCIS for the newly sent eRx. The Rx change in PrognoCIS is signified as CHGREQ in the Type column of Prescription screen.
Figure 3.1-1: Change request type on Prescription screen
· The change of new Rx is grouped in following three types:
o Therapeutic Interchange
o Generic Substitution
o Prior Authorization
Therapeutic Interchange
The Therapeutic Interchange is the practice of replacing a medication originally prescribed for a Patient with a chemically different medication with the approval of prescribing Provider. Therapeutic Interchange may be required on following scenarios:
- Requesting a replacement of prescribed drug with an alternative drug that will treat the condition with lesser or no adverse effects.
- When the pharmacy receives a claim reject (or even paid) message which identifies preferred alternative drugs which may have lower copay for a patient.
- When the pharmacy receives a prescription indicating a 30-day supply, but the pharmacy determines that the patient has a 90-day benefit.
- When the pharmacy receives a prescription indicating a 1 10 MG Tablet Twice a Day, but the patient desires to take 1 20 MG tablet once a day.
- When the pharmacy is unsure of the prescriber’s intent; e.g. Prozac weekly once a day for 200 MG versus 20 MG which looks like a prescriber error.
Generic Substitution
Generic substitution is a pharmacist-initiated act by which a different brand or an unbranded drug product is dispensed instead of a drug brand that was prescribed by the Provider. Generic substitution may be required on following scenarios:
- When the pharmacy receives a prescription which indicates Substitution not allowed, but a generic is available.
- When the pharmacy received the original prescription, it was written for a brand drug with no generic alternatives. The prescriber indicates substitution not allowed. During the course of therapy, a generic becomes available.
- When the pharmacy received the original prescription, it was written for a brand drug and the prescriber indicated substitution not allowed. The pharmacy bills the brand, but the payer indicates brand not covered.
Prior Authorization
Prior authorization (PA) is a requirement that the physician obtain approval from health insurance plan to prescribe a specific medication for patient. Prior Authorization may be required on following scenarios:
- When the pharmacy receives a claim reject indicating that a Prior Authorization is required, the pharmacy can request a Prior Authorization from the prescriber.
- Depending on the drug, the prescriber, needs to acquire, a Prior Authorization (electronic or non-electronic) from the payer.
- In this case, since, PrognoCIS, is not yet supporting (ePA) electronic Prior Authorization, if the provider clinic workflow supports, the non-electronic workflow for Prior Authorization, then, that is to be followed by the provider. The Prior Authorization number if available and if requested by payer, will be required to be entered in PrognoCIS.
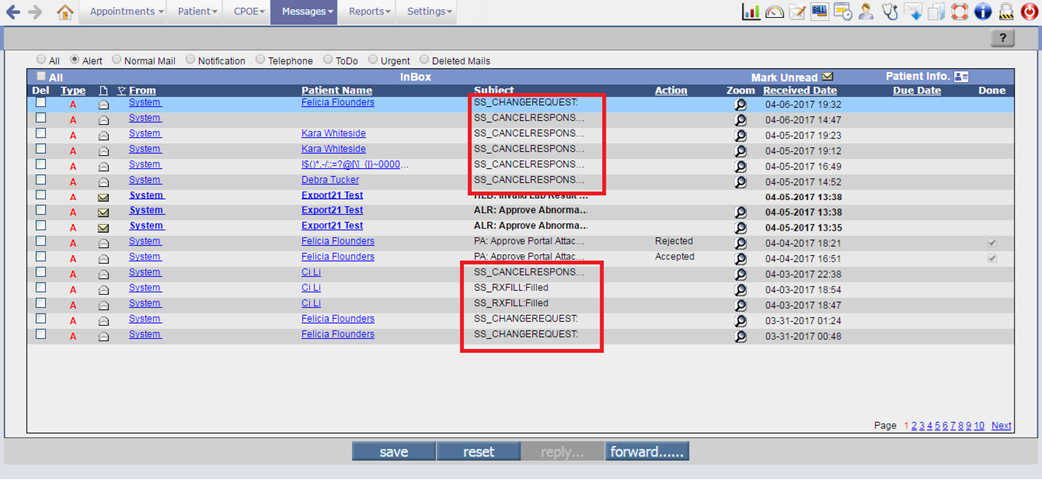
· If there are any Rx changes for the newly sent prescription from Surescripts Pharmacy then the Rx change request message is sent to the Provider in Messageà In screen with the subject as SS_CHANGEREQUEST: <type of change request>.
Figure 3.1-2: Change request messages in Message-In screen
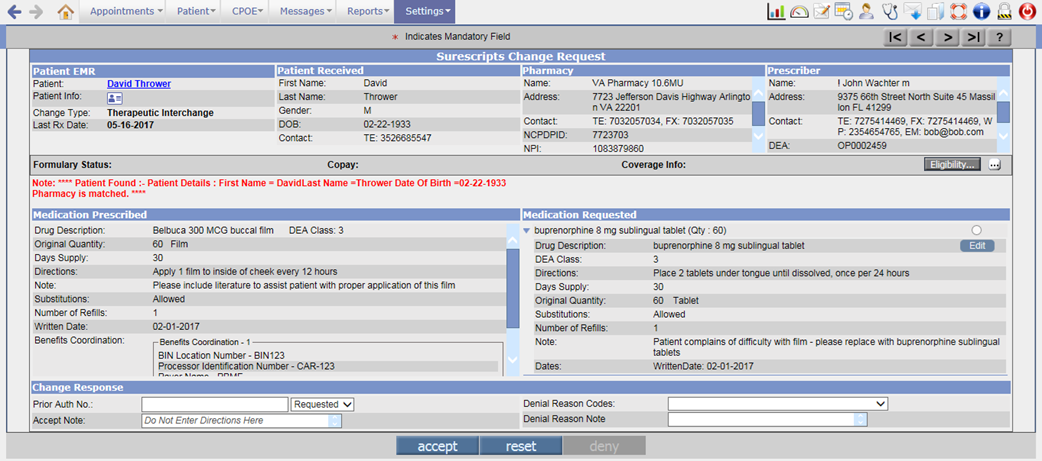
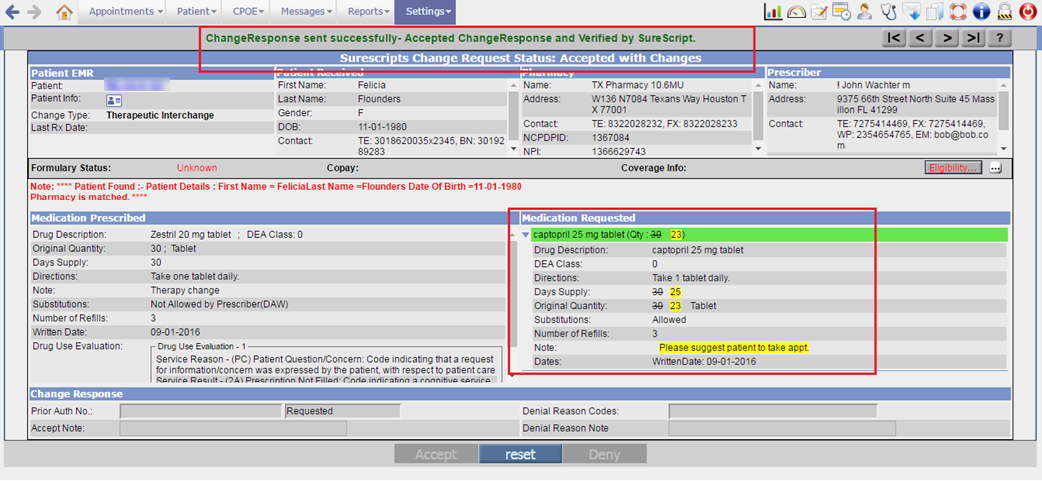
· On click of zoom button for Rx change request, the Change Request screen is invoked. It displays the Patient details in EMR, Patient details as received, Pharmacy details, Prescriber details, Change request type, Medication Prescribed, Medication requested, and the Change Response sections.
Figure 3.1-3: Change request message
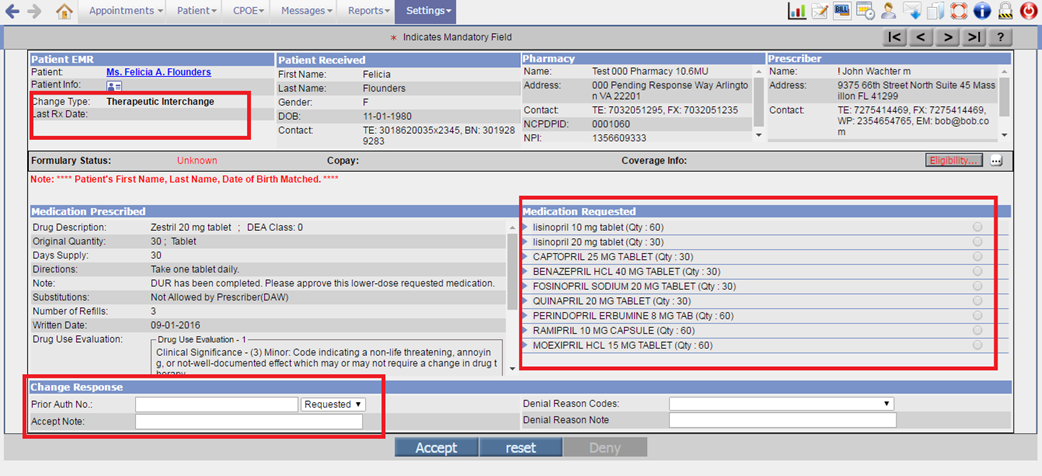
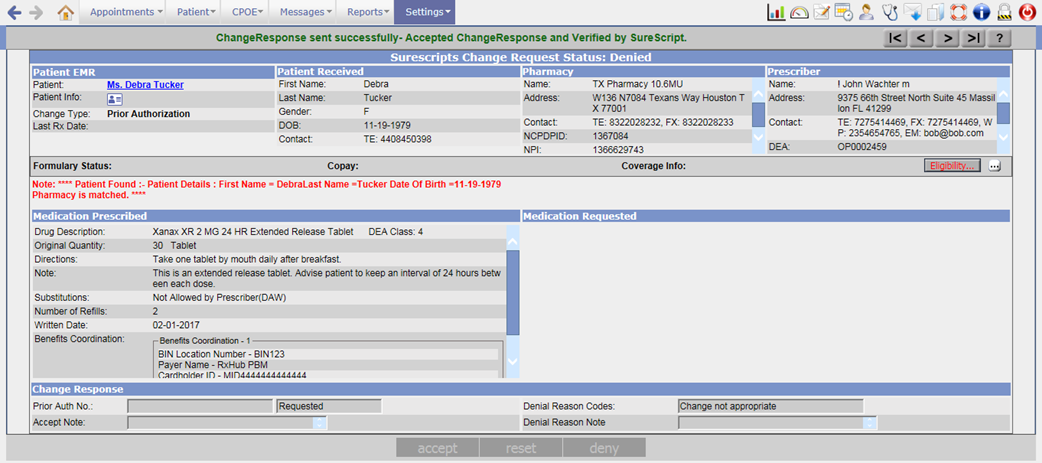
· If the Change type of the prescription is Prior Authorization then it is recommended for a user to enter the Prior Auth No. In this scenario, the Medication Requested section is not sent by the Pharmacy and thus that section is displayed as blank.
Figure 3.1-4: Prior Authorization change request message

· In the Medication Requested section, the drugs requested by the Pharmacy are displayed. The multiple requested drugs are displayed in collapsed format and a click on expand arrow; it would show the respective drug’s details. If a single drug is requested by the Pharmacy, then that drug by default will appear in an expanded format.
Figure 3.1-5: Therapeutic Interchange message
· A click on radio button for the drug would select the drug, expand the drug details and display the drug name in Green.
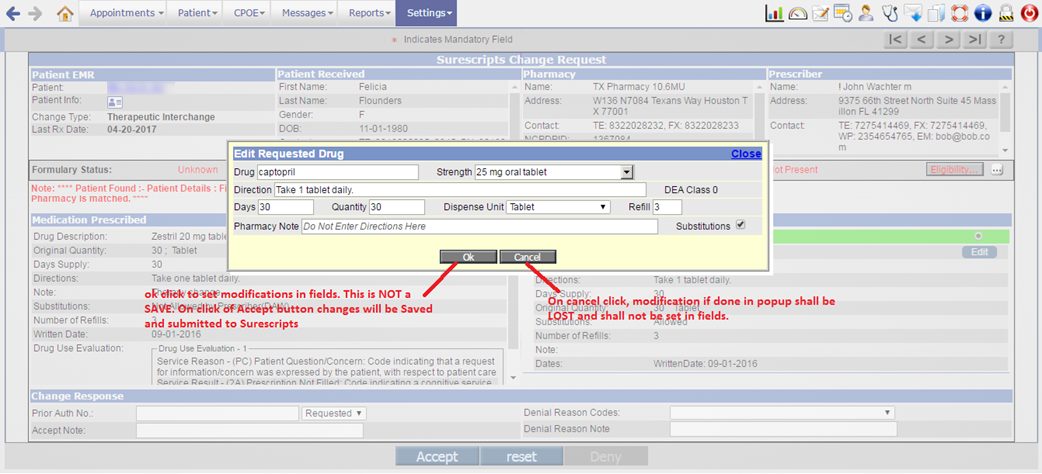
· In case the Provider wants to change the selected requested drug then an Edit button has been provided. On click of Edit button, the Edit Requested Drug popup is invoked. From this popup, Provider can change the drug and its basic details.
![]() Note: The editing of drug is allowed only for Therapeutic
Interchange type of change request. Thus the Edit
button will not be available for drugs of Generic Substitution and Prior
Authorization change type.
Note: The editing of drug is allowed only for Therapeutic
Interchange type of change request. Thus the Edit
button will not be available for drugs of Generic Substitution and Prior
Authorization change type.
Figure 3.1-6: Edit button for changing the drug details
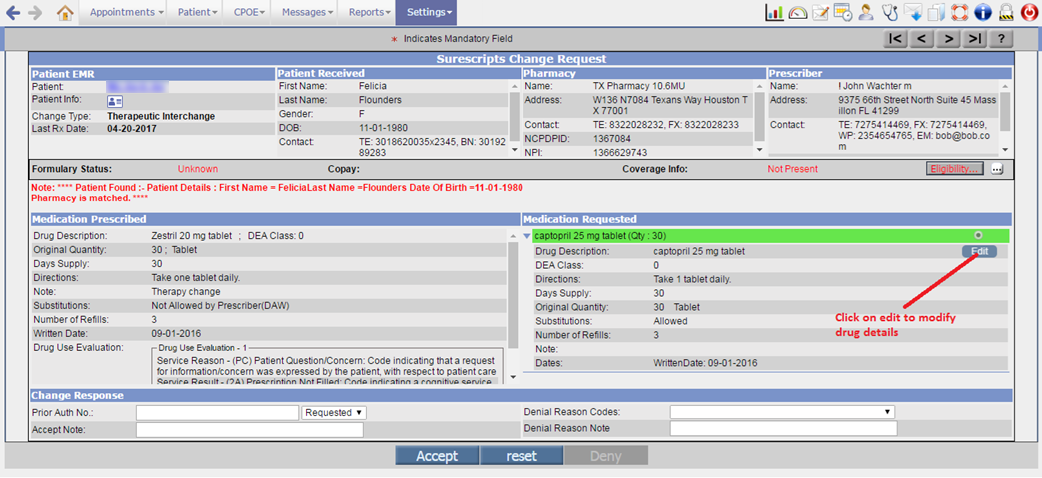
Figure 3.1-7: Edit Requested Drugs popup
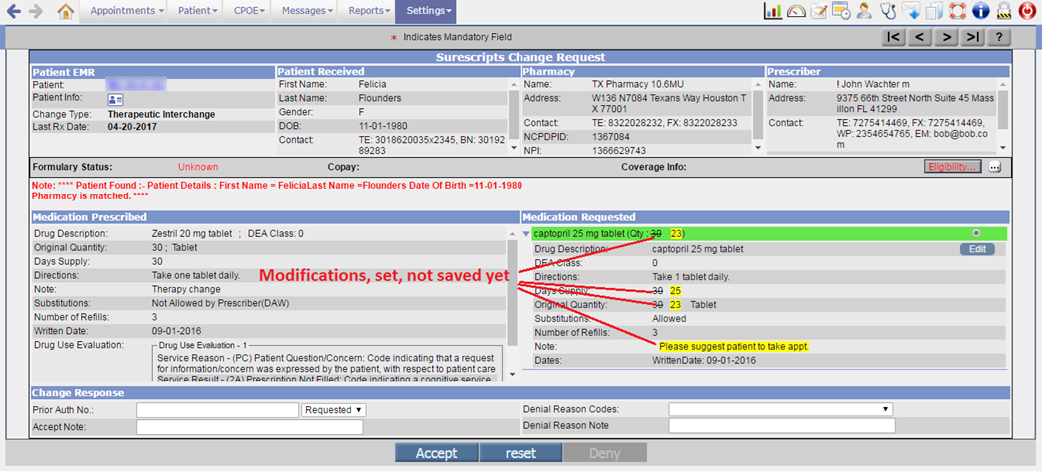
· After editing the drug and clicking on ok button, the changed drug details would display in yellow background and the old details in strike-through format.
Figure 3.1-8: Changed drug details highlighted in Yellow
![]() Note: After editing the drug if a user selects another
requested drug then the editing of that previous drug is cleared.
Note: After editing the drug if a user selects another
requested drug then the editing of that previous drug is cleared.
· After making the required changes, when a user clicks on Accept button, the change request approve response is sent to the Pharmacy.
Figure 3.1-9: Accepted change request message
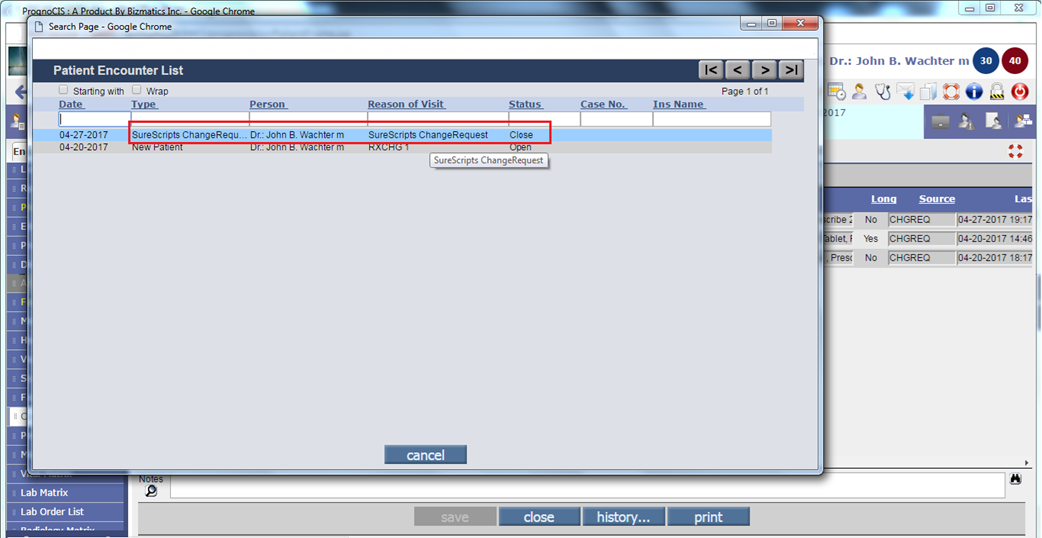
· On approving the change request for Therapeutic Interchange and Generic Substitution type of drugs, a new encounter of type XC (Surescripts Request) is created. This is a closed encounter consisting of approved and changed approved drugs.
Figure 3.1-10: Surescripts change request encounter type
![]() Note: The original drug entry would be removed from the
encounter in which it was precribed.
Note: The original drug entry would be removed from the
encounter in which it was precribed.
· To deny the change request, it is mandatory for a user to enter either Denial Reason Code or Denial Reason Note or both and click on Deny button. The Deny button is enabled only on selection of Denial Reason Code or Denial Reason Note else by default, Accept button is displayed as enabled.
· On selecting the Denial Reason Code or entering the Denial Reason Note, the drug selection and editing is cleared.
Figure 3.1-11: Prior Authorization change request
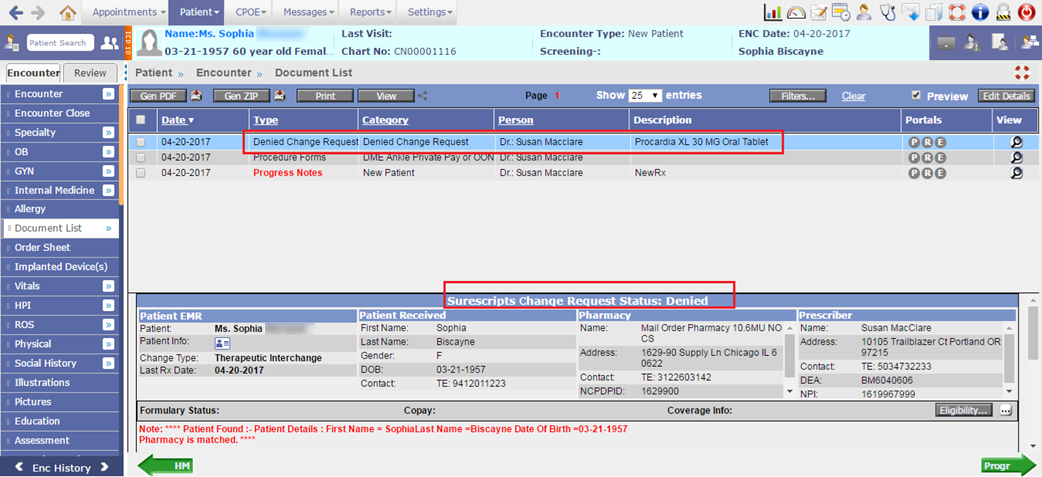
· The denied change request are then available on the Document List screen of Patient’s encounter.
Figure 3.1-12: Denied change request in Document List screen
· The change request for drugs is signified as following in the Type column of Prescription screen:
|
Value in Type column |
Significance |
|
CHGREQ |
Change request came for drug from Pharmacy to Prescriber. |
|
CHGRES_A |
Approved change response for drug sent by Prescriber to Pharmacy. |
|
CHGRES_C |
Approved change response for drug with changes sent by Prescriber to Pharmacy |
|
CHGRES_D |
Denied the change request sent by Pharmacy to Prescriber. |
Cancel Rx
· Rx cancel refers to an electronic request to cancel a prescription. This request is sent by Provider to the Surescripts Pharmacy to whom the corresponding new Rx was sent successfully. The pharmacy then responds to the cancel request with a cancel response. This cancel response contains status for the cancel request indicating, whether the cancel request was Approved or Denied.
· There can be multiple scenarios for the cancel request / response, depending on whether after sending NewRx, the recipient pharmacy has already dispensed some of the refills for that drug and after that the provider identifies that this sent NewRx is improper and intends to cancel the sent NewRx. In this case, the remaining refills for that drug are canceled. There may be no dispensing done, so pharmacy shall cancel entire prescription. The cancel response is sent from Pharmacy depending upon the actions taken by Pharmacy at that time.
·
A new button, Cancel eRx
![]() has been provided on the Prescription screen to cancel
the newly sent eRx. When a user selects the eRx sent drug and click on Cancel
eRx button, the Cancel/Discontinue eRx popup is displayed. This popup displays
the Patient details, Prescriber details, Pharmacy details, and Drug details for
cancellation.
has been provided on the Prescription screen to cancel
the newly sent eRx. When a user selects the eRx sent drug and click on Cancel
eRx button, the Cancel/Discontinue eRx popup is displayed. This popup displays
the Patient details, Prescriber details, Pharmacy details, and Drug details for
cancellation.
Figure 3.1-13: Cancel/Discontinue eRx popup
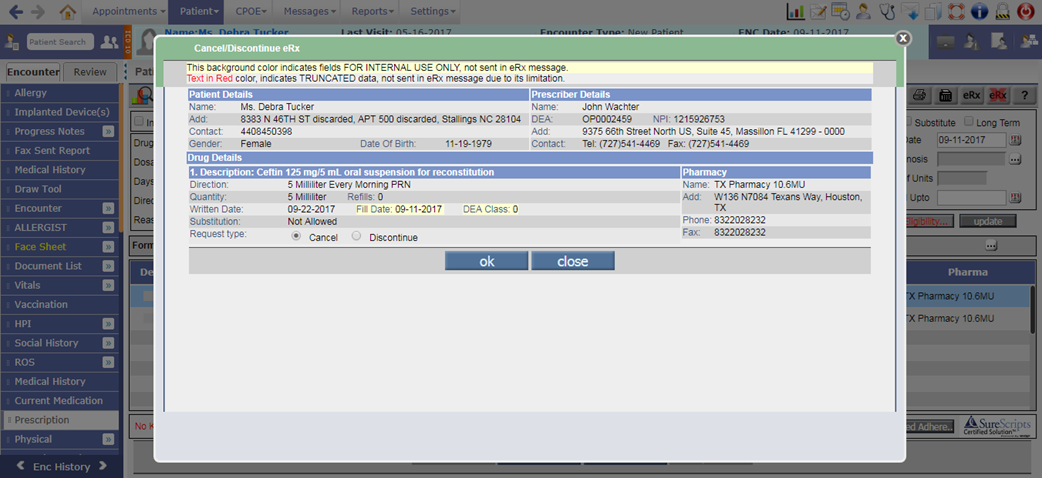
· Depending on the Request type selected, the Provider may Cancel the entire Prescription or Discontinue the refills. After selecting the Request type, a click on ok button would send the cancel request to the Pharmacy.
Figure 3.1-14: Cancel request on Prescription screen
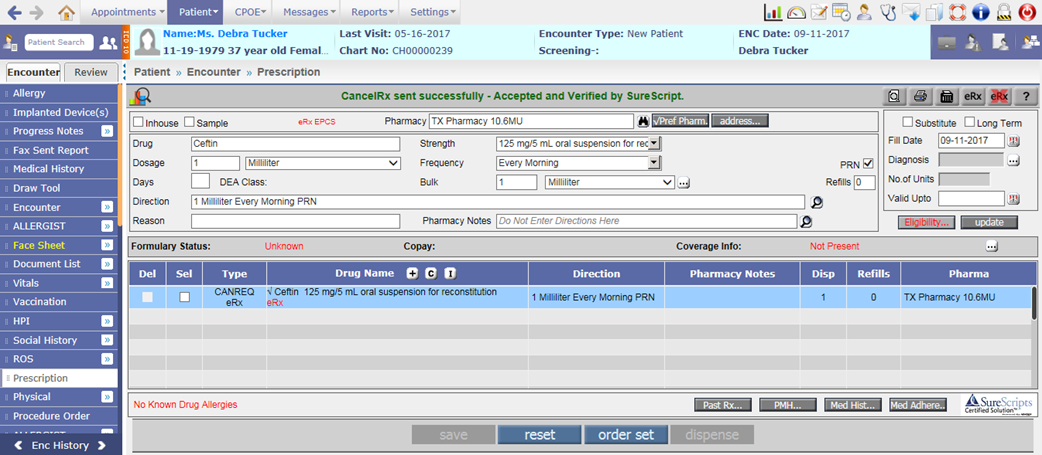
· Depending on the dispense status of the prescription i.e. either Patient has not picked up the medication or Patient has Patient has picked up the medication; the Pharmacy cancels entire prescription or discontinues the remaining refills and sends back the cancel response to the Provider.
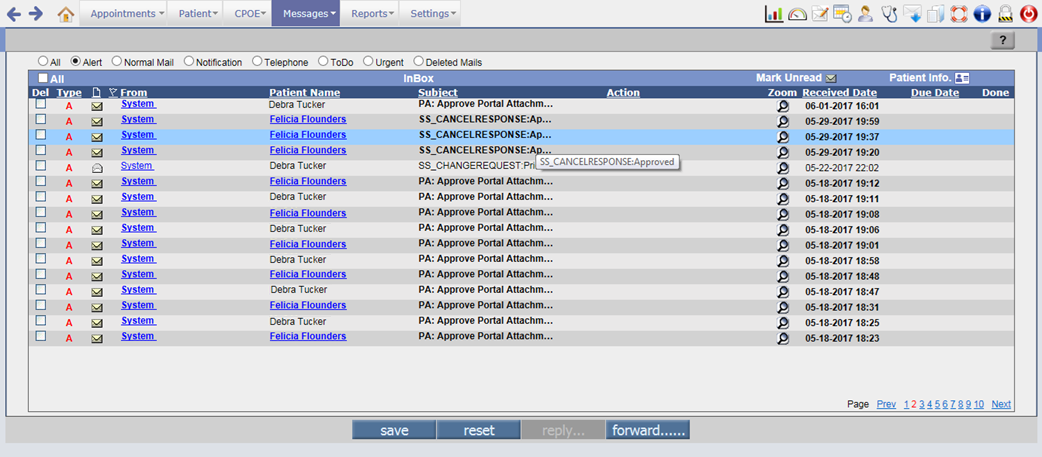
· The cancel response messages sent to the Provider are displayed in the Messageà In screen with the subject as SS_CANCELRESPONSE:<status of the request>.
Figure 3.1-15: Cancel response message in Message-in screen
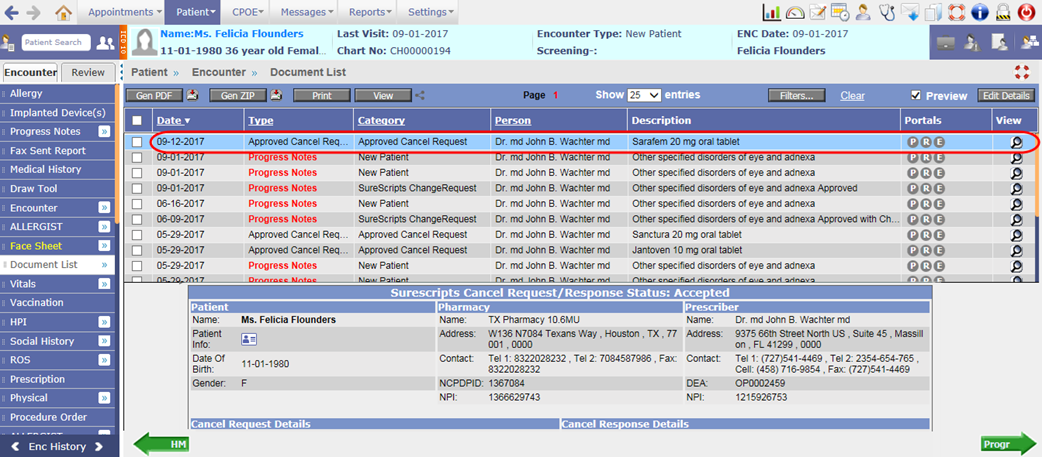
· On click of zoom button for cancel response, the Cancel Request/Response screen is displayed. The screen consists of Patient details in EMR, Pharmacy details, Prescriber details, Cancel Request details, Cancel Response details, and Refill details.
Figure 3.1-16: Cancel Reponse message
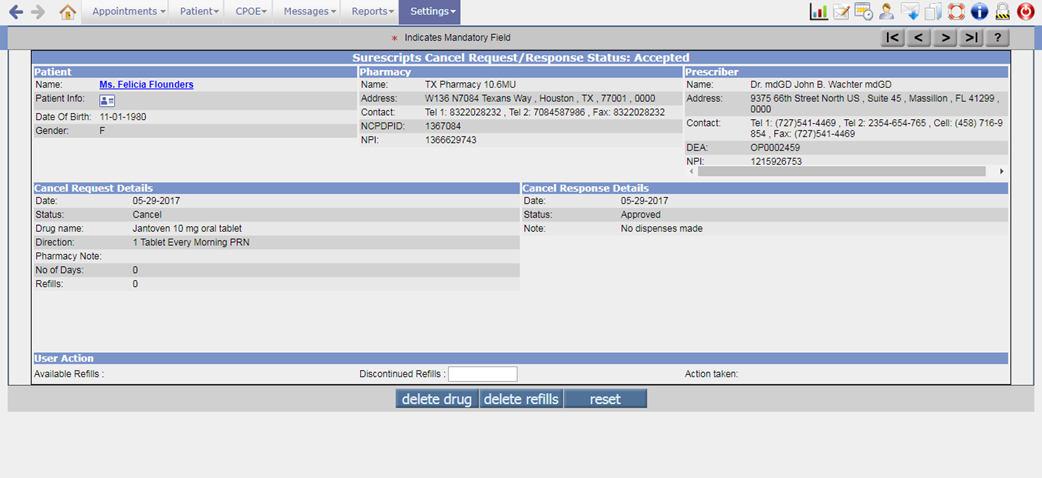
· The Cancel Response displays the Date of cancellation, Status of the cancel request, and the Note entered by Pharmacy.
· The User Action section displays the Available Refills of the prescription and Discontinued Refills textbox to enter the number of refills to be deleted. After entering the Discontinued Refills when a user clicks on delete refills button, an alert showing the count of updated refill and the confirmation message to discontinue the refills is displayed. On click of OK button for the confirmation message, the refills are deleted and respective refill detail is then updated on the Prescription screen.
· A click on delete drug button would delete the entire drug from Prescription screen.
· The cancel request are then available on the Document List screen of Patient’s encounter.
Figure 3.1-17: Approved Cancel request in Document list screen
· The cancel request for drugs is signified as following in the Type column of Prescription screen:
|
Value in Type column |
Significance |
|
CANREQ |
Cancel request sent for drug from Prescriber to Pharmacy. |
|
CANRES_A |
Approved cancel response for drug from Pharmacy to Prescriber. |
|
CANRES_D |
Denied cancel response for drug from Pharmacy to Prescriber. |
Rx Fill
· The Rx Fill messages are sent by the pharmacy notifying the Prescriber about the status of a prescription i.e. the Pharmacy sends the notification confirming full/partial/no dispense of an eRx sent from PrognoCIS.
· The Rx Fill messages are used in following three instances:
- To notify about the dispensed prescription i.e. the patient picked up the medication or the medication will be delivered to the specified LTC organization.
- To notify about the partially dispensed prescription i.e. the patient picked up part of the medication or part of the medication will be delivered to the specified LTC organization
- To notify about the prescription that wasn’t dispensed i.e. the patient did not pick up the medication or the medication will not be dispensed at the present time. This message will be generated when the date is beyond Upto Date.
· The Rx fill for drugs is signified as following in the Type column of Prescription screen:
|
Value in Type column |
Significance |
|
RXFILL_F |
Rx fully dispensed from Pharmacy to Prescriber. |
|
RXFILL_PF |
Rx partially dispensed from Pharmacy to Prescriber. |
|
RXFILL_NF |
Rx not dispensed from Pharmacy to Prescriber. |
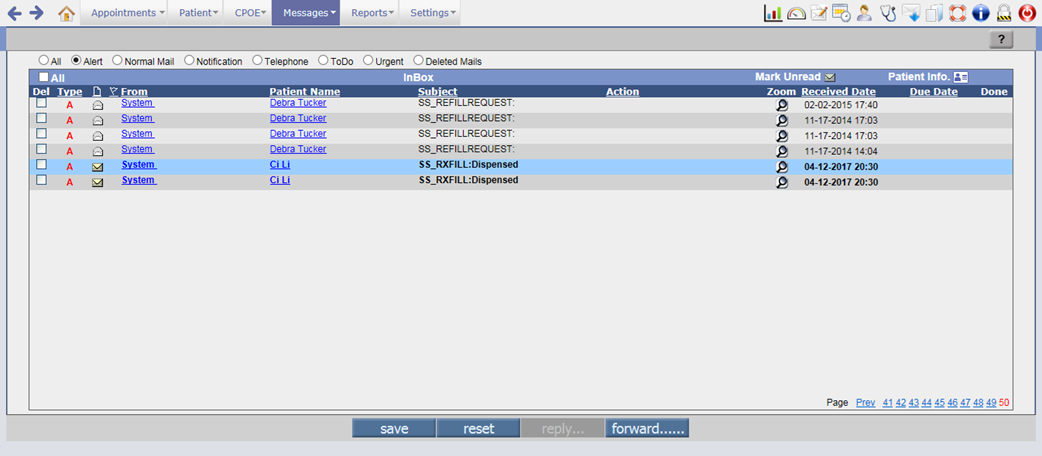
· When a Pharmacy sends the status of the dispense, the Rx fill message is sent to the Provider in the Messageà In screen with the subject as SS_RXFILL:<status of the dispense>.
Figure 3.1-18: Rx Fill message on Message-In screen
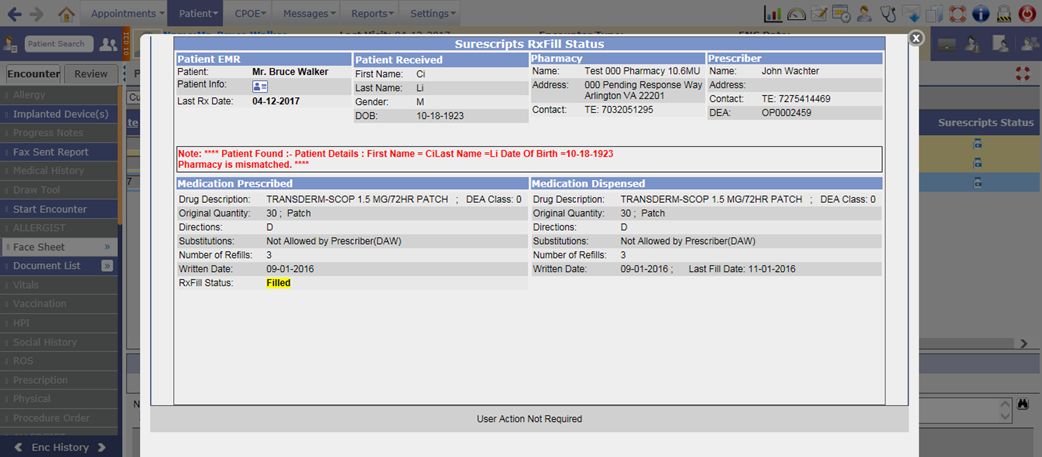
· A click on zoom button for Rxfill message would invoke the Rx fill status screen. The screen displays the details such as Patient in EMR, Patient received, Pharmacy, Prescriber, Medication Prescribed, and Medication Dispensed.
Figure 3.1-19: Rx Fill message
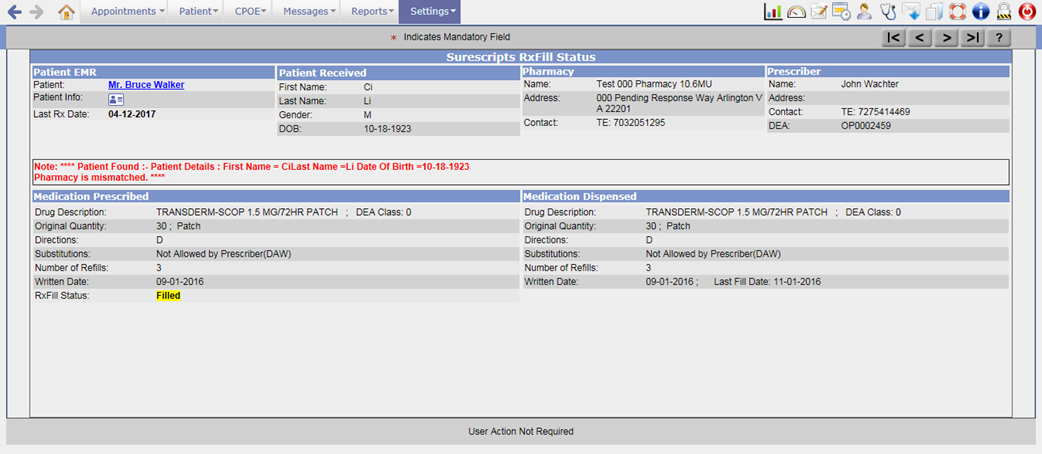
· The status of the Rxfill is displayed under Medication Prescribed section. If there are any notes for the Rxfill then it will be displayed under the RxFill Status field.
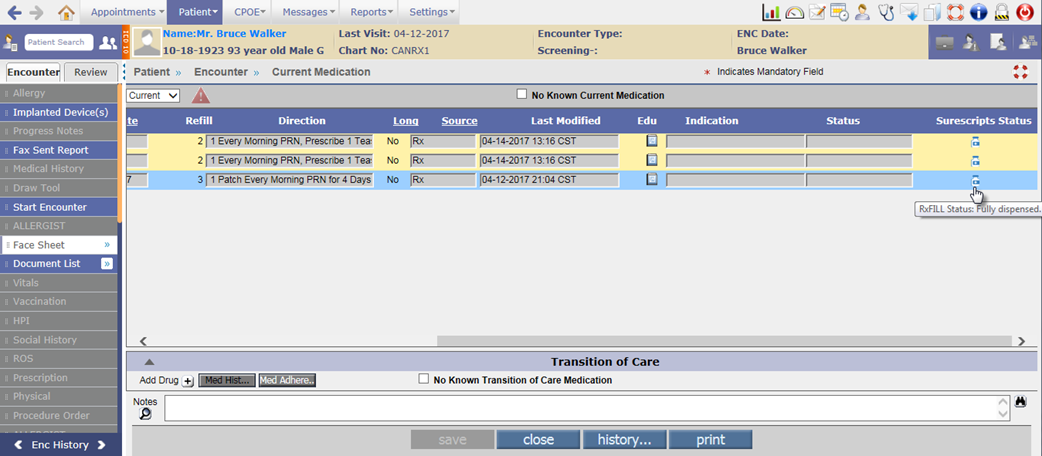
Changes on Current Medication screen
·
A new column, Surescripts Status has been added on the
Current Medication screen which displays the icon: ![]() . The tooltip of the icon indicates the drug change
and Rx Fill details for the Patient.
. The tooltip of the icon indicates the drug change
and Rx Fill details for the Patient.
Figure 3.1-20: Surescripts Status column on Current Medication screen
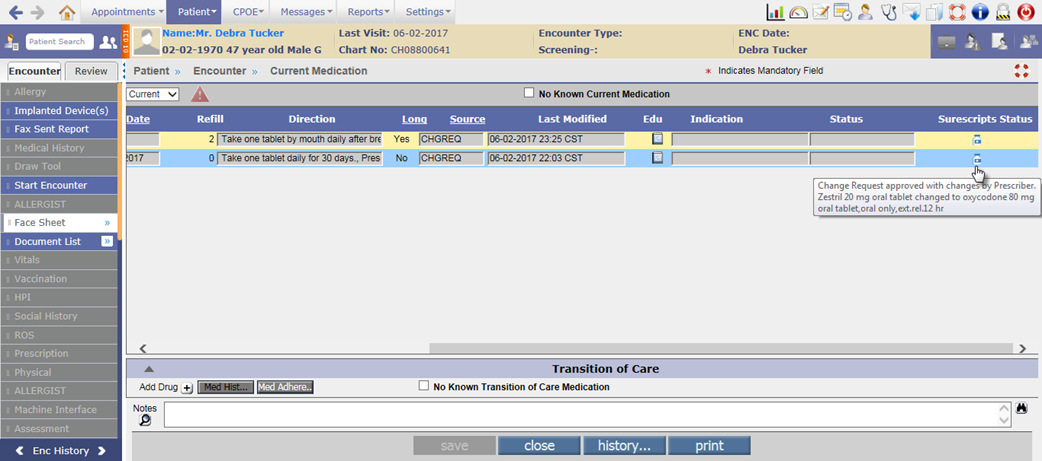
Figure 3.1-21: Tooltip of Surescripts Status icon
·
A click on the icon:
![]() from Current Medication screen for change Rx and Rx
Fill would invoke the respective Change Request and Rx Fill status popup.
from Current Medication screen for change Rx and Rx
Fill would invoke the respective Change Request and Rx Fill status popup.
Figure 3.1-22: Change request details on click of Surescripts Status icon
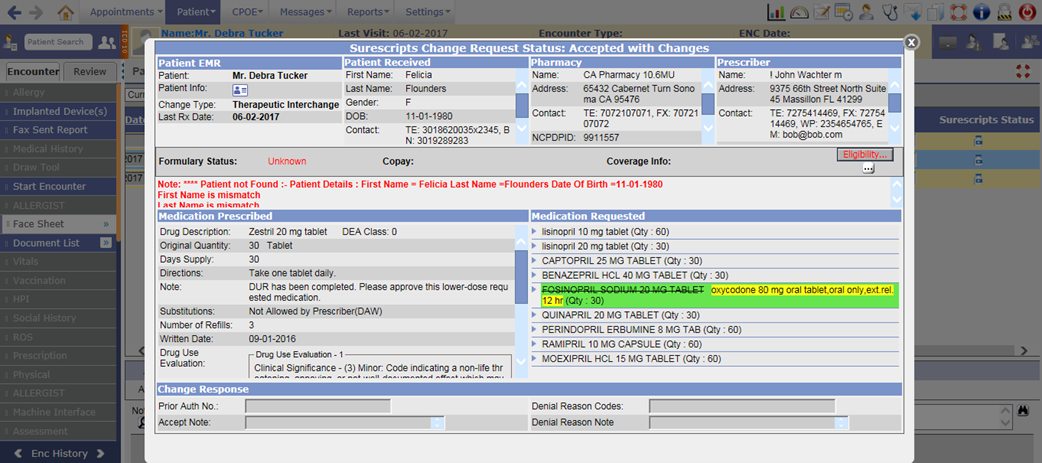
Figure 3.1-23: Rx Fill details on click of Surescripts Status icon
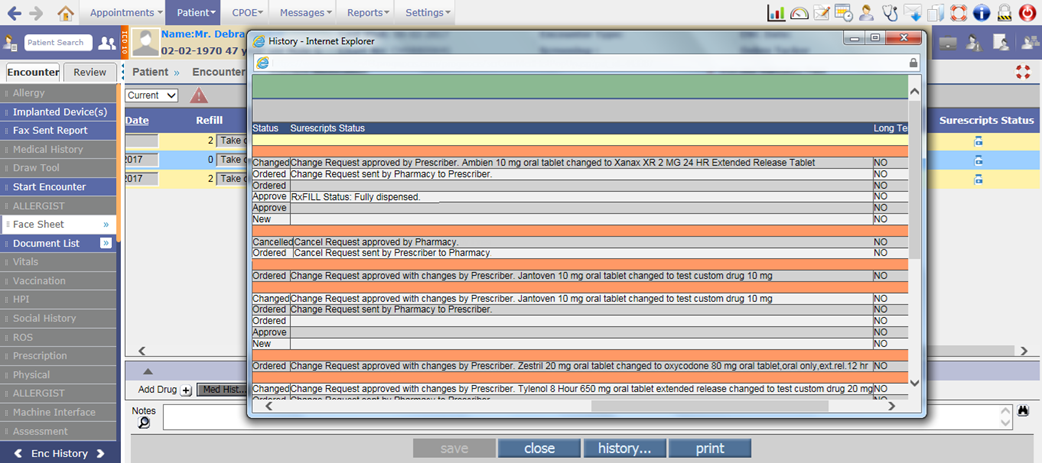
· Also, on the Current Medication History popup (click on history… button), a new Surescripts Status column has been added which displays the status and details of the change request, cancel request and Rx fill drugs.
Figure 3.1-24: Surescripts status on Current Medication history
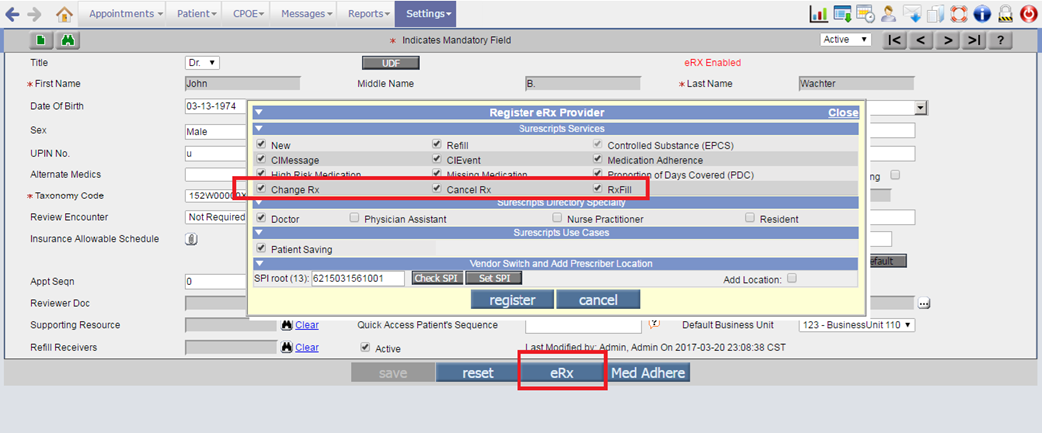
Configuration for Rx change, Rx cancel and Rx fill request messages:
· The following newly added Surescripts services needs to be enabled for a Provider (Goto: Provider Master screenà click on eRx buttonà Register eRx Provider popup):
Ø Change Rx
Ø Cancel Rx
Ø RxFill
Figure 3.1-25: Surescripts services on Register eRx Provider popup
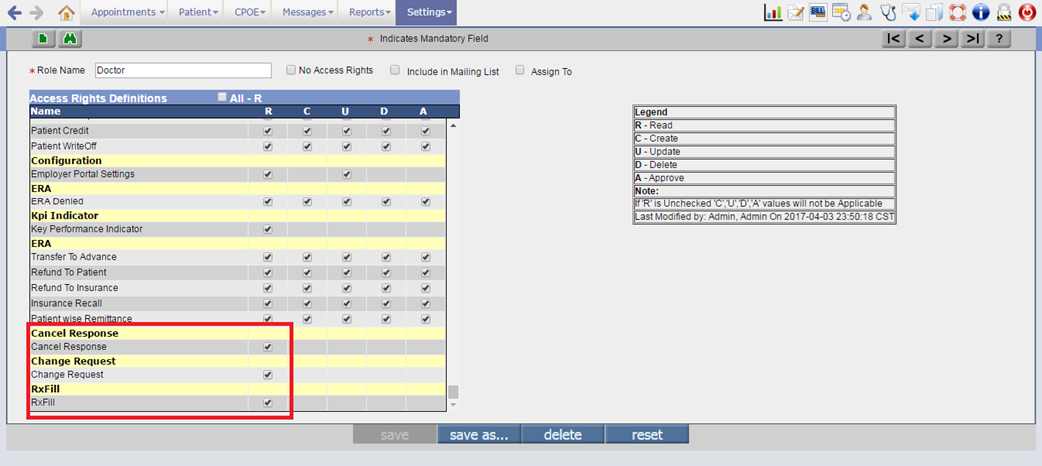
· The Read rights for Change Request, Cancel Response, and RxFill needs to be set for the Doctor or any required role.
Figure 3.1-26: Surescripts service rights on Role master screen
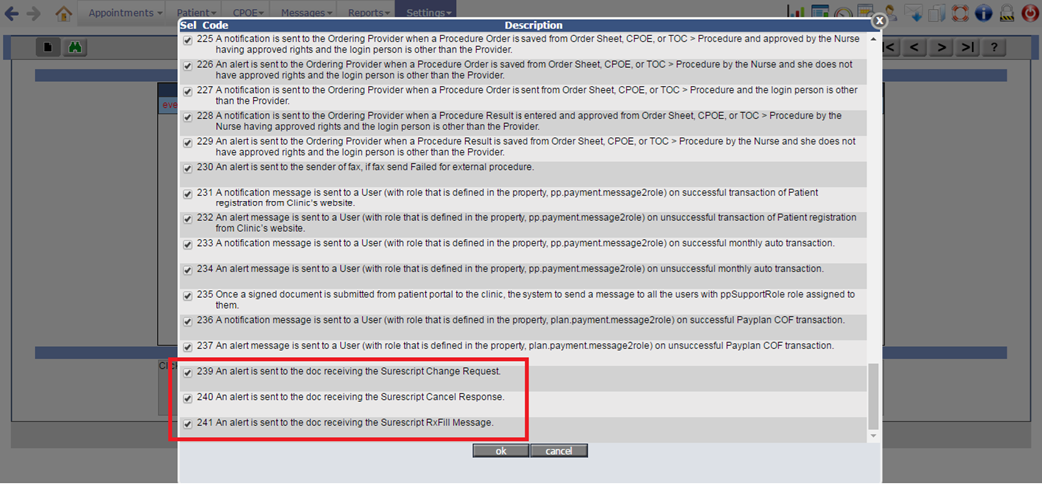
· The following newly added supported events needs to be set: to receive the Rx change, Rx cancel, and RxFill request messages from Pharmacy to the Provider:
Ø 239 – For change request of the newly Rx sent from Pharmacy to Provider.
Ø 240 – For cancel response from Pharmacy to Provider indicating the status of the cancel Rx sent by that Provider.
Ø 241 – For Refill message notification sent from Pharmacy to the Provider.
Figure 3.1-27: Supported events for surescripts services
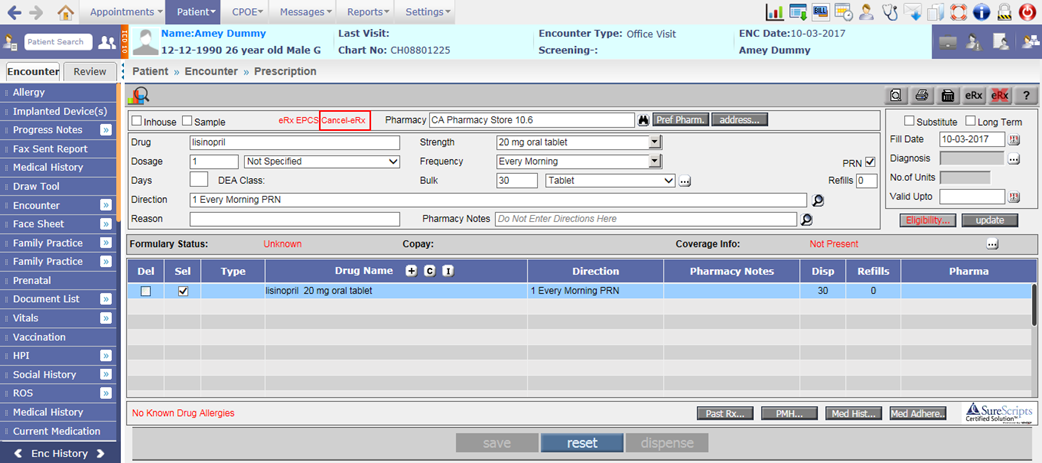
Additional changes on Prescription screen
1. Cannot delete/modify the eRx sent drugs
· If the Pharmacy supports Cancel eRx service, then the Del checkbox and update button will be disabled for drugs sent via eRx even if the property, rx.edit.sent.drugs is set to ON. However, for the Pharmacy not having Cancel eRx service, the Del checkbox and update button will remain enabled.
· If the selected Pharmacy supports cancel eRx service then the text, ‘Cancel-eRx’ displays in Red before the Pharmacy field.
Figure 3.1-28: Cancel eRx label for selected pharmacy on Prescription screen
2. Training zeros after decimal in Dosage and Bulk quantity is removed
Earlier for Bulk quantity, the zeros after decimal point were removed. Now, for Dosage field as well the zeros after decimal point are removed.
3. Unit should be Milliliter for Oral liquid drugs
For any oral liquid drug, if a user selects Dosage and Bulk quantity other than Milliliter then an alert, “Please select ‘Milliliter as Dosage/Dispense Unit” is displayed and for multiple oral liquid drugs following alert is displayed:
“Please select ‘Milliliter’ as Dosage Unit for following drugs:
- <drug name>
- <drug name>
Please select ‘Milliliter’ as Dispense Unit for following drugs:
- <drug name>
- <drug name>”
4. Medication History related changes
i. Medication History popup displays the drugs which are sent through eRx in last 2 years within the coverage period of the plan. Now, provision has been given to send Medication History for 1 year.
A new system level property, rx.medhist.offset.1year has been added to fetch the Medication History for 1 year. If the property is turned ON then the Medication History for last 1 year from the encounter date will be fetched. However, if the property is turned OFF then it will be fetched for the default amount of time, which is 2 years.
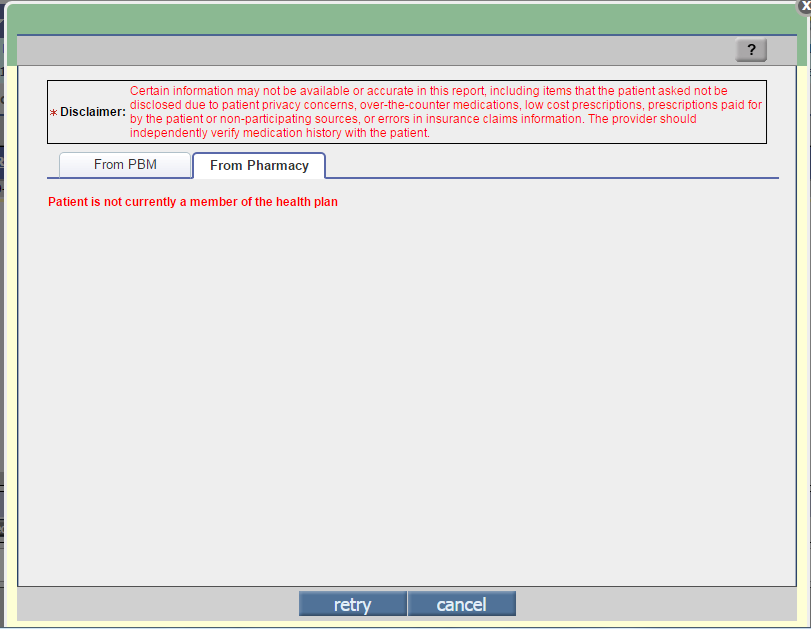
ii. Earlier in Medication History popup, for denied response, the message “Patient not found” was displayed. Now, the following message is displayed:
“Patient is not currently a member of the health plan”
Figure 3.1-29: Message on Medication History popup
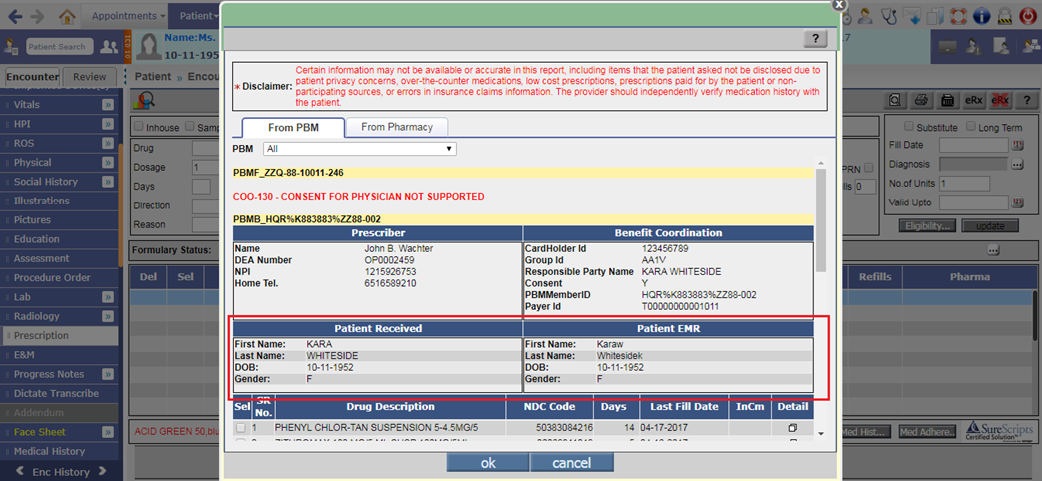
iii. The Patient information such as First name, Last name, DOB, Gender is displayed on the Medication History popup. The Patient Received section displays the Patient information from the Medication History response XML; whereas the Patient EMR section displays the information from EMR.
Figure 3.1-30: Patient details on Medication History popup
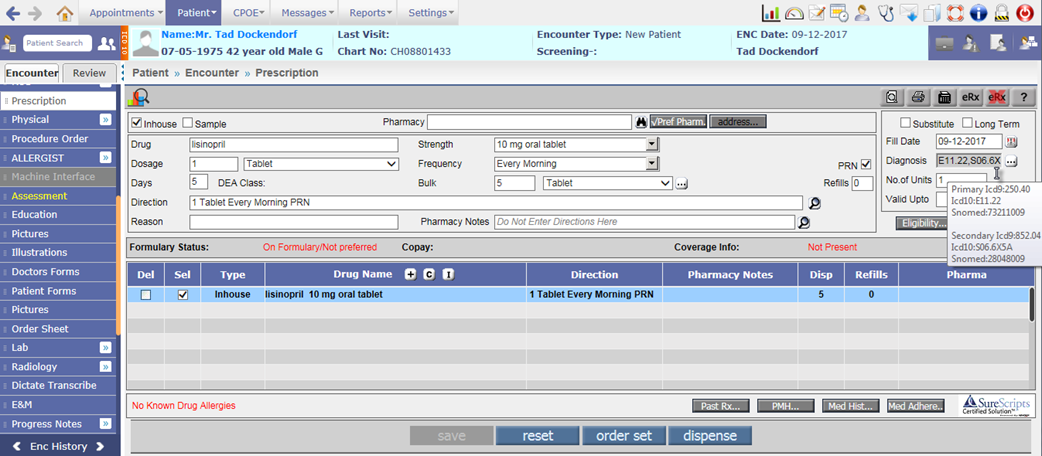
5. Associate Primary and Secondary Diagnosis code to the drug
·
When a User clicks on the Diagnosis button:
![]() , the list of all ICD codes selected on Assessment
screen are displayed. Earlier, a user could associate only one ICD code to the
drug. Now, provision has been given to associate primary and secondary ICD code
to the drug.
, the list of all ICD codes selected on Assessment
screen are displayed. Earlier, a user could associate only one ICD code to the
drug. Now, provision has been given to associate primary and secondary ICD code
to the drug.
· The first selected ICD code will be by default considered as Primary and the second selected ICD code as Secondary. Both selected ICD10 codes for the highlighted drug are then displayed in the Diagnosis field of Prescription screen. The tooltip will display the Primary and Secondary ICD9, ICD10, and SNOMED codes.
Figure 3.1-31: Primary and secondary diagnosis code on Prescription screen
![]() Note: If encounter is ICD10 then Diagnosis field display ICD10 codes else ICD9
codes are displayed.
Note: If encounter is ICD10 then Diagnosis field display ICD10 codes else ICD9
codes are displayed.
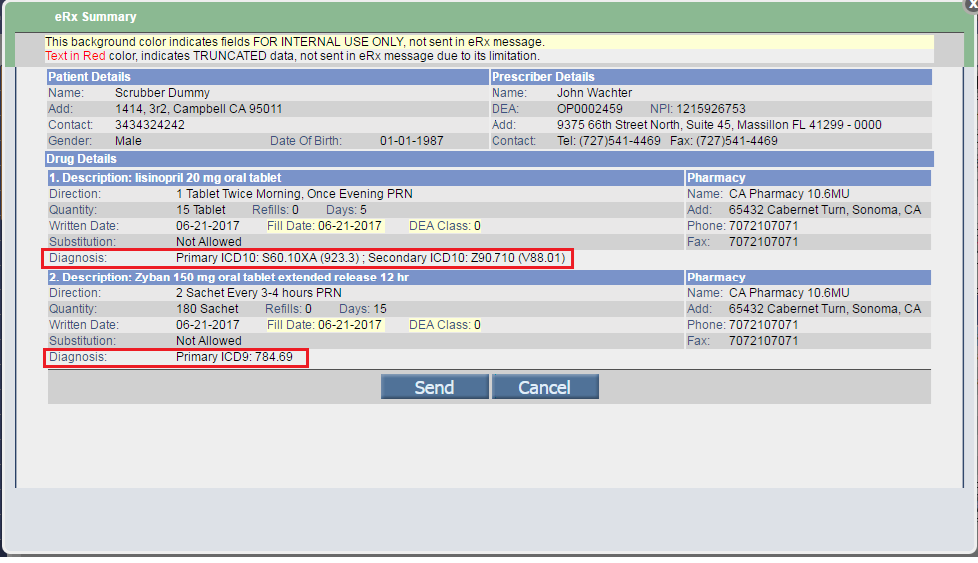
· On eRx Summary popup, Diagnosis field under the Drug details section displays the primary and secondary ICD codes selected for the drug. It would display the Diagnosis code as “Primary ICD10 (ICD9), Secondary ICD10 (ICD9)”.
Figure 3.1-32: Diagnosis code on eRx Summary popup
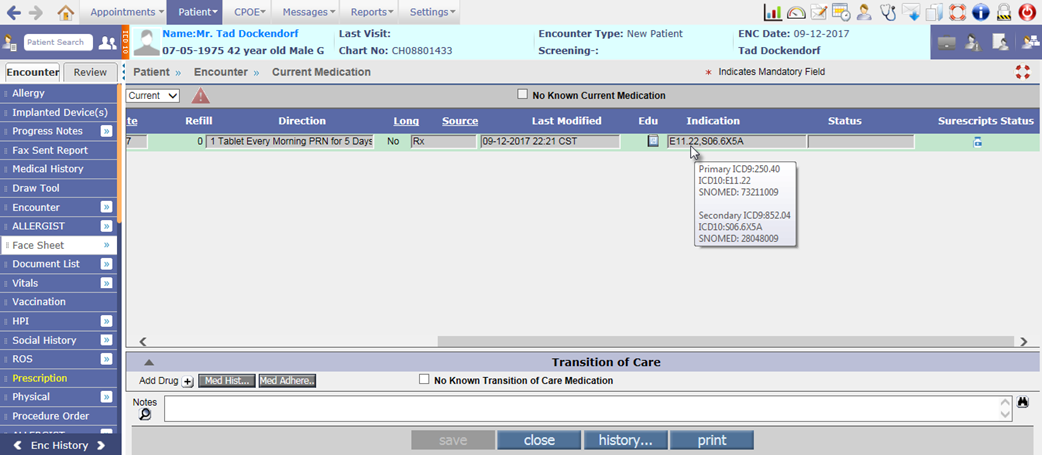
6. Indication column on Current Medication screen displays the Diagnosis codes
The Indication column on Current Medication screen also displays the associated ICD10 codes for the drug and its tooltip displays the Primary and Secondary ICD9, ICD10, and SNOMED codes.
Figure 3.1-33: Diagnosis codes on Current Medication screen
3.2 Provision to add Family History Problems based on SNOMED codes
Navigation Goto Patient’s Encounter à Encounter TOCà Family History
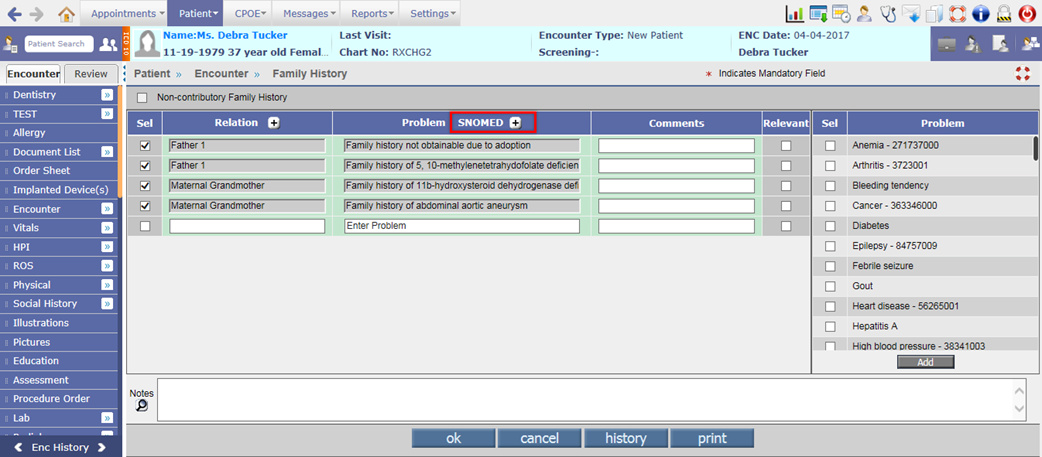
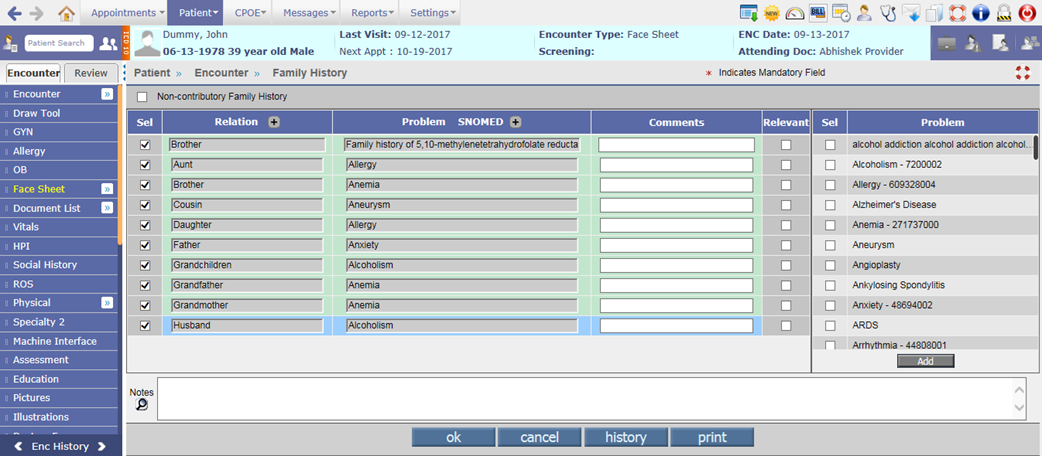
· A SNOMED [+] button has been provided beside the Problem column to add the Family History Problems based on SNOMED codes. A click on SNOMED [+] button invokes the IMO search popup namely, Family Health History SNOMED Codes.
Figure 3.2-1: SNOMED button on Family History screen
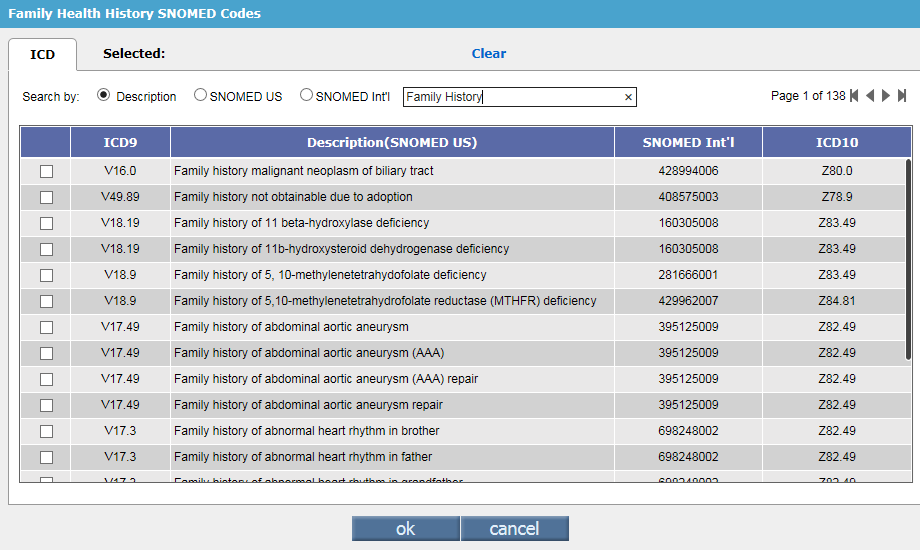
· The Family Health History SNOMED Codes popup consists of only ICD tab with the default text, ‘Family History’ in the search field. Based on this default text, all the SNOMED codes related to Family History are displayed in the IMO search popup.
Figure 3.2-2: Family History IMO search
· The maximum number of Family History SNOMED codes that can be selected from IMO search for adding in to an Encounter is dependent on the value set in the property, newrows.familyhistory. For adding Relations also, the value set in this property is considered.
· Once the number of added Relation or SNOMED reaches the value set in the property, newrows.familyhistory then the respective Relation [+] or SNOMED [+] button displays disabled thus restricting a user from adding more records.
Figure 3.2-3: Maximum Relations added on Family History screen
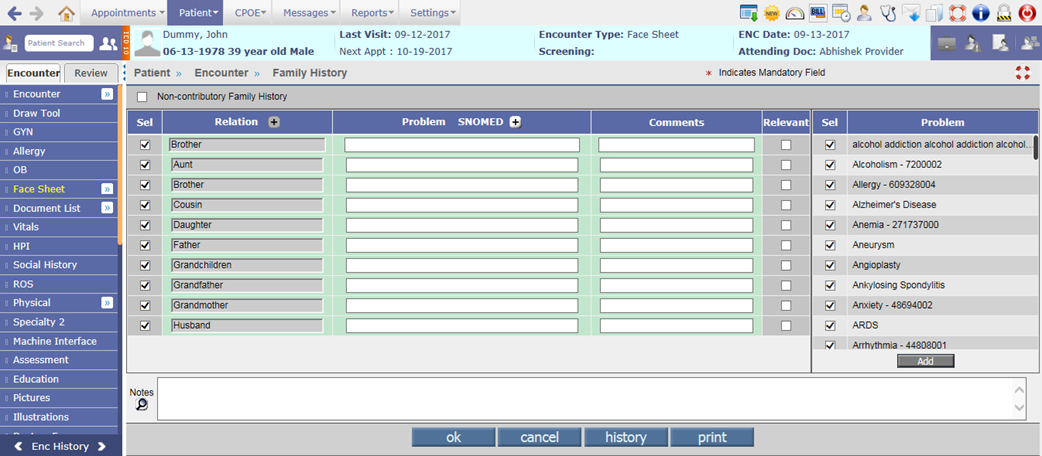
![]() Note: If both, Relation and SNOMED values are assigned
and the maximum rows are reached then the Relation
[+] and SNOMED [+] buttons
are displayed as disabled.
Note: If both, Relation and SNOMED values are assigned
and the maximum rows are reached then the Relation
[+] and SNOMED [+] buttons
are displayed as disabled.
Figure 3.2-4: Relation and SNOMED buttons diabled after adding the maximum rows
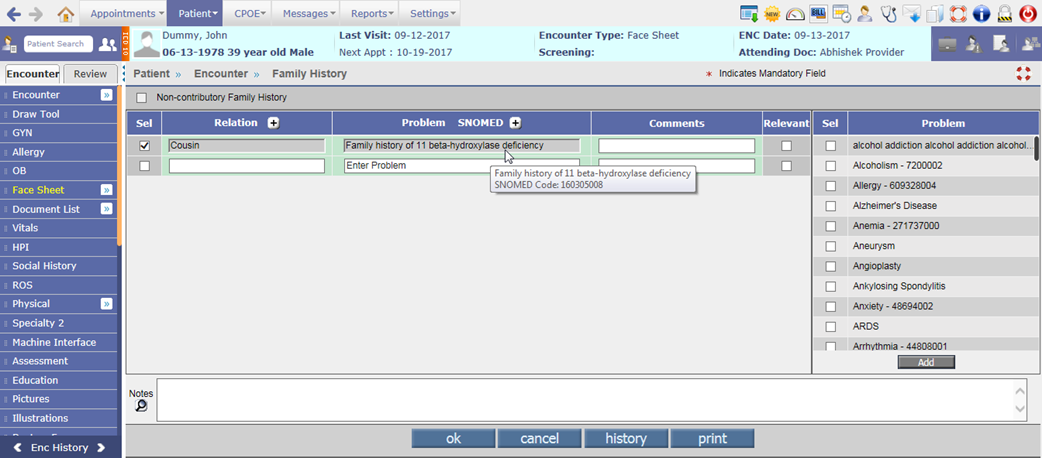
· On save of Family History screen, the tooltip of added Problem column displays the description of Family History SNOMED code and its associated SNOMED code.
Figure 3.2-5: Tooltip of added SNOMED code
![]() Note: The manually entered Relation and/or Problem, will
be always displayed as enabled even after saving the details.
Note: The manually entered Relation and/or Problem, will
be always displayed as enabled even after saving the details.
![]() Hint: Irrespective
of the property, facesheet.familyhistory.byrelation
being turned ON or OFF, it is always recommended to select the value in first
column and then associate the respective information in second column.
Hint: Irrespective
of the property, facesheet.familyhistory.byrelation
being turned ON or OFF, it is always recommended to select the value in first
column and then associate the respective information in second column.
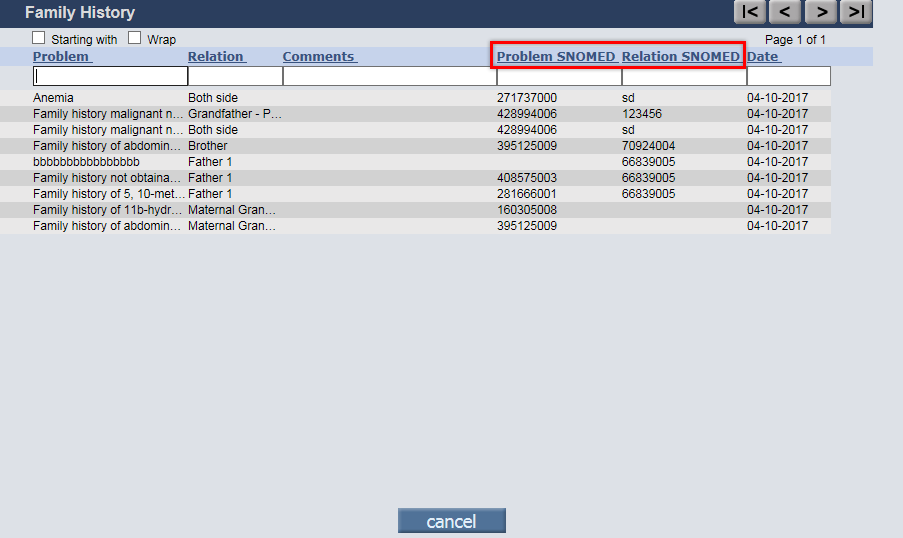
· On Family History popup (click on History button), the columns such as Prob Snomed and Rel Snomed have been relabeled to Problem SNOMED and Relation SNOMED respectively.
Figure 3.2-6: Relabeled columns on Family History popup
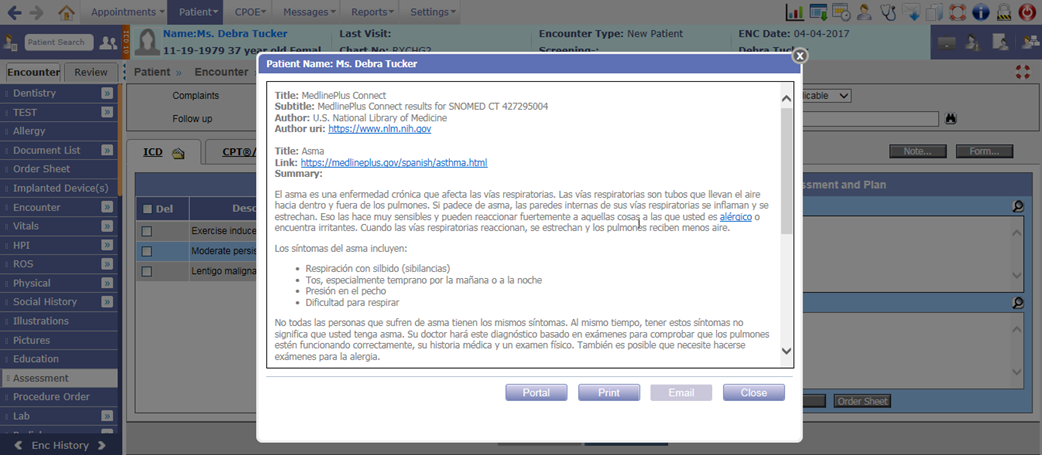
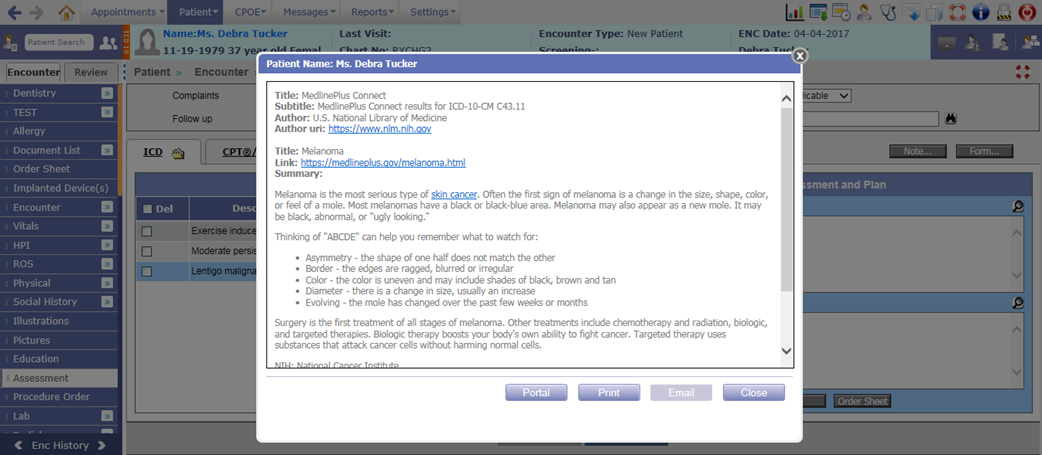
3.3 Provision to provide Education material based on Patient’s preferred language
EMR
Earlier when a User clicked on Education icon:
![]() , the Medlineplus Education material always displayed
in English language only. Now, based on Patient’s preferred language, the
Medlineplus Education material is displayed in that respective language.
, the Medlineplus Education material always displayed
in English language only. Now, based on Patient’s preferred language, the
Medlineplus Education material is displayed in that respective language.
Figure 3.3-1: Education material in Patient's preferred language
However, if there is no set preferred language or Patient has declined to specify the preferred language then for such Patients, Medlineplus Education material by default will be displayed in English language.
In case, the Patient has preferred language added but the education material is not available in that language then too it is displayed in English language.
Figure 3.3-2: Education material in English
Following is the list of screens where Education material is available:
· Past Medical History
· Current Medication
· Allergy
· Assessment
· Lab Order
Also, Medline Education material for codes such as SNOMED, ICD10, LOINC, RXNORM, and NDC is fetched based on Patient’s preferred language.
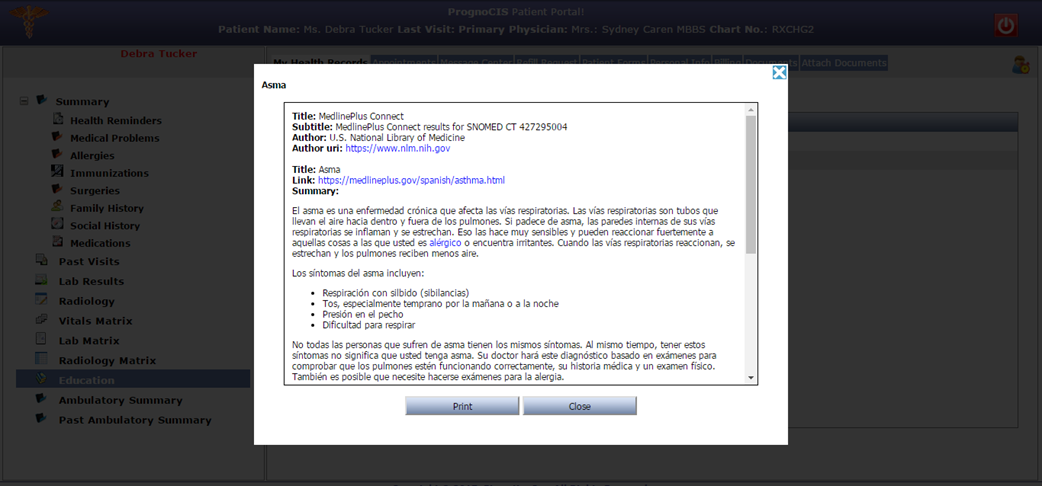
Patient Portal
Even on Patient Portal, the Medlineplus Education material is now displayed in Patient’s preferred language.
Figure 3.3-3: Education material in Patient preferred language on Patient Portal
3.4 Provision to import the Immunization History and Forecast from Registry
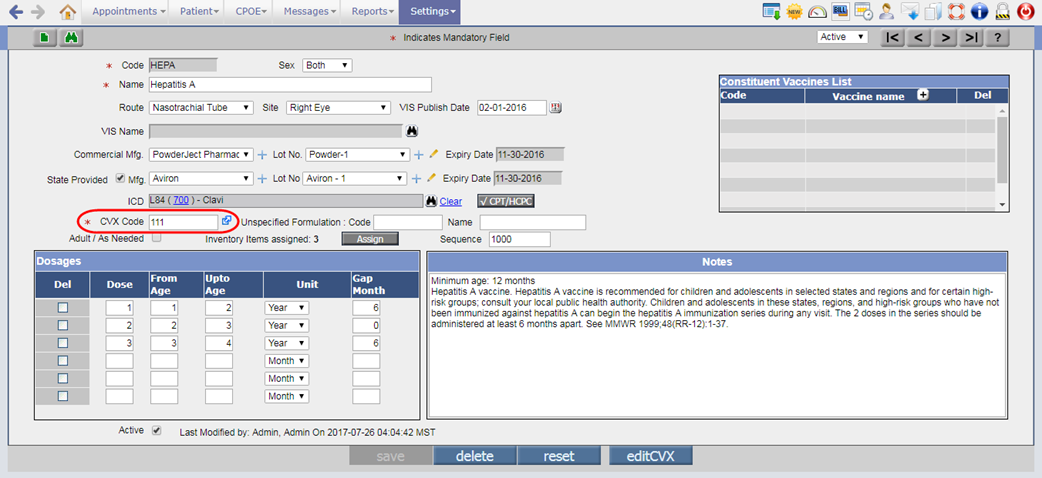
Changes done on Vaccine Master screen
Navigation Goto menu: Settingsà Configurationà under Codes/Drugs column, click Vaccineà Vaccine Master screen
· The CVX Code field is now mandatory for any Vaccine. It allows a user to enter code up to 3 digits.
Figure 3.4-1: CVX code field on Vaccine Master screen
·
A new icon:
![]() has been provided for CVX code field to invoke the
reference link for identifying the CVX code which needs to be associated to the
Vaccine.
has been provided for CVX code field to invoke the
reference link for identifying the CVX code which needs to be associated to the
Vaccine.
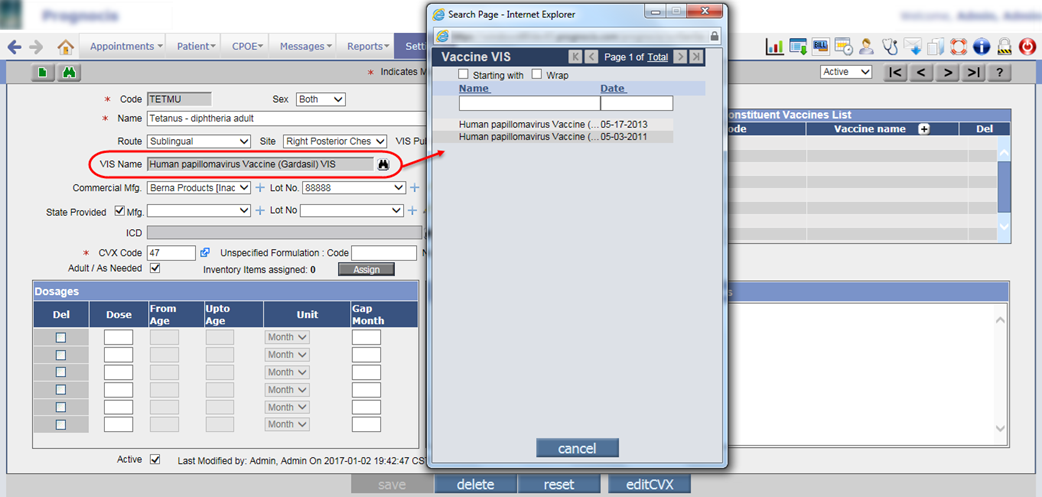
· Provided the new field, VIS Name to associate VIS (Vaccine Information Statement) for the Vaccine. Based on the entered CVX code, the list of all available VIS is displayed in Vaccine VIS search.
Figure 3.4-2: VIS name on Vaccine Master screen
· Depending upon the selected VIS Name, the VIS Publish Date is updated accordingly.
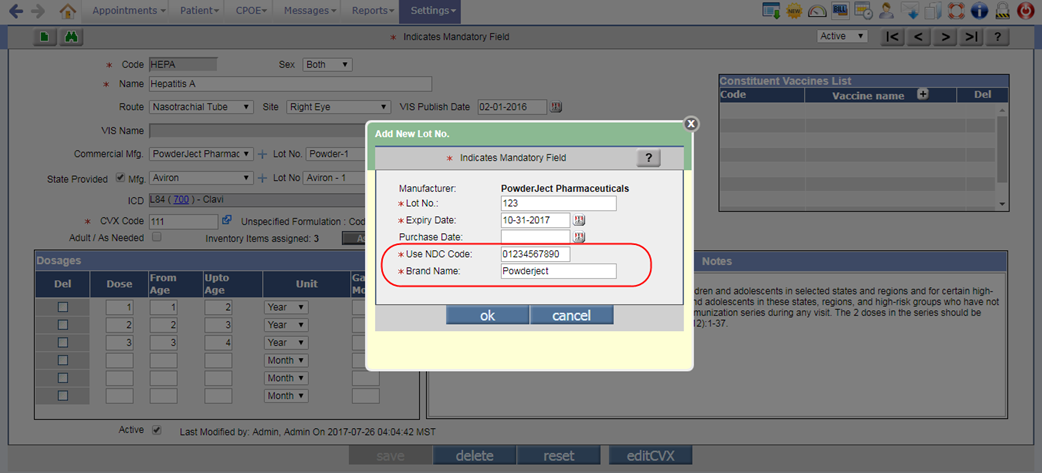
· For Lot No., two new mandatory fields i.e. Use NDC Code and Brand Name have been added. From these fields, User can associate the NDC code and Brand name for that respective Lot number. In Use NDC Code field, maximum 11 digits are allowed to be entered.
Figure 3.4-3: NDC code and Brand name for Vaccine Lot number
Changes on Patient Registration screen
Navigation Goto menu: Patientà Registerà click on Other Info tabà click on Vaccination buttonà Patient Vaccination Details popup
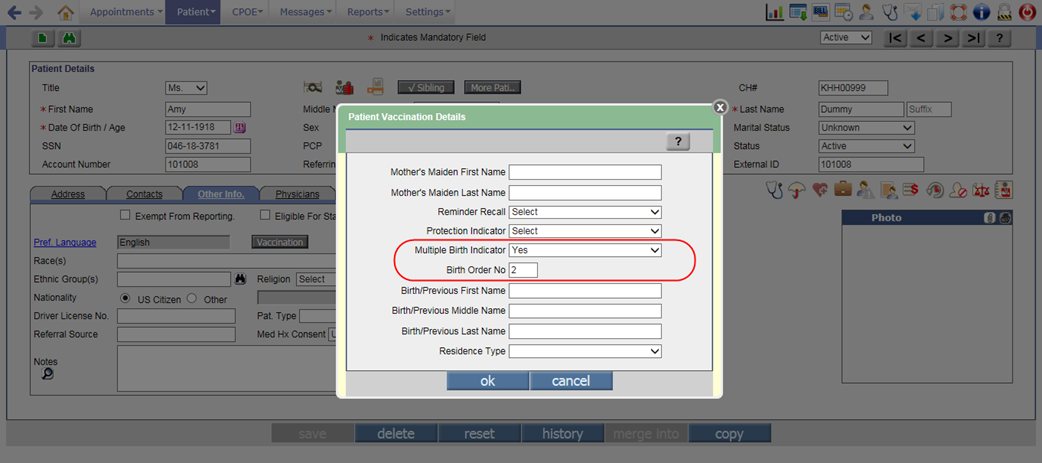
· Two new fields, Multiple Birth Indicator and Birth Order No have been added on the Patient Vaccination Details popup. If the patient is a part of multiple births, for example: Twins, Triplets etc. or has any sibling then the User can set the Multiple Birth Indicator field as Yes and provide the order number in which the patient was born. The User can enter value up to 2 digits in the Birth Order No field.
Figure 3.4-4: Mutiple Birth details on Patient Vaccination Details popup
· The following new tags have been added to display its respective details:
|
Tag |
Description |
|
PT_BIRTH__INDICATOR |
Displays if the patient was a part of a multiple birth or not. |
|
PT_BIRTH__ORDERNO |
Displays the order number in which the patient was born. |
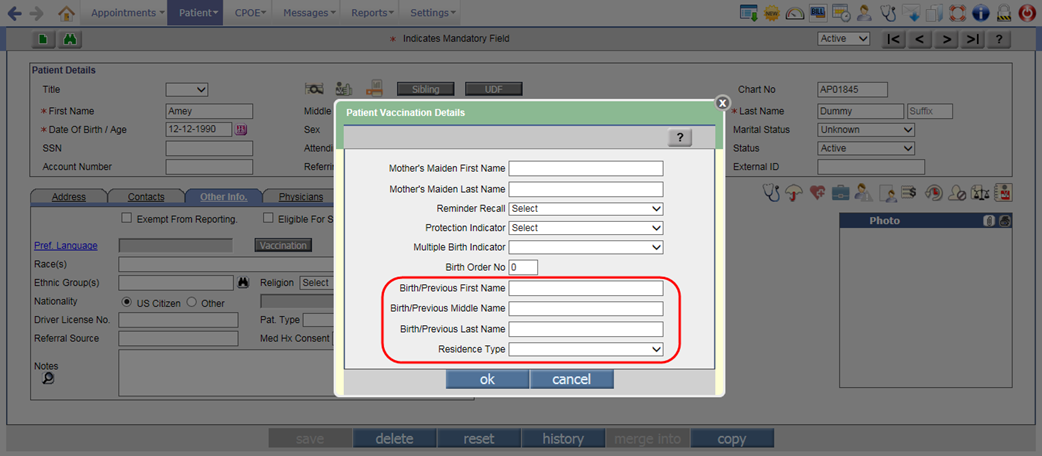
· Also, the following new fields have been added to enter the Patient’s previous or birth details:
- Birth/Previous First Name
- Birth/Previous Middle Name
- Birth/Previous Last Name
- Residence Type
Figure 3.4-5: Birth details on Patient Vaccination Details popup
Changes on Vaccination screen
Navigation Goto: Patient’s encounterà Encounter TOCà Face Sheetà Vaccination
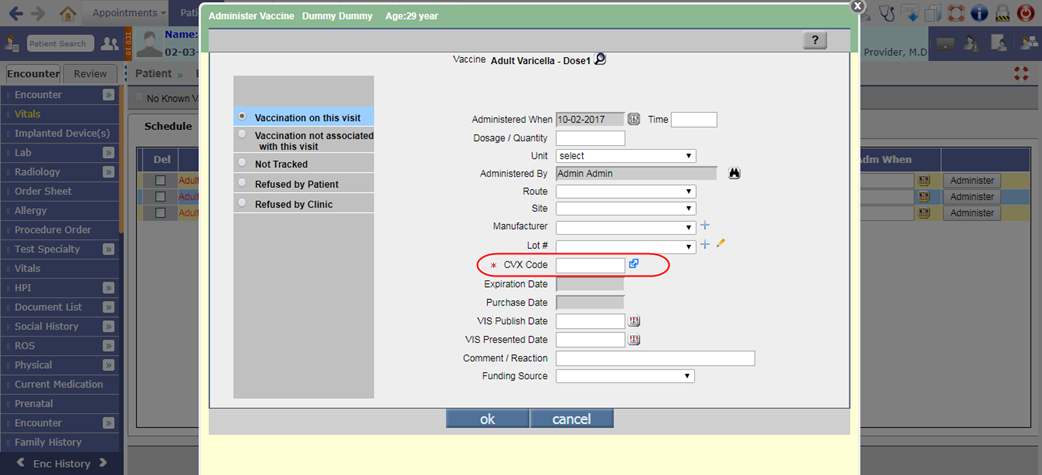
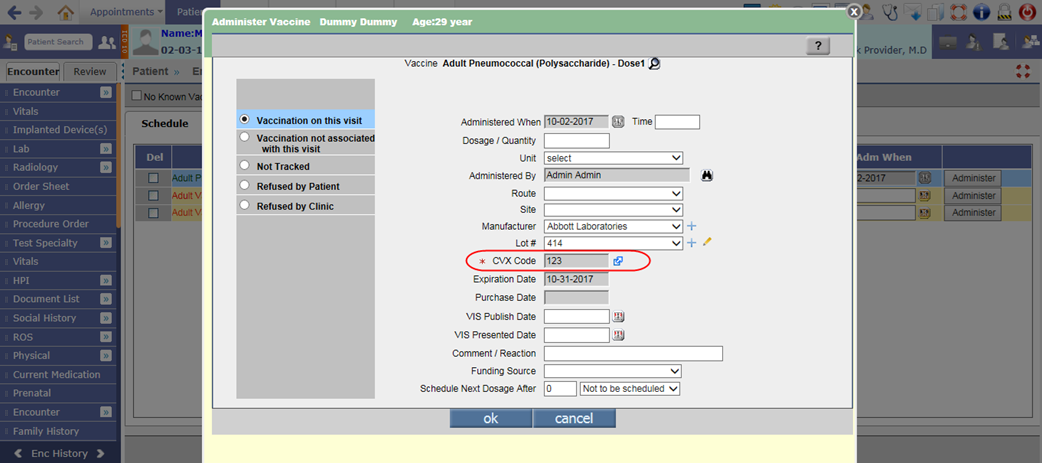
1. The CVX code field has been provided on the Administer Vaccine popup
·
A new mandatory field, CVX Code
with reference link icon:
![]() has
been provided on the Administer Vaccine popup to associate CVX code to the
Vaccine.
has
been provided on the Administer Vaccine popup to associate CVX code to the
Vaccine.
Figure 3.4-6: CVX code on Administer Vaccine popup
· Once the CVX code is entered and the vaccine is administered, the added CVX code will be updated on the Vaccine Master as well.
· If the CVX is already associated for the vaccine then the field would display as read only.
Figure 3.4-7: Added CVX code on Administer Vaccine popup
2. Vaccines without CVX code are not allowed to be administered
· If the CVX Code is blank for any Vaccine, then the Adm When field will be disabled for a User to restrict administering such vaccines and a tooltip, ‘CVX code is missing’ would be displayed.
Figure 3.4-8: Tooltip on Adm When field for missing CVX code
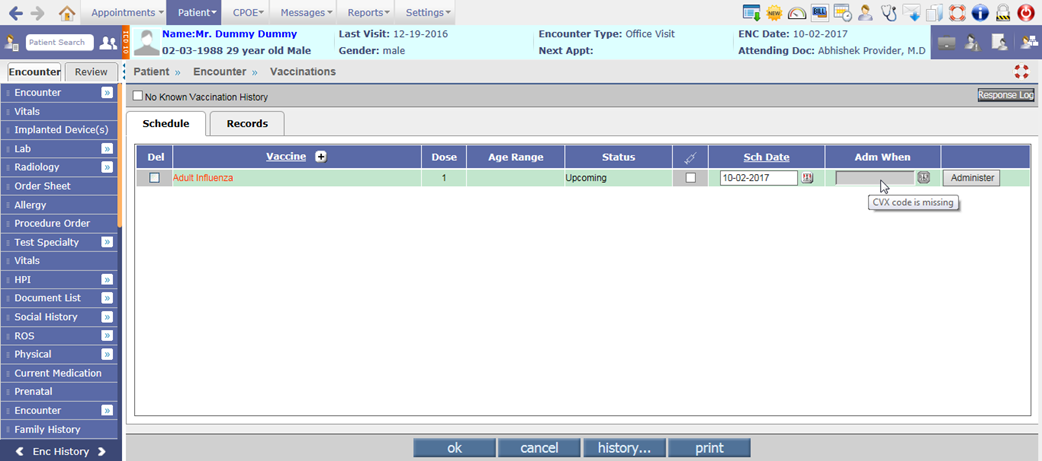
· However, Administer button would be enabled for a User to add the CVX code for that vaccine.
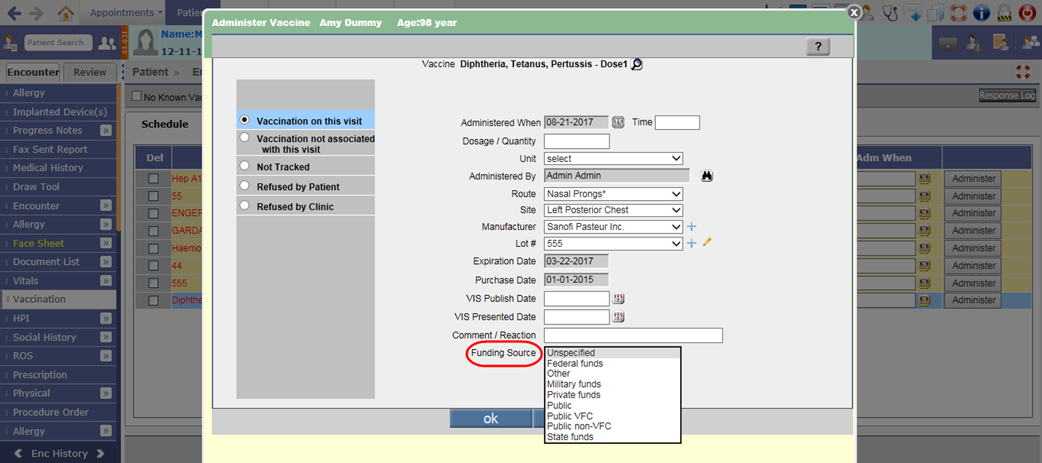
3. New field has been provided on Administer Vaccine popup
A new field, Funding Source has been provided on the Administer Vaccine popup to add the funding source of a vaccination. This field is available only for Vaccinations on this visit option.
Figure 3.4-9: Funding Source on Administer Vaccine popup
4. Provided two new buttons, Registry and Response Log on Vaccination screen
· Two new buttons, Registry and Response Log have been provided on the Vaccination screen.
Figure 3.4-10: Registry and Response Log buttons on Vaccination screen
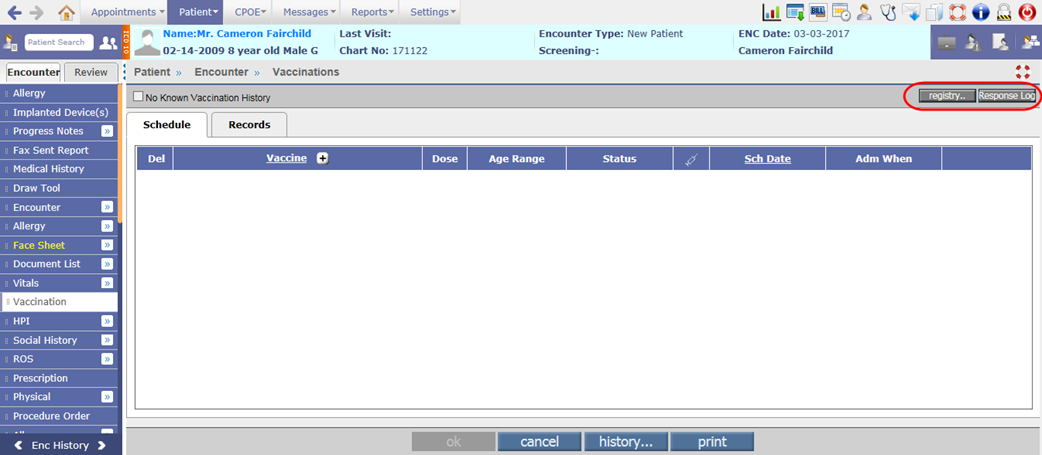
· Displaying of Registry button is dependent on the newly added property, vaccination.show.historyandforecast. Only if the property is set to ON, the Registry button would be available on the Vaccination screen else it will not be displayed. Whereas, the availability of Response Log button is dependent on the properties, vaccination.show.historyandforecast and export.vacc.createHL7Message. If either of the property is ON then the Response Log button will be displayed on Vaccination screen.
Registry button:
· A click on Registry button would invoke the Evaluated Immunization History and Forecast popup. This popup displays the Patient Information, Evaluated Immunization History and Immunization Forecast details imported from the Registry.
Figure 3.4-11: Immunization History and Forecast popup
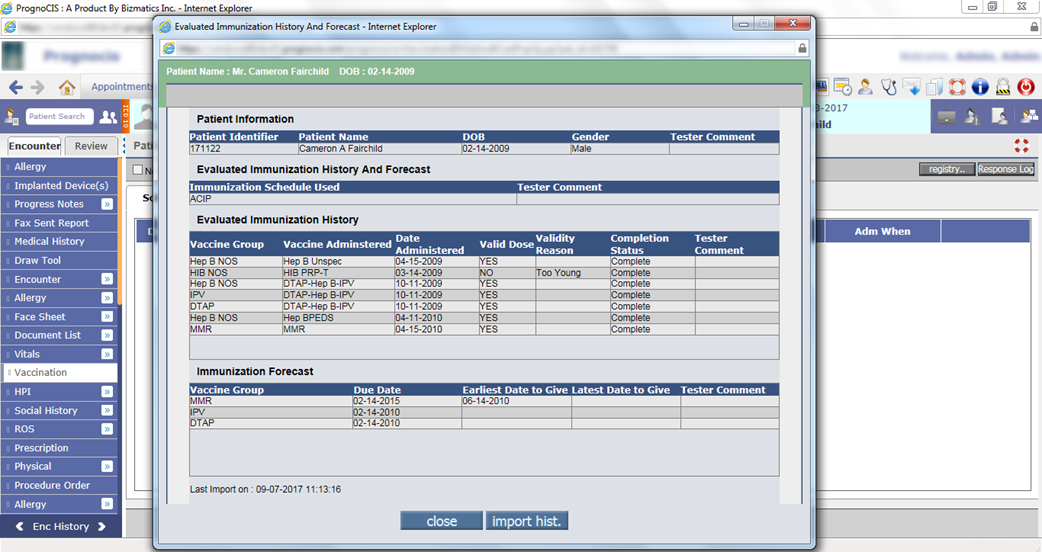
· A click on import hist. button on the Evaluated Immunization History and Forecast popup would import the latest Immunization details for that Patient present with the Registry. Once the import process is completed, an alert, “Immunization History and Forecast Imported Successfully” is displayed.
· However if the import process fails then an alert, “Failed to import Immunization History and Forecast” is displayed. Also, for Patient not found and too many match of Patient records in Registry respective alerts are displayed.
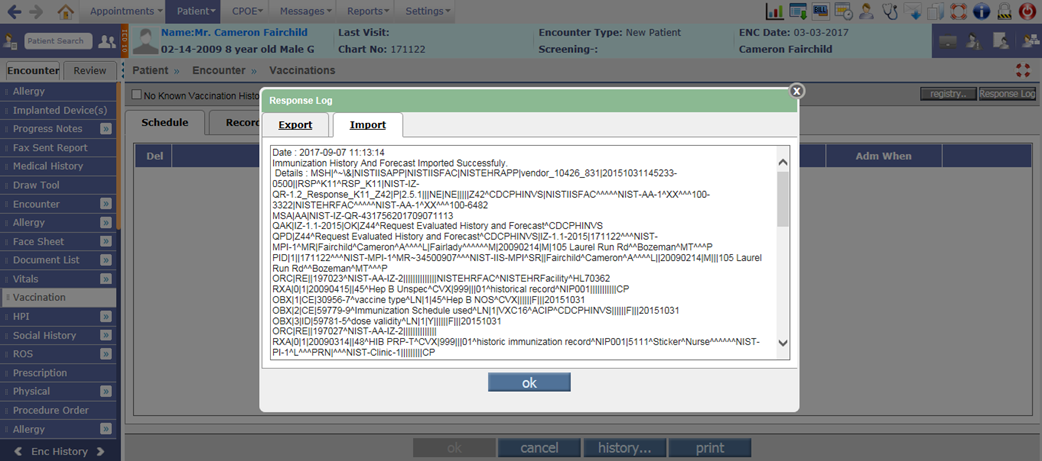
Response Log:
· A click on Response Log button would display the log of HL7 messages for Import and Export done with the Registry in the respective tabs. It also displays errors, if there are any. This button is useful only for HL7 Interface.
Figure 3.4-12: Response Log popup
5. Provision to export Vaccination message as per 2015 MU version
· A new property, export.vacc.MUVersion has been added to export the Vaccination message as per 2015 MU version.
· If the existing property, export.vacc.createHL7Message is set to Y and the property, export.vacc.MUVersion is set to MU3 then the Vaccination messages are exported as per 2015 MU version.
![]() Note: If the export.vacc.MUVersion
property is kept as blank then the Vaccination messages are exported as per
2014 MU version.
Note: If the export.vacc.MUVersion
property is kept as blank then the Vaccination messages are exported as per
2014 MU version.
· On deletion of administered vaccine, the HL7 message is generated and the Reason entered in Comment/Reaction field is sent.
3.5 Newer version of CCD is now available with UI changes
Navigation Goto: Patient’s Encounterà Encounter TOCà Encounter Closeà click on MU Summary buttonà Clinical Summary
· A newer version of CCD i.e. CCD 2.1 is now available in PrognoCIS. Also, the UI (User Interface) of this CCD has been changed so that it allows a user to:
- Directly display the data only within a particular section.
- Set a sequence for the display of specific sections.
- Set the number of sections to be displayed by default.
· All the below changes would be applicable for following types of CCD:
Ø Clinical Summary (2.1)
Ø Transition of Care (2.1)
Ø Health Summary (2.1)
Ø Referral Note (2.1)
Ø Data Portability (2.1)
UI related changes
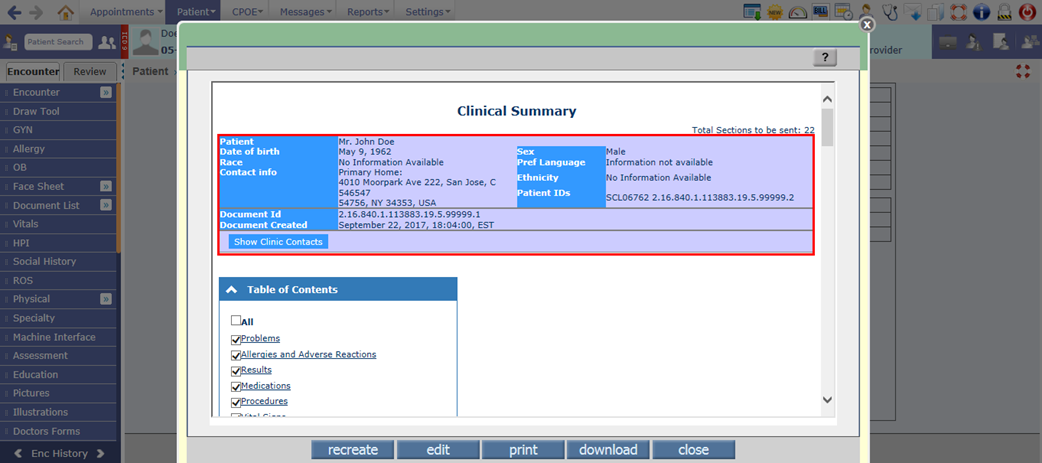
1. The Clinic contact information such as Author Contact info, Information Contact info, Legal authenticator Contact info, and Document maintained by Contact info is now displayed in expandable and collapsible format. By, default it will be displayed in collapsed format and a user can click on Show Clinic Contacts to view the details. To hide the Clinic contact information, a user needs to click on Hide Clinic Contacts.
Figure 3.5-1: Expand/Collapsable Clinic Contact info in Clinical Summary
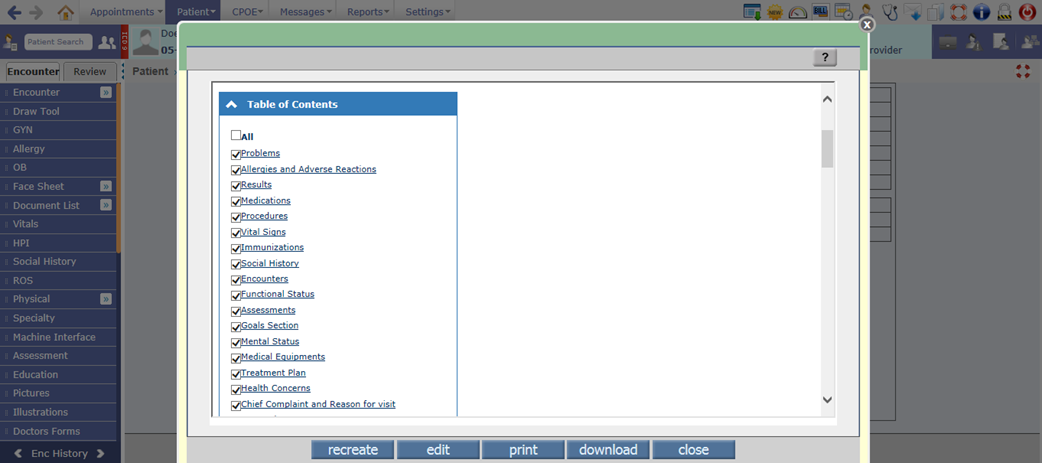
2. The Table of Contents is now displayed as expandable and collapsible. By default, it will be displayed in expanded format. A User can click on up arrow button (^) in the Table of Contents section to collapse it and down arrow button (v) to expand it.
Figure 3.5-2: Expand/Collapsable Table of Contacts in Clinical Summary
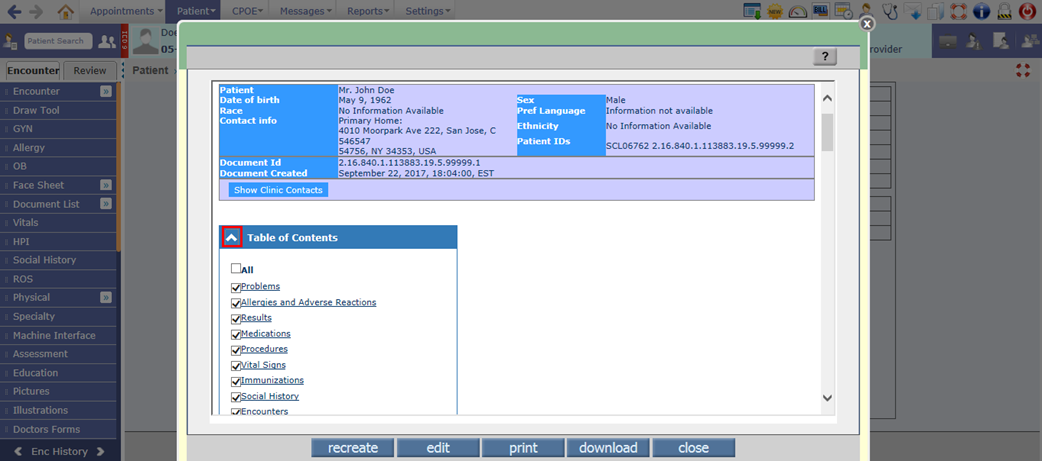
3. Checkbox has been provided for all the sections in Table of Contents. Depending on the checkbox being selected, the respective section is displayed else it will not be displayed in CCD.
If a User selects All checkbox then all the sections are displayed. However, after selecting All, if a user deselects any of the option then the All checkbox will be deselected. Also, if a user manually selects all the sections then the All checkbox will not be displayed as selected by default.
![]() Note: A new property, ccd.show.sections
has provided to set the sections for which checkbox will be displayed as
selected by default. The set sections would be displayed in the same sequence
as entered in the property.
Note: A new property, ccd.show.sections
has provided to set the sections for which checkbox will be displayed as
selected by default. The set sections would be displayed in the same sequence
as entered in the property.
Figure 3.5-3: Table of Contents options in Clinical Summary
4. All the sections in Table of Contents are now displayed with hyperlink, which on click would navigate the user to that respective section.
Figure 3.5-4: Sections displayed as hyperlink in Clinical Summary
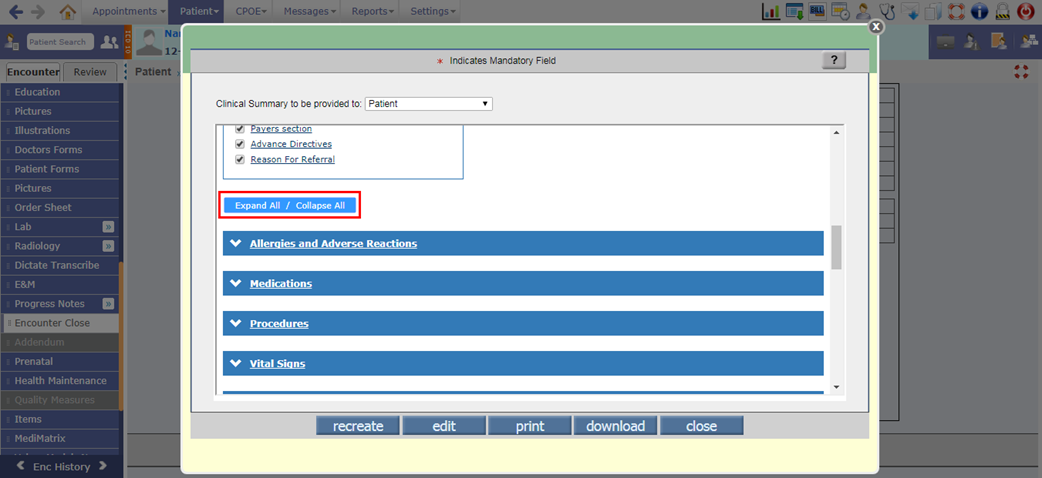
5. The Expand All /Collapse All has been provided below Table of Contents section to expand or collapse all the sections. If there are any sections in expanded format then it will collapse those sections.
Figure 3.5-5: Expand/Collapse all sections in Clinical Summary
6. The user can change the sequence of displayed sections by clicking on the section band and drag/drop functionality.
![]() Note:
Note:
v Changing the sequence of sections would not affect the section’s sequence in Table of Contents.
v The changed sequence is for viewing purpose only thus it would be reset on close of CCD.
7. A user also has a provision to expand and collapse individual section by clicking on up or down arrow buttons provided on the sections.
![]() Note: Depending on the sections set in the property, ccd.show.sections; which sections from that
needs to be displayed in expanded format by default should be set in the newly
added property, ccd.sections.expand.
Note: Depending on the sections set in the property, ccd.show.sections; which sections from that
needs to be displayed in expanded format by default should be set in the newly
added property, ccd.sections.expand.
Section related changes
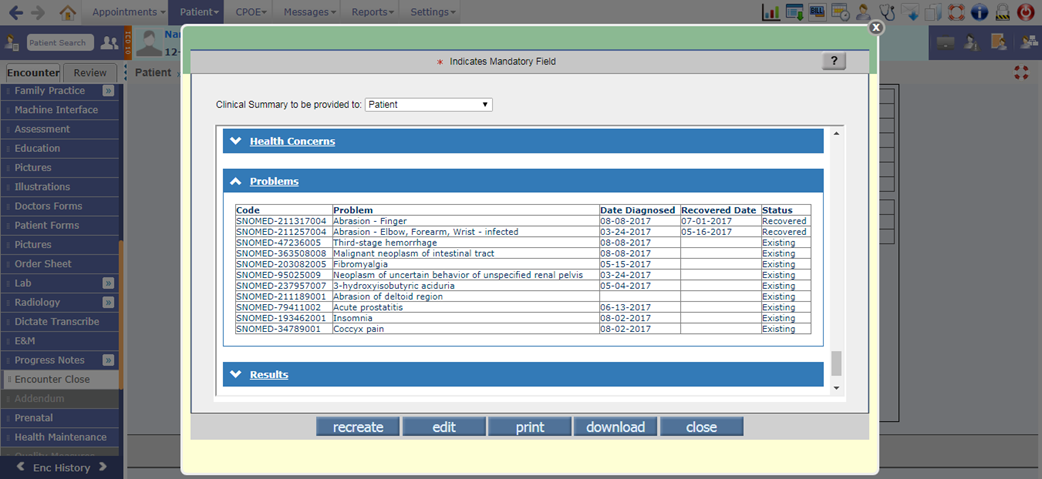
1. Problem: Earlier this section displayed problems which were marked as Existing on PMH screen. Now, Existing as well as Recovered problems are displayed. For that, a new Recovered Date column has been added in CCD Html to display the problem recovered date.
Figure 3.5-6: Problem section in Clinical Summary
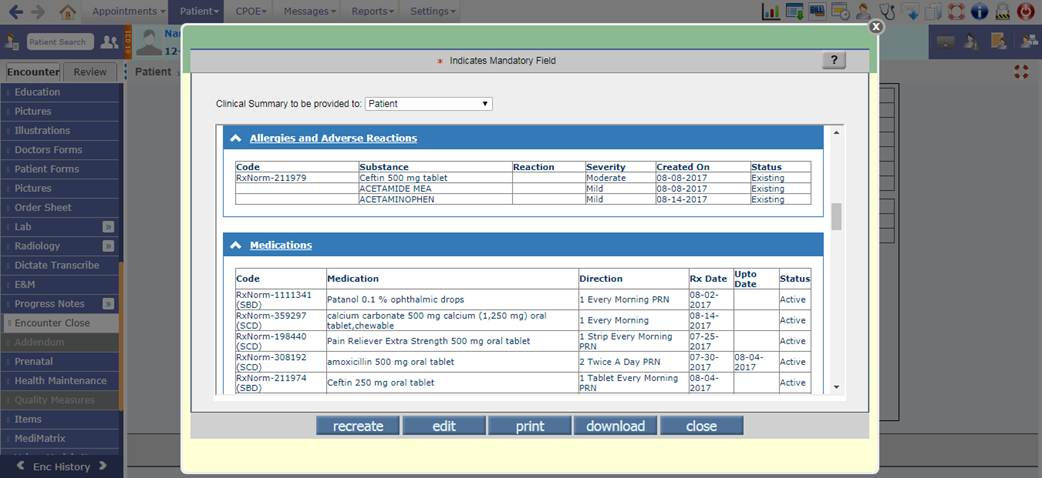
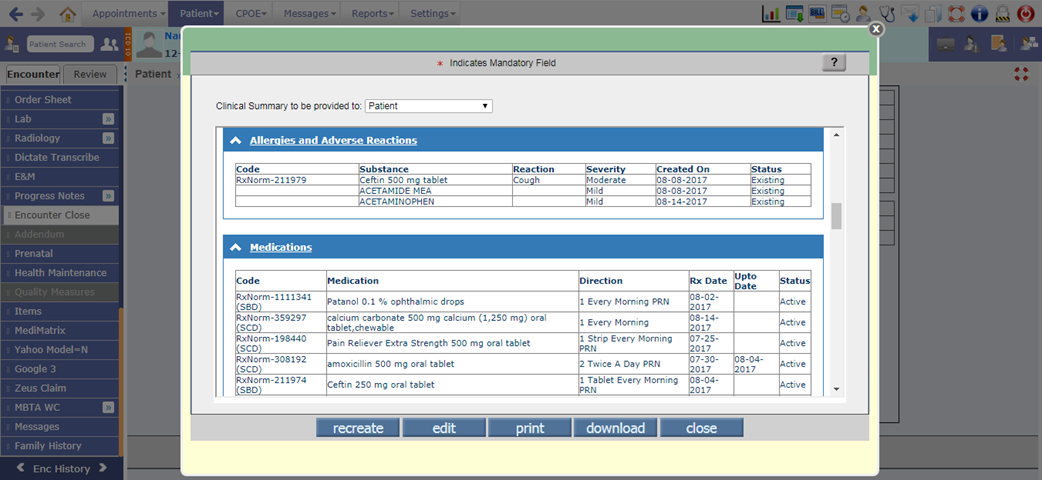
2. Allergies and Adverse Reactions: For any allergy, if a reaction is selected from Reaction search popup (click on Reaction search icon on Allergy screen) then its associated SNOMED code will be send in CCD.
Figure 3.5-7: Allergies and Adverse Reactions on Allergy screen
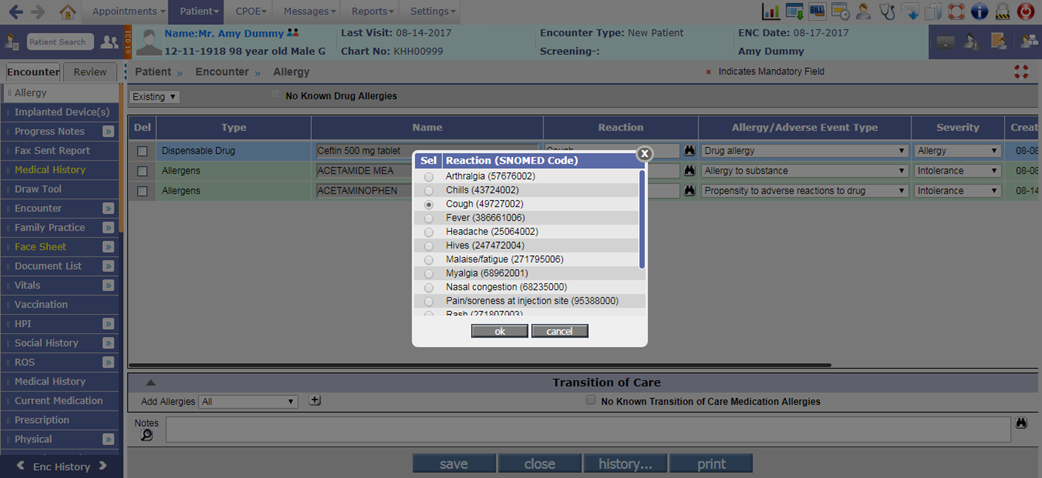
Figure 3.5-8: Allegies and Adverse reaction section in Clinical Summary
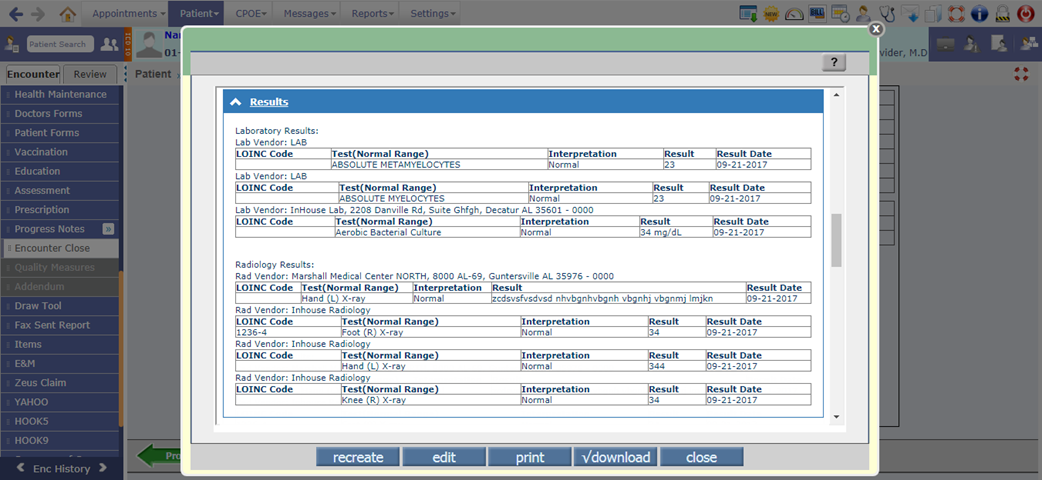
3. Results: Earlier the Lab/Radiology results were displayed in single table only. Now, it has been divided into two separate tables i.e. Laboratory Results and Radiology Results which would display the results as per vendors.
Figure 3.5-9: Results section in Clinical Summary
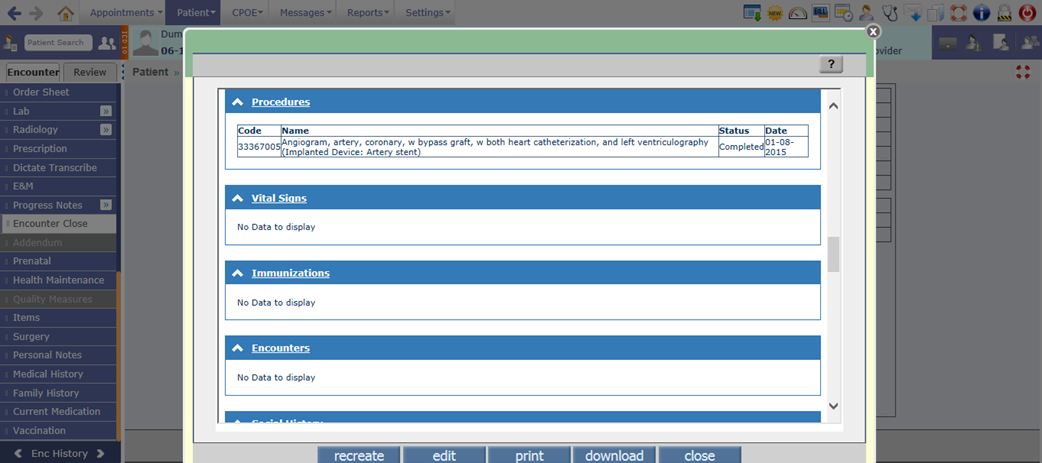
4. Procedures: Now, the Procedures associated to Implanted Devices are also displayed in the Procedures section of CCD.
Figure 3.5-10: Procedures section in Clinical Summary
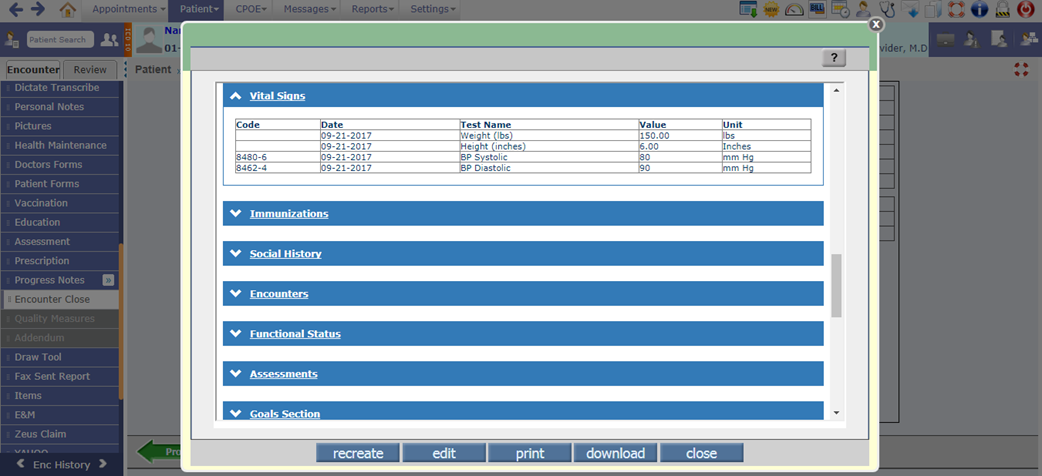
5. Vital Signs: Now, the LOINC Code associated to the test is displayed in CCD.
Figure 3.5-11: Vital Signs section in Clinical Summary
6. Immunizations: Now a new column, Additional Notes has been provided in CCD to display the reason/comments entered for the vaccine in Administer popup.
Figure 3.5-12: Immunization section in Clinical Summary

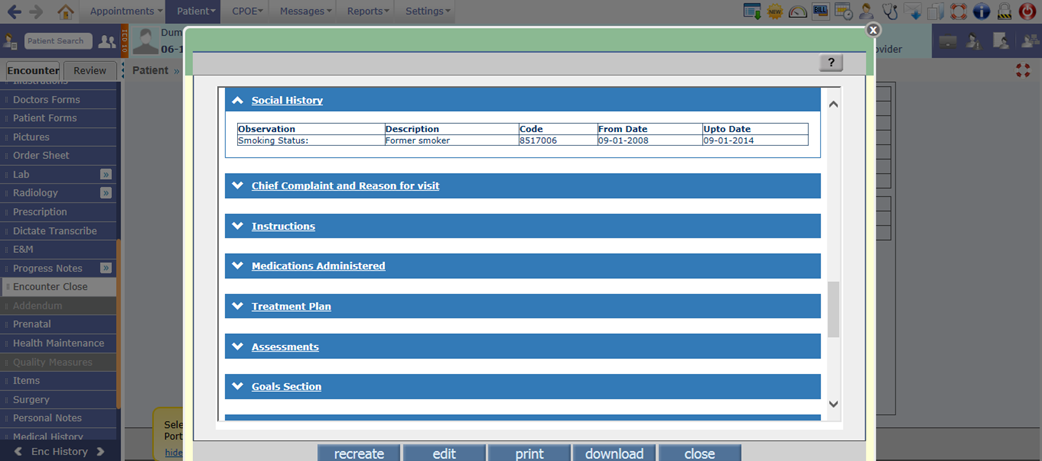
7. Social History: Depending test code set in the newly added property, ccd.smokinghistory.testcode, if that respective test is answered then its details would be available in this section.
To send dates in CCD for the Smoking history test mentioned in above property, system will check if there are any tests answered with same test code suffixed as 'FD' for From date and 'UD' for Upto Date.
Figure 3.5-13: Social History section in Clinical Summary
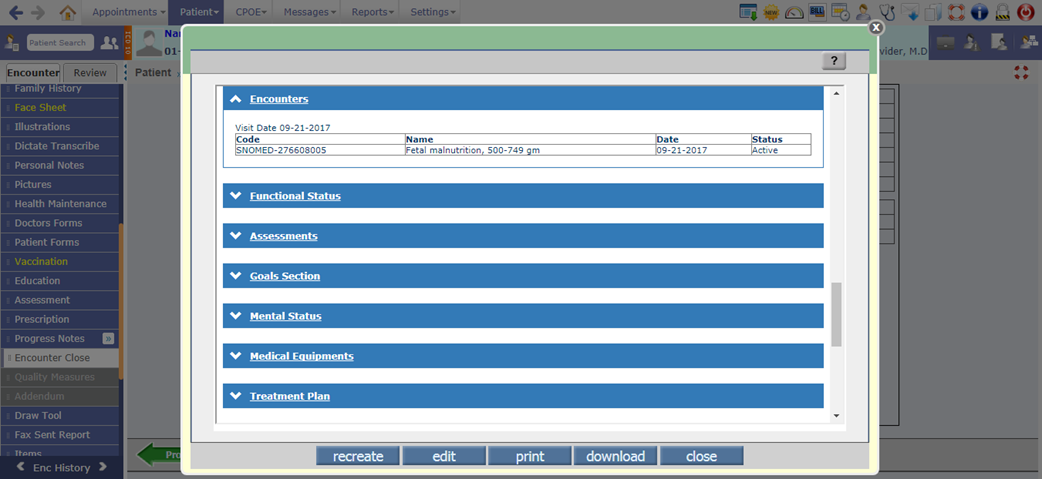
8. Encounters: It displays the current encounter’s Visit Date and Primary ICD’s details such as SNOMED code, ICD description, date and Status.
Figure 3.5-14: Encounters section in Clinical Summary
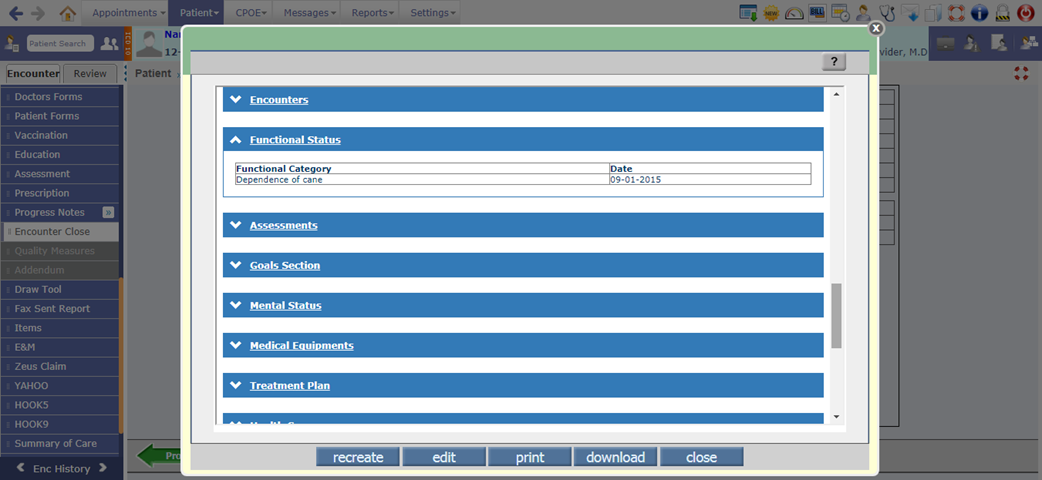
9. Functional Status: Earlier for this section, tests answered on Review of System were sent as Functional status. Now, a new property, ccd.functionalstatus.testcode has been added to set the test code which if answered then the information will be displayed in this section.
If there are any tests answered with same test code suffixed as 'FD' then the From date for Functional status type of tests is sent.
Figure 3.5-15: Functional Status section in Clinical Summary
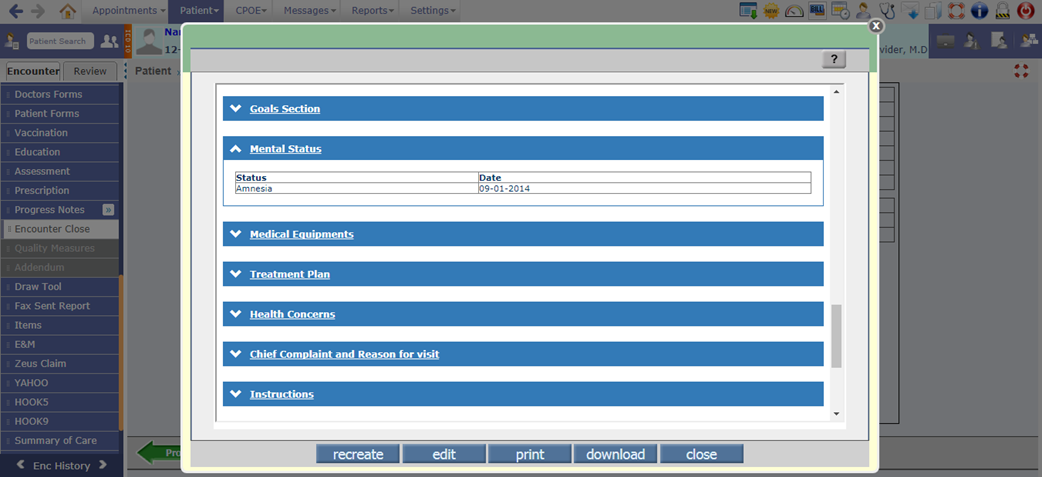
10. Mental Status: Earlier for this section tests answered on Review of System were sent as Mental status. Now, a new property, ccd.mentalstatus.testcode has been added to set the test code which if answered then the information will be displayed in this section.
If there are any tests answered with same test code suffixed as 'FD' then the From date for Mental status type of tests is sent.
Figure 3.5-16: Mental Status section in Clinical Summary
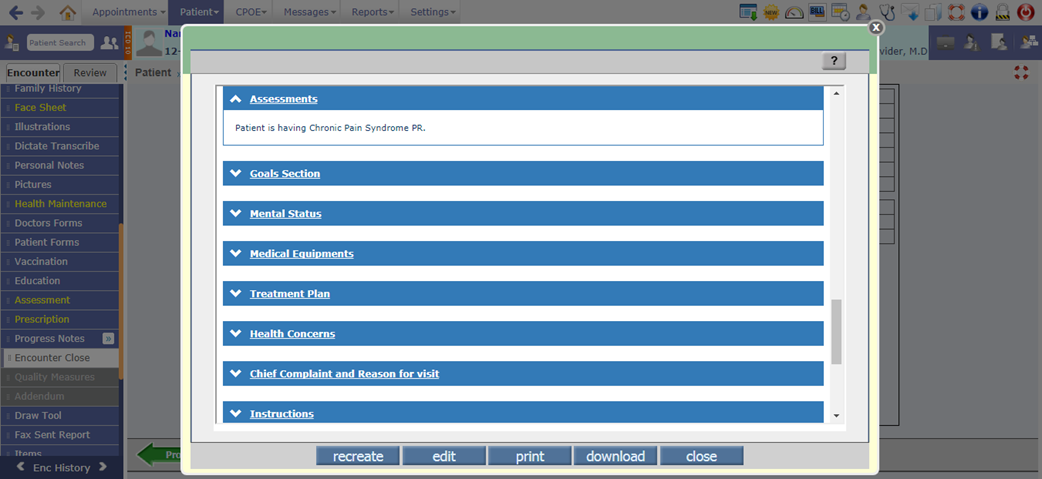
11. Assessments: This section displays the notes entered in the Assessment section of Notes tab (on Assessment screen).
Figure 3.5-17: Assessments section in Clinical Summary
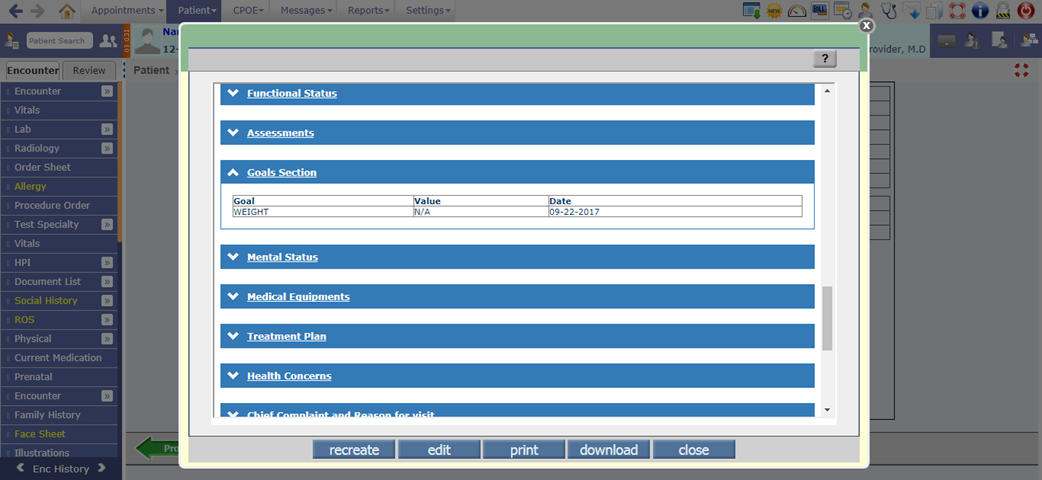
12. Goals section: This section displays the goals entered for patient on Care plan screen.
![]() Note: The data entered in Goals tab of Assessment screen
is not captured.
Note: The data entered in Goals tab of Assessment screen
is not captured.
Figure 3.5-18: Goals section in Clinical Summary
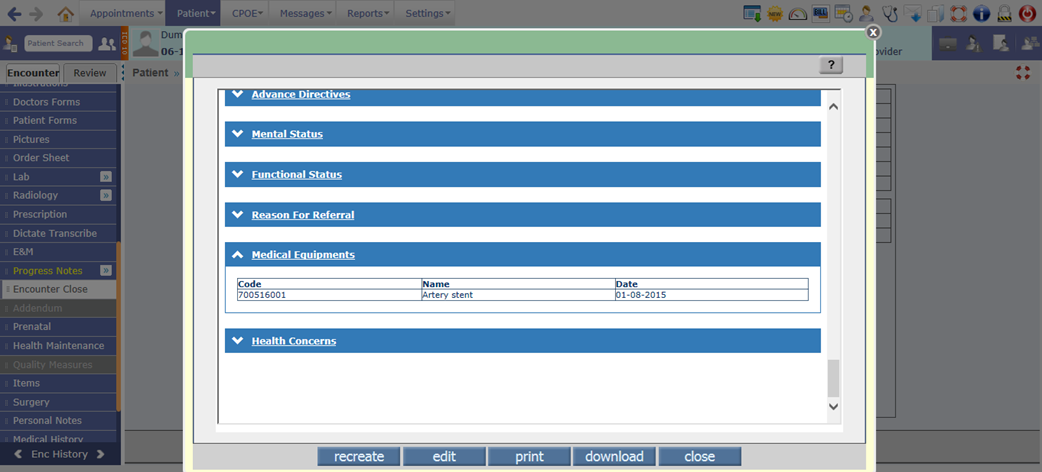
13. Medical Equipments: This section displays all the active Implanted devices present for the patient. The details such as SNOMED code, Device name and the Date of implant are displayed.
Figure 3.5-19: Medical Equipments section in Clinical Summary
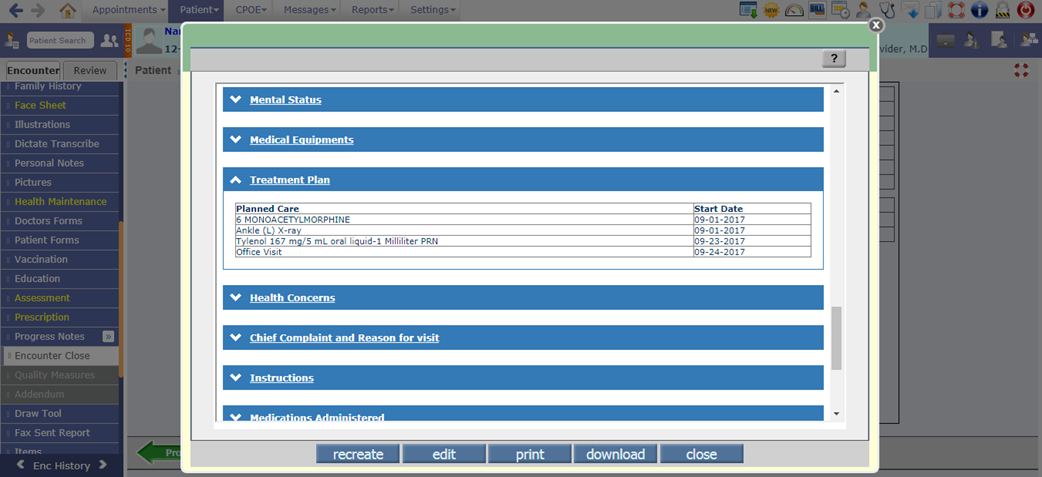
14. Treatment Plan: This section displays the Prescriptions having Fill Date greater than Encounter date, Lab/Radiology/Procedure with Due Status in Health Maintenance screen, and Future Appointments details.
Figure 3.5-20: Treatment Plan section in Clinical Summary
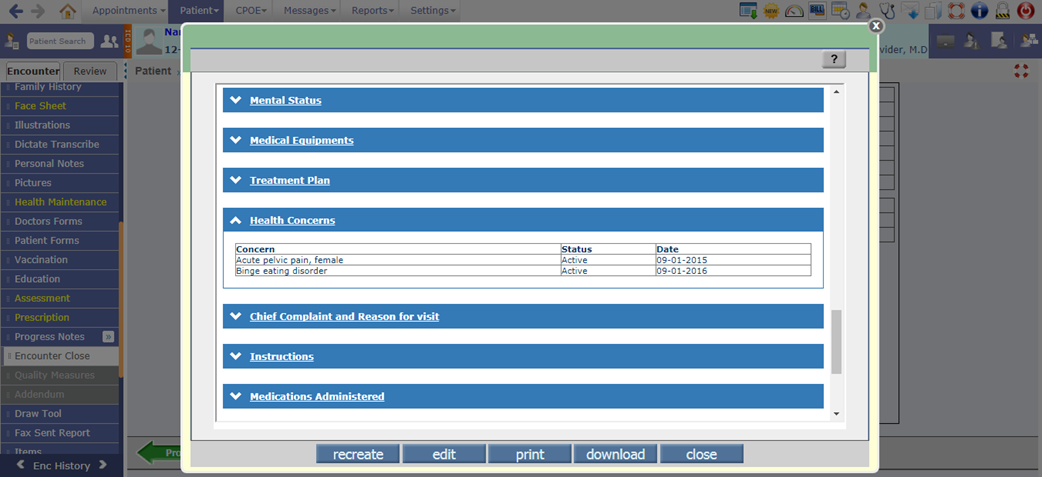
15. Health Concerns: This section displays the concerns/ risks entered for patient on Care plan screen.
Figure 3.5-21: Health Concerns section in Clinical Summary
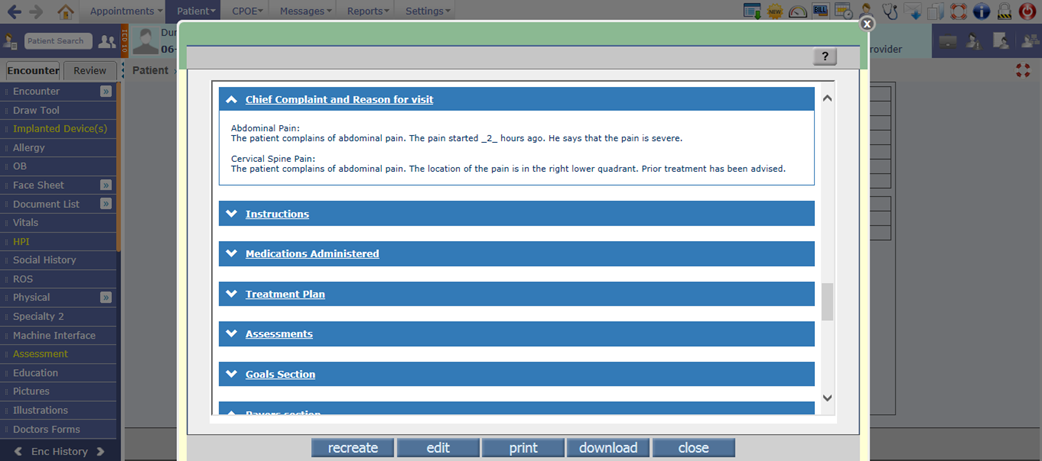
16. Chief Complaint and Reason for visit: This section displays the information about the Complaint(s) marked as Chief on the HPI screen.
Figure 3.5-22: Chief Complaint and Reason for visit section in Clinical Summary
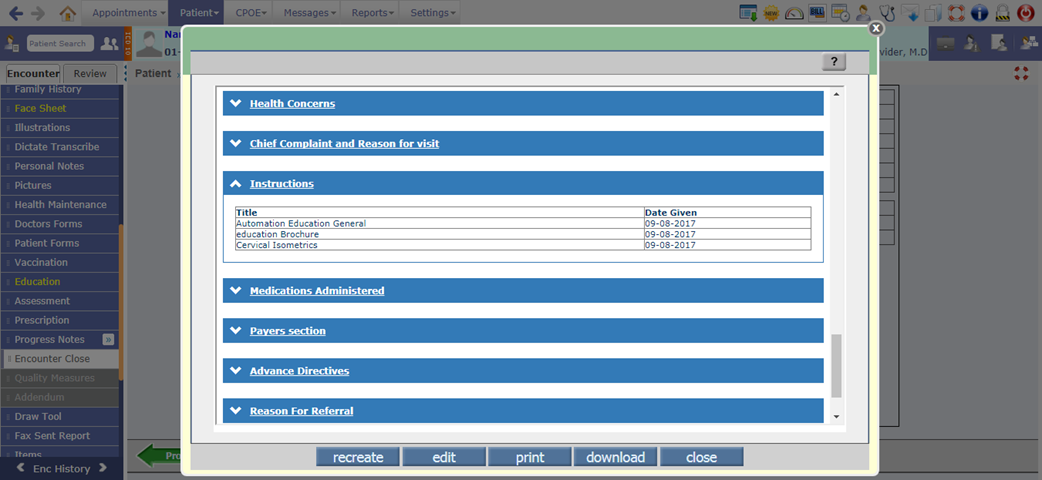
17. Instructions: This section displays the list of all education materials provided to Patient along with the date when it was given.
Figure 3.5-23: Instructions section in Clinical Summary
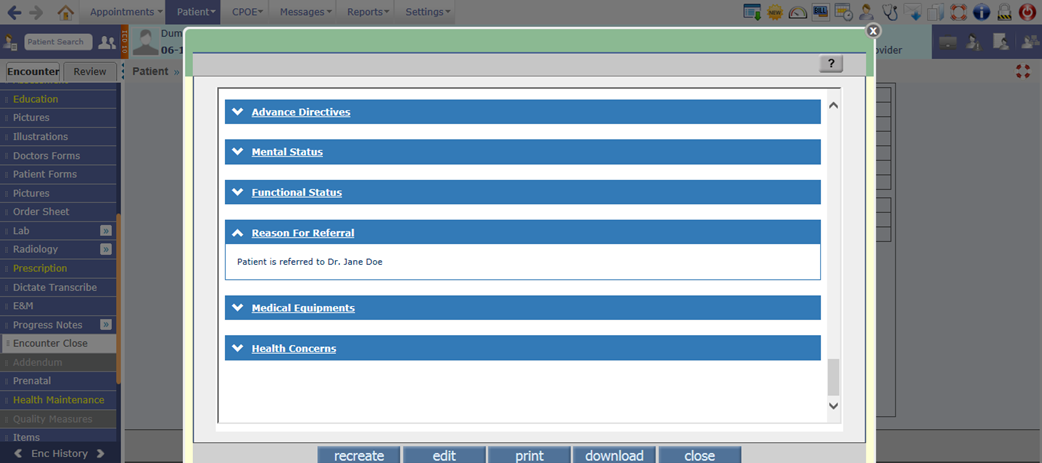
18. Reason for Referral: This section displays the reason for Referral Note entered from the newly provided button, Referral Reason on Encounter Close screen. The entered Referral reason would be saved and available in CCD only on click of save button on the Encounter Close screen.
Figure 3.5-24: Reason for Referral section in Clinical Summary
3.6 The Adverse Event type of Allergy is now imported from CCD
Navigation Goto: Patient’s Encounterà Encounter TOCà Face Sheetà Allergy
· Now, if the CCD consists of Adverse Event type of Allergy then it is imported in PrognoCIS. A new column, Allergy/Adverse Event Type has been provided on the Allergy screen that would display the Adverse Event type of Allergy from the imported CCD. However, a user can add this information for the newly added Allergies also.
Figure 3.6-1: Allergy/Adverse Event Type column on Allergy screen
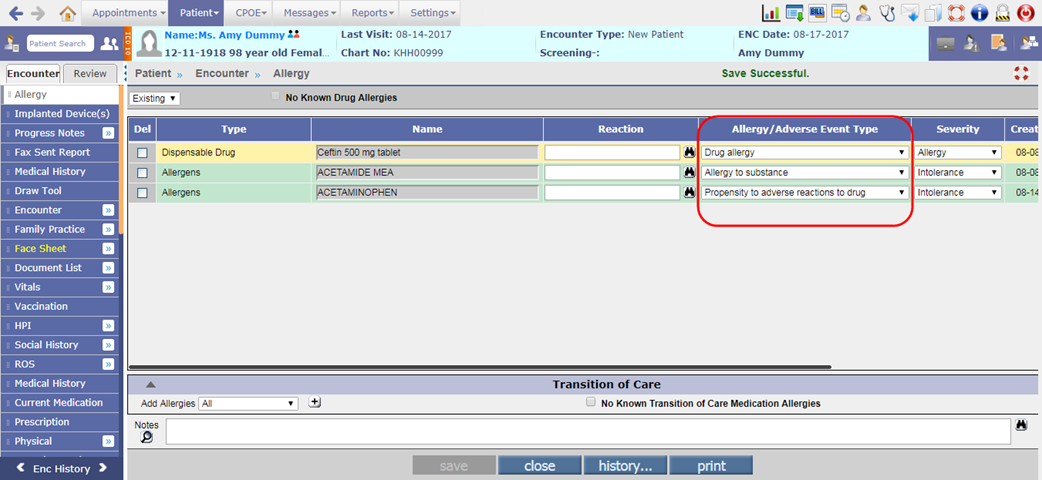
· The Allergy/Adverse Event Type dropdown list consists of the following set of values:
Ø Allergy to substance
Ø Drug allergy
Ø Drug intolerance
Ø Food allergy
Ø Food intolerance
Ø Propensity to adverse reactions
Ø Propensity to adverse reactions to drug
Ø Propensity to adverse reactions to food
Ø Propensity to adverse reactions to substance
3.7 Provided NQF definitions for all 26 measures as per 2017 performance period
Navigation Goto: Patient’s encounterà Encounter TOCà Assessmentà click on eCQM buttonà eCQM Compliance Status popup
For all the below 26 eCQM (Electronic Clinical Quality Measures), the NQF definitions have been updated as per 2017 performance period:
|
NQF number |
Measure Description |
|
0002 |
Appropriate Testing for Children with Pharyngitis |
|
0018 |
Controlling High Blood Pressure |
|
0022 |
Use of High-Risk Medications in the Elderly |
|
0024 |
Weight Assessment and Counseling for Nutrition and Physical Activity for Children and Adolescents |
|
0028 |
Preventive Care and Screening: Tobacco Use: Screening and Cessation Intervention |
|
0031 |
Breast Cancer Screening |
|
0032 |
Cervical Cancer Screening |
|
0034 |
Colorectal Cancer Screening |
|
0036 |
Use of Appropriate Medications for Asthma |
|
0041 |
Preventive Care and Screening: Influenza Immunization |
|
0043 |
Pneumonia Vaccination Status for Older Adults |
|
0052 |
Use of Imaging Studies for Low Back Pain |
|
0055 |
Diabetes: Eye Exam |
|
0056 |
Diabetes: Foot Exam |
|
0059 |
Diabetes: Hemoglobin A1c Poor Control |
|
0060 |
Hemoglobin A1c Test for Pediatric Patients |
|
0062 |
Diabetes: Urine Protein Screening |
|
0064 |
Diabetes: Low Density Lipoprotein (LDL) Management |
|
0068 |
Ischemic Vascular Disease (IVD): Use of Aspirin or Another Antithrombotic |
|
0069 |
Appropriate Treatment for Children with Upper Respiratory Infection (URI) |
|
0075 |
Ischemic Vascular Disease (IVD): Complete Lipid Panel and LDL Control |
|
0083 |
Heart Failure (HF): Beta-Blocker Therapy for Left Ventricular Systolic Dysfunction (LVSD) |
|
0086 |
Primary Open Angle Glaucoma (POAG): Optic Nerve Evaluation |
|
0089 |
Diabetic Retinopathy: Communication with the Physician Managing Ongoing Diabetes Care |
|
0101 |
Falls: Screening for Future Fall Risk |
|
0421 |
Preventive Care and Screening: Body Mass Index (BMI) Screening and Follow-Up |
3.8 A new column, Problem Control has been added on the Past Medical History screen
Navigation Goto: Patient’s Encounterà Encounter TOCà Face Sheetà PMH
· A new column, Problem Control has been added on the Past Medical History screen to select the current status of the Problem whether it is in control or not. Following are the standard options available in the dropdown list:
Ø Moderately controlled
Ø Well controlled
Ø Existing worse
Ø Slightly controlled
Ø Uncontrolled
Figure 3.8-1: Problem Control column on Past Medical History screen
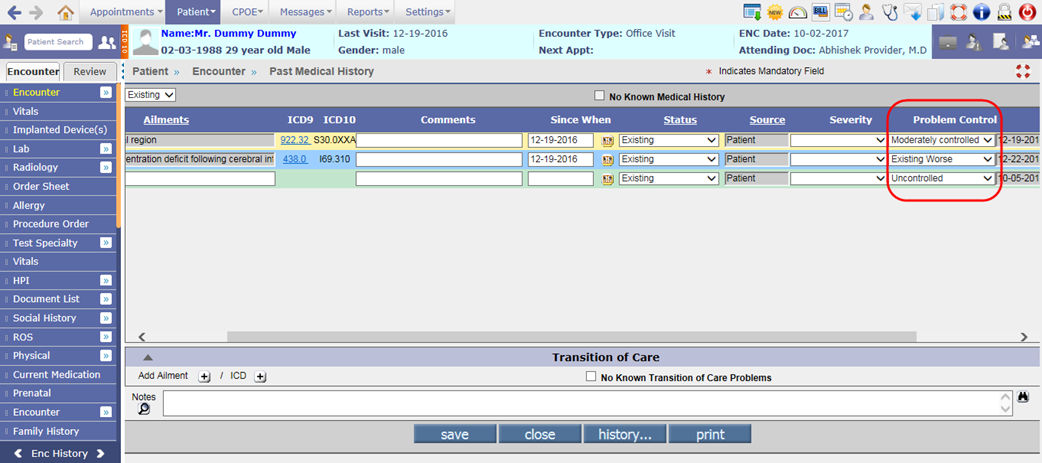
· This column value will be sent in the NAMCS (National Ambulatory Medical Care Survey) Health care survey type of CCD.
3.9 A new dropdown list, ‘Major Reason for Visit’ has been provided on the Start New/Edit Existing Encounter screen
Navigation Goto: Patient’s Encounterà Encounter TOCà Encounter Close
· A new dropdown list, Major Reason for Visit has been provided on the Start New/Edit Existing Encounter screen to add the major reason for Patient’s visit.
· The following are the standard options available in the dropdown list:
Ø Chronic problem, flare-up
Ø Chronic problem, routine
Ø New problem (<3 mos. onset
Ø Pre/Post surgery
Ø Preventive care (e.g., routine prenatal, well-baby, screening, insurance, general exams)
Figure 3.9-1: Major reason for visit on Start new encounter screen
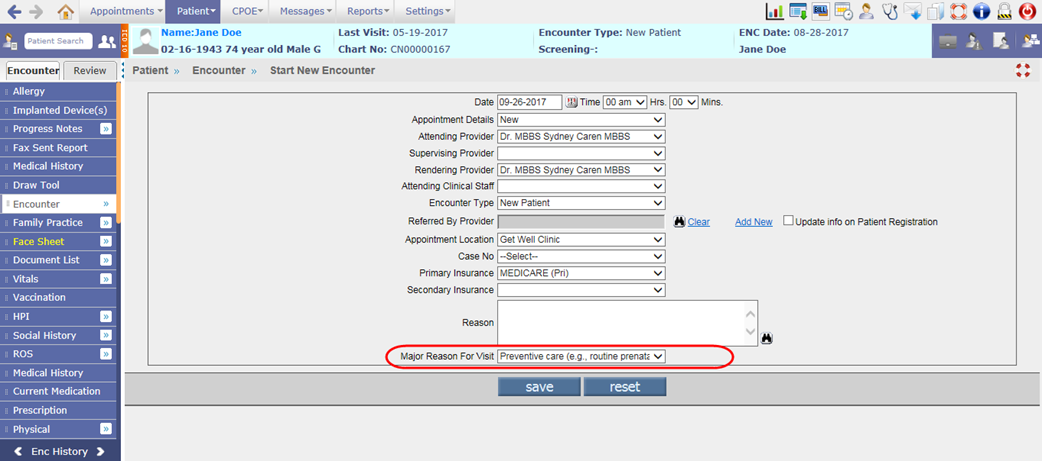
· This field will be sent in the NAMCS (National Ambulatory Medical Care Survey) Health care survey type of CCD.
3.10 A new field, TOC Visit Status has been provided on the Edit Existing Encounter screen
Navigation Goto: Patient’s Encounterà Encounter TOC à Encounter à Edit Existing
A new field, TOC Visit Status has been provided on the Edit Existing Encounter screen which displays the Transition of Care visit status.
Figure 3.10-1: TOC visit status on Edit existing encounter screen
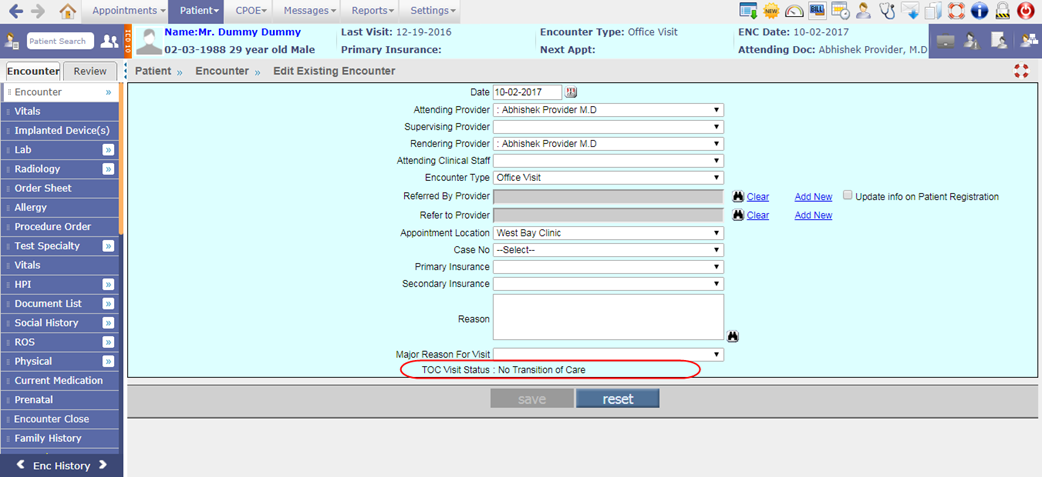
Based on previous Encounter TOC visit status, the system will display any of the following TOC Visit Status:
· No Transition of Care
· Transition of Care(New Patient)
· Transition with Summary of Care
· New Patient without Summary of Care
· Transition without Summary of Care
· Transition with Referral Note
· Transition without Referral Note
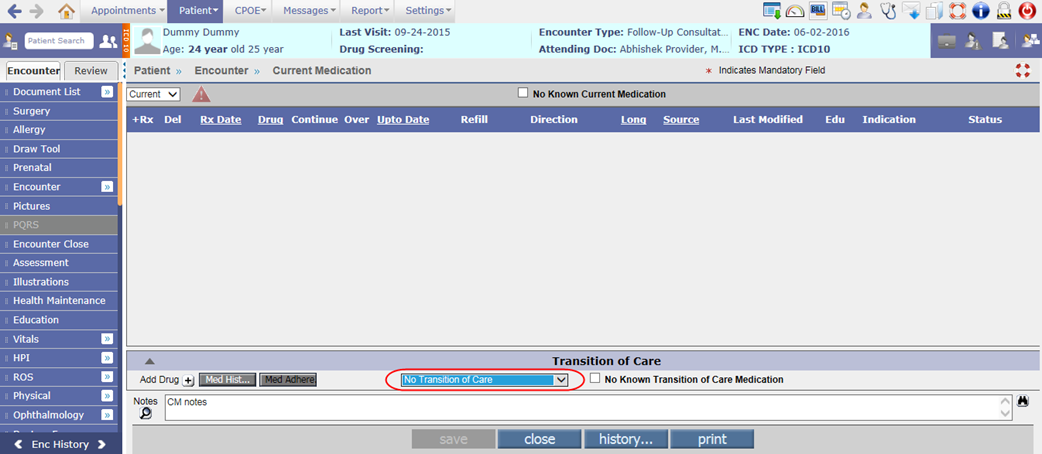
Also, the dropdown list for Transition of Care has been removed from the Transition of Care section of Current Medication screen.
Figure 3.10-2: Dropdown removed from Current Medication screen
![]() Note: System
will exclude the encounters of following type while checking for the previous
encounter’s TOC visit status:
Note: System
will exclude the encounters of following type while checking for the previous
encounter’s TOC visit status:
DE, FS, DB, DL, DR, RR, SR, XC
3.11 Provided two new checkboxes on the Encounter Close screen to share Health Summary on Portal and API
Navigation Goto: Patient’s Encounterà Encounter TOCà Encounter Close
Share Health Summary on Portal
· A new checkbox, Share Health Summary on Portal has been provided on the Encounter Close screen to share the Patient’s Health summary on Patient Portal. If this checkbox is selected and a user clicks on save button of Encounter Close screen then the Health summary will be shared.
Figure 3.11-1: Share health summary on Portal checkbox
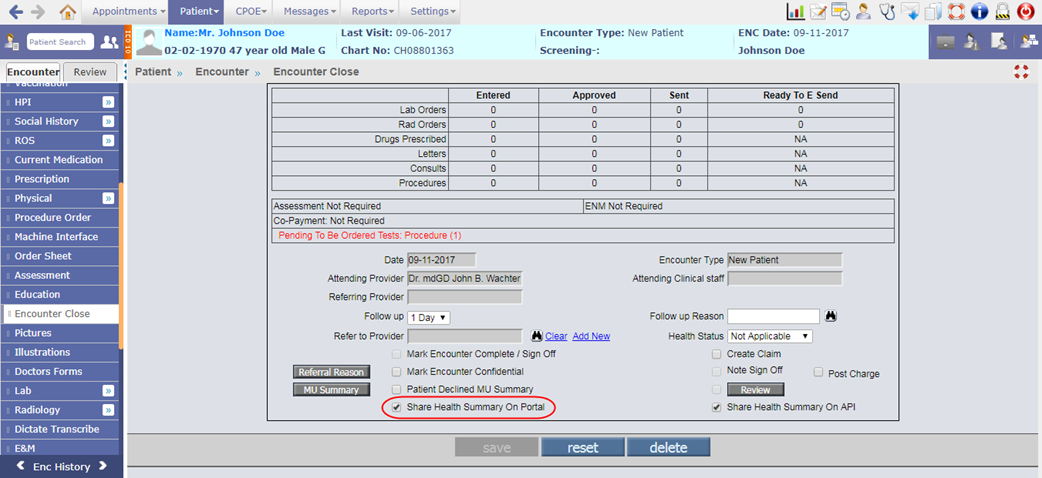
· Also, the portal button has been removed from Clinical Summary. Thus by default, the Clinical Summary will be shared on the Past Health Summary screen of Patient Portal.
Share Health Summary on API
· A new checkbox, Share Health Summary on API has been provided on Encounter Close screen to share the Health summary to the third party via exposed FHIR API (Fast Healthcare Interoperability Resources Application Programming Interface).
Figure 3.11-2: Share health summary on API checkbox
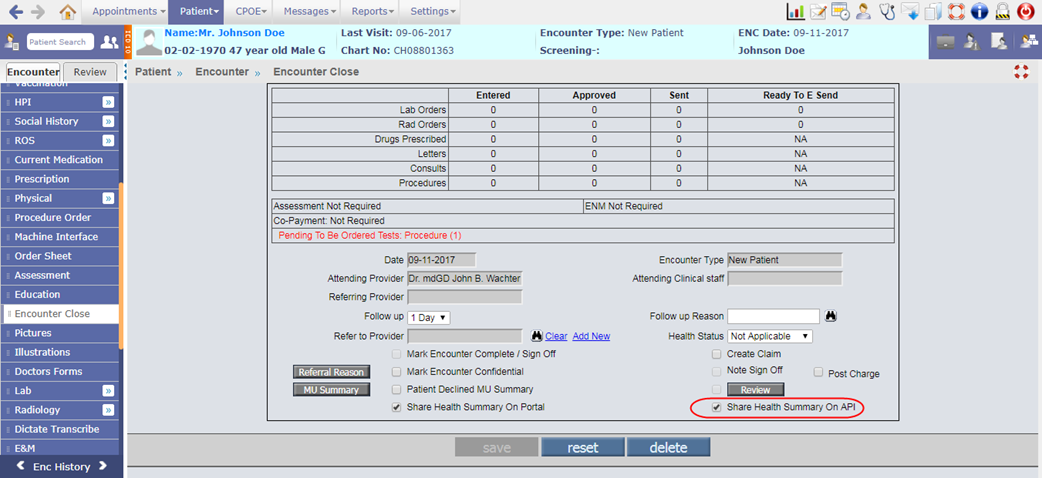
· If this checkbox and Share Health Summary on Portal checkbox are selected for Provider with QPP stage selected as MIPS and/or Meaningful Use stage as Stage 3, then the Patient will be counted in the Patient Electronic Access measure's numerator.
![]() Note: For Provider
with Meaningful Use stage as Modified Stage 2, Share Health Summary on API checkbox
will not be considered.
Note: For Provider
with Meaningful Use stage as Modified Stage 2, Share Health Summary on API checkbox
will not be considered.
4 Patient –Letters-Out
4.1 Provision to send new Continuity of Care Document and Referral Notes (CCD) from PrognoCIS
On Letters-Out screen
Navigation Goto menu: Patientà Letters-Out
· CCD 2.1 is the newer version of CCD now available in PrognoCIS. A user has provision to send the newer version of CCD i.e. New Continuity of Care Document (CCD) and Referral Note (CCD) from Letters-Out screen.
Figure 4.1-1: New Continuity of Care and Referral Note on Letters-Out screen
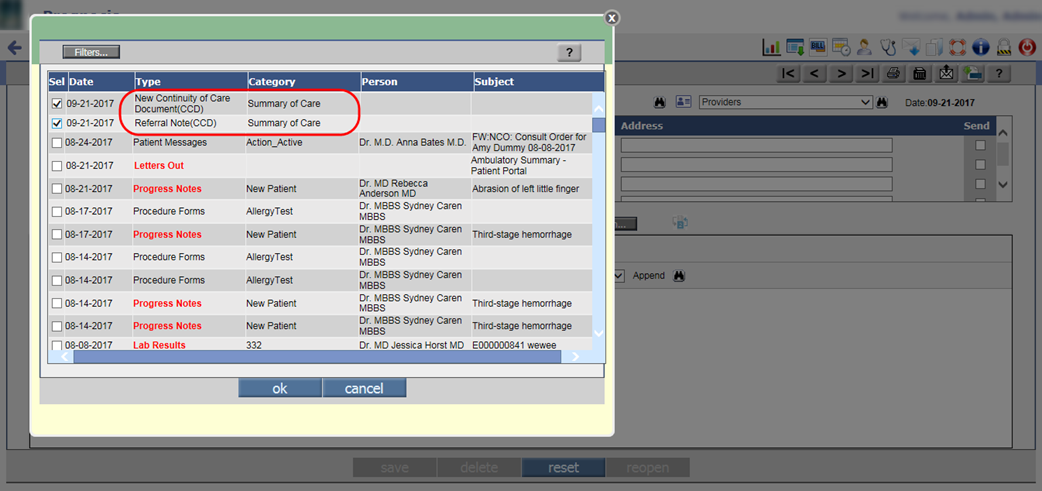
· When the user attaches the New Continuity of Care Document or Referral Note CCD (click on Attach buttonà select the CCDà click ok) then a Reason for Referral Note popup is invoked.
Figure 4.1-2: Reason for Referral Note popup
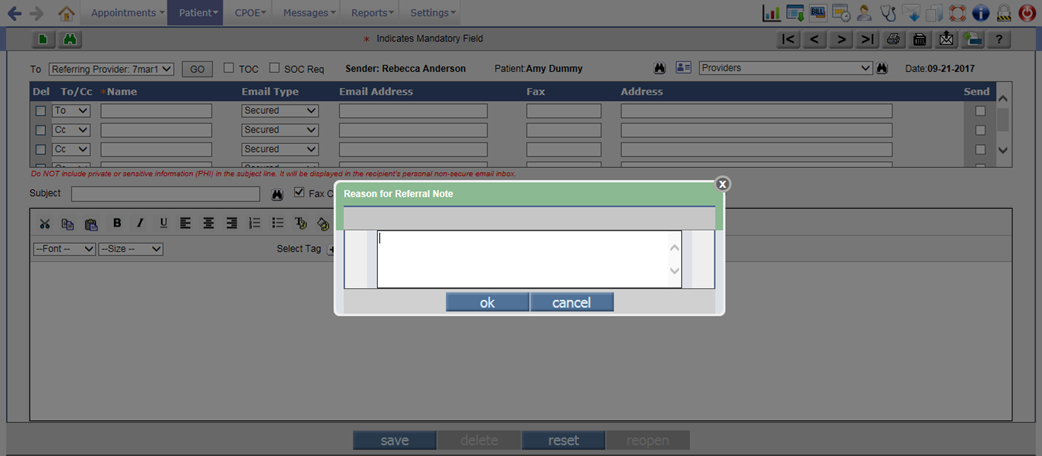
· The entered referral reason in the popup will be then a part of attached Summary of Care (CCD) under Reason for Referral section.
Figure 4.1-3: Referral reason in CCD attached on Letters-Out screen
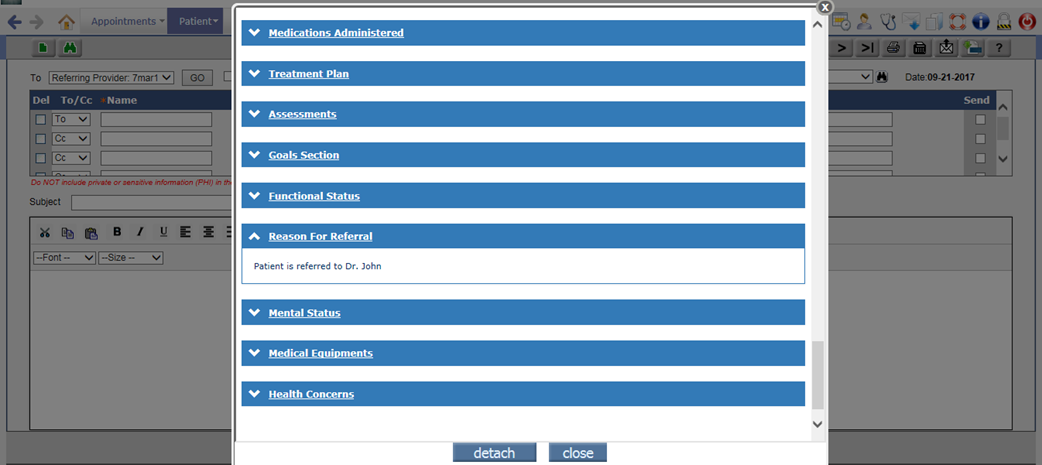
· On selecting the New Continuity of Care Document and Referral Note, the XML and HTML of each CCD is attached; and its tooltip displays the type of CCD.
Figure 4.1-4: Attached CCD tooltip on Letters-Out screen
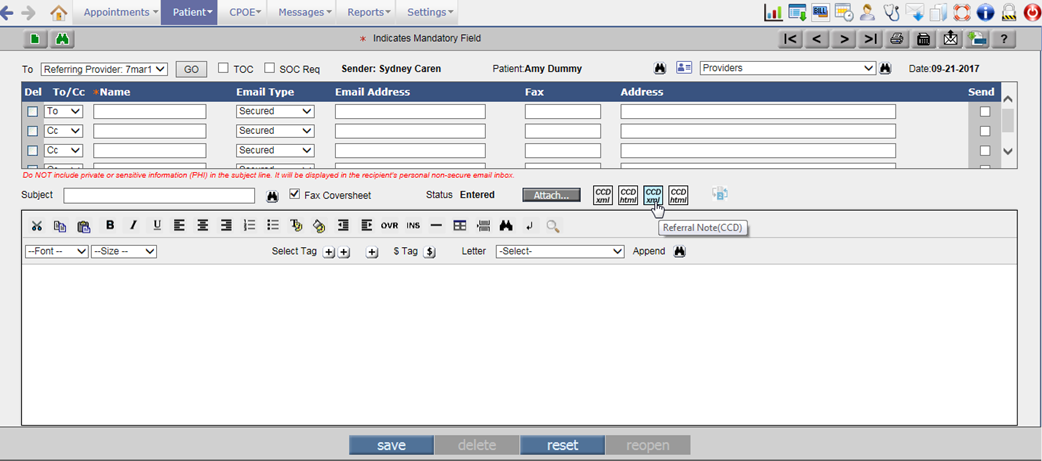
On Summary of Care screen
Navigation Goto: Patient’s Encounterà Review TOCà Summary of Care
· A user has provision to export the newer version of CCD i.e. CCD 2.1 and Referral Note from Summary of Care screen. A new dropdown list, Type has been provided to select the required type of CCD for exporting.
Figure 4.1-5: New CCD and Referral Note on Summary of Care screen
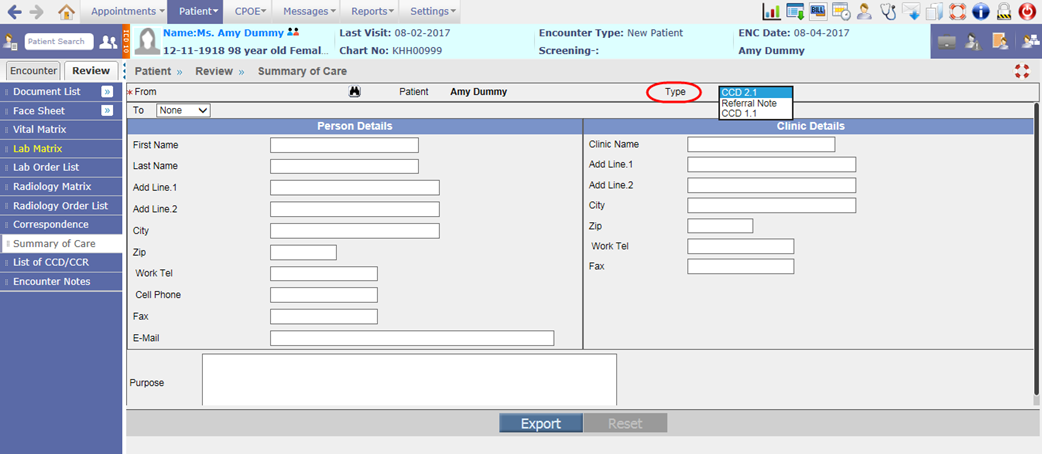
4.2 Provided a new checkbox, ‘SOC Req’ on the Letters-Out screen
Navigation Goto menu: Patientà Letters-Out
A new checkbox, SOC Req i.e. Summary of Care Request has been provided on the Letters-Out screen. If a User selects the SOC Req checkbox and sends the Summary of Care Request to the Provider then it gets counted in the Receive Incorporate measure of MU3.
Figure 4.2-1: SOC Req checkbox on Letters-Out screen
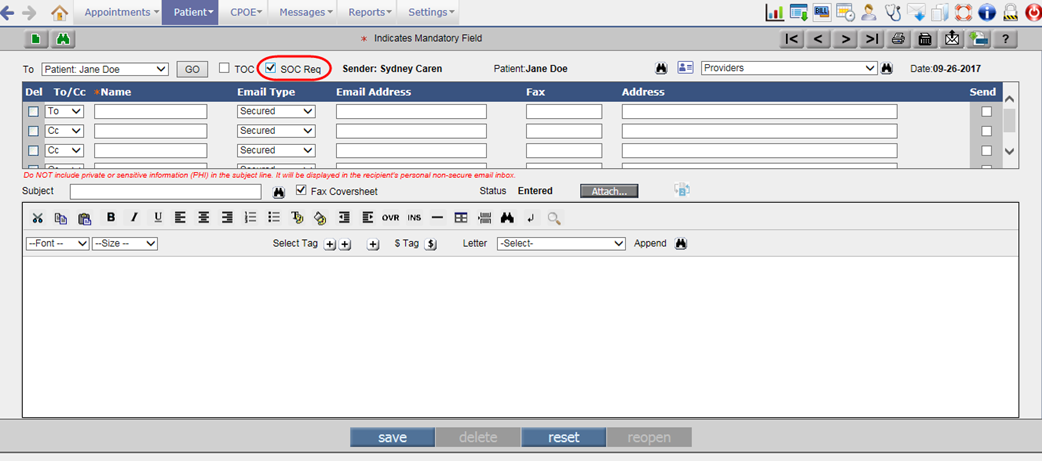
5 Patient – Care Plan
5.1 A new sub-menu has been provided to record the Patient’s care plan
Navigation Goto menu: Patientà Care Plan
· A care plan is a detailed approach to care that is customized as per an individual Patient’s needs. Care plans are required when patients can benefit from personalized instruction and feedback to help manage their health condition.
· A new sub-menu, Care Plan has been provided under Patient menu to enter future recovery plan for the Patient.
Figure 5.1-1: Care Plan submenu

· A click on Care Plan sub-menu would invoke the Care Plan Concern popup which at the start displays the Patient Band with Patient information of current encounter. If there is no encounter in session then on click of Care Plan sub-menu, the Patient search is invoked for selection of the Patient.
Figure 5.1-2: Patient band on Care Plan Concern popup
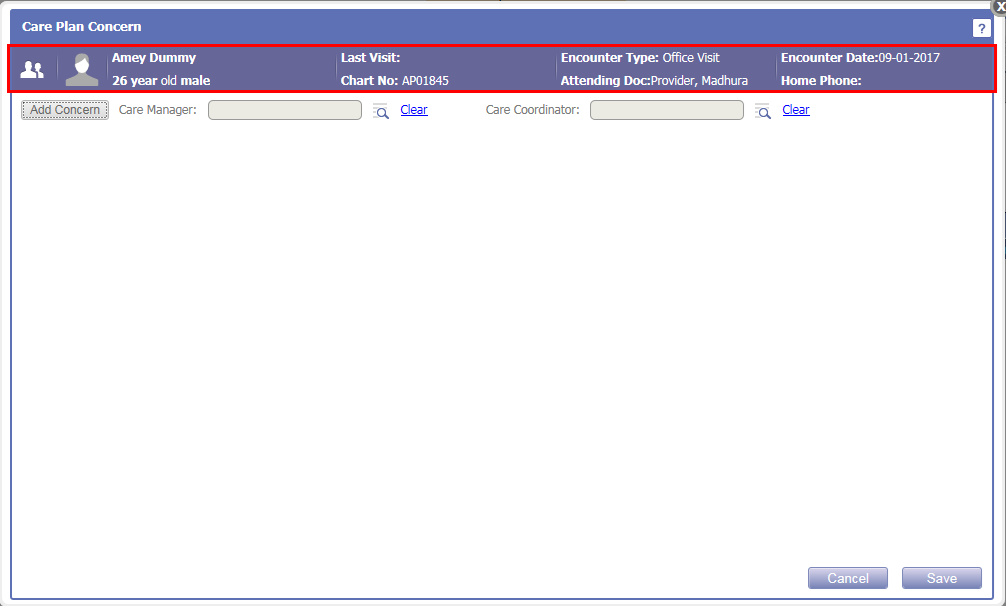
· Configuring the Patient Band of Care Plan Concern popup is dependent on the following properties:
ü careplan.patientband.r1.c1
ü careplan.patientband.r1.c2
ü careplan.patientband.r1.c3
ü careplan.patientband.r1.c4
ü careplan.patientband.r2.c1
ü careplan.patientband.r2.c2
ü careplan.patientband.r2.c3
ü careplan.patientband.r2.c4
·
By clicking on the Add Concern button, the User has provision
to add the Patient’s concern from the Add New
Concern popup. Based on the Type
selected from the dropdown list i.e. PMH, Assessment, Social History, or New
Diagnosis, a click on search icon:
![]() would
display its respective ICDs for selection. If New Diagnosis is selected then a
click on search icon would invoke the IMO search for ICD selection.
would
display its respective ICDs for selection. If New Diagnosis is selected then a
click on search icon would invoke the IMO search for ICD selection.
· On selecting the required ICD, its details such as Description, ICD10, and SNOMED are displayed as read-only in the respective fields of Add New Concern popup.
Figure 5.1-3: Add New Concern popup
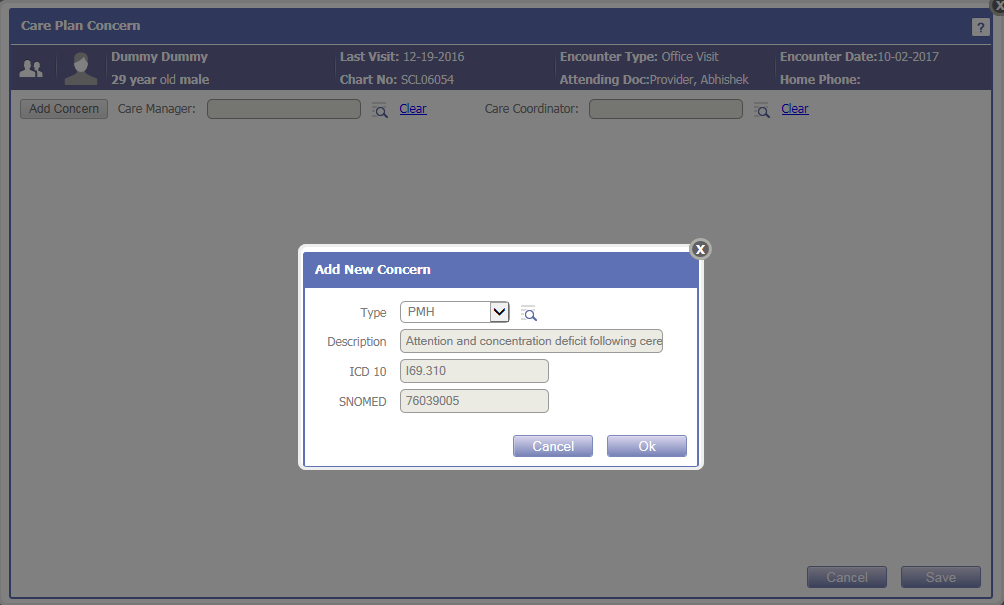
· The User also has provision to add the Care Manager and Care Coordinator for the Patient. Depending on the value set in the property, careplan.users.type, the user types would be displayed in the Care Manager search popup.
Figure 5.1-4: Care Manager and Care Coordinator on Care Plan Concern popup
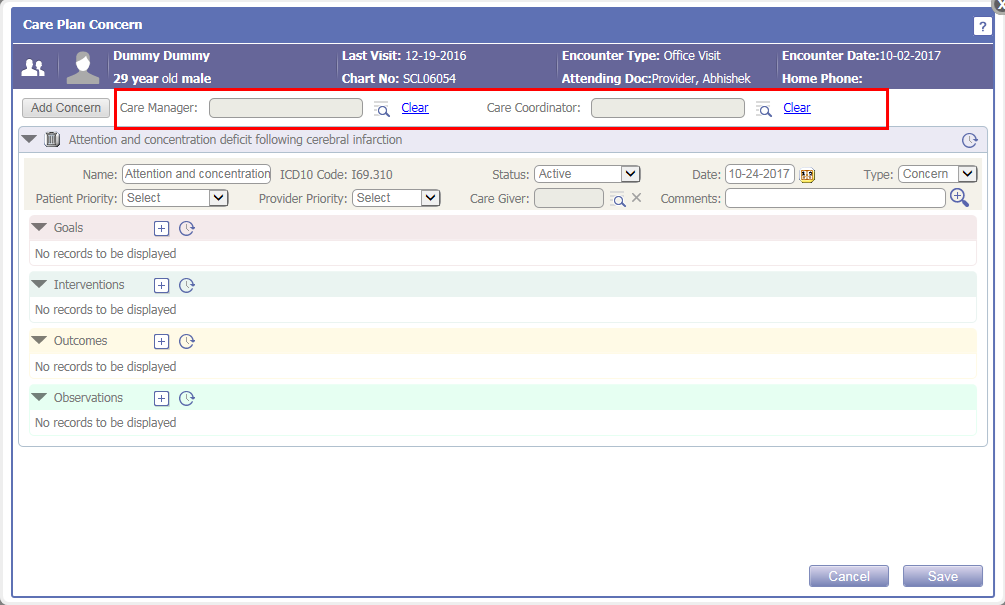
· Once the User selects the concern(s), its details such as Name, ICD10 code, Status, Date, and Type are displayed in the respective concern(s) accordion. The User may change the Name and Date as required, Status to either Active or Recovered, and set Type if it is a Concern or Risk.
· The User also has provision to set the Patient and Provider Priority of the concern if it is High, Normal, or Delayed; select the Care Giver from the search icon; and enter any Comments, if required.
Figure 5.1-5: Added Concern's details
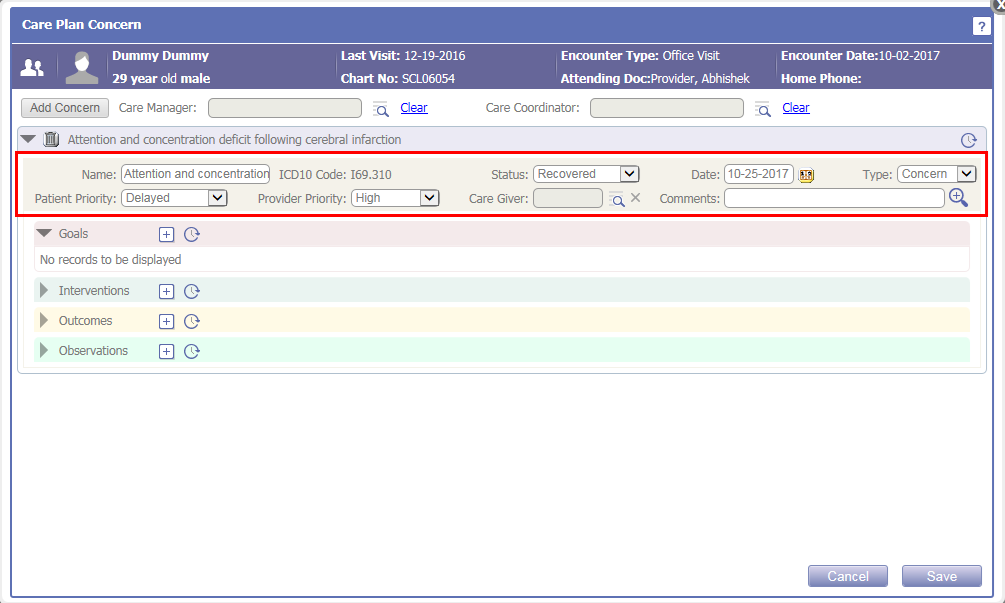
·
By clicking on the History icon:
![]() of Concern’s accordion, the history of any
modification done in any of the above mentioned field is displayed.
of Concern’s accordion, the history of any
modification done in any of the above mentioned field is displayed.
Figure 5.1-6: Concern History
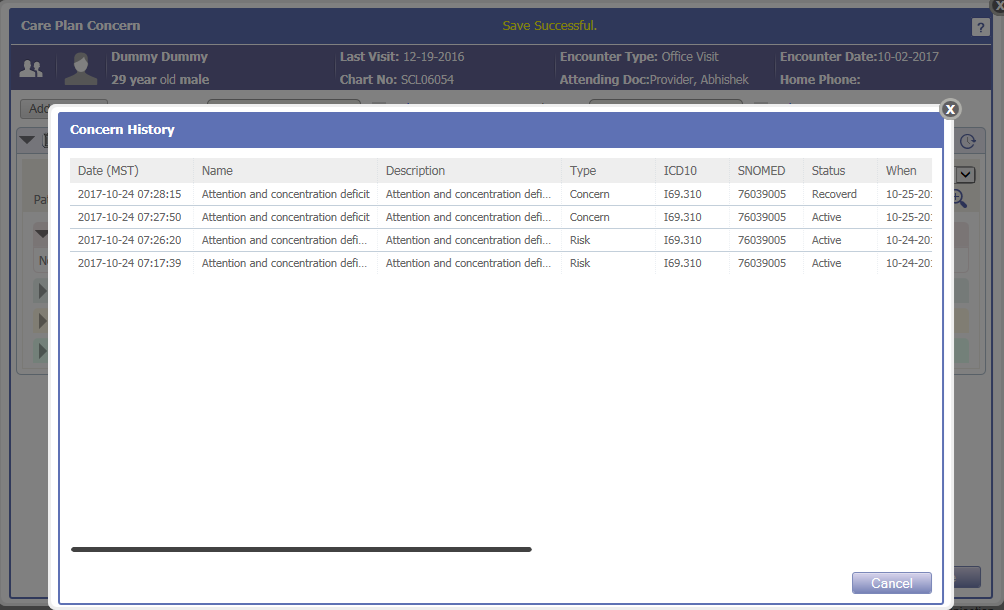
·
For each concern, the User has
provision to enter the Goals, Interventions, Outcomes, and Observations by
clicking on Add New icon:
![]() from
the respective accordions.
from
the respective accordions.
Figure 5.1-7: Concern's Goal, Intervention, Outcome, and Observation accordions
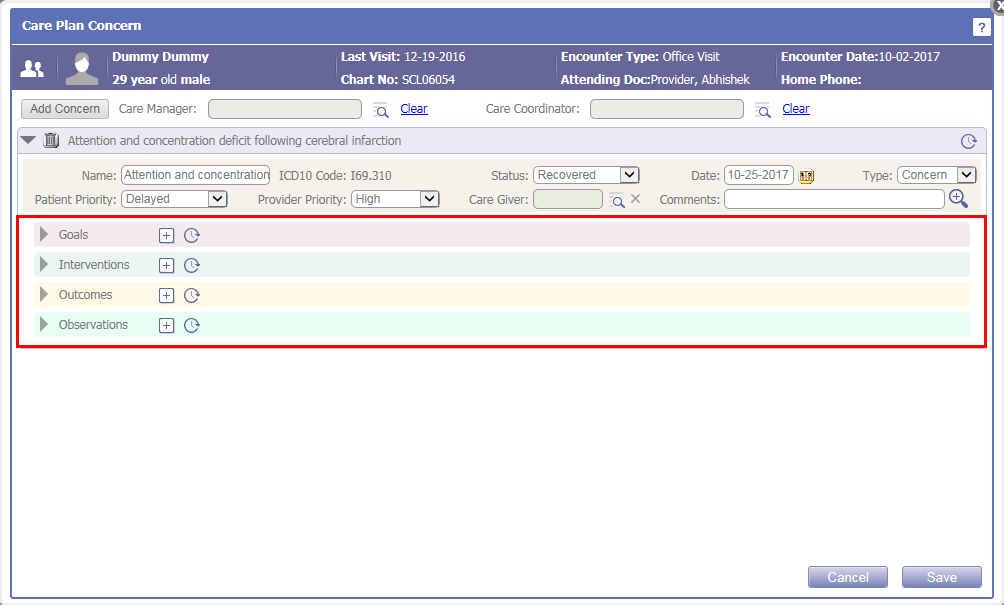
· For each added Goals, Interventions, Outcomes, and Observations, fields such as Name, Date, Status, Value, Unit, Reference, and Comments are available.
Figure 5.1-8: Added Concern's Goal accordion
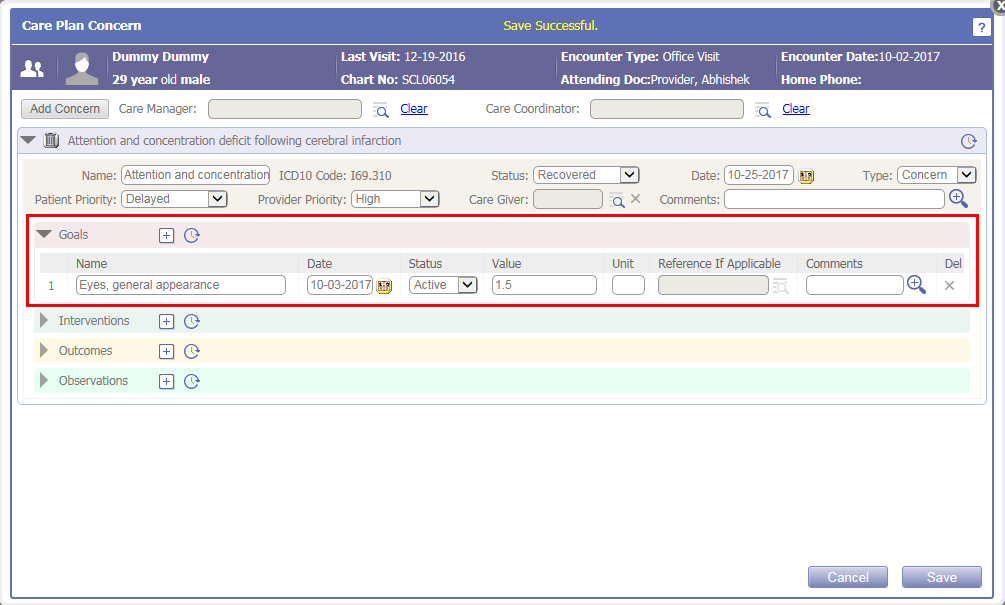
·
A click on History icon:
![]() of each accordion would display the history of any
modification done in fields of that respective accordion.
of each accordion would display the history of any
modification done in fields of that respective accordion.
Figure 5.1-9: Goals History
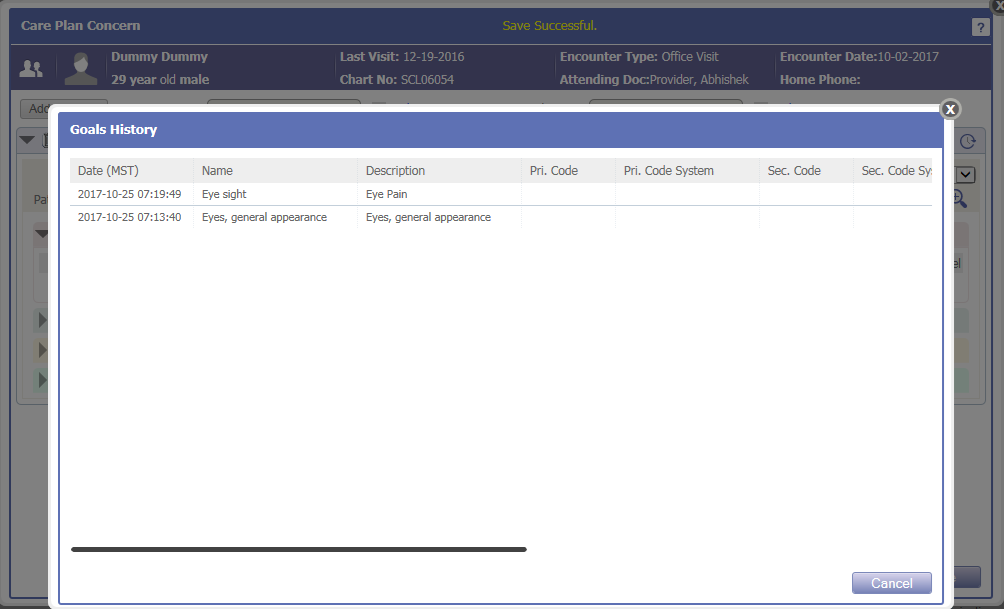
6 Reports
6.1 New MU and QPP reports provided for 2017 performance period
Navigation Goto menu: Reportsà MU/QPP Reports
· The following MU reports have been provided for 2017 performance period under classification, 2017-MU:
|
Report name |
Code |
|
Medicaid Modified Stage 2 Meaningful Use Report (2017 only) |
STAGE2-MOD-2017 |
|
Medicaid Modified Stage 2 Meaningful Use Report For All Locations (2017 Only) |
STG2-MDAL-2017 |
|
Medicaid Stage 3 Meaningful Use Report (2017) STAGE3-MEDICAID-2017 |
STAGE3-MEDICAID-2017 |
|
Medicaid Stage 3 Meaningful Use Report For all locations (2017) |
STAGE3-MDAL-2017 |
· The following QPP-MIPS reports have been provided for 2017 performance period under classification, 2017-QPP-MIPS:
|
Report name |
Code |
|
QPP - MIPS -ACI |
MACRA-ACI |
|
QPP - MIPS -ACI For all locations |
MACRA-ACI-MDAL |
|
QPP - MIPS -ACI Transition (2017) |
MACRA-ACI-TRANS |
|
QPP - MIPS -ACI Transition For all locations (2017) |
MACRA-ACI-TRS-MDAL |
· The following Global test reports have been provided for 2017 performance period under classification, GLOBAL-TEST:
|
Report name |
Code |
|
Global Test Required Medicaid Modified Stage 2 Meaningful Use Report (2017 only) |
ST2-MOD-2017-GBLTST |
|
Global Test Required Medicaid Stage 3 (2017) |
ST3-MD-2017-GBLTST |
6.2 Provided QRDA1 and QRDA3 reports as per 2017 performance period
Navigation Goto menu: Reportsà MU/QPP Reports
· Changes have been done as per 2017 performance period in the QRDA1 report for all 26 measures.
· Also, now Medicaid QRDA3-cumulative of all eCQM measure report is additionally available in the QRDA3 report.
· All the QRDA1 reports are now classified under Quality-EHR-eCQM-QRDA1 and all QRDA3 reports under Quality-EHR-eCQM-QRDA3 on the MU/QPP Reports screen.
· The QRDA1 report name now consists of CMS number.
6.3 User can export the QRDA1 and QRDA3 reports
Navigation Goto menu: Reportsà MU/QPP Reports
By clicking on the Download icon:
![]() ,
the User can download and export the generated QRDA1 or QRDA3 report. The
downloaded QRDA1 zip file consists of xml file for each Patient. Whereas, the
QRDA3 zip file is Provider wise.
,
the User can download and export the generated QRDA1 or QRDA3 report. The
downloaded QRDA1 zip file consists of xml file for each Patient. Whereas, the
QRDA3 zip file is Provider wise.
6.4 Patient and Additional filters are now available for QRDA1 and QRDA3 reports
Navigation Goto menu: Reportsà MU/QPP Reports
· Earlier the user could select only one Provider (from the Provider dropdown list) and generate the report for that respective Provider only. Now, the user has provision to select multiple Providers (from the Provider search icon) and generate reports for those selected Providers.
Figure 6.4-1: Provider search on MU/QPP reports

· The Patient filter is now available for QRDA1 and QRDA3 reports to filter the patients based on Gender, Race(s), Ethnic Group(s), and Age in years as on.
Figure 6.4-2: Patient filter for QRDA1 and QRDA3 reports
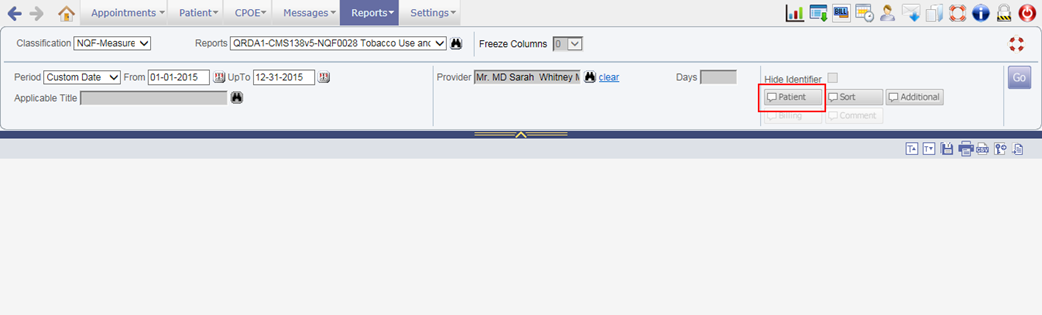
Figure 6.4-3: Patient Filter popup
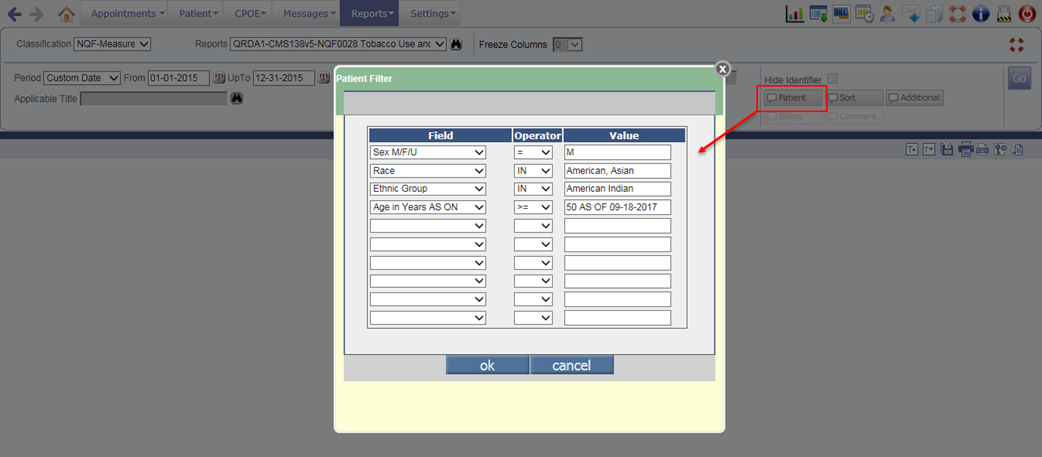
· Also, an Additional filter has been provided only for QRDA1 and QRDA3 reports to filter the selected measure report based on following criteria:
- Problem: The problems which are applicable for the selected measure are displayed in Select Problem dropdown list.
- Group/TIN: Based on entered Group/TIN of the Clinic (available on Location Master screenà FTIN field), the report for selected measure is filtered.
- Practice Site Address: Based on entered location address of the Clinic, the report for selected measure is filtered.
Figure 6.4-4: Additional filter for QRDA1 and QRDA3 reports
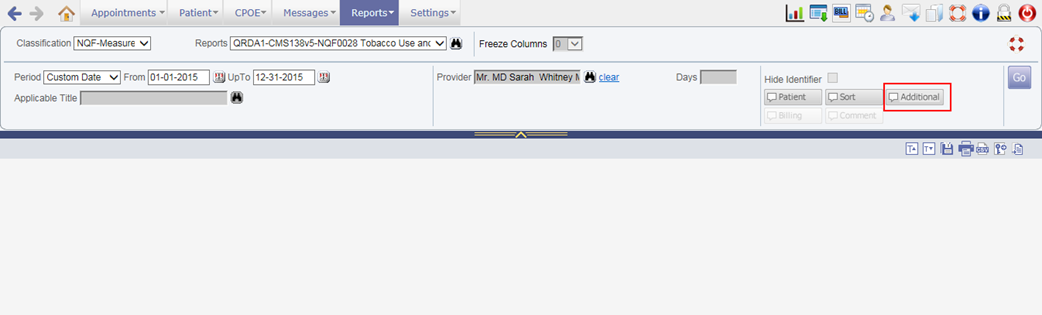
Figure 6.4-5: Additional Filters popup
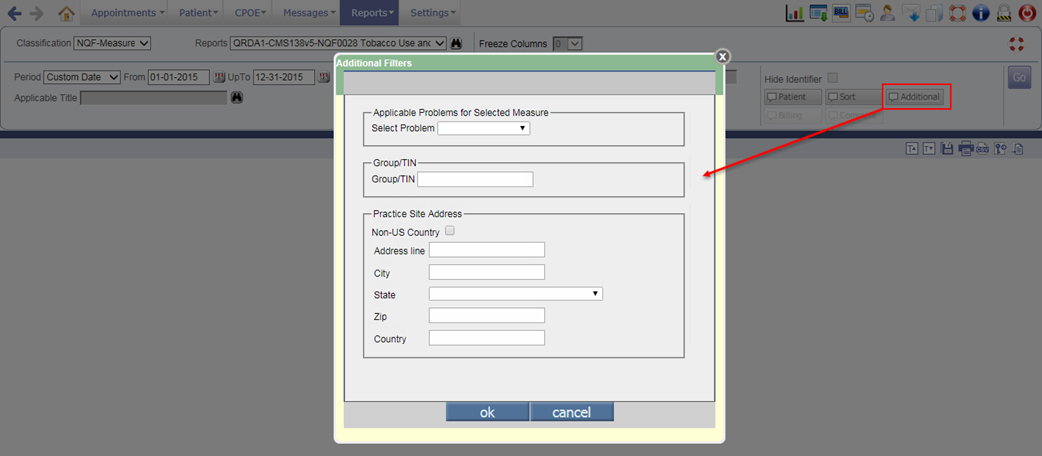
6.5 Actions such as activating/deactivating User and assigning/removing User role is now audited
Navigation Goto menu: Reportsà Audit Trail
The action of activating/deactivating User and assigning/removing User role is now audited. Following are the audit comments for the respective actions:
|
Action |
Comment |
|
Activates the User |
ACCOUNT IS RE-ENABLED Updated Provider Record for <User name> (Code: <User type code>) |
|
Deactivates the User |
ACCOUNT IS DISABLED Updated Provider Record for <User name> (Code: <User type code>) |
|
Assigns User Role |
Updated Login Person: <User name> Added Roles: <comma separated assigned User role names> |
|
Removes User Role |
Updated Login Person: <User name> Removed Roles: <comma separated removed User role names> |
Figure 6.5-1: Audit Trail report
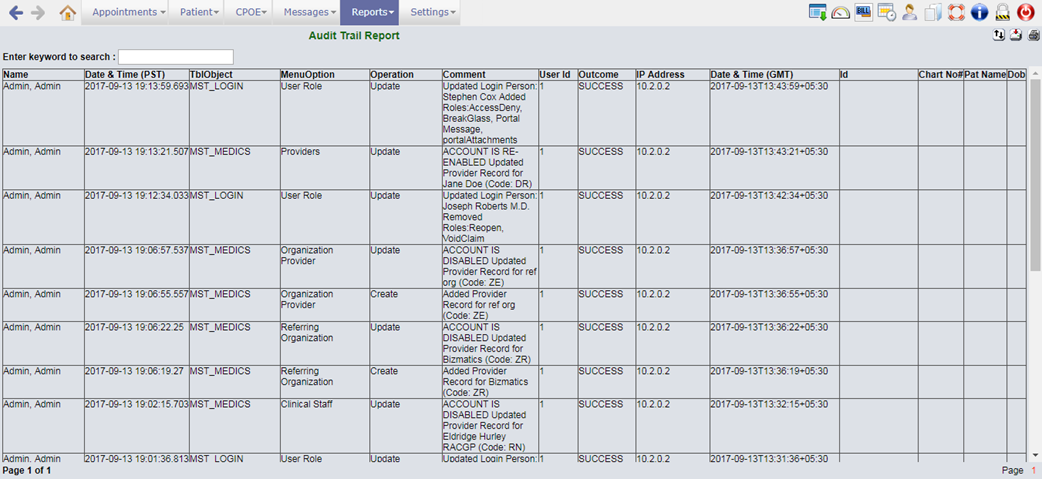
![]() Note: For following User types, the action of
Activating/Deactivating is audited:
Note: For following User types, the action of
Activating/Deactivating is audited:
· Provider (DR)
· Resource (RS)
· Medical Assistant (MA)
· Clinical Staff (RN)
· Office Staff (ST)
· Referring Doc (RD)
· Billing Staff (BL)
· Organization Provider (ZE)
· Referring Organization (ZR)
6.6 The action of Export/Download is now audited in the Audit Trail Report
Navigation Goto menu: Reportsà Audit Trailà Audit Trail Report popup
· A new checkbox, Export/Download has been provided on the Audit Trail Report popup to display the audited details about Export/Download action taken in PrognoCIS.
· Following is the list of screens from where the Export/Download action is going to be audited:
|
Sr No |
Screen |
Action |
|
EMR |
||
|
1. |
Document List screen |
·
Download PDF via
·
Download ZIP via
|
|
2. |
Letters-Out screen |
Download letter via
|
|
3. |
Order Sheet screen |
Download the Consult order via
|
|
4. |
CPOEà Consult screen |
Download the Consult order via
|
|
5. |
Encounter Close screenà Click on MU Summary button |
Download the MU Summary |
|
6. |
Draw Tool screen |
Download the diagram via
|
|
7. |
Reportsà Tabular |
Export the Tabular report in CSV format via
|
|
8. |
Reportsà Meaningful Use |
Export the Meaningful Use report in CSV format via
|
|
9. |
Reportsà Audit Trail |
Export the Audit Trail report in CSV format via
|
|
10. |
Review TOCà Summary of Care |
Export the Summary of Care |
|
11. |
Employer Master screen |
Export the Employer’s list on click of
|
|
12. |
CPT Master screen |
Export CPT’s list on click of
|
|
13. |
HCPC Master screen |
Export HCPC’s list on click of
|
|
14. |
Test Exec Template Master screen (Specialty/Physical/ROS/Vitals/Social History) |
Export the Test Exec templates |
|
15. |
Download Files Master screen |
Download the files by clicking on the File name hyperlink |
|
16. |
Data Portability Master screen |
Export the Patient’s data and view the respective message with subject ‘Background Process Complete’ on the Messageà In screen. |
|
17. |
Messageà In screen |
Download the file(s) or CCD file(s) by clicking on zoom icon. |
|
18. |
Lab Vendor Master screen |
Export the Insurance List by clicking on
|
|
19. |
Radiology Master screen |
Export the Insurance List by clicking on
|
|
Patient Portal |
||
|
20. |
My Health Records menuà click on Ambulatory Summary submenu |
Download the Ambulatory summary |
|
21. |
My Health Records menuà click on Past Ambulatory Summary submenu |
Download the required Past Ambulatory summary |
![]() Note:
Note:
v The document name and count will not be displayed in the Audit Trail report.
v On click of Export/ Download button, the audit is generated irrespective of a User closed or cancelled the window’s generated confirmation message to download the file.
· In the Audit Trail report, the column, Id Chart No# Name Dob has been removed. Instead the following four new individual columns have been added to display the Patient details:
o Pat Name
o Id
o Chart No#
o DOB
·
The above options have been also
provided on the Sort popup
(click on Sort icon:
![]() )
to apply sorting based on this newly added columns.
)
to apply sorting based on this newly added columns.
7 Settings
7.1 The UI of MU/QPP Settings popup has been changed
Navigation Goto menu: Settingsà Configurationà under Workflow column, click MU/QPP Settings
The following describes all the UI (User Interface) related changes done on the MU/QPP Settings popup:
· The label of MU Settings has been changed to MU/QPP Settings.
Figure 7.1-1: MU Settings relabled to MU/QPP Settings
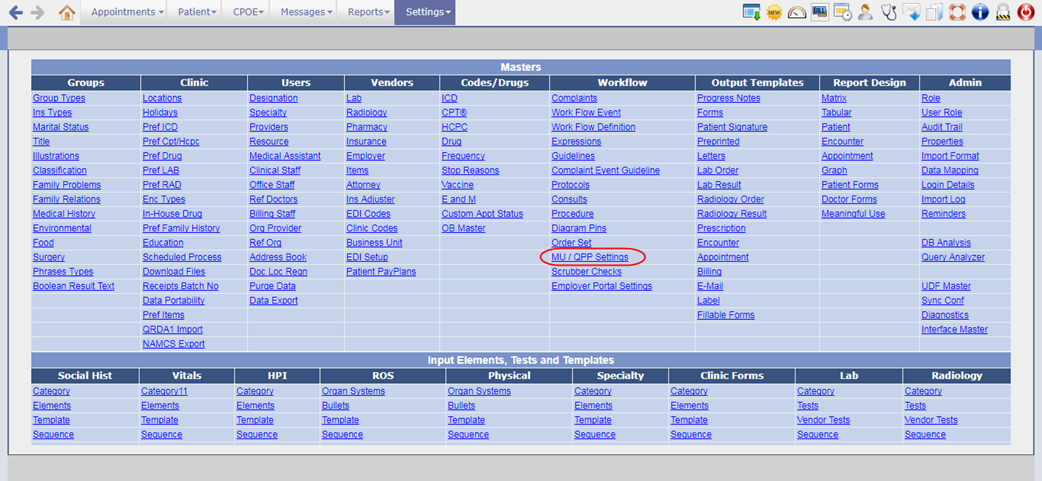
· Earlier the MU Settings popup displayed three tabs i.e. Provider, Clinic, and Setup Required. Now, all the information is merged and displayed in single layout only.
Figure 7.1-2: Old and new MU/QPP Settings UI
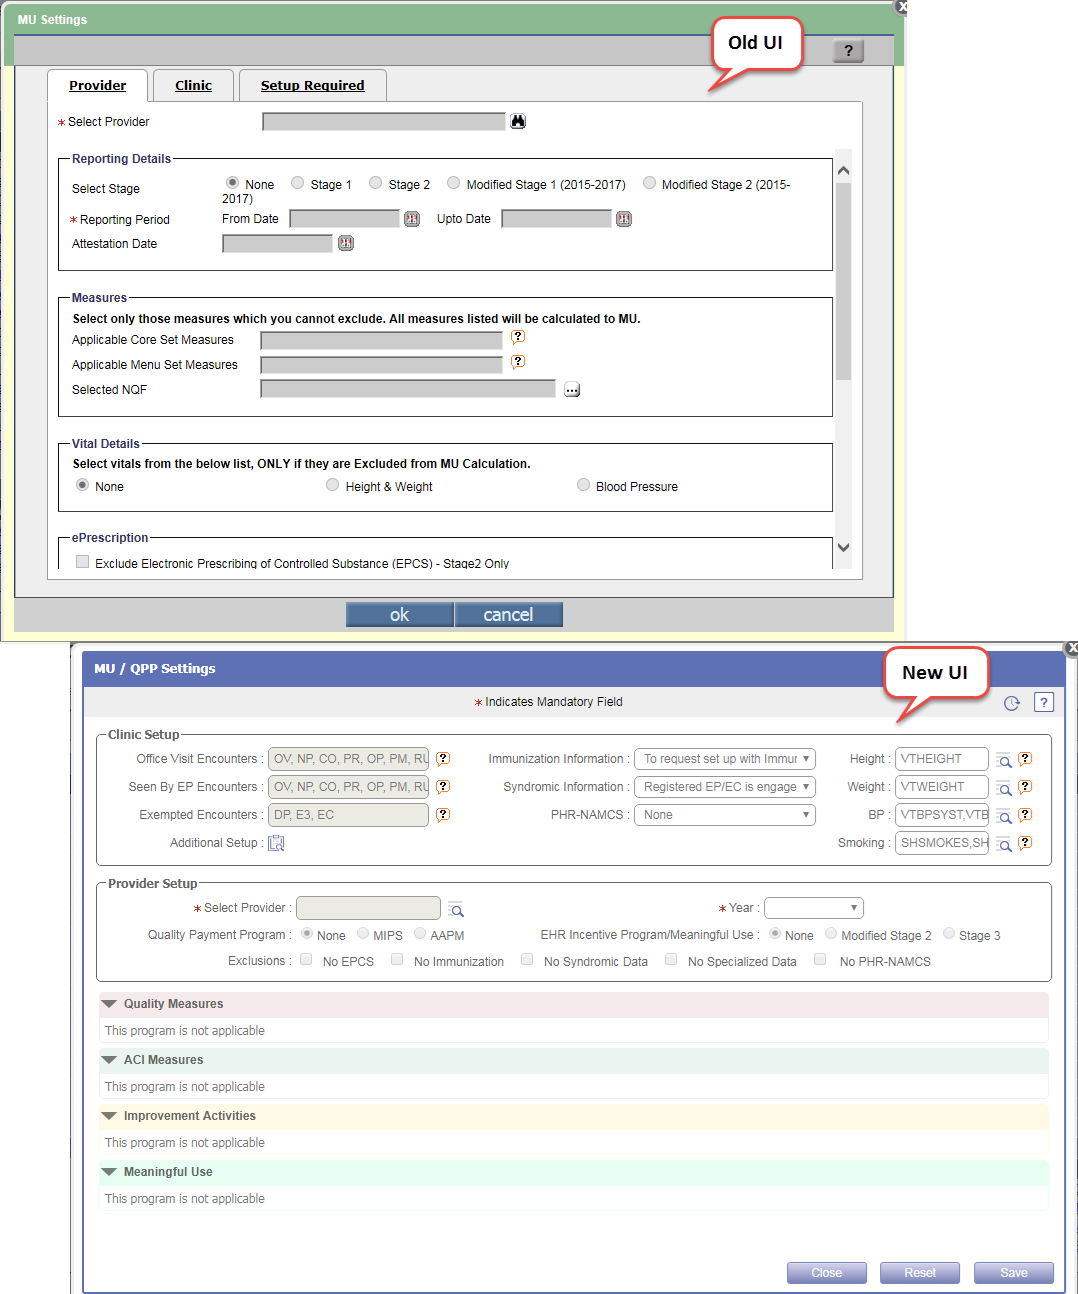
· The MU/QPP Settings popup now displays the information categorized into two sections i.e. Clinic Setup and Provider Setup.
Clinic Setup
· The Clinic Setup section displays all the fields that were earlier available under Clinic tab such as Office Visit Encounters, Seen by EP Encounters, Exempted Encounters, Height, Weight, BP (Blood Pressure), and Smoking.
Figure 7.1-3: Clinic Setup on MU/QPP Settings popup
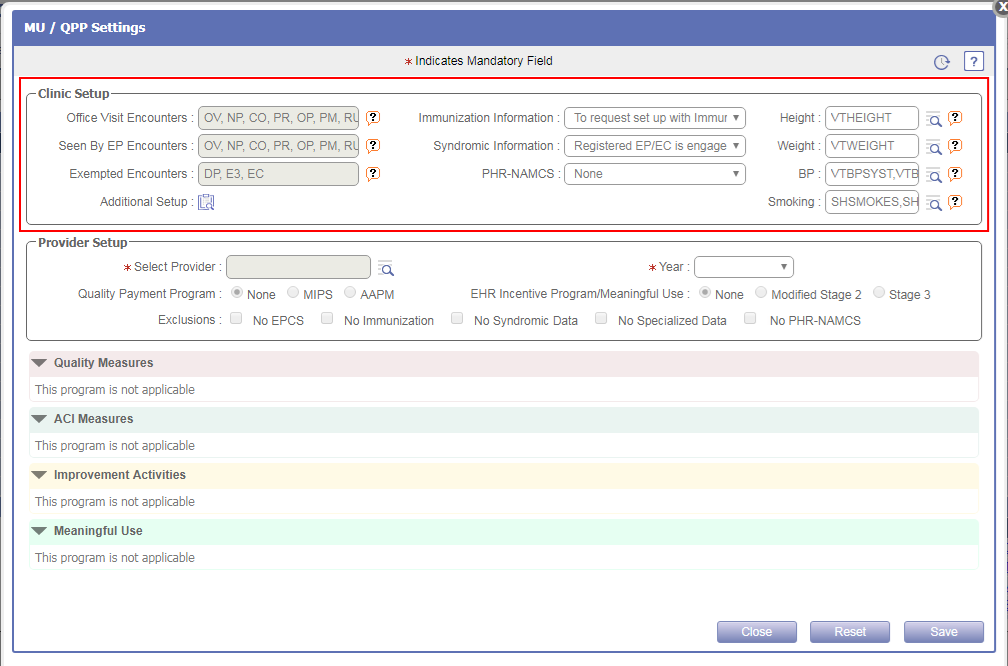
· The Immunization Information and Syndromic Surveillance Information are now displayed as dropdown list.
· The PHR- NAMCS is a newly added dropdown list from which the User can set the NAMCS information.
Figure 7.1-4: PHR-NAMCS under Clinic Setup
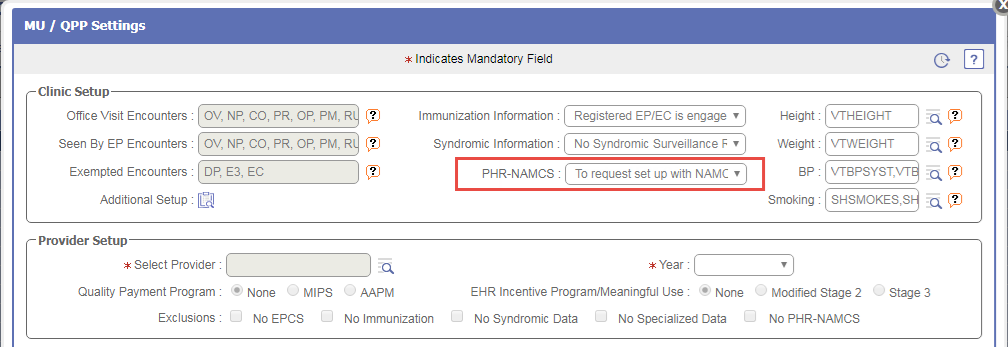
·
Also, a new Additional Setup icon:
![]() has been provided under Clinic
Setup section which on click would display the Dashboard and Interface Details sections.
has been provided under Clinic
Setup section which on click would display the Dashboard and Interface Details sections.
Figure 7.1-5: Additional Setup popup
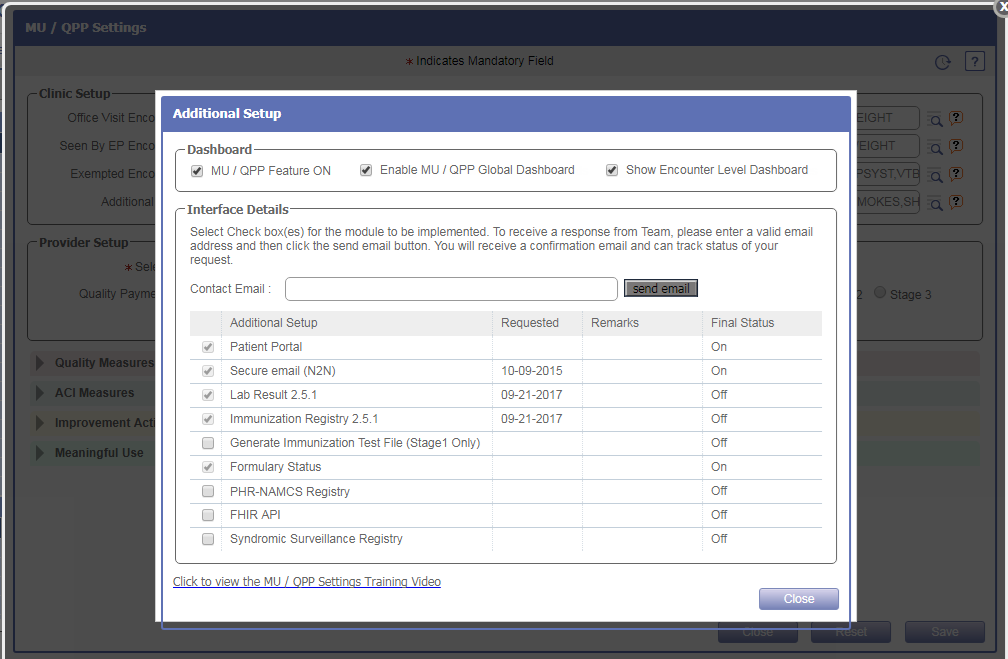
· The earlier options under the Dashboard section has been now relabeled to the following on Additional Setup popup:
|
Old label |
New Label |
|
Meaningful Use On |
MU/QPP Feature ON |
|
Show Dashboard |
Enable MU / QPP Global Dashboard |
· The Interface Details section displays all the information such as Contact Email field, Setup for Patient Portal, Secure email (N2N), Lab Result 2.5.1, Immunization Registry 2.5.1, Generate Immunization Test File (Stage1 Only), and Formulary Status are displayed as it, just that now following options has been additionally provided to request for the setup:
- PHR-NAMCS Registry
- FHIR API
- Syndromic Surveillance Registry
Figure 7.1-6: New options under Interface Details section of Additional Setup popup
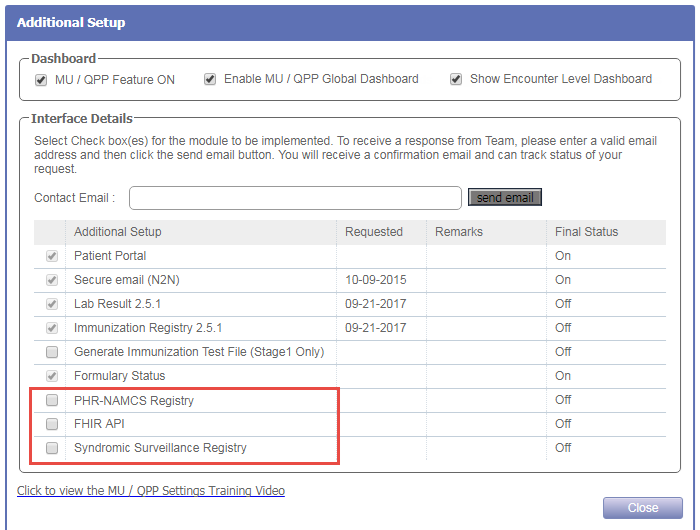
Provider Setup
· The User now has provision to set the following options for the Provider selected from Select Provider search field:
Figure 7.1-7: Provider setup on MU/QPP Settings popup
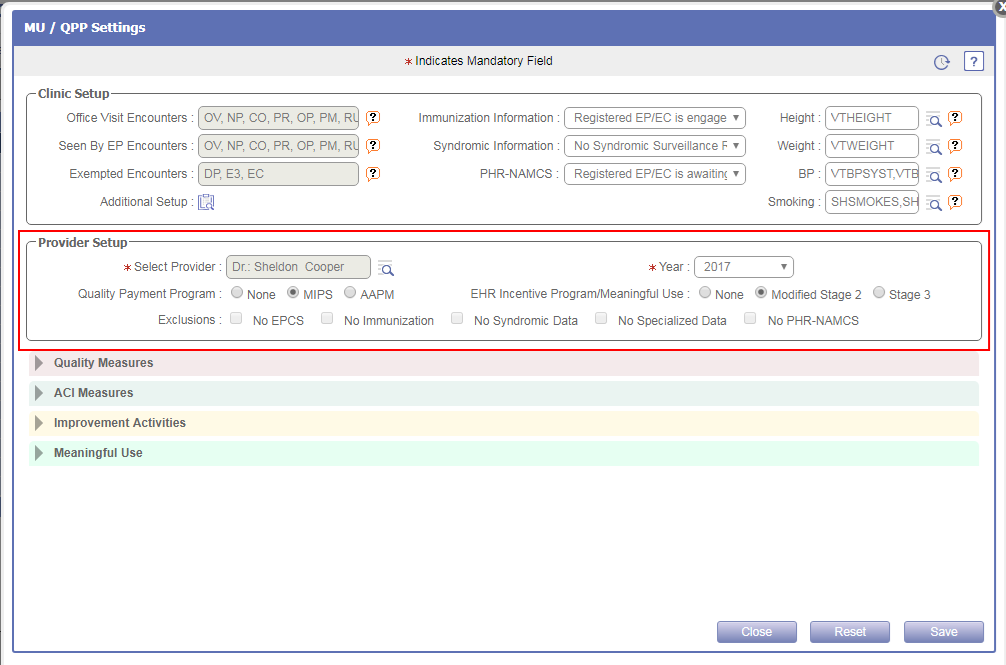
- Year: It is the year for which the Provider is reporting.
- Quality Payment Program: It is the Quality Payment Program i.e. MIPS or AAPM for which Provider wants to report.
- EHR Incentive Program/Meaningful Use: It is the Meaningful Use Program i.e. Modified Stage 2 or Stage 3 for which Provider wants to report.
- Exclusions: It is the exclusion which the Provider wants to set. The exclusions such as No EPCS, No Immunization, No Syndromic Data, and No Specialized Data were pre-existing. Now, an additional exclusion, No PHR-NAMCS has been provided.
The tooltip of each checkboxes displays the detail about respective exclusion.
Figure 7.1-8: Tooltip displaying the exlusions
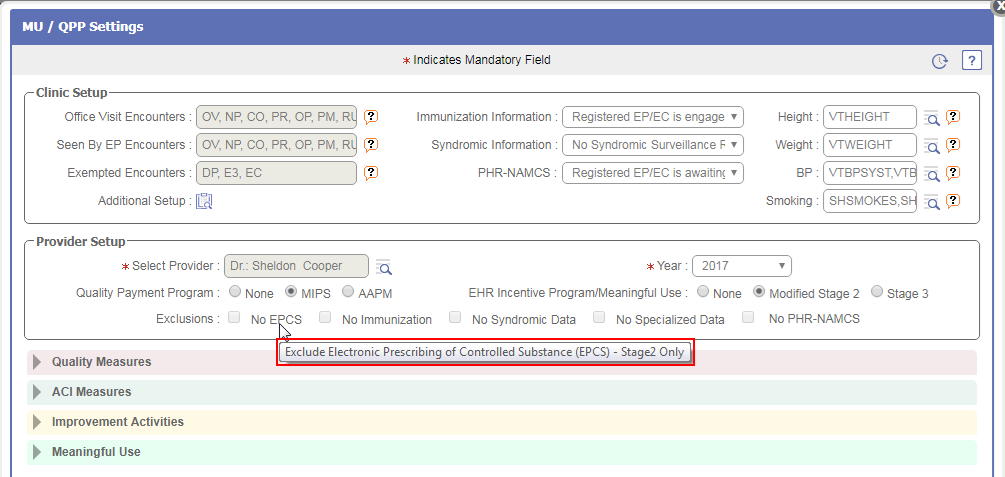
Accordions on MU/QPP Settings popup
· The following four accordions are available for a User to set the measures for Quality Payment Program and EHR Meaningful Use:
- Quality Measures
- ACI Measures
- Improvement Activities
- Meaningful Use
Figure 7.1-9: Accordions on MU/QPP Settings popup
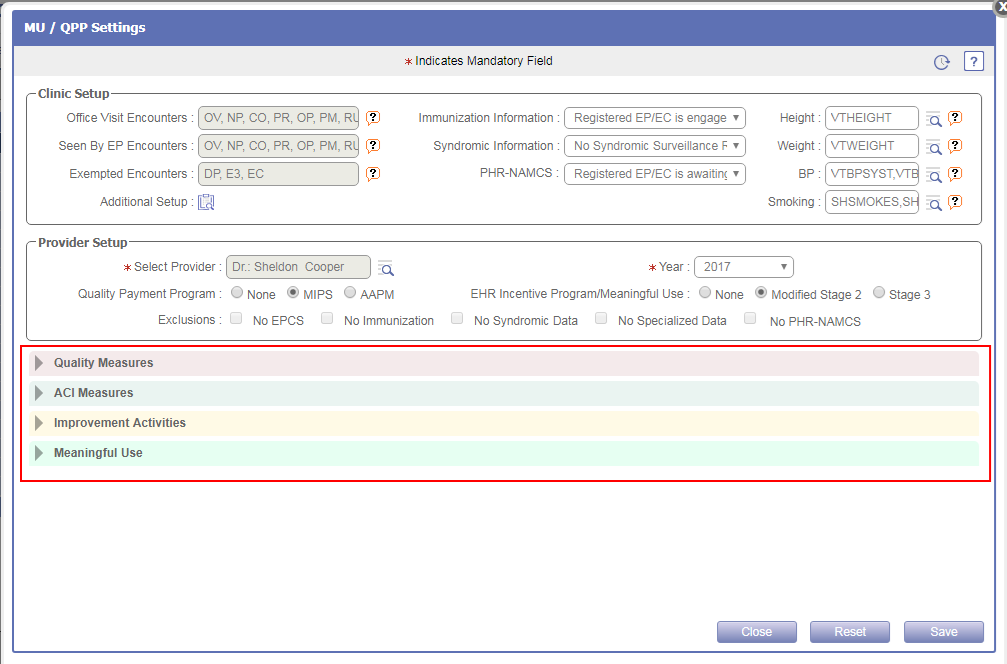
· From each accordion, the User has provision to set the respective measures’ Reporting Period and Submission Date.
Figure 7.1-10: Reporting period on MU/QPP Settings popup
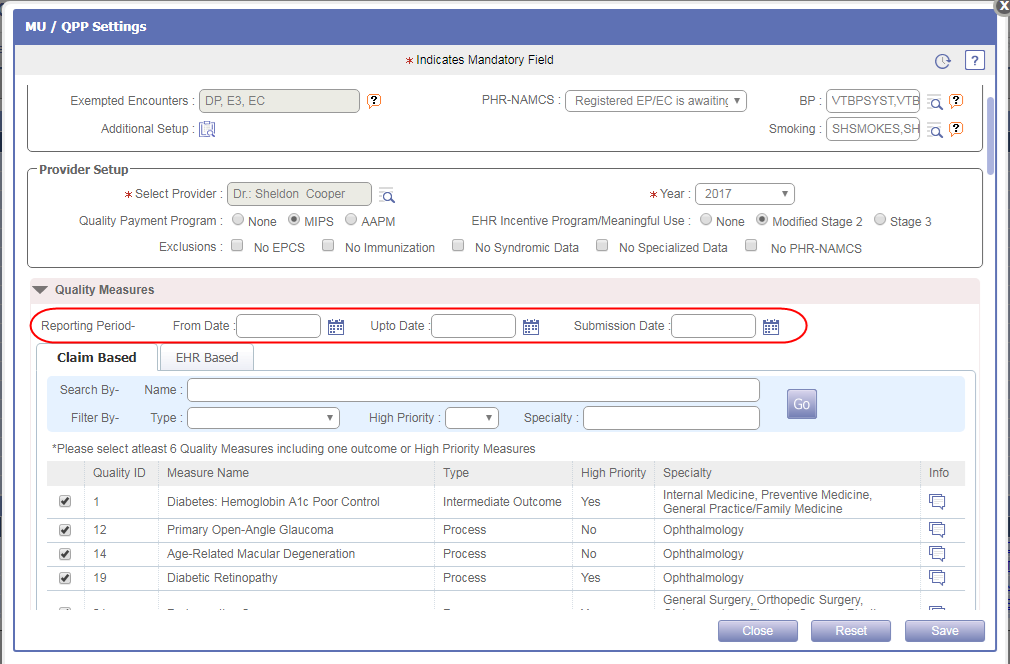
· Also, User can Search and Filter the measures in respective accordion by the given criteria.
Figure 7.1-11: Search and filter criteria on MU/QPP Settings popup
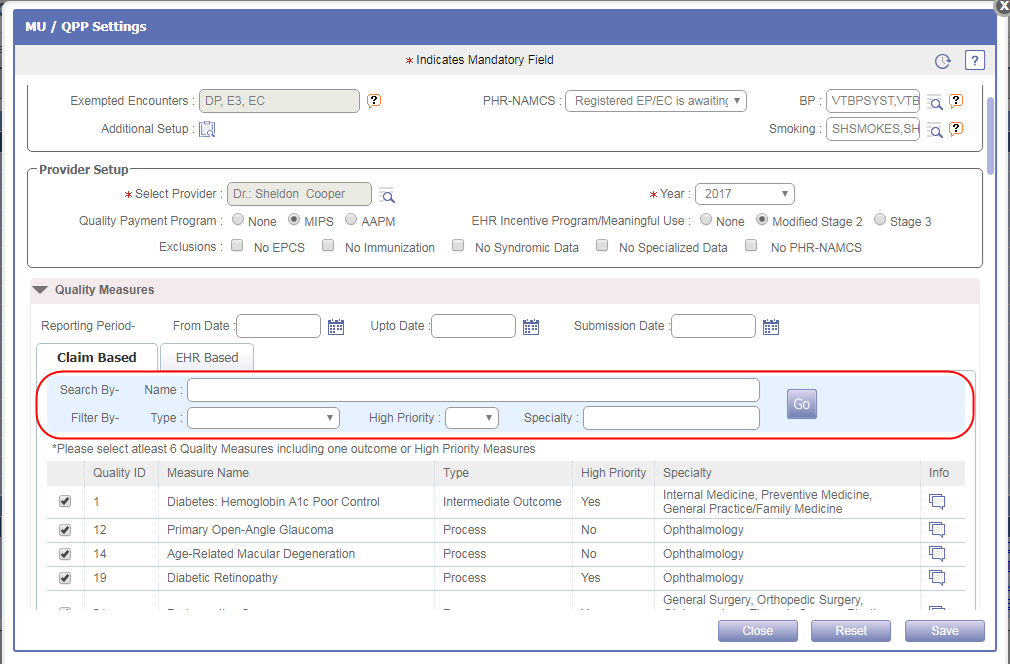
Quality Measures
· The Quality measure accordion is applicable for MIPS and AAPM Quality Payment Program. This accordion displays two tabs, Claim Based and EHR Based.
Figure 7.1-12: Quality Measures accordion
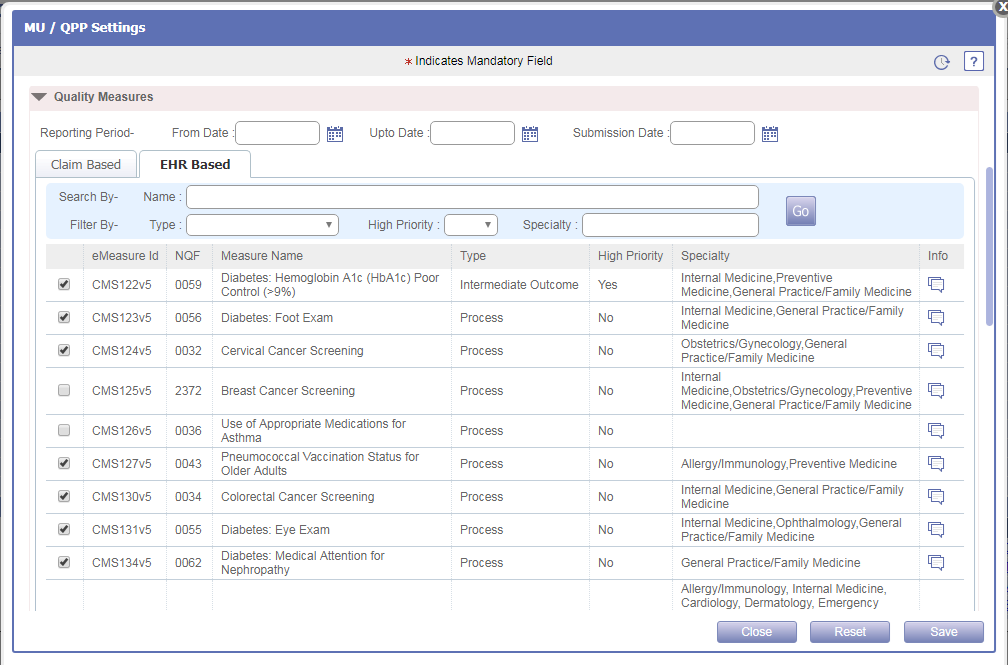
Claim Based tab
· The Claim Based tab displays the list of Quality measures (earlier PQRS) from which a User can select the required measures for reporting by selecting the checkboxes.
·
For each Quality measure, details
such as Quality ID, Measure name, Type, High Priority, Specialty, and Info icon
![]() is displayed. A click on Info icon:
is displayed. A click on Info icon:
![]() would display the Denominator and Numerator criteria
for the respective Quality measure.
would display the Denominator and Numerator criteria
for the respective Quality measure.
Figure 7.1-13: Claim based measure information
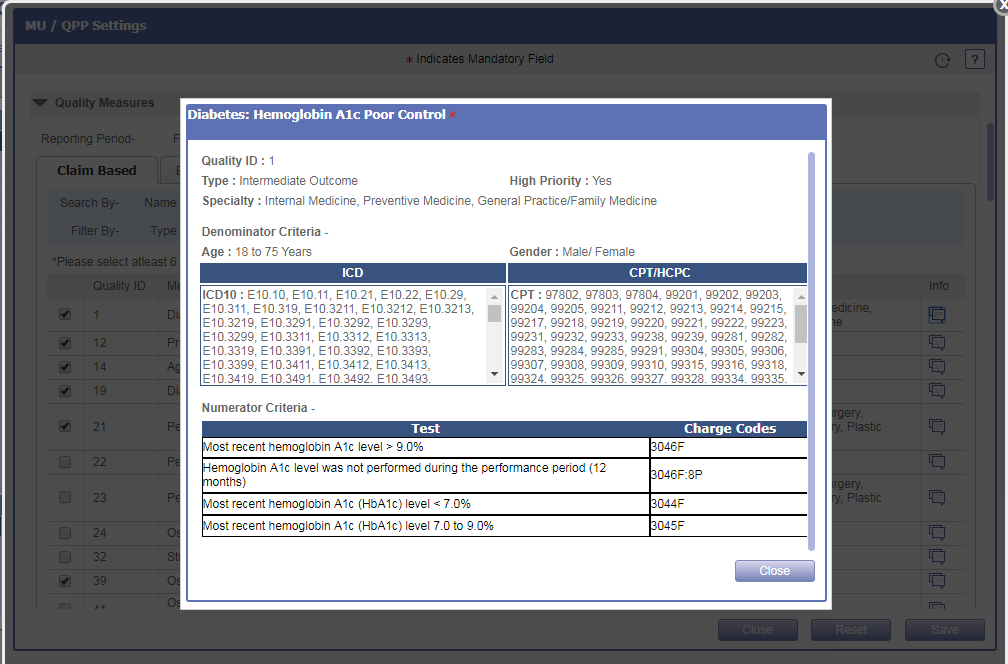
![]() Note: If a Provider is reporting for Quality measure then it
is mandatory to select 6 Quality measures including one measure of outcome type
or of High priority.
Note: If a Provider is reporting for Quality measure then it
is mandatory to select 6 Quality measures including one measure of outcome type
or of High priority.
EHR Based tab
· The EHR Based tab displays the list of eCQM measures (earlier NQF) from which a User can select the required measures for reporting by selecting the checkboxes.
·
For each eCQM measure, details
such as eMeasure ID, NQF, Measure name, Type, High Priority, Specialty, and
Info icon
![]() is
displayed. A click on Info icon:
is
displayed. A click on Info icon:
![]() would
display the Description of the respective measure.
would
display the Description of the respective measure.
Figure 7.1-14: EHR based measure information
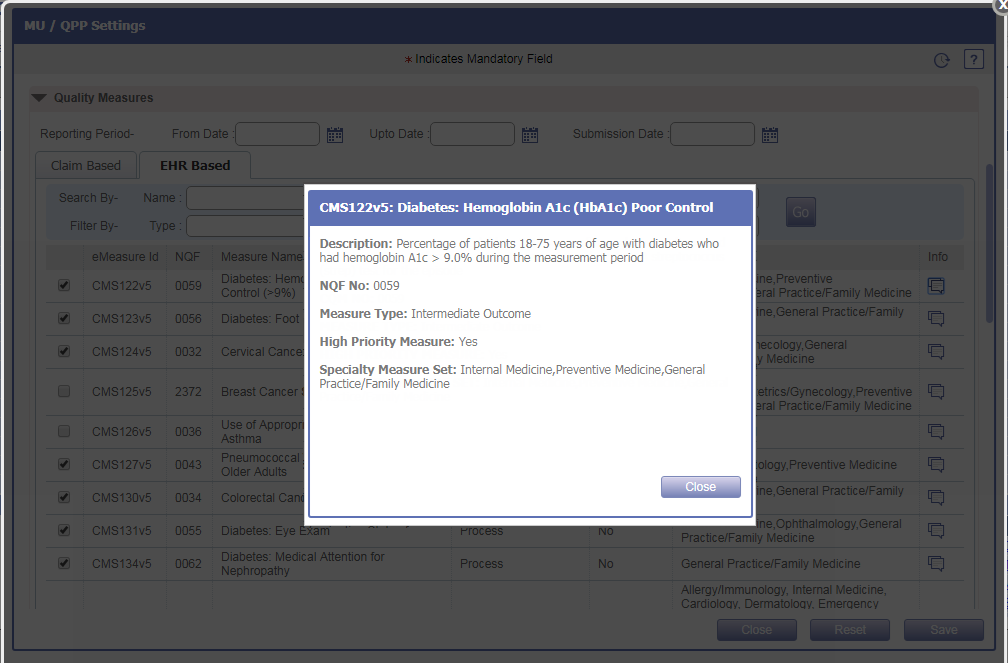
ACI Measures
· The ACI Measures accordion is applicable for MIPS and AAPM Quality Payment Program. This accordion displays the list of ACI measures from which a User can select the required measures for reporting by selecting the checkboxes.
Figure 7.1-15: ACI measures accordion
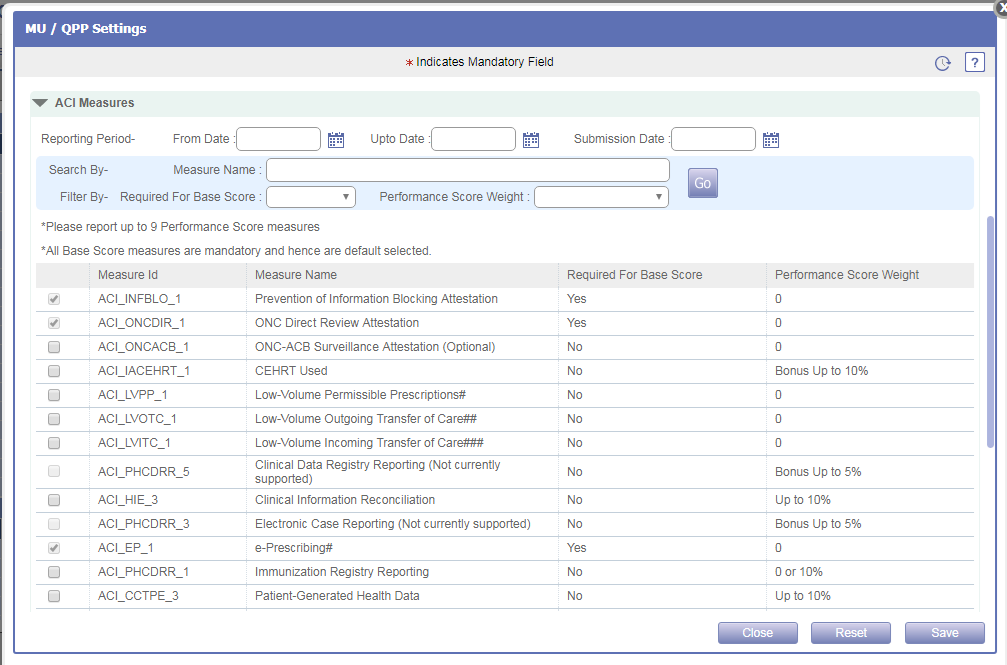
· For each ACI measure, details such as Measure ID, Measure name, Required for Base Score, and Performance Score Weight is displayed. Certain Measure name are suffixed with asterisk (*) and Hash mark (#) which means,
* Performance Score: Additional achievement on measures above the base score requirements
# Exclusion condition for e-Prescribing measure
## Exclusion condition for Send a Summary of Care measure
### Exclusion condition for Request/Accept Summary of Care
· As the Base Score measures are mandatory, those respective measures are selected by default and displayed as disabled.
![]() Note: If a Provider is reporting for ACI measure then it is
mandatory to select up to 9 Performance Score measures.
Note: If a Provider is reporting for ACI measure then it is
mandatory to select up to 9 Performance Score measures.
Improvement Activities
· The Improvement Activities accordion is applicable for MIPS and AAPM Quality Payment Program. This accordion displays the list of activities from which a User can select the required activity for reporting by selecting the checkboxes.
Figure7.1-16: Improvement Activities accordion
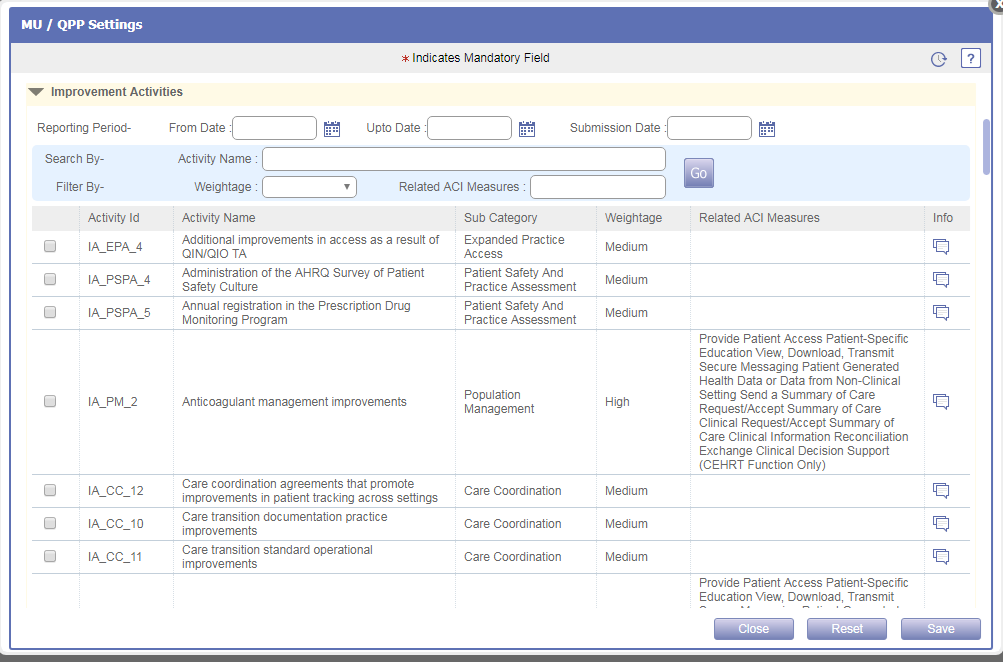
·
For each Improvement Activity,
details such as Activity ID, Activity name, Sub Category, Weightage, Related
ACI Measures, and Info icon
![]() is
displayed. A click on Info icon:
is
displayed. A click on Info icon:
![]() would
display the Description of the respective activity.
would
display the Description of the respective activity.
Figure 7.1-17: Improvement activity information
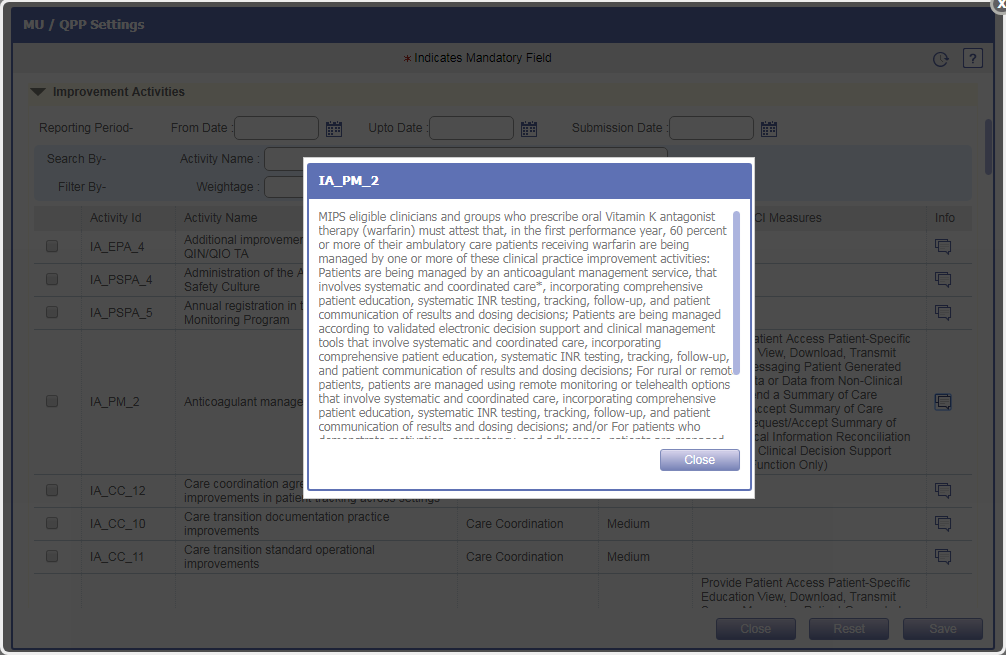
Meaningful Use
· The Meaningful Use accordion is applicable for Modified Stage 2 and Stage 3 EHR Incentive Program/Meaningful Use. This accordion displays the list of Meaningful Use measures from which a User can select the required measures for reporting by selecting the checkboxes.
· For each Meaningful Use measure, details such as Measure ID, Measure name, and Submission Criteria is displayed.
Figure 7.1-18: Meaningful Use accordion
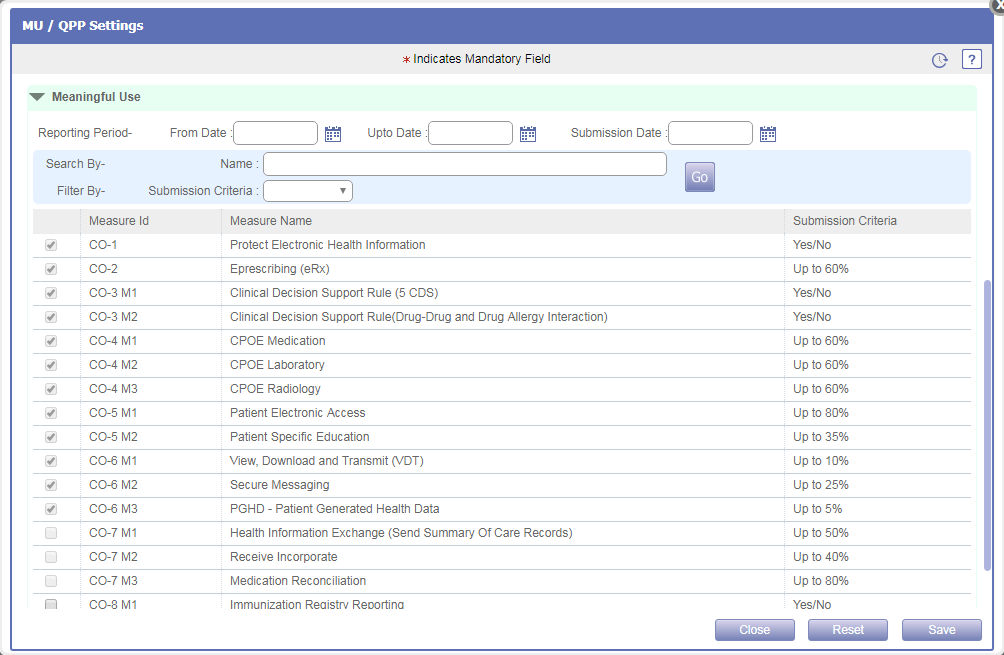
![]() Note: Certain measures which are mandatory for Meaningful
Use reporting are displayed as selected and disabled by default.
Note: Certain measures which are mandatory for Meaningful
Use reporting are displayed as selected and disabled by default.
7.2 Provision given to export the NAMCS Health Care Survey type of CCD from PrognoCIS
Navigation Goto menu: Settingsà Configuration
· A new option, NAMCS Export has been added under Clinic column on the Configuration screen to export the NAMCS (National Ambulatory Medical Care Survey) Health care survey type of CCD.
Figure 7.2-1: NAMCS export on Settings screen
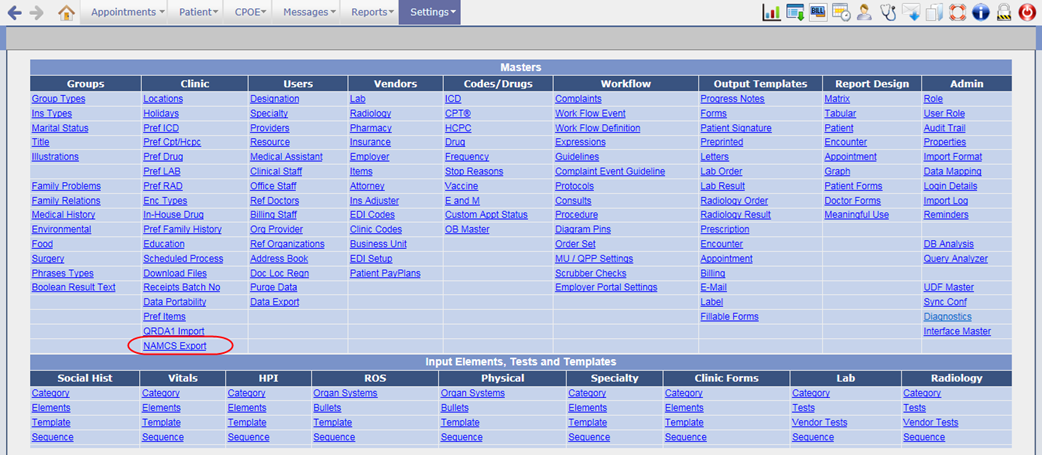
· A click on NAMCS Export option would invoke the NAMCS Export popup from where a User can export the NAMCS CCD for Patient(s) based on set filters. Following are the filters available on the popup:
Ø Patient
Ø Patients Primary Provider
Ø Encounter Attending Provider
Ø Encounter Date range
Figure 7.2-2: NAMCS Export popup
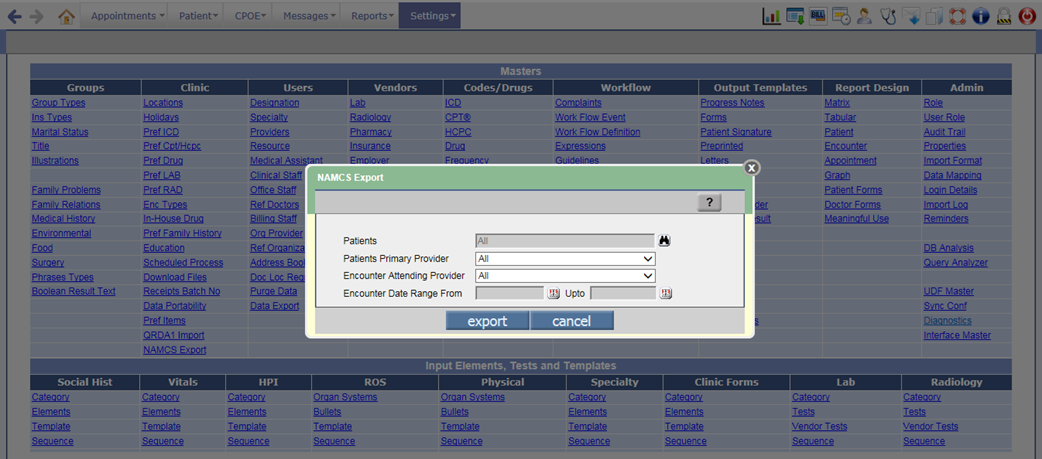
· Once the NAMCS Health Care Survey type of CCD is exported, the notification message is sent to the logged-in User’s inbox (Messageà In screen).
![]() Note: A new supported event, 243 has been added to send
the notification message to the user once NAMCS Export process is done.
Note: A new supported event, 243 has been added to send
the notification message to the user once NAMCS Export process is done.
Figure 7.2-3: NAMCS export notification message in Message-In screen
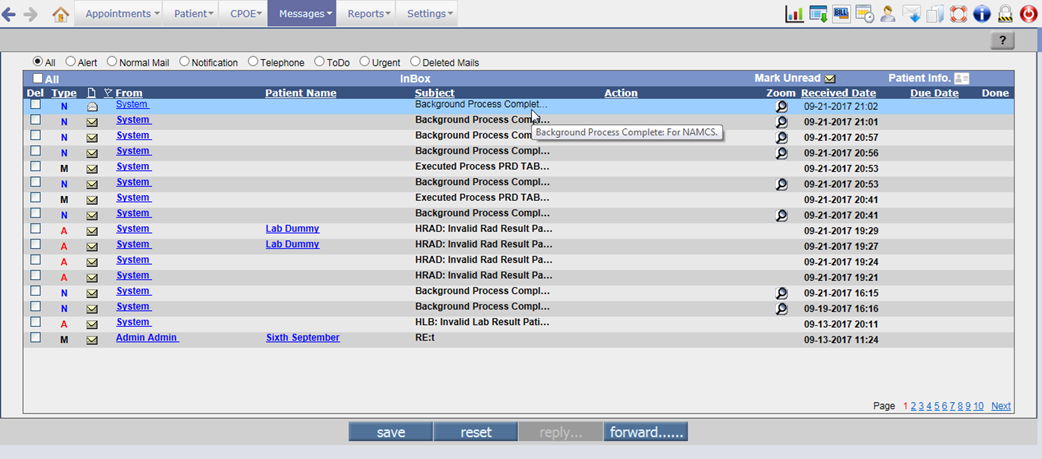
· On click of zoom icon, the zip file for NAMCS CCD is downloaded. This zip file consists of XML and HTML files of CCD.
![]() Note: Depending on the property, prognocis.filedownload.noencryption, the User
Password for encryption/decryption of zip file is displayed. If the property is
turned OFF then the User Password popup will be displayed else it will not be
displayed.
Note: Depending on the property, prognocis.filedownload.noencryption, the User
Password for encryption/decryption of zip file is displayed. If the property is
turned OFF then the User Password popup will be displayed else it will not be
displayed.
· The exported NAMCS CCD zip file will also be available on the Download Files screen (Settingsà Configurationà under Clinic column, click Download Files) under the newly added category, NAMCS Health Care Survey.
Figure 7.2-4: NAMCS file on Download Files screen
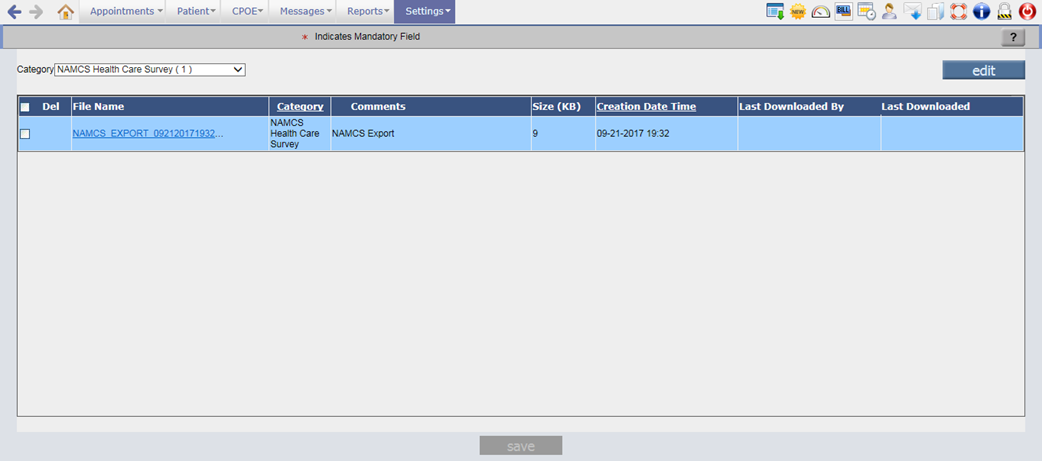
· Only the user having Read rights for the newly added role, NAMCS Export will be able to export the NAMCS Health Care survey type of CCD.
Figure 7.2-5: NAMCS Export role
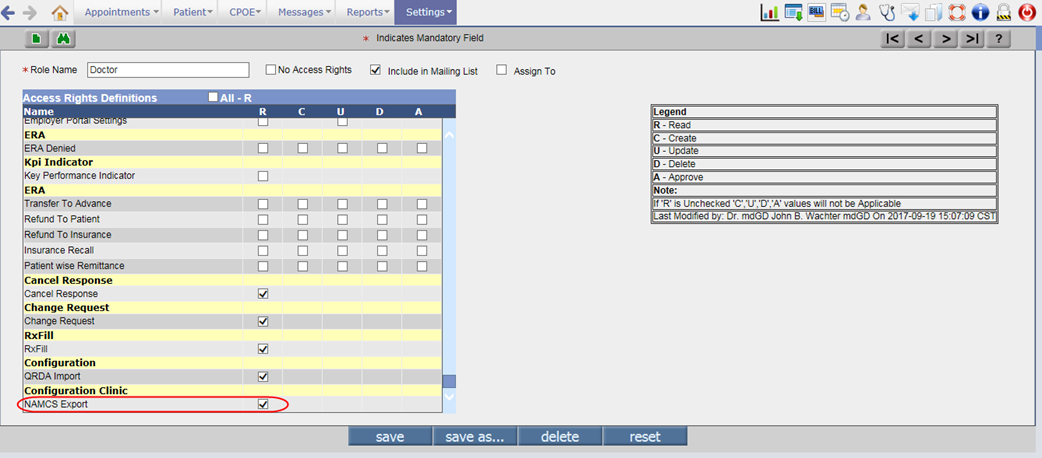
7.3 Provision given to import the QRDA1 file into PrognoCIS
Navigation Goto menu: Settingsà Configuration
· A new option, QRDA1 Import has been added under Clinic column on the Configuration screen to import the QRDA1 file into PrognoCIS.
Figure 7.3-1: QRDA1 Import on Settings screen
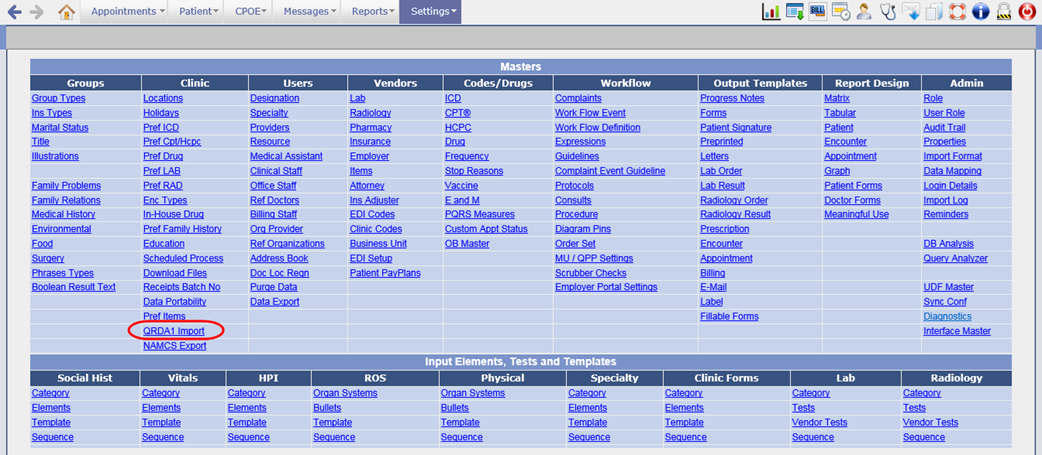
· A click on QRDA1 Import option would invoke the Patient QRDA1 Import popup from where a User can attach the QRDA1 zip file and import it.
· Only if the Patient’s First name, Last name, Gender, DOB, and Provider NPI in the attached xml is matched with the Patient details in EMR then the respective data is imported else it will not be imported.
Figure 7.3-2: QRDA1 Import popup
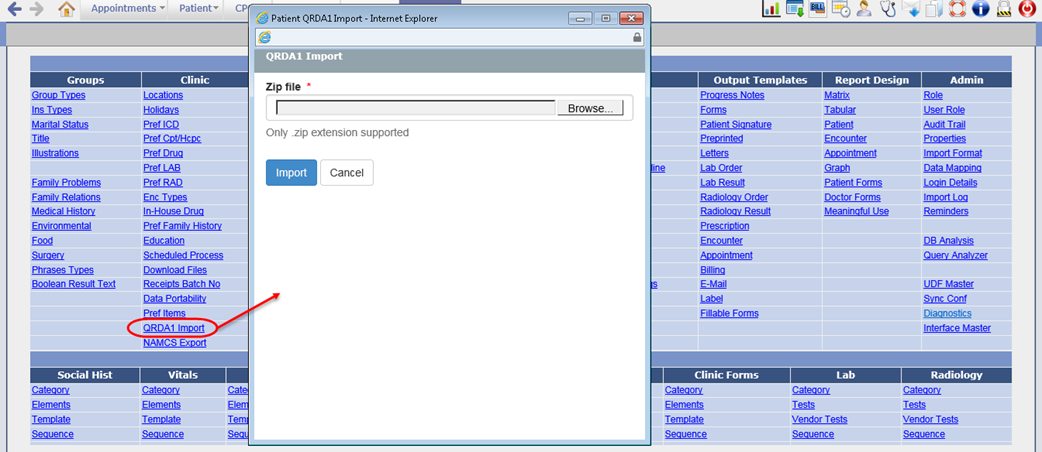
· Only the user having Read rights for the newly added role, QRDA Import will be able to import the QRDA1 file.
Figure 7.3-3: QRDA1 Import role
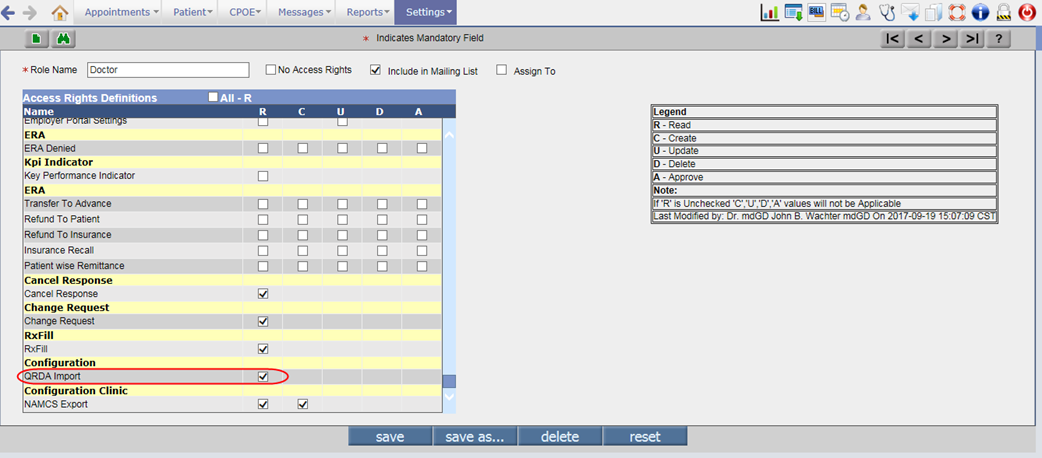
7.4 NQF measure is calculated for the imported QRDA1 file
· Through the existing property, encounter.close.processnqf, when set to ON, the NQF measure for the Patient is calculated on close of encounter.
· Similarly, the process of calculating NQF measure for the imported QRDA1 file would be done on successful import.
7.5 Provision to set multiple parameters for the Patient Data export
Navigation Goto menu: Settingsà Configurationà under Clinic column, click Data Portabilityà Patient Data Portability popup
· By data export, the patient’s encounter data can be exported and downloaded in the XML format to facilitate the migration of Patient record from one EMR to another.
· Earlier the data was exported based on the parameters such as Patients, Primary Doctor, or Encounter Date Range. The user could select only one parameter option at a time to export and download the encounter data.
· Now, the following changes have been done on the Patient Data Portability popup:
o The radio buttons for parameters options have been removed. Thus user can select the combination of multiple parameters to export the patient data.
o The Primary Doc and Medics options have been relabeled to Patients Primary Provider and Encounter Attending Provider respectively.
o By default, All option is displayed as selected for Patients search, Patient Primary Provider, and Encounter Attending Provider.
o An additional parameter option, Patients Last Name has been provided. From this option, the user can export the encounter data for the Patient having last name matching the entered From and Upto range.
For example, if the letter A is entered in Patients Last Name From field and N in Upto field then for all the Patients having last name starting from A to N, the encounter data will be exported.
Figure 7.5-1: Data Portability old and new UI
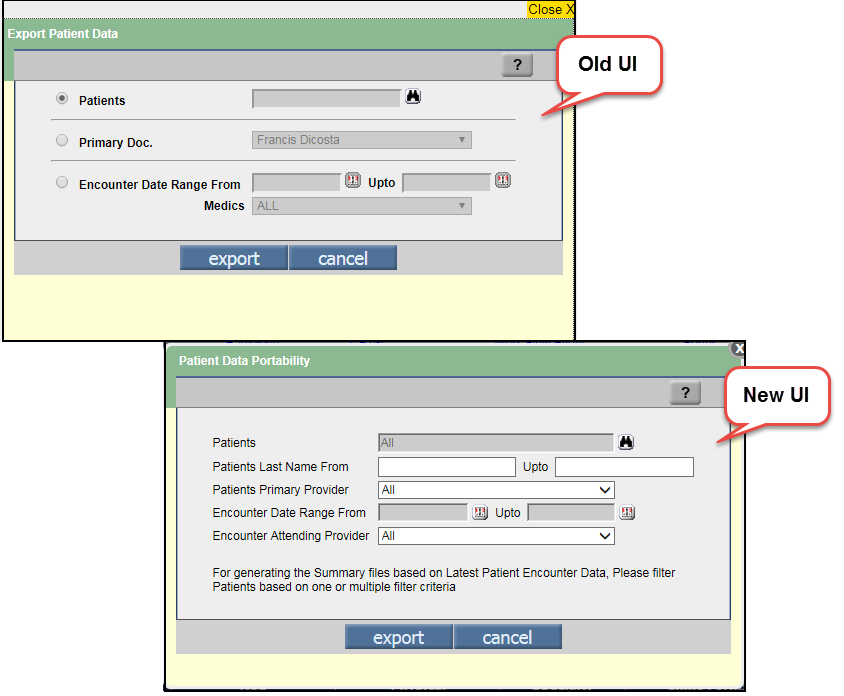
· Also, a new scheduled process, Data Portability has added to schedule the data export for Patient(s) based on the set parameters (click on params button).
Figure 7.5-2: Data Portability process

· The parameters of data portability process are same as on the Patient Data Portability popup i.e. Patients selection, Primary Provider, From and Upto Last name, Encounter Date range, and Encounter Attending Provider.
Figure 7.5-3: Parameters of Data Portability
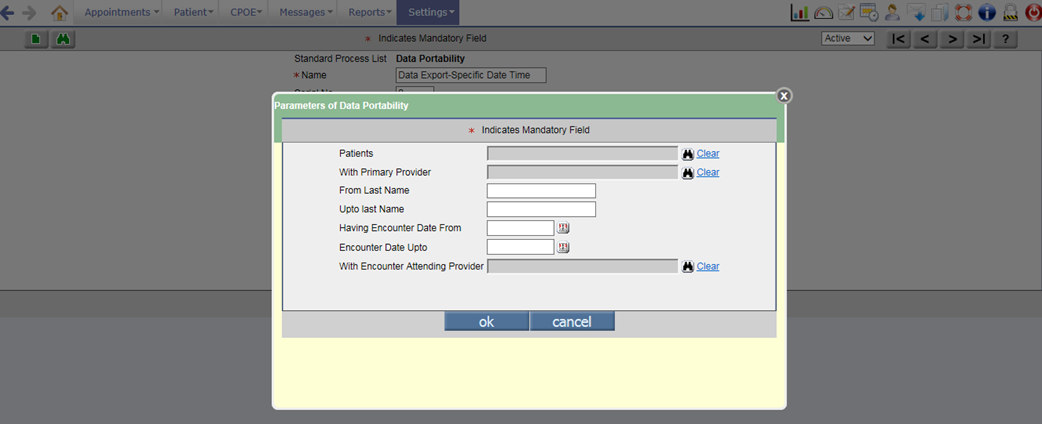
7.6 Enhancements related to Clinical Decision Support (CDS) feature
Navigation Goto menu: Settings à Configuration à Expressions
Expression in Patient’s preferred language
· A new tag ID 118 with tag name, Language has been added in the Object Type search popup for expressions of type, Patient so as to configure and display the Expressions in Patient’s preferred language.
· If the Patient’s preferred language is set to blank or Declined to specify then by default the expression is displayed in English.
Bibliography related changes for EMR type of Expression
· According to the existing functionality of Expression feature, depending upon the source of information procured from, the Expressions are categorized either as EMR or Medlineplus type.
Figure 7.6-1: Two types of expression – EMR and Medlineplus displayed
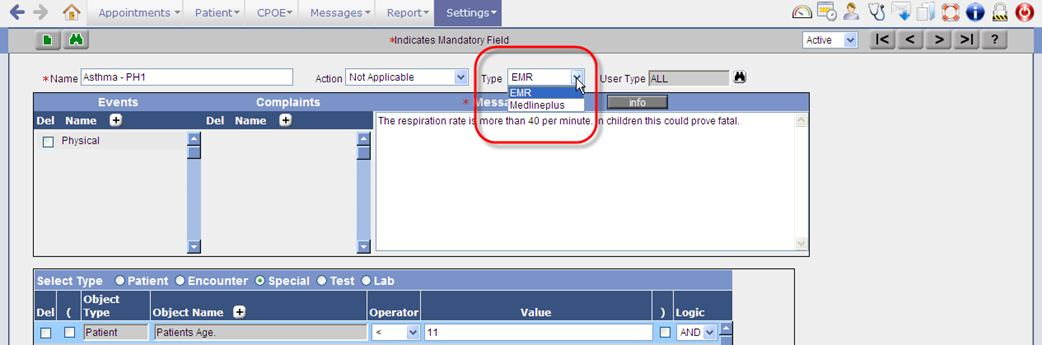
· The EMR type facilitates a User to ‘enter’ Bibliography whereas the Medlineplus type facilitates a User to procure information externally from the website of Medline Plus.
· The defined expressions become available only to the User(s) whose role is selected from the User Type search. By default, ALL is the value that remains selected if nothing is specifically selected. Refer to figure 10.4-1
Figure 7.6-2: User type for expression
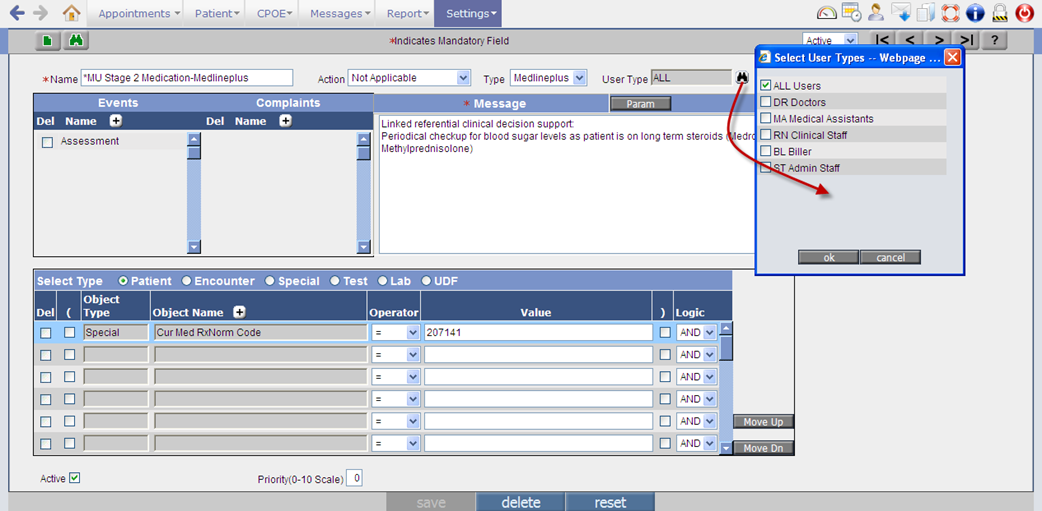
· For EMR type of expressions, Info button is available and for MedlinePlus type of expressions, the Params button is available on the Expression Master screen. The Info button invokes Edit Bibliography popup and the Params button invokes Expression Params popup. The Edit Bibliography popup now displays five default labels. Refer to figure
Figure 7.6-3: Edit Bibliography displaying default labels

· Following is the list of labels:
- Developer of the intervention
- Bibliographic citation
- Funding Source
- Release date
- Last Updated
· These labels have been introduced to capture bibliography details of the information material in a standard pre-defined format and if there are pre-existing details on the popup then these labels are appended at the end. The maximum character limit for entering text in Edit Bibliography popup is 1024.
![]() Note: The
default values displayed for the labels are ‘Unknown’.
Note: The
default values displayed for the labels are ‘Unknown’.
· When a User adds the tags of type ‘Special’ and enters the appropriate values (i.e. codes such as SNOMED; ICD; CPT; RxNorm; NDC; and LOINC) then automatically these values are also available on the Expression Params popup that is invoked from the Param button.
Figure 7.6-4: Expression Params popup displaying values entered on the expression screen
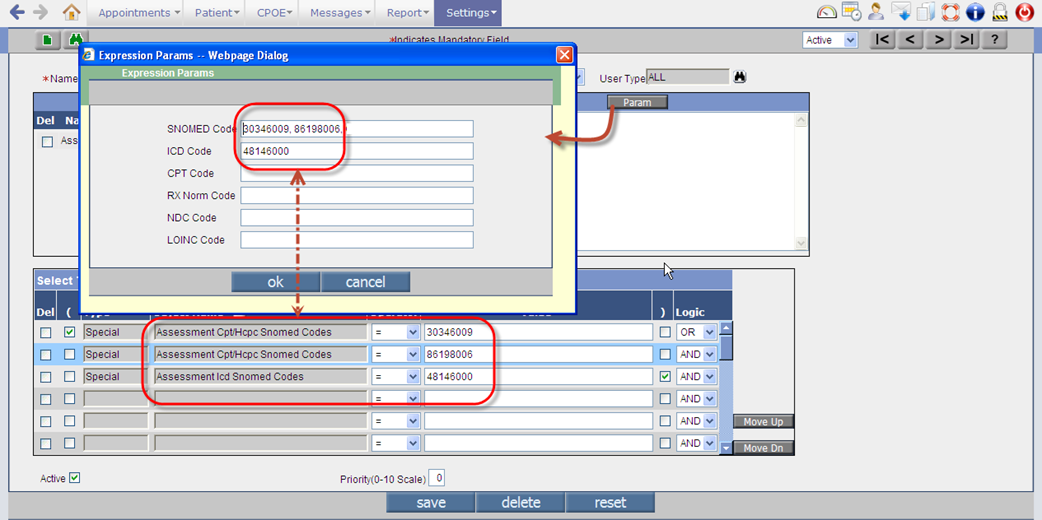
![]() Note: It
is also possible to manually add values directly to the fields.
Note: It
is also possible to manually add values directly to the fields.
New object types added for Special type of Expression
· To configure the Expression for Allergies RxNorm code and NDC code, the following two new Object Types have been added for Special type of Expression:
|
Tag ID |
Tag Name |
|
338 |
Allergies Based on RX Norm Code |
|
339 |
Allergies Based on NDC Code |
Changes on invoked Expression messages
· The Expression (message) popup invoked in an encounter displays the EMR type of expression with the hyperlink, ‘See Bibliography’ and the Medlineplus type of expression with the text, ‘For details from Medline Plus click here’ wherein the text, ‘click here’ is a hyperlink. Refer to figure
Figure 7.6-5: EMR type of Expression
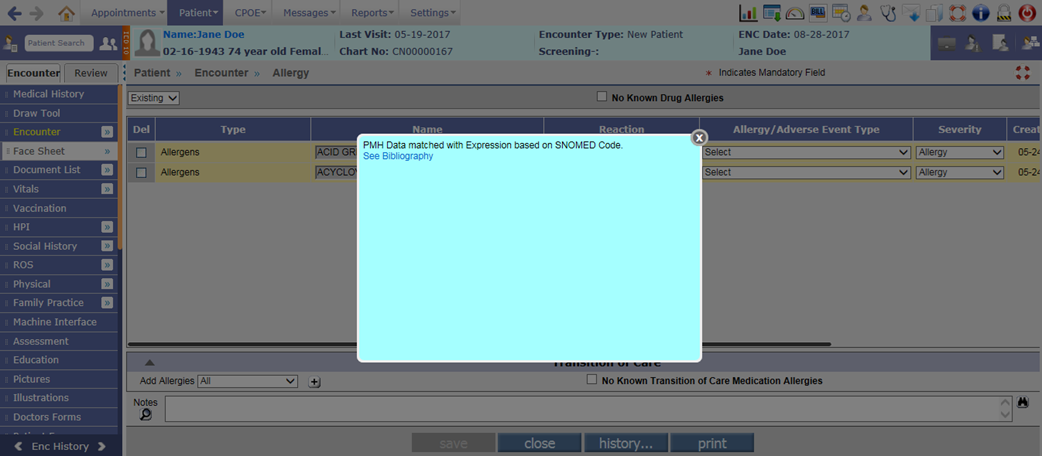
Figure 7.6-6: Medline type of Expression
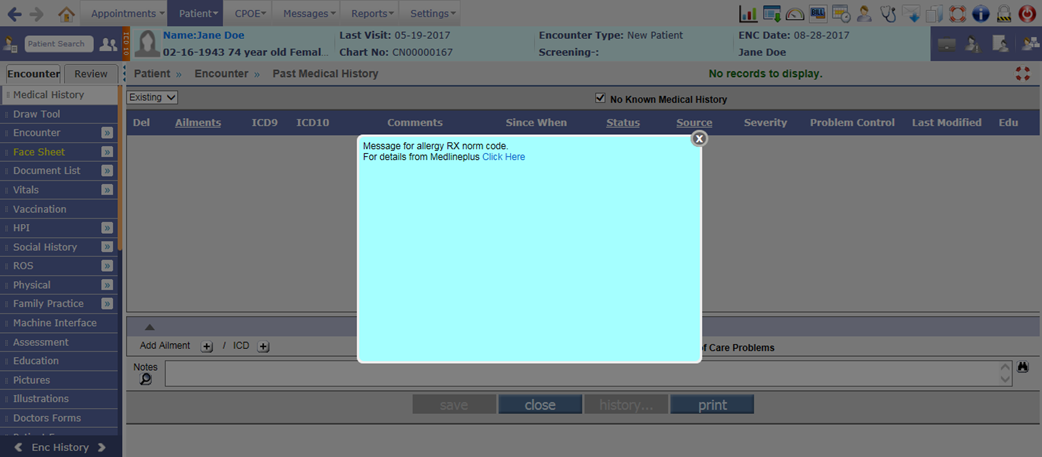
· Consider an example where expressions E1 and E2 are of EMR type and expressions E3 and E4 are of Medlineplus type then the system concatenates the messages as E1+E2+E3+E4 and displays the same on the Expression popup. Refer to figure
Figure 7.6-7: An Expression popup invoked in an encounter displaying both EMR and Medlineplus expression links.
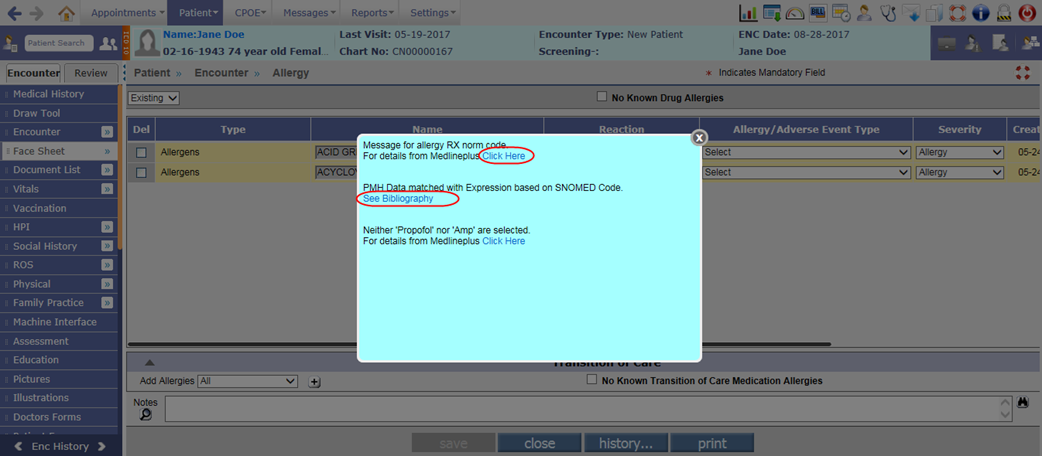
· On click of the link, See Bibliography, the Bibliography popup is invoked displaying the details that were entered in Edit Notes or Bibliography popup (invoked via Info button on Expression screen). Refer to figure
Figure 7.6-8: Expression Bibliography popup displaying entered Bibliography
· On click of the link, click here, the Expression Medline popup is invoked displaying the details procured from the Medline Plus website and concatenated according to the codes entered in the Expression Params popup. Refer to figure
Figure 7.6-9: Expression Medline popup displaying a concatenated list of details that is procured from Medline Plus® website

![]() Note: MedlinePlus is the
National Library of Medicine's web site for consumer health information. The
site offers authoritative, up-to-date health information.
Note: MedlinePlus is the
National Library of Medicine's web site for consumer health information. The
site offers authoritative, up-to-date health information.
7.7 Provision to associate LOINC code to the Social History Test Result values
Navigation Goto menu: Settingsà Configurationà under Social Hist column, click Template
· Earlier there was only a LOINC Code field for a User to assign LOINC code for the Test. Now, a new field, LOINC Code for Answer has been provided on the Social History Test definition screen to associate LOINC code for the specific Answers list. Refer to figure
Figure 7.7-1: LOINC code for Answer for Social History test
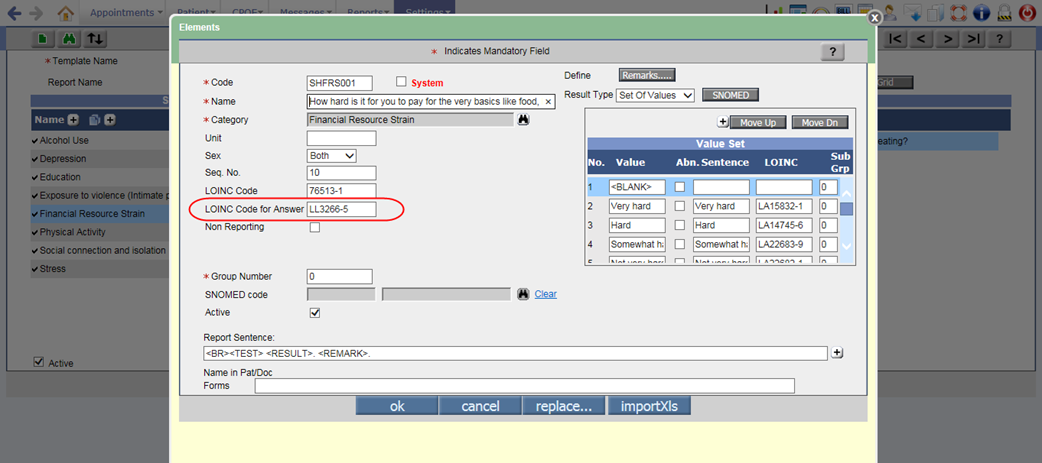
· Also, for Social History test with Result Type such as Boolean, Set of Values, and Score, the LOINC column is displayed to associate LOINC code for each value. Refer to figure
Figure 7.7-2: LOINC code for Result type's Value set
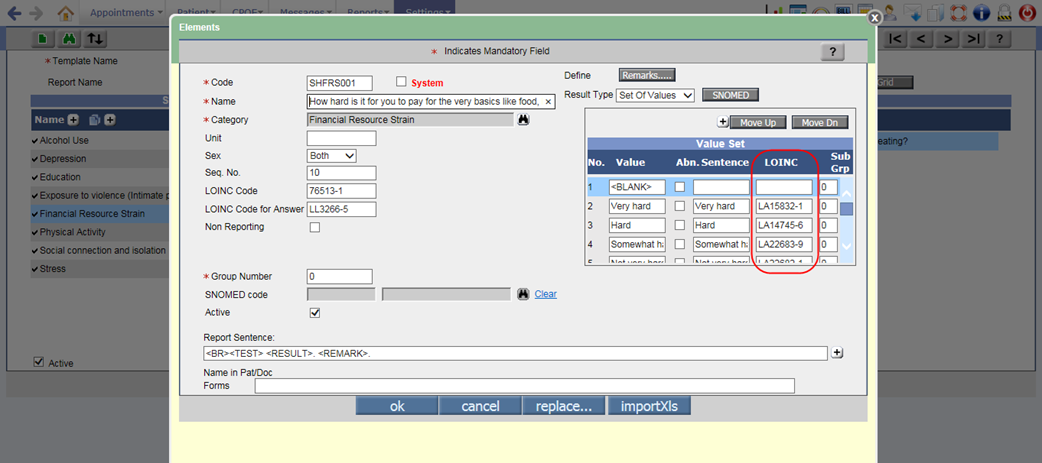
![]() Note: For tests other than Social History, the LOINC Code for Answer field will not be available
and the LOINC column in the Value set
will be displayed as disabled.
Note: For tests other than Social History, the LOINC Code for Answer field will not be available
and the LOINC column in the Value set
will be displayed as disabled.
· The length of the Social History Test name has been increased to 150 characters.
· A new template with name, Social, Psychological, and Behavioral Data has been added on the Social History screen with specific systems, tests, and answer options. From this template, a user may record, change, and access the Patient’s following social, psychological, and behavioral data:
Ø Financial resource strain
Ø Education
Ø Stress
Ø Depression
Ø Physical activity
Ø Alcohol use
Ø Social connection and isolation
Ø Exposure to violence (intimate partner violence)
· Following table displays the Social, Psychological, and Behavioral Data Tests and its associated LOINC code for question, Answer list ID, and each answer value:
No. Criteria LOINC code for Question Question LOINC code for Answer list ID LOINC code for Answer value 1. Financial resource strain 76513-1 How hard is it for you to pay for the very basics like food, housing,
medical care, and heating? [CARDIA] LL3266-5 Very hard - LA15832-1 Hard - LA14745-6 Somewhat hard - LA22683-9 Not very hard - LA22682-1 Declines to specify 2. Education 63504-5 What is the highest grade or level of school you have completed or
the highest degree you have received? [NHANES] LL1069-5 Never attended/ kindergarten only – LA15606-9 1st grade – LA15607-7 2nd grade – LA15608-5 3rd grade – LA15609-3 4th grade – LA15610-1 5th grade – LA15611-9 6th grade – LA15612-7 7th grade – LA15613-5 8th grade – LA15614-3 9th grade – LA15615-0 10th grade – LA15616-8 11th grade – LA15617-6 12th grade, no diploma – LA15618-4 High school graduate – LA15564-0 GED or equivalent – LA15619-2 Some college, no degree – LA15620-0 Associate degree: occupational, technical, or vocational program – LA15621-8 Associate degree: academic program – LA15622-6 Bachelor’s degree (e.g., BA, AB, BS) –LA12460-4 Master’s degree (e.g., MA, MS, MEng, MEd, MSW, MBA) – LA12461-2 Professional school degree (example: MD, DDS, DVM, JD) – LA15625-9 Doctoral degree (example: PhD, EdD) – LA15626-7 Refused – LA4389-8 Don't know – LA12688-0 3. Stress 76542-0 Do you feel stress - tense, restless, nervous, or anxious, or unable
to sleep at night because your mind is troubled all the time - these days? LL3267-3 Not at all – LA6568-5 Only a little – LA22687-0 To some extent – LA22686-2 Rather much – LA22685-4 Very much – LA13914-9 4. Depression 55757-9 Patient Health Questionnaire 2 item (PHQ-2) [Reported] N/A N/A 44250-9 (Q1) Little interest or pleasure in doing things? LL358-3 Not at all – LA6568-5 Several days – LA6569-3 More than half the days – LA6570-1 Nearly every day – LA6571-9 44255-8 (Q2) Feeling down, depressed, or hopeless? LL358-3 Not at all – LA6568-5 Several days – LA6569-3 More than half the days – LA6570-1 Nearly every day – LA6571-9 55758-7 Patient Health Questionnaire 2 item (PHQ-2) total score N/A N/A 5. Physical activity 68515-6 How many days of moderate to strenuous exercise, like a brisk walk,
did you do in the last 7D [SAMHSA] N/A N/A 68516-4 On those days that you engage in moderate to strenuous exercise, how
many minutes, on average, do you exercise? [SAMHSA] N/A N/A 6. Alcohol use 72109-2 Alcohol Use Disorder Identification Test - Consumption [AUDIT-C] N/A N/A 68518-0 How often do you have a drink containing alcohol? LL2179-1 Never – LA6270-8 Monthly or less – LA18926-8 2-4 times a month – LA18927-6 2-3 times a week – LA18928-4 4 or more times a week – LA18929-2 68519-8 How many standard drinks containing alcohol do you have on a typical
day? LL2180-9 1 or 2 – LA15694-5 3 or 4 – LA15695-2 5 or 6 – LA18930-0 7 to 9 – LA18931-8 10 or more – LA18932-6 68520-6 How often do you have 6 or more drinks on 1 occasion? LL2181-7 Never – LA6270-8 Less than monthly – LA18933-4 Monthly – LA18876-5 Weekly – LA18891-4 Daily or almost daily – LA18934-2 75626-2 Total score [AUDIT-C] N/A N/A 7. Social connection and isolation 76506-5 Social connection and isolation panel N/A N/A 63503-7 Are you now married, widowed, divorced, separated, never married or
living with a partner? LL1068-7 Married – LA48-4 Widowed – LA49-2 Divorced – LA51-8 Separated – LA4288-2 Never married – LA47-6 Living with partner – LA15605-1 Refused – LA4389-8 Don't know – LA12688-0 76508-1 In a typical week, how many times do you talk on the telephone with
family, friends, or neighbors [NHANES III] N/A N/A 76509-9 How often do you get together with friends or relatives [NHANES III] N/A N/A 76510-7 How often do you attend church or religious services [NHANES] N/A N/A 76511-5 Do you belong to any clubs or organizations such as church groups
unions, fraternal or athletic groups, or school groups [NHANES III] LL963-0 Yes – LA33-6 No – LA32-8 76512-3 Social isolation score [NHANES] N/A N/A 8. Exposure to violence (intimate partner violence) 76499-3 Humiliation, Afraid, Rape, and Kick questionnaire [HARK] N/A N/A 76500-8 Within the last year, have you been humiliated or emotionally abused
in other ways by your partner or ex-partner [HARK] LL963-0 Yes – LA33-6 No – LA32-8 76501-6 Within the last year, have you been afraid of your partner or
ex-partner [HARK] LL963-0 Yes – LA33-6 No – LA32-8 76502-4 Within the last year, have you been raped or forced to have any kind
of sexual activity by your partner or ex-partner [HARK] LL963-0 Yes – LA33-6 No – LA32-8 76503-2 Within the last year, have you been kicked, hit, slapped, or
otherwise physically hurt by your partner or ex-partner LL963-0 Yes – LA33-6 No – LA32-8 76504-0 Total score [HARK] N/A N/A
· When a User answers any test and saves it then on tooltip of the respective test, the Result value and its associated LOINC code is displayed.
Figure 7.7-3: Tooltip displaying the test and LOINC code for Social History
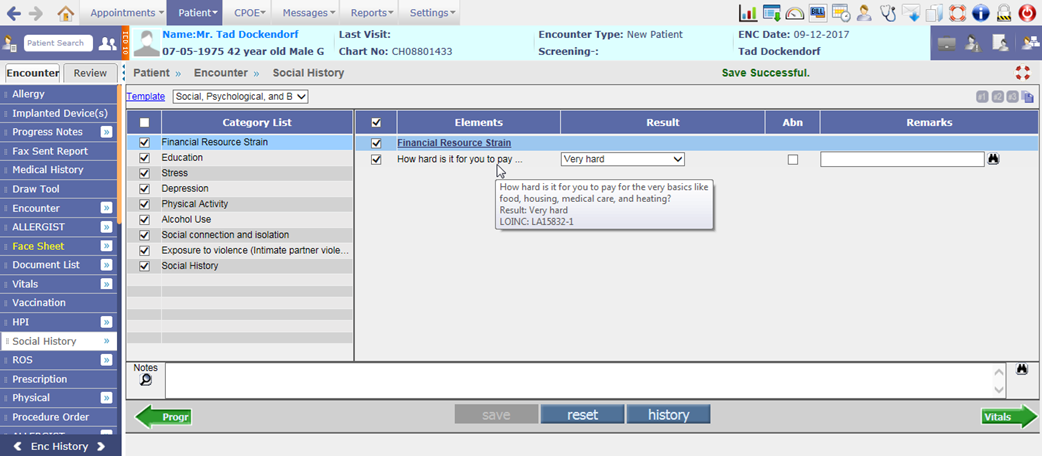
7.8 Provision to send Syndromic Surveillance messages as per MU3
· Syndromic Surveillance module sends the Diagnostic Information to state registries in HL7 format. In PrognoCIS, if the Assessment has ICD codes present in the list, only then the syndromic Surveillance message is generated.
· If the existing property, hl7.create.syndromic.surveillance is set to ON and the newly added export.syndromic.surveillance.MUVersion property is set to MU3 then the Syndromic Surveillance messages are exported as per MU3 version.
· In MU3, Syndromic Surveillance message will be generated only if:
- Encounter is of non-zero duration
- The Encounter’s Appointment Location State matches the Registry State code
- Assessment is present with at least one ICD from the list of valid ICD9 /10 codes and there is no ICD9/10 code in Assessment which is a part of Exclusion List.
· Admission, Update, and Discharge messages are generated as per below:
- If the newly added property, syndromic.adminmsg.from.assessment is set to ON then Admission message are generated on save of Assessment and Discharge message on close of encounter. However, if the property is set to OFF then the Admission message are generated on close of encounter.
- After saving the Assessment, if any changes are made then the Update message is sent to the Registry.
- In case of encounter re-open, neither Admission nor Discharge messages are generated.
· A new property, syndromic.registry.rule has been added to set the rule for sending Syndromic Surveillance messages to the Registry. If the property is set to 0 (zero) then by default, the messages are sent to the First Single Active Registry and if set to 1 then it is sent to the Registry corresponding to Encounter Appointment Location’s State.
· OBX segment is mandatory. Following details are now sent in the OBX segment:
- Facility/Visit Type
- Age of Patient
For Patient age greater than or equal to 2 years, the age is displayed in Years; and for Patient age less than 2 years, it will be displayed in months.
- Chief Complaint
- Vital details such as Height and Weight
Following properties are considered to send the vitals data:
vital.weight.testcode
vital.height.testcode
vital.weight.kg
vital.height.cms
- Smoking Status
The property, vital.smoking.testcode is considered to send the Smoking details.
- Name of Assessment ICDs
· Earlier, the Reason for Visit was sent in the OBX segment. Now, it is sent in the PV2 field.
8 Miscellaneous
8.1 Label changes done in PrognoCIS
Following mentioned are the label changes done in PrognoCIS:
1. MU Settings:
Navigation Goto menu Settings à Configuration à under Workflow column MU Settings
The label of MU Settings has been changed to MU/QPP Settings.
2. Meaningful Use:
Navigation Goto menu Reports à Meaningful Use
The label of Meaningful Use has been changed to MU/QPP Reports.
3. PQRS Report:
Navigation Goto menu Reports à PQRS Report
The label of PQRS Report has been changed to MIPS-Quality-Claims Report.
4. NQF:
Navigation Goto menu Patient’s Encounter à Encounter TOC à Assessment à NQF button
The label of NQF button has been changed to eCQM.
5.PQRS:
Navigation Goto menu Patient’s Encounter à Encounter TOC à Physician Quality Reporting System (PQRS)
A. The title of the screen Physician Quality Reporting System (PQRS) has been changed to Medicare Quality Measures - Claims Reporting Method.
B. The TOC menu option name of PQRS has been changed to Quality Measures.
C. The label of column name G code has been changed to QDC.
D. The label of column name Measure has been changed to Quality ID.
For Example: ‘Measure #405’ has been changed to ‘Quality ID 405’.
E. On the click of ICD and CPT/HCPC button popup, the label of column name Measure has been changed to Quality ID.
F. On the Info button popup, the title of the Info button popup has been changed from Measure to Quality ID.
For Example: ‘Measure #405’ has been changed to ‘Quality ID 405’.
G. The button MAV has been removed.
H. Red asterisk mark is not displayed for some cross-cutting measures.
6.PQRS category:
Navigation Goto menu Settings à Configuration à Click on Providers under Users column à select a Provider à Provider Master screen
The PQRS Category field has been removed.
![]() Note: All
PQRS measures are displayed on MU/QPP Settings
screen under the Quality Measures tab.
Note: All
PQRS measures are displayed on MU/QPP Settings
screen under the Quality Measures tab.
7.PQRS Measures:
Navigation Goto menu Settings à Configuration à PQRS Measures
The PQRS Measures option has been removed.
8.Source column:
Navigation Goto menu Patient’s Encounter à Encounter TOC à Assessment à Click on CPT/HCPC à Source column
The Source has been changed from PQRS to QDC and in the tooltip it displays Quality Data Codes.
8.2 List of newly added Properties in PrognoCIS
Following is the list of newly defined Properties in PrognoCIS:
|
No. |
Property Tag |
Help |
|
Vaccination |
||
|
1. |
vaccination.show.historyandforecast |
If the property is set to ON, the Registry button would be available on the Vaccination screen else it will not be displayed. |
|
2. |
export.vacc.MUVersion |
To export the Vaccination message as per 2015 MU version.
|
|
Prescription |
||
|
3. |
rx.medhist.offset.1year |
If the property is set to ON, then it will fetch the medication history for the last 1 year from encounter date. Turning off the property will fetch the medication history for the default amount of time, which is 2 years. |
|
Syndromic Surveillance |
||
|
4. |
syndromic.registry.rule |
To set the rule for sending Syndromic Surveillance messages to the Registry. If the property is set to 0 (zero) then by default, the messages are sent to the First Single Active Registry and if set to 1 then it is sent to the Registry corresponding to Encounter Appointment Location’s State. |
|
5. |
export.syndromic.surveillance.MUVersion |
If the existing property, hl7.create.syndromic.surveillance is set to ON and the newly added export.syndromic.surveillance.MUVersion property is set to MU3 then the Syndromic Surveillance messages are exported as per MU3 version. |
|
6. |
syndromic.adminmsg.from.assessment |
If this property is set to ON then Admission message are generated on save of Assessment and Discharge message on close of encounter. However, if the property is set to OFF then the Admission message are generated on close of encounter. |
|
Care Plan |
||
|
7. |
careplan.patientband.r1.c1 |
Care Plan screen Patient band is printed consisting of 2 Rows and 4 Columns. At each position, a String can consist of a combination of Text and Template TAGS. This property can define String to be printed in Row 1, Column 1. |
|
8. |
careplan.patientband.r1.c2 |
Care Plan screen Patient band is printed consisting of 2 Rows and 4 Columns. At each position, a String can consist of a combination of Text and Template TAGS. This property can define String to be printed in Row 1, Column 2. |
|
9. |
careplan.patientband.r1.c3 |
Care Plan screen Patient band is printed consisting of 2 Rows and 4 Columns. At each position, a String can consist of a combination of Text and Template TAGS. This property can define String to be printed in Row 1, Column 3. |
|
10. |
careplan.patientband.r1.c4 |
Care Plan screen Patient band is printed consisting of 2 Rows and 4 Columns. At each position, a String can consist of a combination of Text and Template TAGS. This property can define String to be printed in Row 1, Column 4. |
|
11. |
careplan.patientband.r2.c1 |
Care Plan screen Patient band is printed consisting of 2 Rows and 4 Columns. At each position, a String can consist of a combination of Text and Template TAGS. This property can define String to be printed in Row 2, Column 1. |
|
12. |
careplan.patientband.r2.c2 |
Care Plan screen Patient band is printed consisting of 2 Rows and 4 Columns. At each position, a String can consist of a combination of Text and Template TAGS. This property can define String to be printed in Row 2, Column 2. |
|
13. |
careplan.patientband.r2.c3 |
Care Plan screen Patient band is printed consisting of 2 Rows and 4 Columns. At each position, a String can consist of a combination of Text and Template TAGS. This property can define String to be printed in Row 2, Column 3. |
|
14. |
careplan.patientband.r2.c4 |
Care Plan screen Patient band is printed consisting of 2 Rows and 4 Columns. At each position, a String can consist of a combination of Text and Template TAGS. This property can define String to be printed in Row 2, Column 4. |
|
15. |
careplan.users.type |
Click the icon: |
|
CCD |
||
|
16. |
ccd.mentalstatus.testcode |
Add Review of System tests that should be sent as Mental status tests in CCD. |
|
17. |
ccd.functionalstatus.testcode |
Add Review of System tests that should be sent as Functional status tests in CCD. |
|
18. |
ccd.smokinghistory.testcode |
Add Social History test that should be sent as History of Smoking status tests in CCD. |
|
19. |
ccd.sections.expand |
Click the icon:
|
|
20. |
ccd.show.sections |
Click the icon:
|
|
Patient Portal |
||
|
21. |
pp.show.directly.edumaterial |
Turn ON the property to add education material directly on Patient Portal. |
|
FHIR |
||
|
22. |
fhir.patient.show.resources |
From MultiSelect
|
|
Insurance |
||
|
23. |
ins.eligibility.bu.code |
Add appropriate BU code from Master to be used as Default BU code while requesting Real Time Eligibility. Property would consider CL as default business unit if property value is left blank.
|
8.3 List of newly added tags in PrognoCIS
Following is the list of newly added tags in PrognoCIS:
|
No. |
Tag |
Description |
|
Patient Tags |
||
|
1. |
PT_NAME_SUFFIX |
It prints the Patient’s name along with suffix. |
|
2. |
PT_SEXUAL__ORIENTATION_CODE |
It prints the code of Patient’s Sexual Orientation. |
|
3. |
PT_SEXUAL__ORIENTATION_NAME |
It prints the Patient’s Sexual Orientation. |
|
4. |
PT_GENDER__IDENTITY_CODE |
It prints the code of Patient’s Gender Identity. |
|
5. |
PT_GENDER__IDENTITY_NAME |
It prints the Patient’s Gender Identity. |
|
6. |
PT_COMMUNICATION__LANGUAGES$ |
It prints the Patient Communication Language’s details. Following are the tag’s extension: Ø N – Name Ø C – Code Ø A – Ability Ø P – Proficiency > |
|
7. |
PT_BIRTH__INDICATOR |
It prints if the patient was a part of a multiple birth or not. |
|
8. |
PT_BIRTH__ORDERNO |
It prints the order number in which the patient was born. |
|
9. |
PT_IMPLANTDEVICE_LINE$ |
It prints each Active Implanted Device details in per line. |
|
10. |
PT_IMPLANTDEVICE_PARA$ |
It prints all the Active Implanted Device details in one paragraph. |
|
11. |
PT_IMPLANTDEVICE_TBL$ |
It prints the Active Implanted Device(s) details in tabular format. |
|
|