Denali 3.0
![]()
Portals Release Notes
Table of Contents
| Important Note: Denali is the latest version of PrognoCIS and is supported with Compatibility View Settings OFF for IE 11 browser.
Following are the browsers with version number that are supported by PrognoCIS Denali:
|
|||||||||||||||||||||||||||||||||||||||||||||||||||||||||||||||||||||||||||||||||||||||||||||||
| 1. | Introduction | ||||||||||||||||||||||||||||||||||||||||||||||||||||||||||||||||||||||||||||||||||||||||||||||
| • The release note describes the
various new features and enhancements carried out on Portals of the new
version, PrognoCISTM Denali; with the specifications and UI details wherever
applicable. |
|||||||||||||||||||||||||||||||||||||||||||||||||||||||||||||||||||||||||||||||||||||||||||||||
| 2. | Portal (Patient/Referring Doc/Employer) | ||||||||||||||||||||||||||||||||||||||||||||||||||||||||||||||||||||||||||||||||||||||||||||||
| 2.1 | Employer Portal | ||||||||||||||||||||||||||||||||||||||||||||||||||||||||||||||||||||||||||||||||||||||||||||||
PrognoCIS Employer Portal is designed for securely sharing Patient’s Protected Health Information (PHI) to their Employer, who is registered in a Clinic. The Employer Portal will allow employers to view various documents shared by a Clinic and Patient’s billing related information for treatments taken in the Clinic.
Following describes the UI (User Interface) of an Employer Portal:
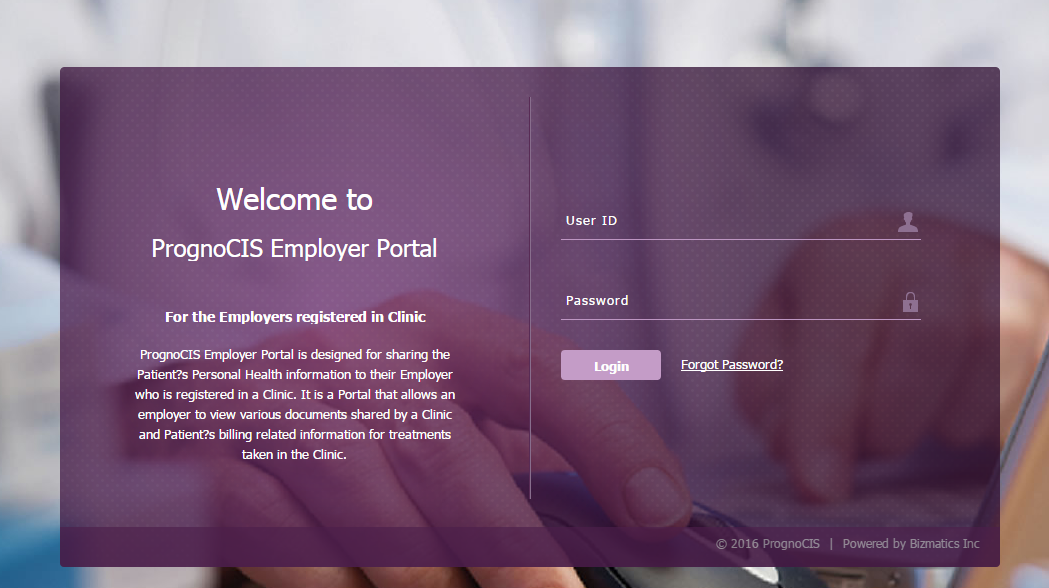
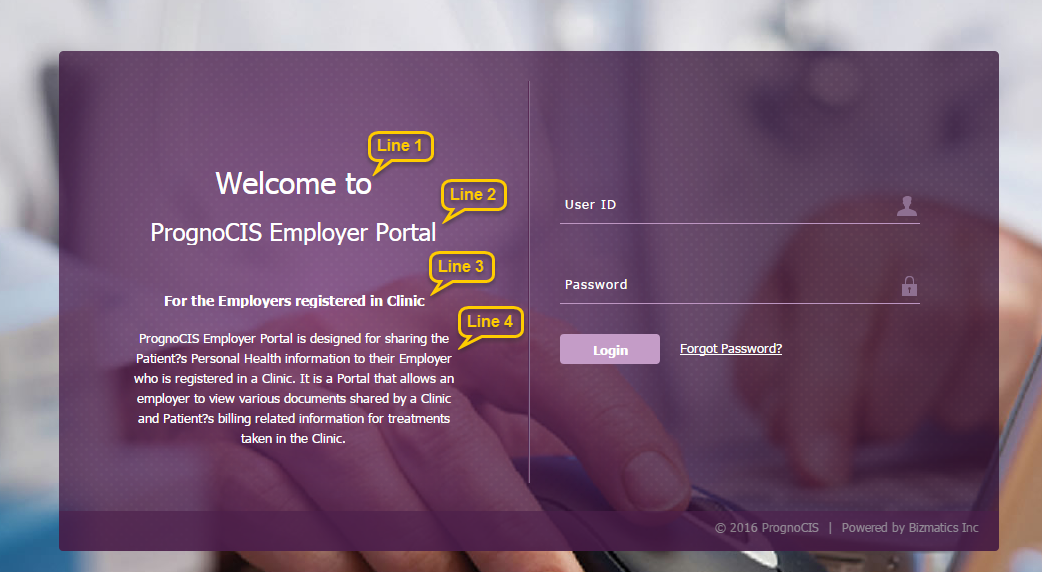
• The left side of Employer Portal Login screen displays the welcome message and other defined messages. Whereas, the right side displays the User ID and Password fields to enter the Employer’s login credentials; Login button; and Forgot Password? link to get new password in case the Employer forgets his/her Password. Refer to figure 2.1-1 Figure 2.1-1: Employer Portal Login screen
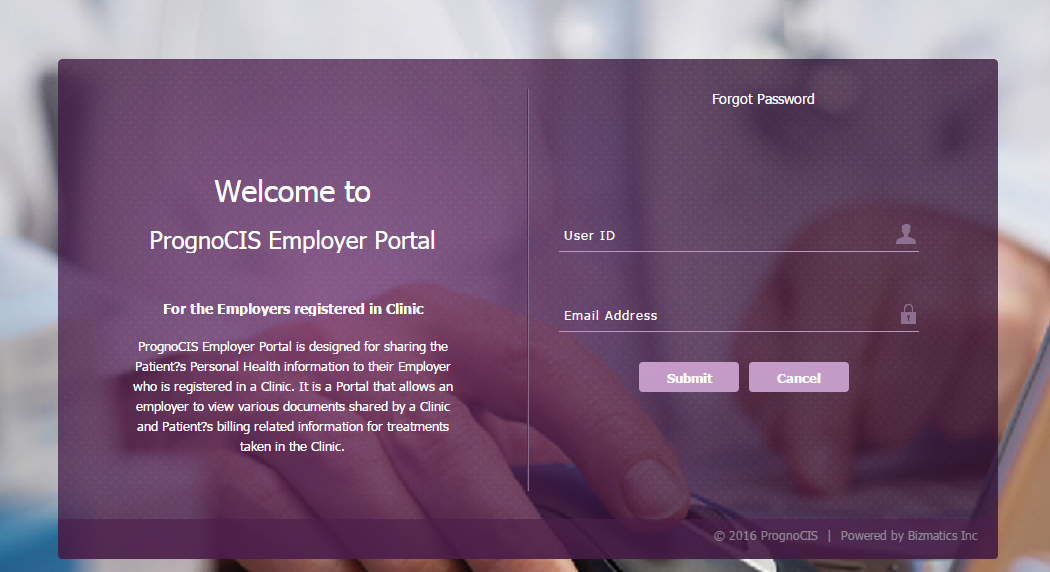
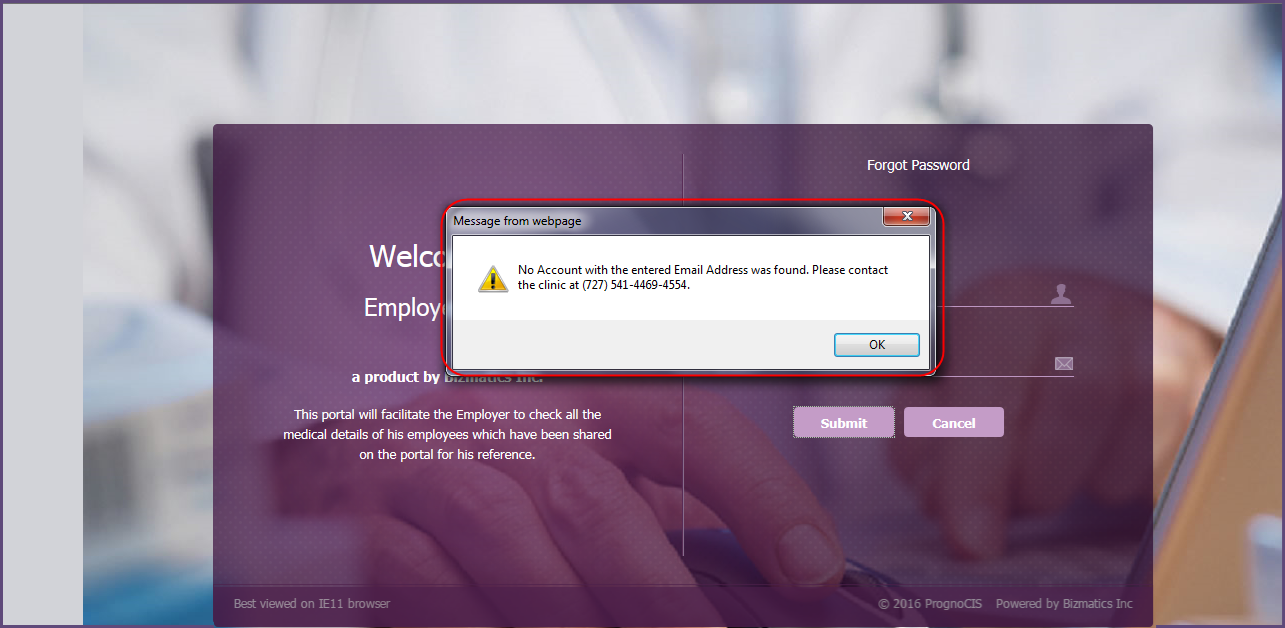
• When the Employer clicks on the Forgot Password? link on the Employer Portal Login screen, the Forgot Password screen is displayed. The Forgot Password screen consists of the User ID and Email Address fields to enter the User ID and Email address of an Employer that is registered in PrognoCIS. Refer to figure 2.1-2 Figure 2.1-2: Employer Portal – Forgot Password screen • If the Employer Account details entered on Forgot Password screen is NOT found in PrognoCIS then an alert, “No Account with the entered Email Address was found. Please contact the clinic at < Clinic’s Work Tel1 >” is displayed. Refer to figure 2.1-3 Figure 2.1-3: Forgot Password alert
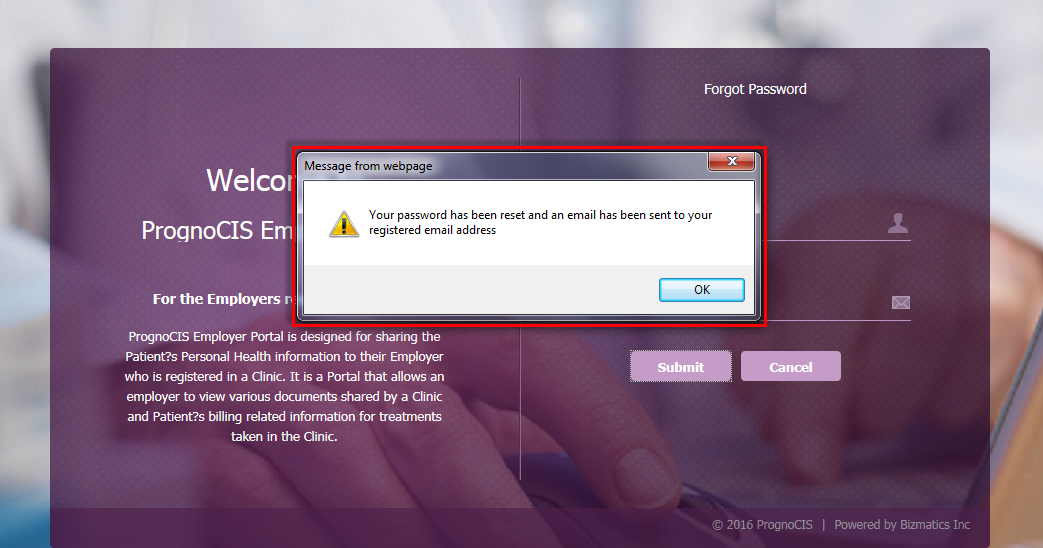
• Once the newly generated password is sent to the Employer’s registered Email address, a confirmation message, “Your password has been reset and an email has been sent to your registered email address.” is displayed. Refer to figure 2.1-4 Figure 2.1-4: Forgot Password set successful alert
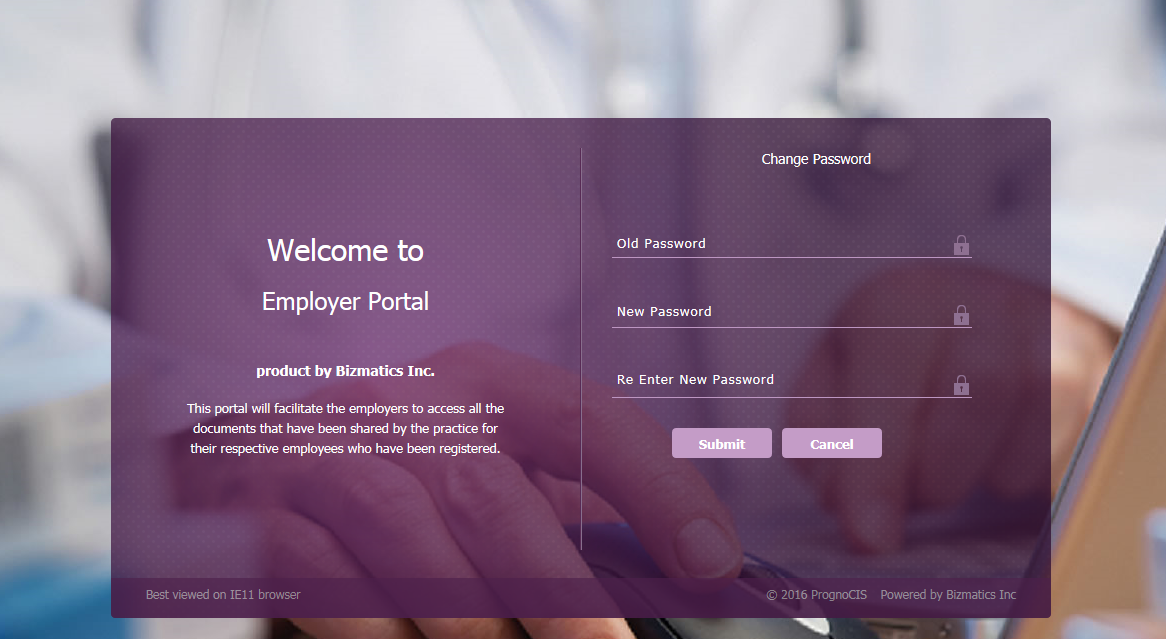
• The Change Password screen is displayed in the following two scenarios:
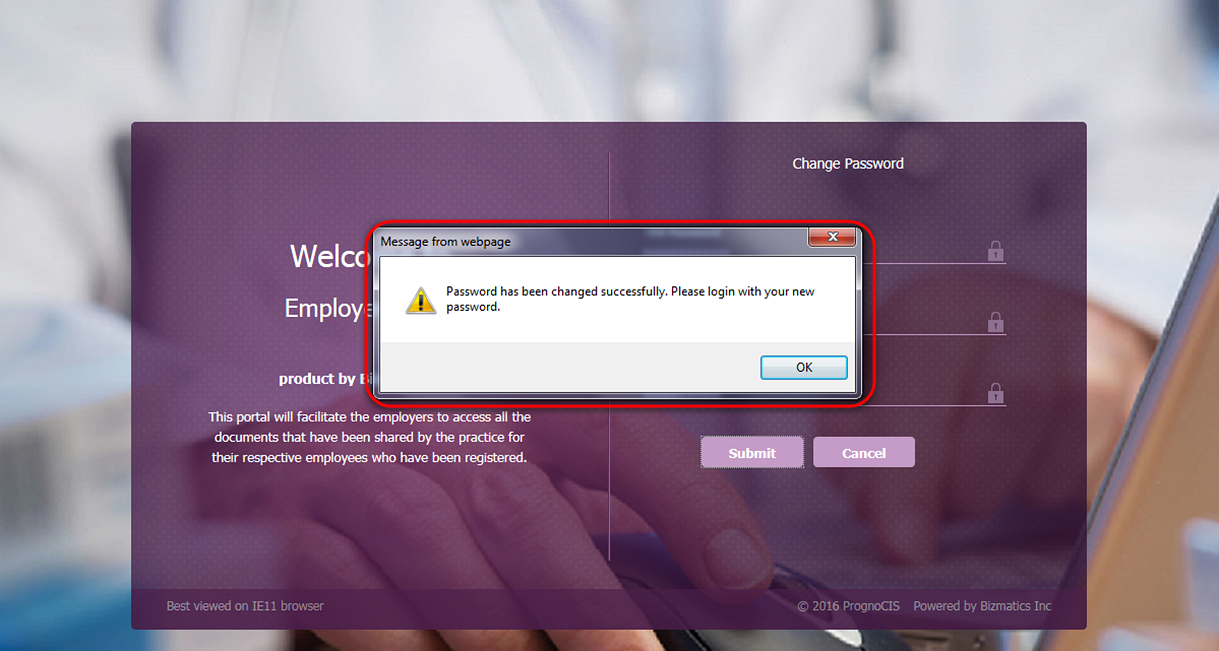
Figure 2.1-5: Change Password screen of Employer Portal • The Change Password screen consists of fields such as Old Password to enter the password received via email; New Password to enter the desired password; and Re Enter New Password to confirm the entered new password. • Once the password is changed, on the click of Submit button, the confirmation message, “Password has been changed successfully. Please login with your new password.” is displayed. Refer to figure 2.1-6 Figure 2.1-6: Change Password successful alert
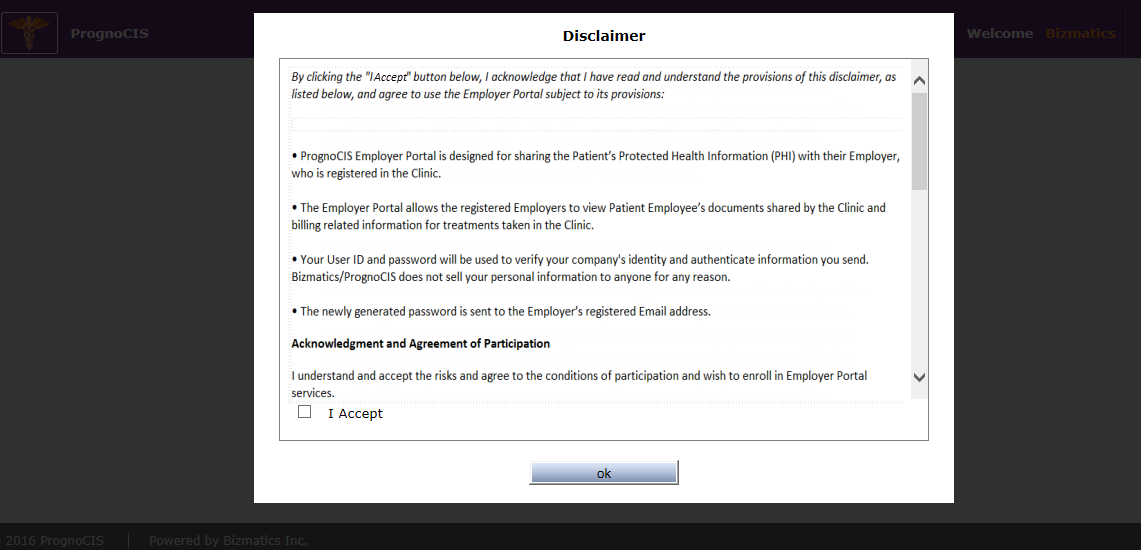
• The Disclaimer or Terms and Conditions popup is displayed when the Employer logs in to the Employer Portal for the first time and after the Password is changed. The Employer has to select the I Accept checkbox and click on ok button to login to their Employer Portal. However, if the Employer clicks on ok button without selecting the I Accept checkbox then the Employer is not allowed to login to their Employer Portal and is navigated back to the login screen. Refer to figure 2.1-7 Figure 2.1-7: Disclaimer on Employer Portal
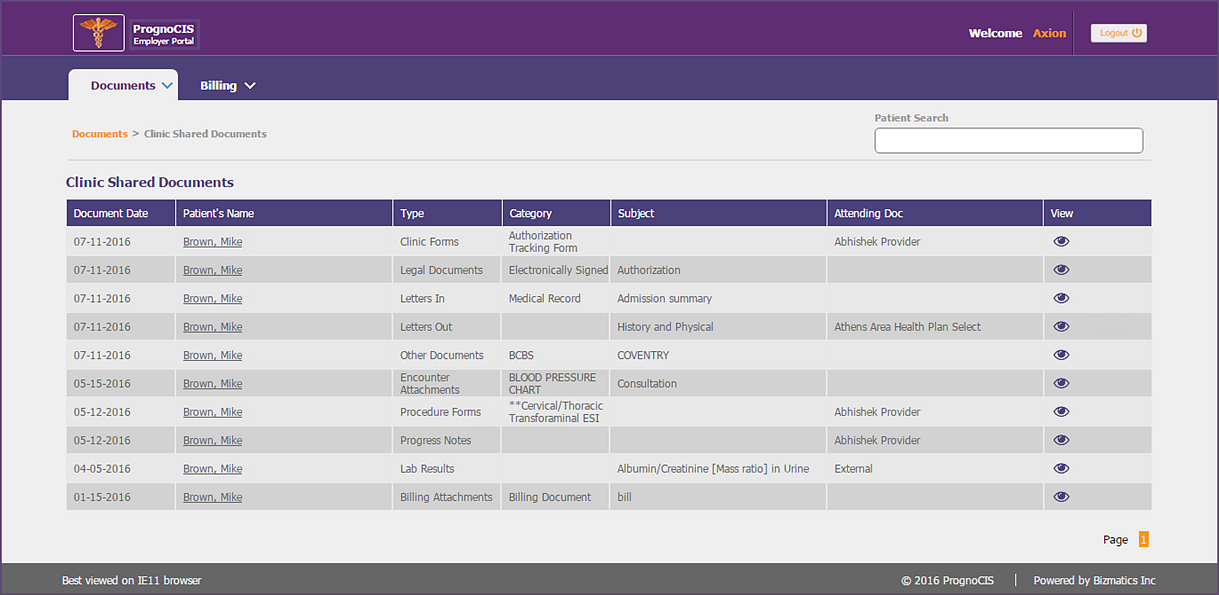
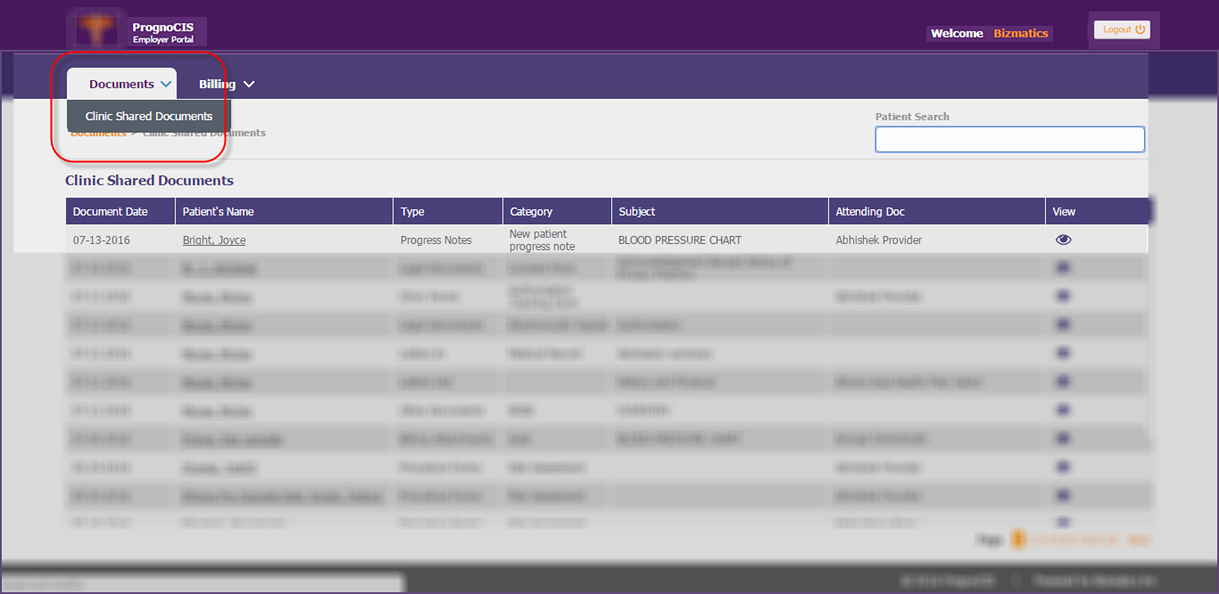
• The header of the Employer Portal screen displays the Clinic Logo along with Clinic name; and the logged-in Employer’s name preceded with the text, ‘Welcome’ and Logout icon: Figure 2.1-8: Employer Portal screen • The footer of the Employer Portal screen displays the Copyright information and the text, ‘Powered by Bizmatics Inc’ and on the left hand side bottom it displays the browser it is compatible with. • The Employer Portal screen displays two menu tabs such as Documents and Billing which can be configured from the Employer Portal Settings screen in PrognoCIS EMR. Refer to figure 2.1-9 Figure 2.1-9:
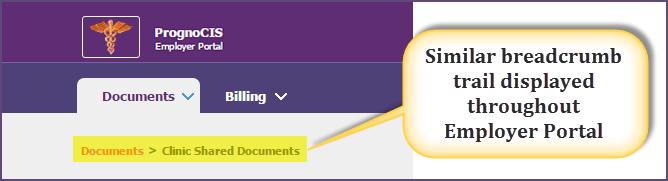
Two menu tabs on Employer Portal • On mouse hover over those menu tabs, respective sub-menus are displayed. The Documents menu tab consists of sub-menu, Clinic Shared Documents and the Billing menu tab consists of sub-menus; Invoices, Receipts, and Aging. • On the Employer Portal, by default the sub-menu screen of the first menu tab’s first is loaded and displayed. A breadcrumb trail of the navigation path is displayed on the tab that informs the Employer the exact location in the Portal. Refer to figure 2.1-10 Figure 2.1-10: The breadcrumb trail informs User the navigated path to reach the screen
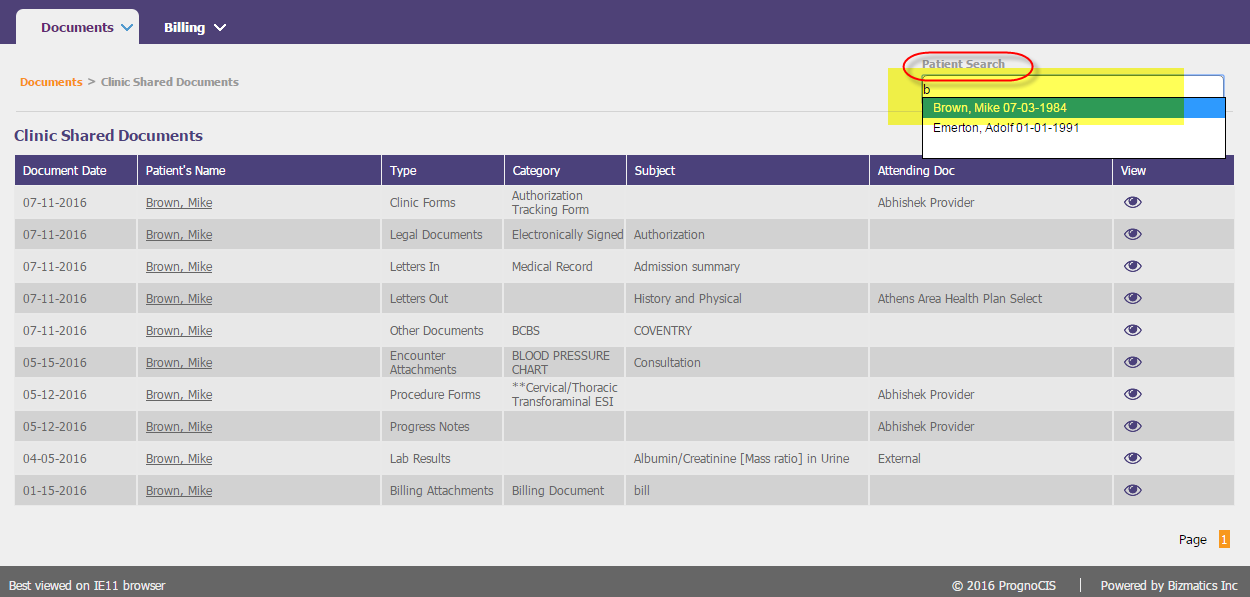
• All the documents shared with an Employer by a Clinic are displayed in the Clinic Shared Documents sub-menu. The Clinic Shared Document sub-menu displays the following details of a document:
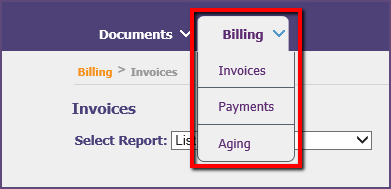
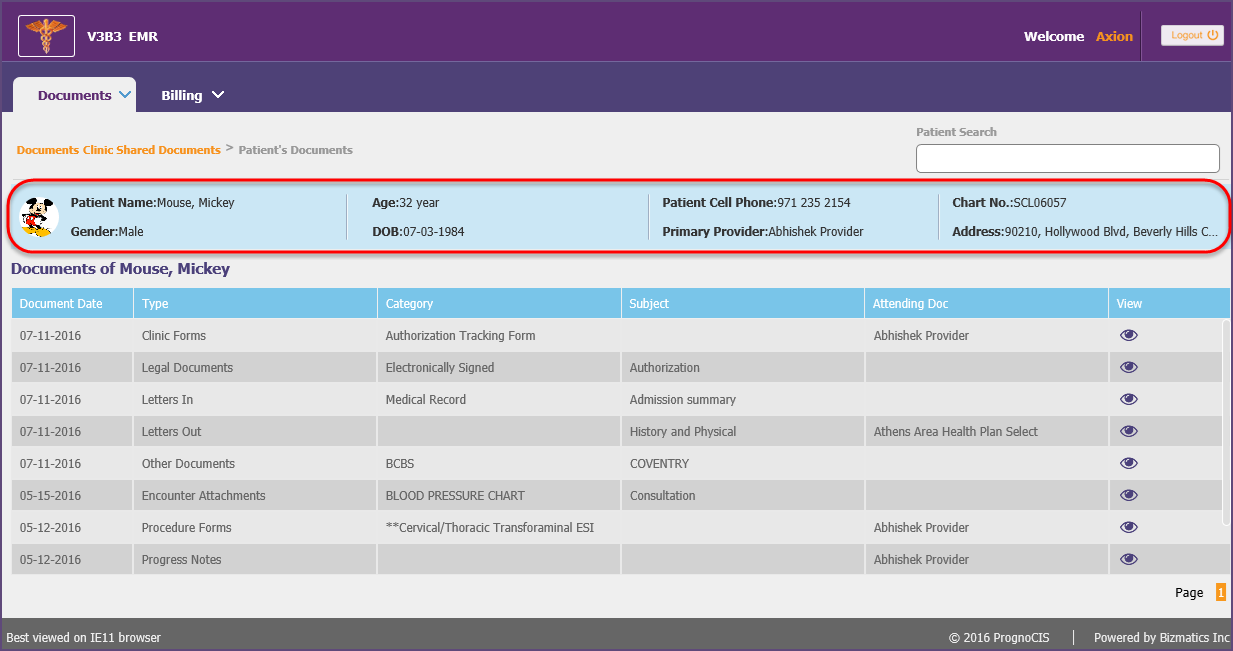
• The Patient Search field has been provided to search the required Patient and view that Patient’s information in Patient band along with his/her shared documents. Refer to figure 2.1-11 Figure 2.1-11: Patient Search field to invoke a particular patient’s document details • A click on any Patient name link from the under Patient’s Name column, displays the Patient band and all the shared documents of that respective Patient. Refer to figure 2.1-12 Figure 2.1-12: Patient details displayed • At a time, 15 documents are displayed in one page of the UI. After that, proceeding pagination numbers are displayed depending upon the number of records. User is then able to navigate by clicking on the page number links provided at the bottom right hand side of the screen. Whereas, the Billing Information on Employer Portal remains intact; the Portal continues displaying the information to appropriate Employers associated on the Claim. The Billing menu tab on Employer Portal consists of following three sub-menus:
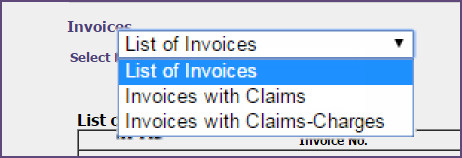
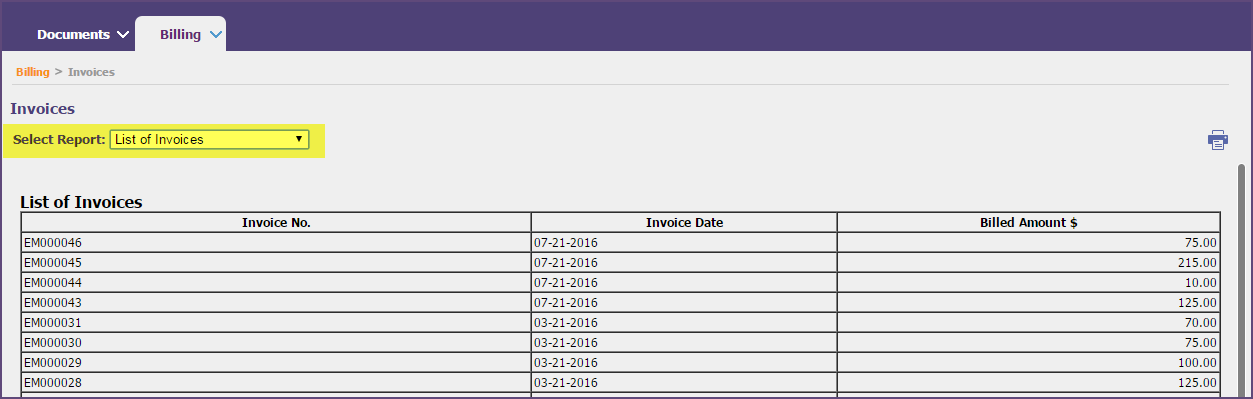
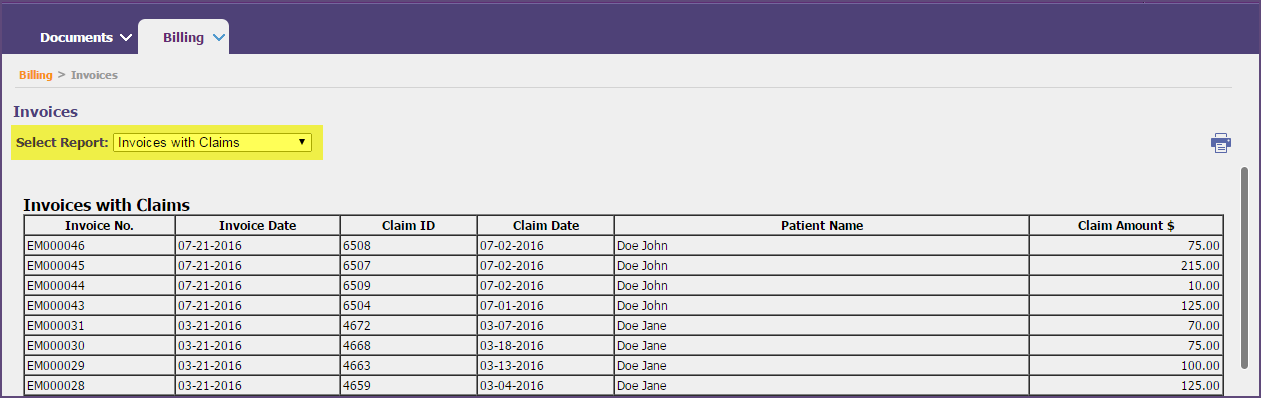
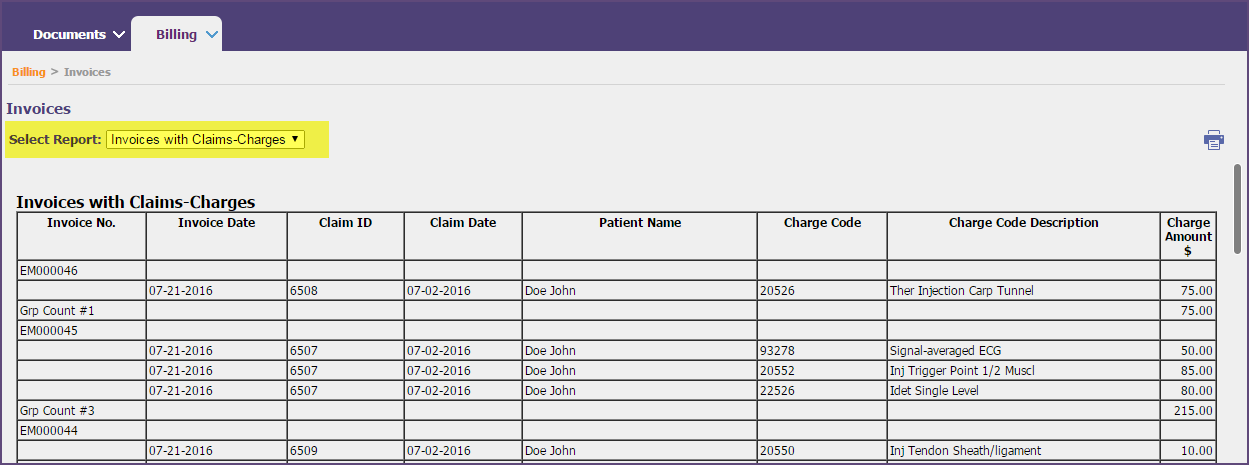
These three sub-menu options are non-editable and view only. Each of these menu options has respective sub-menus. The report names are displayed in a dropdown list for each of the menu options and in the fixed sequence. Refer to figure 2.1-13 Figure 2.1-13: Employer Portal – Billing tab • Invoices: In Invoices sub-menu, the Select Report dropdown list consists of following three options, Refer to figure 2.1-14 Figure 2.1-14: Options such as List of Invoices; Invoices with Claims; and Invoices with Claims-Charges
Figure 2.1-15: Employer Portal – List of Invoices Report
Figure 2.1-16: Invoices with Claims report
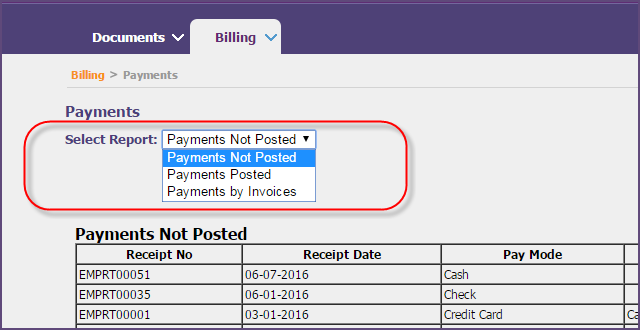
Figure 2.1-17: Invoices with Claims-Charges report • Payments: In Payments sub-menu, the Select Report dropdown list consists of following three options, Refer to figure 2.1-18 Figure 2.1-18: Payments report
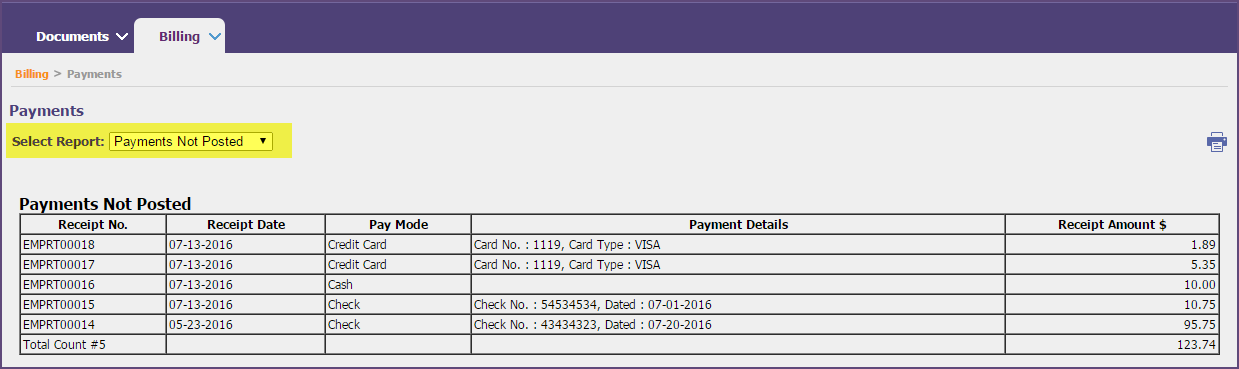
Figure 2.1-19: Report displaying payments not posted
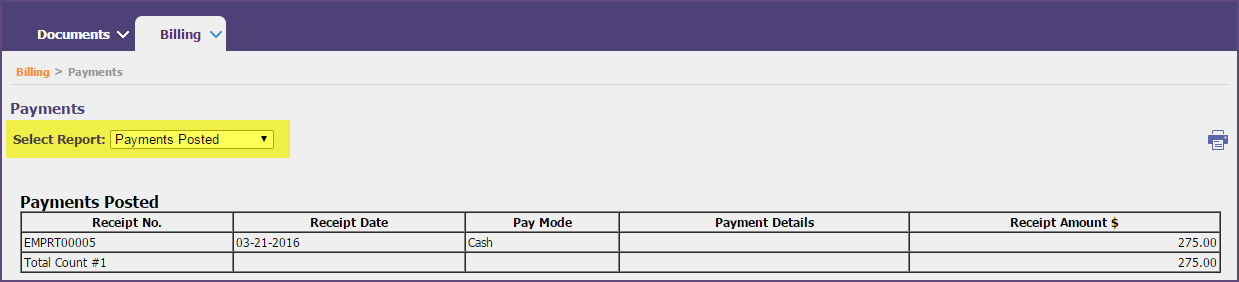
Figure 2.1-20: Report displaying posted payments
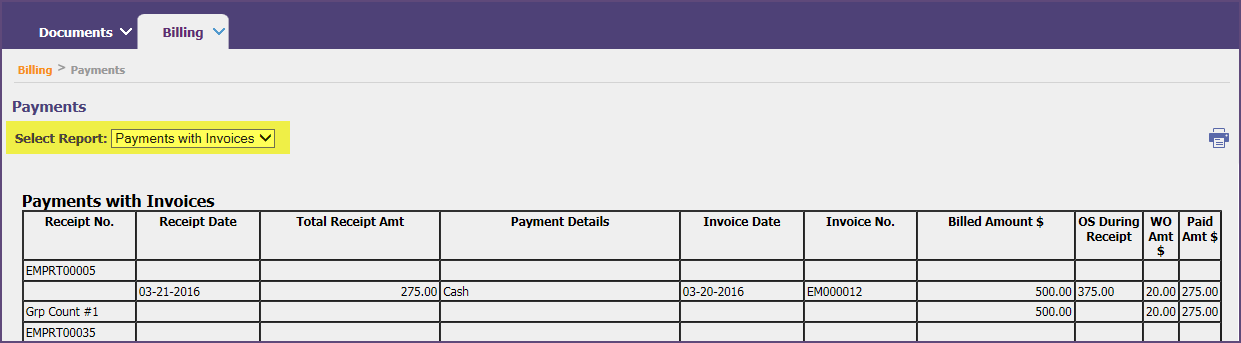
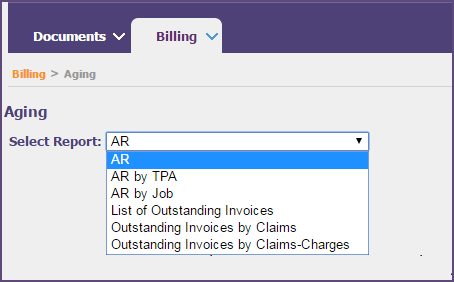
Figure 2.1-21: Receipts by Invoices report on Employer Portal • Aging: In Aging sub-menu, the Select Report dropdown list consists of following six options, Refer to figure 2.1-22 Figure 2.1-22: Sub-menus of the Aging Report
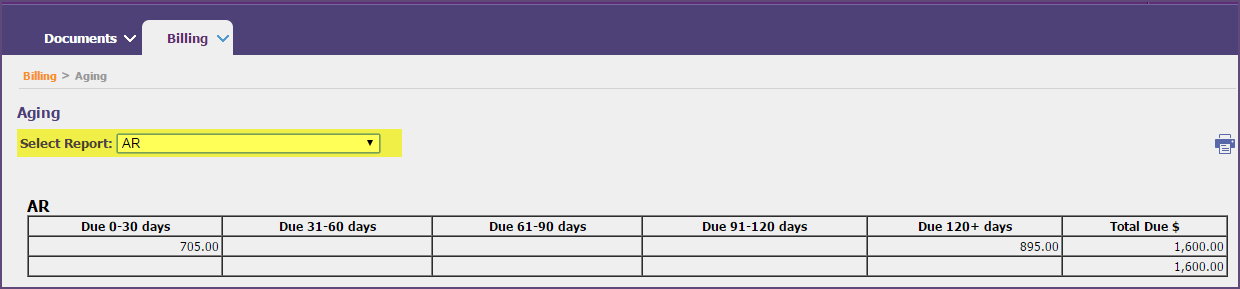
Figure 2.1-23: Aging Report for Account Receivable
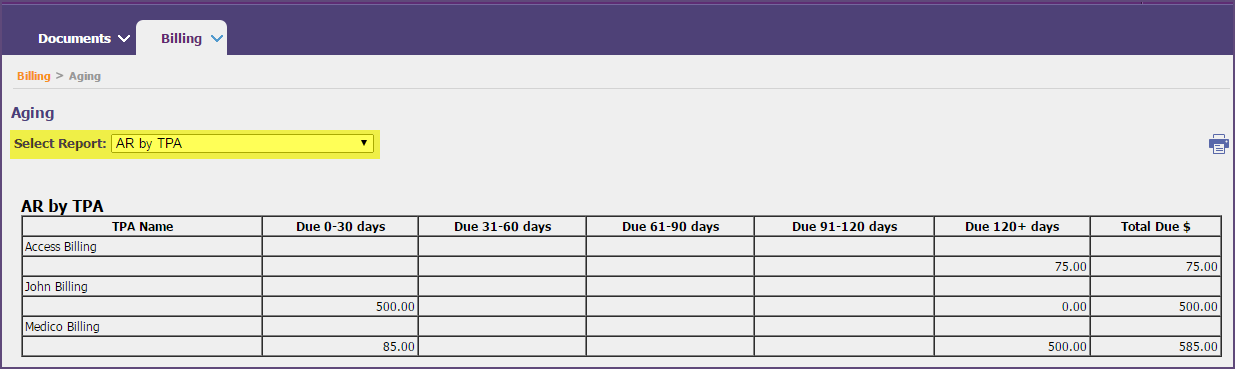
Figure 2.1-24: Aging Report for Third Party Administrators (TPA)
Figure 2.1-25: Aging Report – Account Receivable by Job
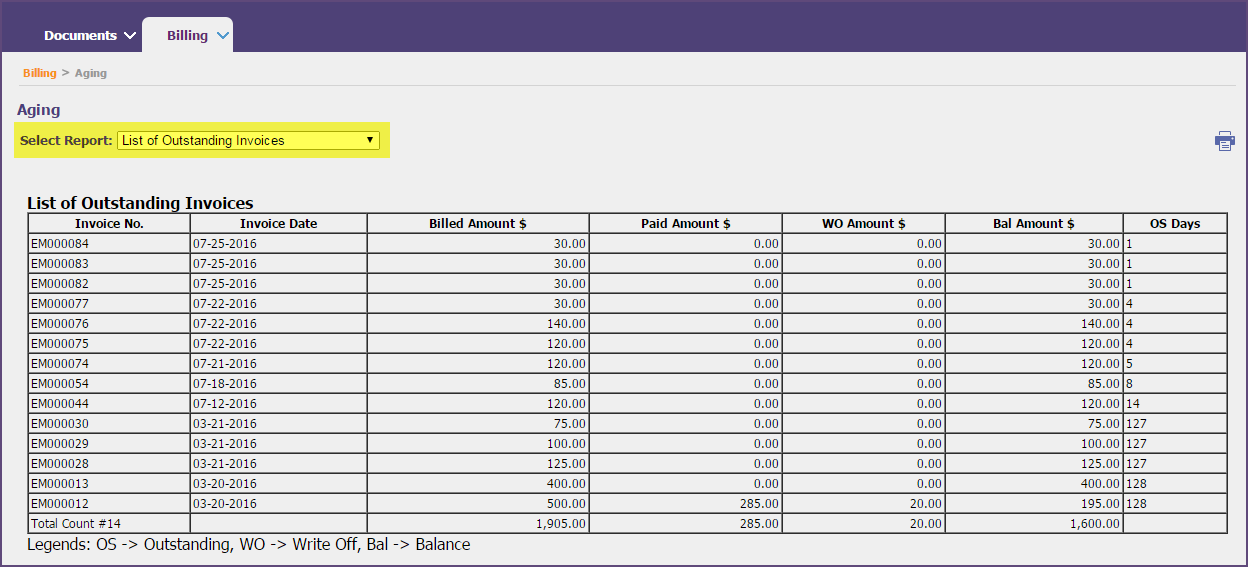
Figure 2.1-26: Aging Report – Outstanding Invoices
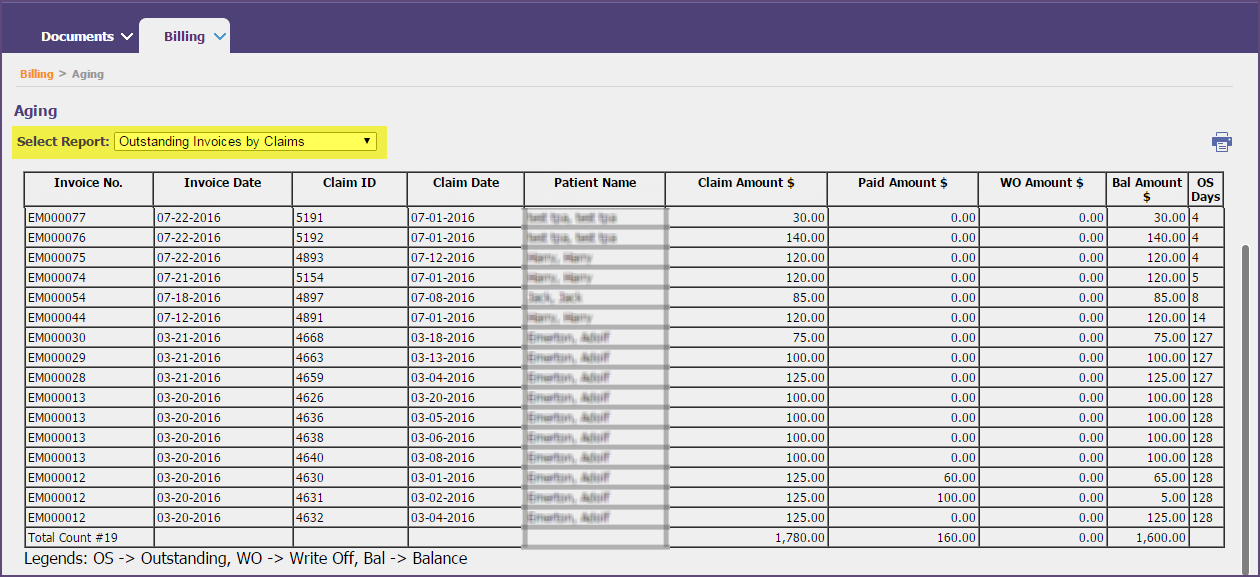
Figure 2.1-27: Aging Report – Outstanding Invoices by Claims
Figure 2.1-28: Outstanding Invoices by Claims-Charges report
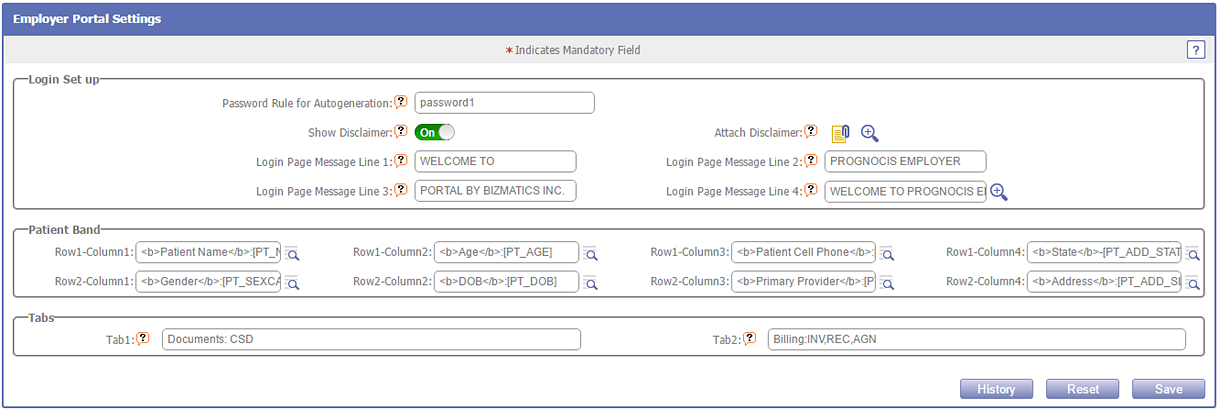
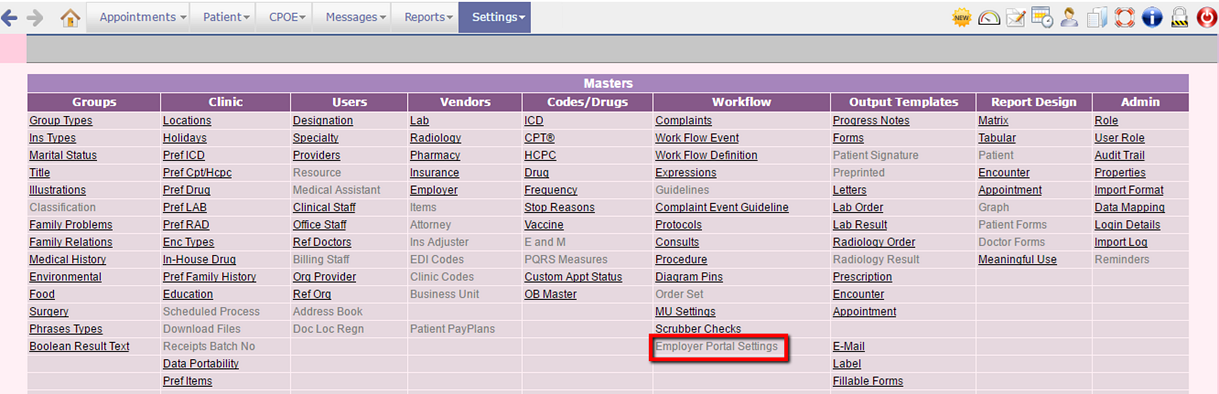
A new screen, Employer Portal Settings master has been provided on the menu Settings → click Configuration → under Workflow column to do the configuration for Employer Portal. Refer to figure 2.1-29 Figure 2.1-29: Employer Portal Settings screen • The Employer Portal Settings master screen consists of the following fields: Login Set up section:
Figure 2.1-30: Employer Portal login screen messages Patient Band section:
Figure 2.1-31: Patient band on Employer Portal Tabs section (Available only on Admin login):
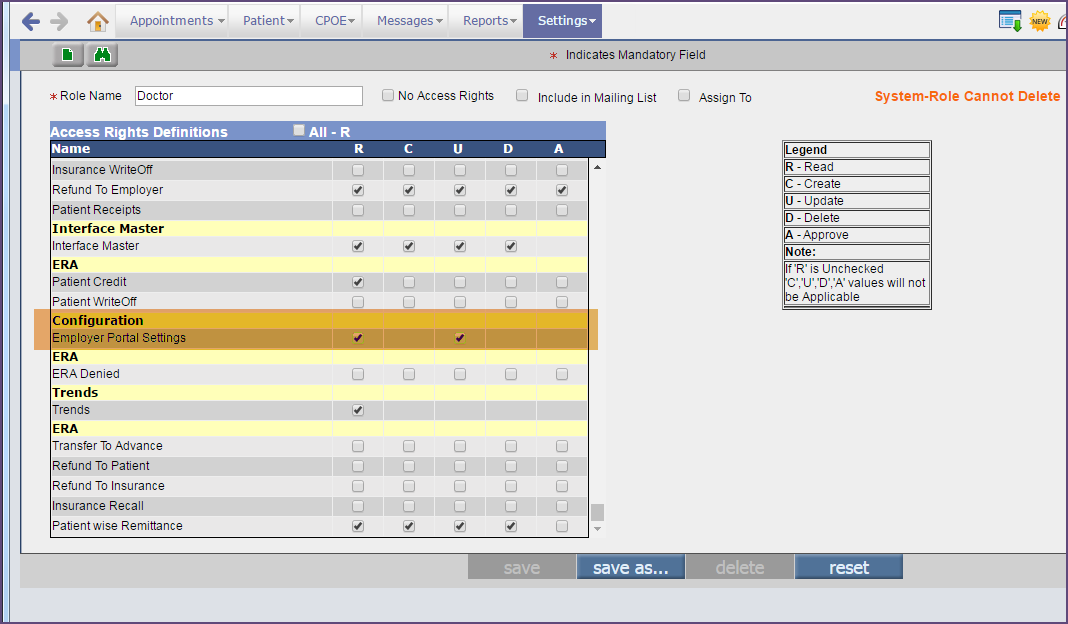
• The History button on the Employer Portal Settings screen displays the details of all the changes done by you or any User. • Only a User Role that has appropriate rights assigned (from menu Settings → click Configuration → under Admin column, click Roles) would have an access to Employer Portal Settings screen. If the Read right is not assigned to a User Role then the Employer Portal Settings link (on menu Settings → click Configuration) won’t be available.
In following screens of EMR, the changes regarding Employer Portal has been done:
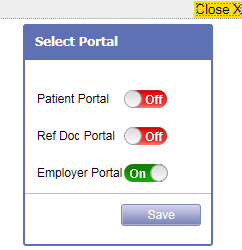
• Share icon is introduced on the Document List screen. Provision is given to share the required documents on the Employer Portal. • An additional option,
Employer Portal has been added on the Select Portal popup. If you select the document; click on Share icon:
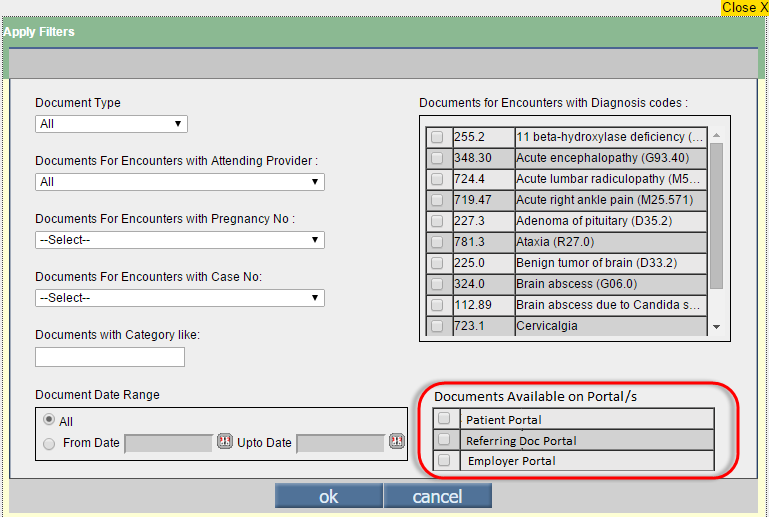
Figure 2.1-32: Employer Portal selection screen • Also, a new option, Employer Portal has been added under Documents Available on Portal/s section on the Apply Filters popup (click on Filters button on Document List screen) to filter and display all the documents that are shared on Employer Portal, when selected. Refer to figure 2.1-33 Figure 2.1-33: Document available on Portal on Apply filters popup has provision for Employer Portal
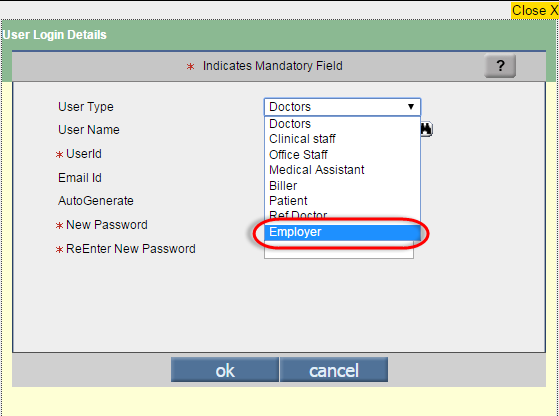
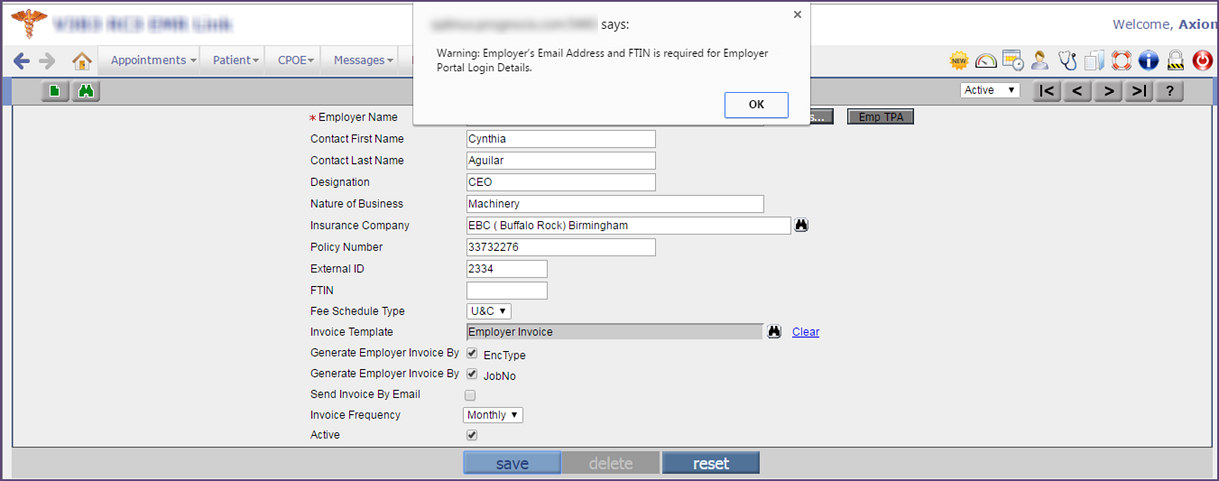
• Also, a new User Type, Employer has been added on User Login Details popup (Goto menu Settings → click Configuration → under Admin column, click Login Details) to generate login details of the required Employer for Employer Portal. The Employer User Type would be available only if the Clinic has Employer Portal ON. Refer to figure 2.1-34 Figure 2.1-34: User Login details popup • Once the Employer login details are generated, the login details are sent to the Employer’s email address (entered in the Employer’s Address details), if present. • However, if the Employer’s email address is not present then the Autogenerate checkbox is displayed disabled and while manually generating the respective Employer’s login details, an alert, “Email ID is missing. The Login details will not be emailed” is displayed. • The following new E-mail templates have been added under Settings → Configuration → E-Mail to send the Employer Portal’s login details and Invoice to the Employer by email:
• Also, the following new employer tags have been added in the Employer E-mail template:
Figure 2.1-35: Warning message displayed on the Employer Master screen
• Access to Employer Portal Settings Screen’s is restricted and is role based. A new section name as Employer Portal Settings, is available on the Roles screen for a User to define the Access rights for the configuration screen, Employer Portal Settings (Goto menu: Settings → Configuration → under workflow column, Employer Portal Settings). Refer to figure 2.1-36 Figure 2.1-36: Access rights for read and update available for Employer Portal Settings screen • If the access rights are not defined for any role then the Employer Portal Settings link on the Settings Master screen is disabled. Refer to figure 2.1-37 Figure 2.1-37: Disabled link of Employer Portal Settings
|
|||||||||||||||||||||||||||||||||||||||||||||||||||||||||||||||||||||||||||||||||||||||||||||||
| 2.2 | Messages from Patient Portal are now sent in a new format to the Clinic | ||||||||||||||||||||||||||||||||||||||||||||||||||||||||||||||||||||||||||||||||||||||||||||||
When a Patient modifies or submits any Patient Form, requests an Appointment, or requests a Refill for any drug then a message notification is sent to the Clinic. Now, the format of these messages has been changed as described below: A. On submission of Patient Form: • When a Patient modifies or submits any Patient Form from Patient Portal then a message is sent to the User(s) depending on the property, pp.submit.form.mailto. • Now following is the new format of the message notification that is sent to the User Role, when a Patient modifies or submits Patient Form from Patient Portal:
B. On request of an Appointment: • When a Patient requests or schedules an Appointment from Patient Portal then a message is sent to the User(s) depending on the property, pp.appointment.mailto. • Now following is the new format of the message notification that is sent to the User Role, when a Patient requests and schedules an Appointment from Patient Portal:
C. On request of a Refill: • When a Patient requests for a refill of any prescribed drug from Patient Portal then a message notification is sent to the User(s) depending on the property, portal.refill.messageto. • Now following is the new format of the message notification that is sent to the User(s), when a Patient requests for a refill from Patient Portal:
• When a doctor either Prints/eRx/Faxes the Refill request that Patient had requested from Portal, then a notification message is sent to the Patient's inbox on portal, along with an email informing him/her of the message. • To send this notification message, a Support event, 216 has been added in the property, events.supported. • Following are the messages in new format that are sent on Patient’s Portal and Email Address when a Provider processes the Patient’s Refill request:
|
|||||||||||||||||||||||||||||||||||||||||||||||||||||||||||||||||||||||||||||||||||||||||||||||
| 2.3 | Patient’s all active Insurances are now available on Patient Portal | ||||||||||||||||||||||||||||||||||||||||||||||||||||||||||||||||||||||||||||||||||||||||||||||
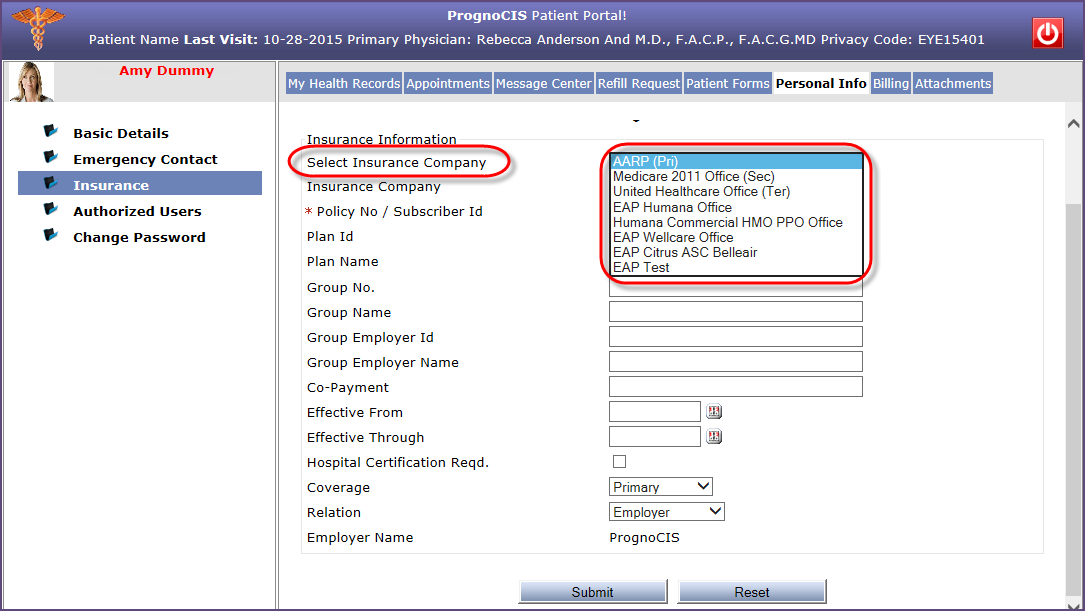
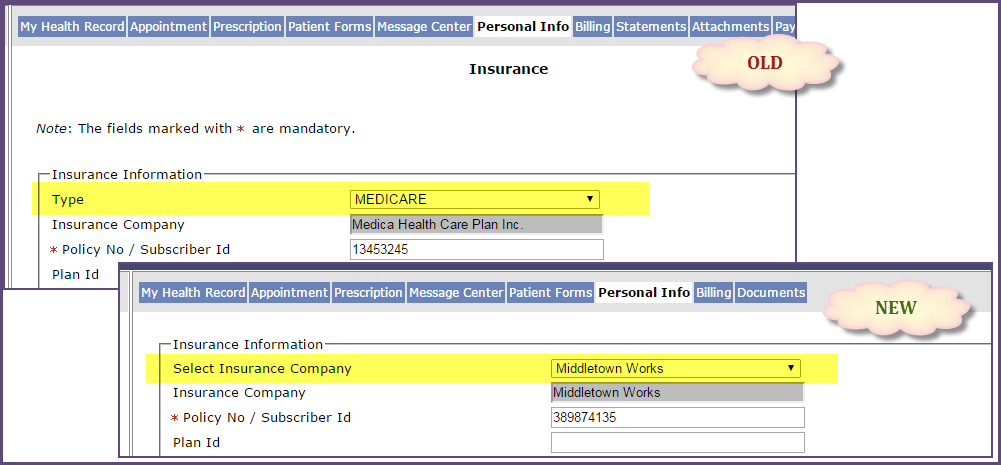
Navigation: Goto Patient Portal → Personal Info tab → click on Insurance menu → Insurance screen • Earlier a Patient could view and edit only the Primary Insurance on Patient Portal. Now, additionally a provision has been given to view and edit all the active Insurances of a Patient on Patient Portal. • A new dropdown list, Select Insurance Company displays a list of Patient’s all the active Insurance companies of the Patient.
• In the Select Insurance Company dropdown list, the default Insurances of a Patient are displayed on top along with its Insurance type i.e. Primary as (Pri), Secondary as (Sec), and Tertiary as (Ter). Refer to figure 2.3-1 Figure 2.3-1: Select Insurance Complany dropdown list on Patient Portal • When a Patient selects any Insurance Company from the Select Insurance Company dropdown list, its respective details are auto-populated and displayed in the Insurance Information section. Also, depending on the value set in the property, pp.insurance.update, a Patient has a provision to edit those details. |
|||||||||||||||||||||||||||||||||||||||||||||||||||||||||||||||||||||||||||||||||||||||||||||||
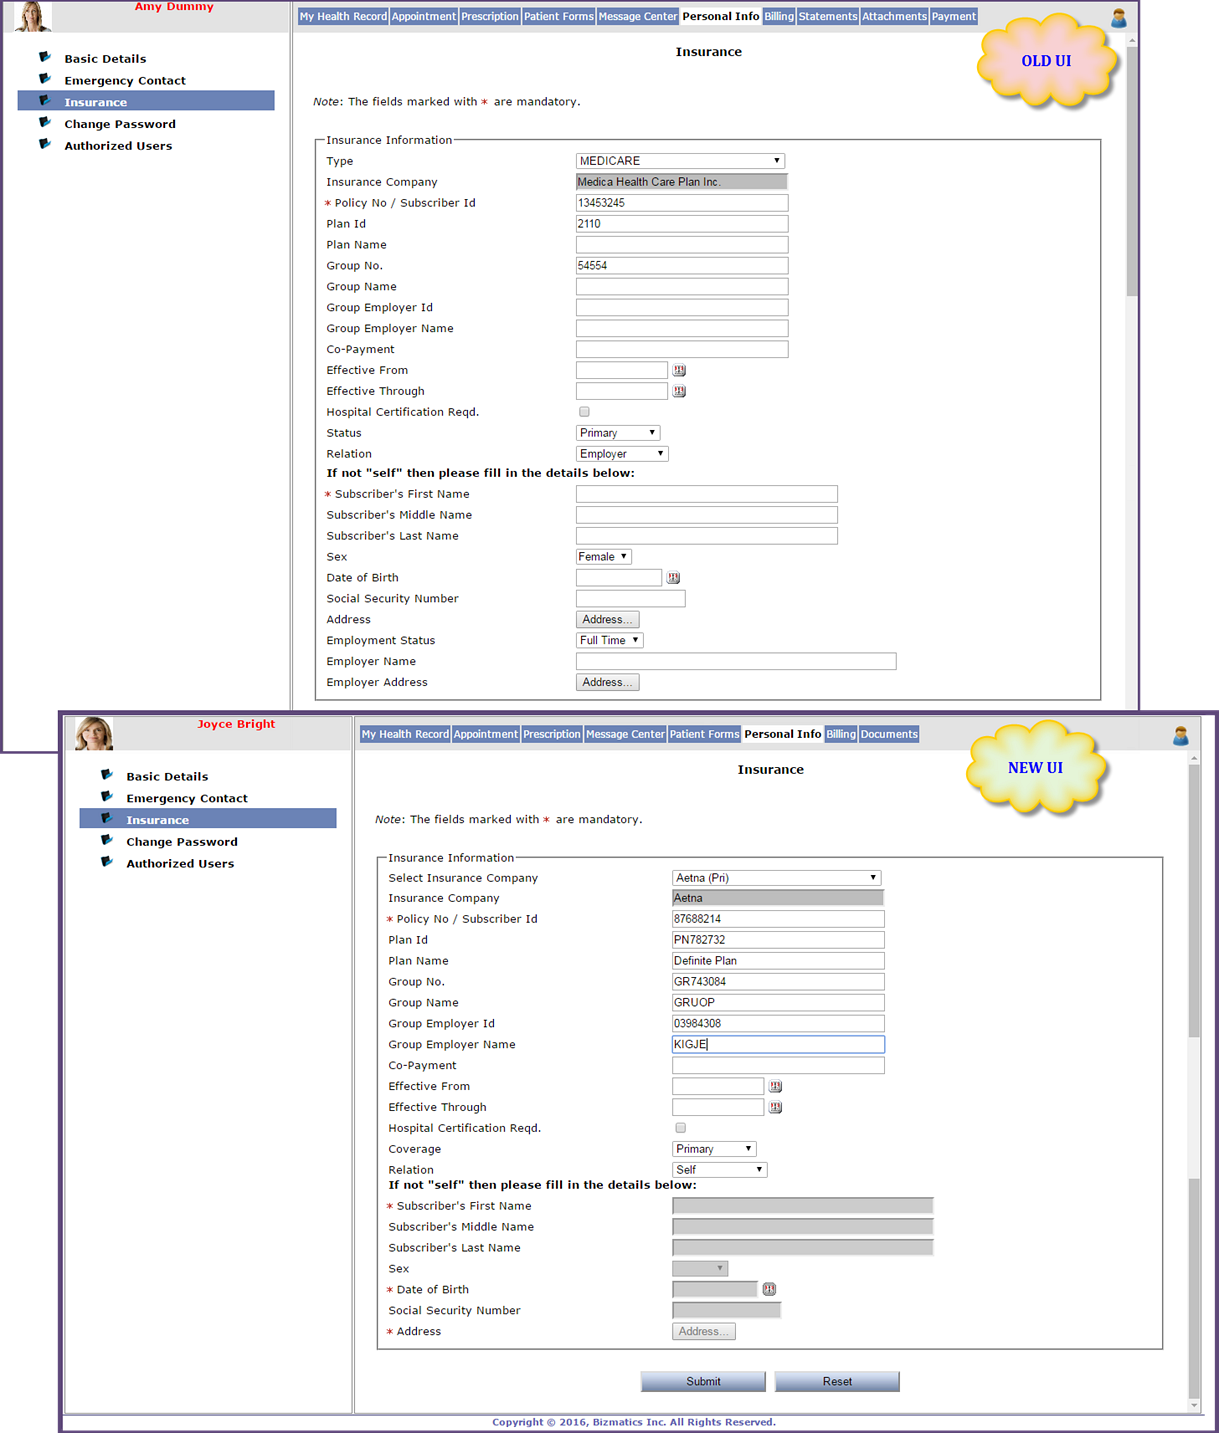
| 2.4 | UI changes of Patient Portal – Insurance screen | ||||||||||||||||||||||||||||||||||||||||||||||||||||||||||||||||||||||||||||||||||||||||||||||
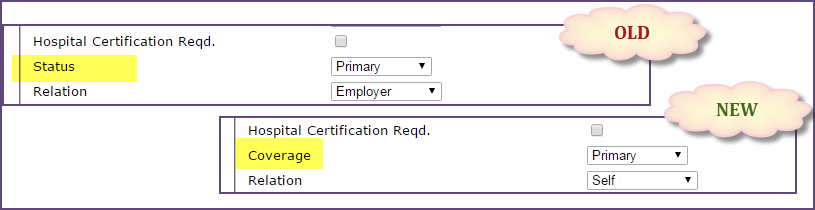
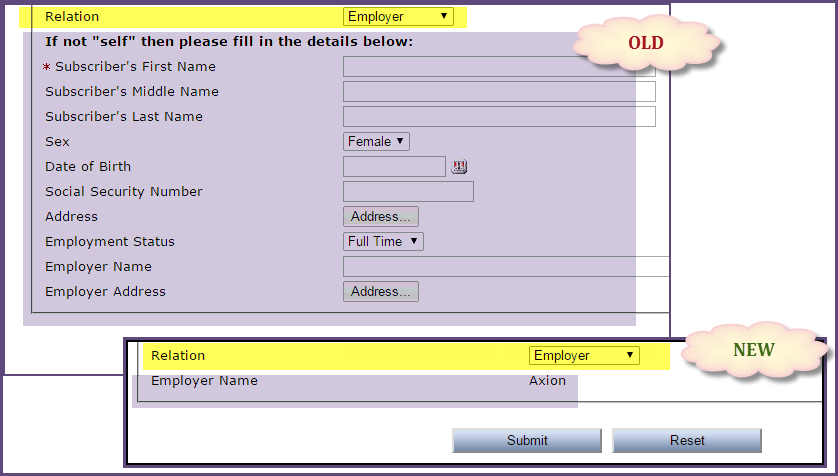
Navigation: Goto Patient Portal → Personal Info tab → click on Insurance menu → Insurance screen The following UI (User Interface) changes (as seen in the comparative images) have been done on the Insurance screen: Figure 2.4-1: Comparison between the existing or old UI with the new UI 1. The Type dropdown list has been removed and in its ‘position’ on screen, the Select Insurance Company dropdown list has been added. Refer to figure 2.4-2 Figure 2.4-2: Type drop-down list removed and in newer UI a new drop-down list added in the same UI position 2. The fields, Employment Status and Employer Address have been removed. Refer to figure 2.4-3 Figure 2.4-3: Two fields Employment Status and Employer Address removed in the newer version 3. The label of Status dropdown list has been changed to Coverage. Refer to figure 2.4-4 Figure 2.4-4: Status field relabeled as Coverage 4. If a Patient selects the Relation as Employer from the Relation dropdown list then only the Employer Name field is displayed unlike the display of all the Subscriber fields in the earlier versions. Refer to figure 2.4-5 Figure 2.4-5: Relation field now selectively displays only Employer name on selection of the Relation |
|||||||||||||||||||||||||||||||||||||||||||||||||||||||||||||||||||||||||||||||||||||||||||||||
| 2.5 | Provision to view Lab Result attachments on Patient Portal | ||||||||||||||||||||||||||||||||||||||||||||||||||||||||||||||||||||||||||||||||||||||||||||||
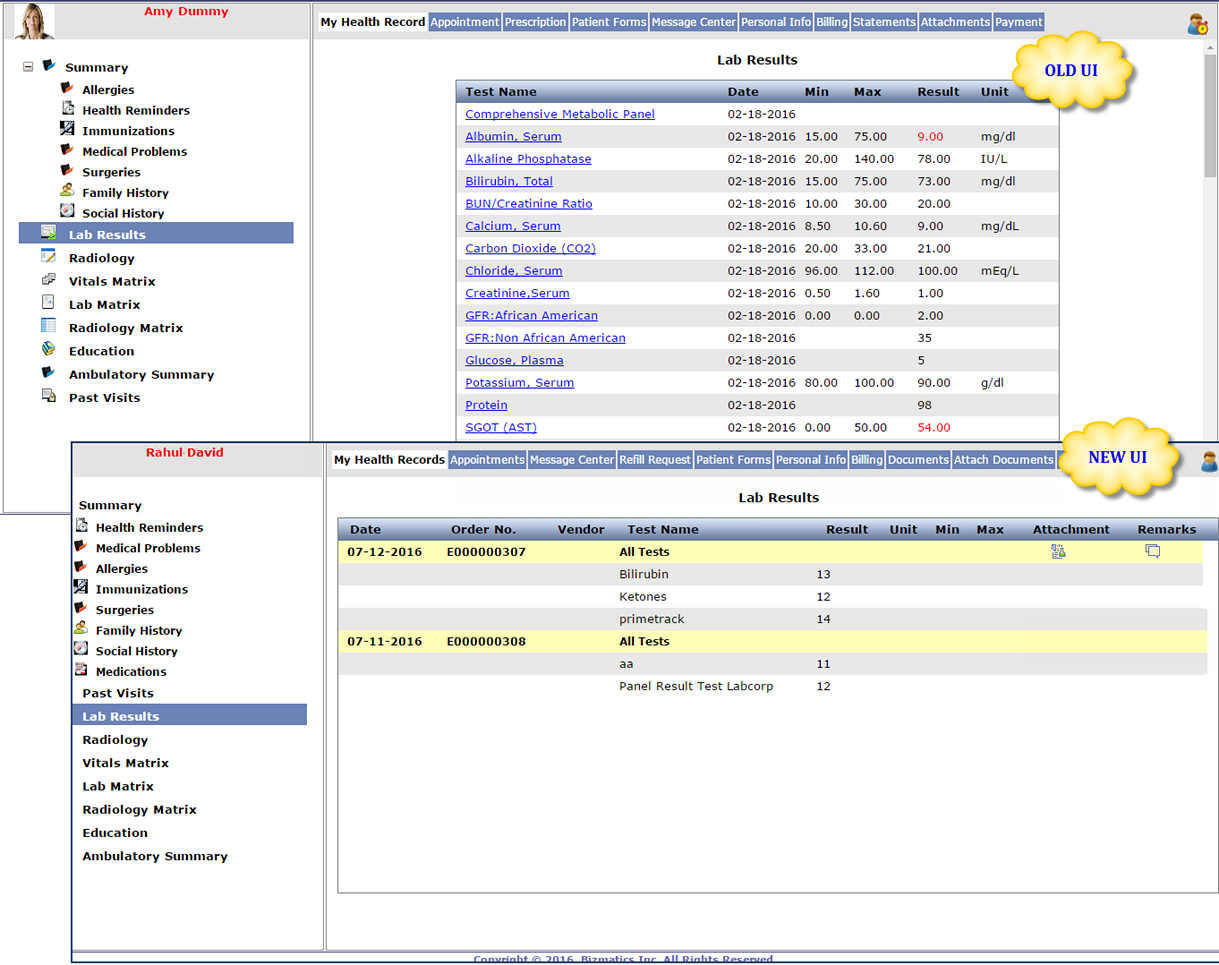
Navigation: Goto Patient Portal → My Health Records tab → click on Lab Results menu → Lab results screen • Earlier there was no provision for a Patient to view the Lab Result attachments on Patient Portal and the Lab Results screen displayed only the following information:
• Now, provision has been given to view the Lab Result attachments and the following additional information is displayed on the Lab Results screen of Patient Portal:
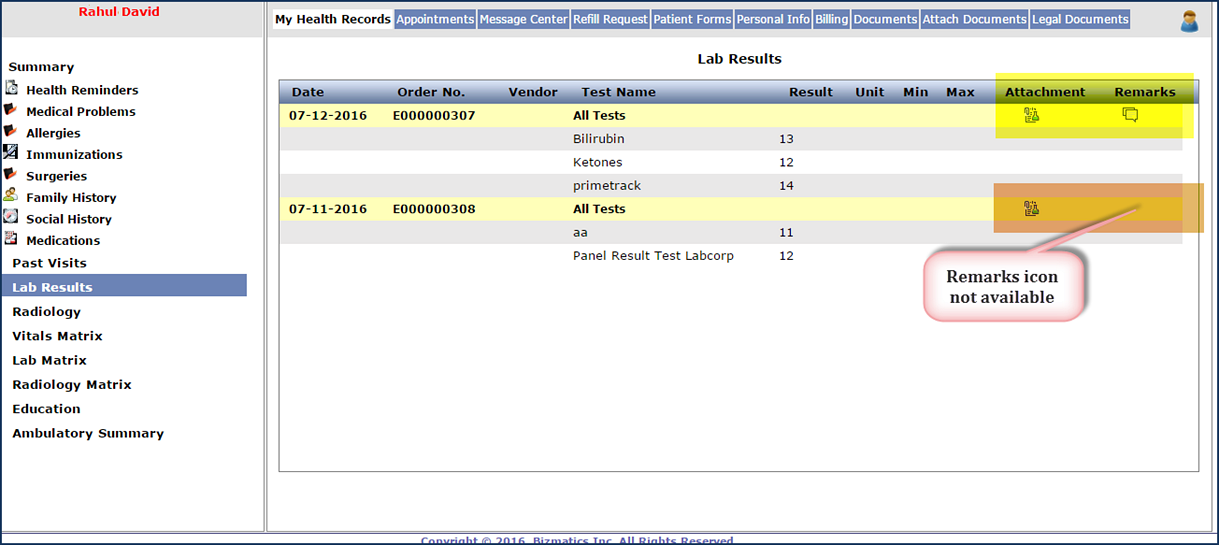
• Also, the UI (User Interface) of the Lab Result screen has been changed. Now the Lab Result screen has been categorized based on the Lab Order number which is displayed in the row highlighted in Yellow. Refer to figure 2.5-1 Figure 2.4-1:
Comparison between the existing or old UI with the new UI • The rows highlighted in Yellow displays the Lab Order details such as Lab Order Date, Order Number, Lab Vendor, Order level attachments and Order level remarks (Remarks icon available only if EMR User has entered a remark in the Lab Result Refer to figure 2.5-2). Whereas the tests and its details such as Test name, Result, Unit, Min, and Max values are displayed below that row. Figure 2.5-2:
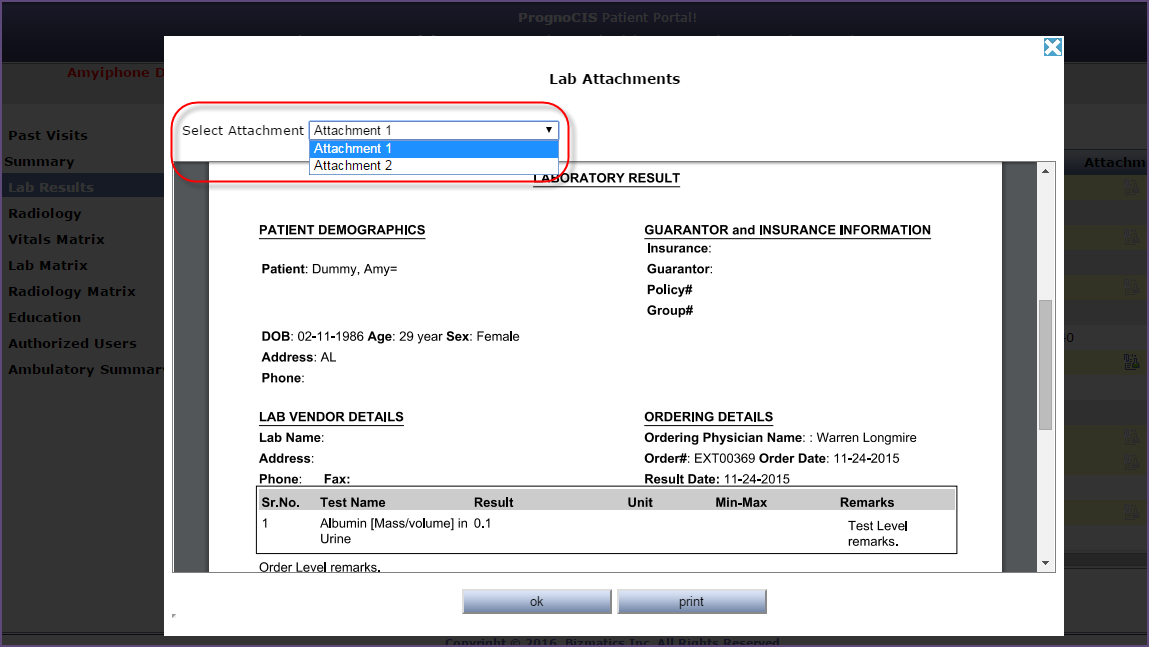
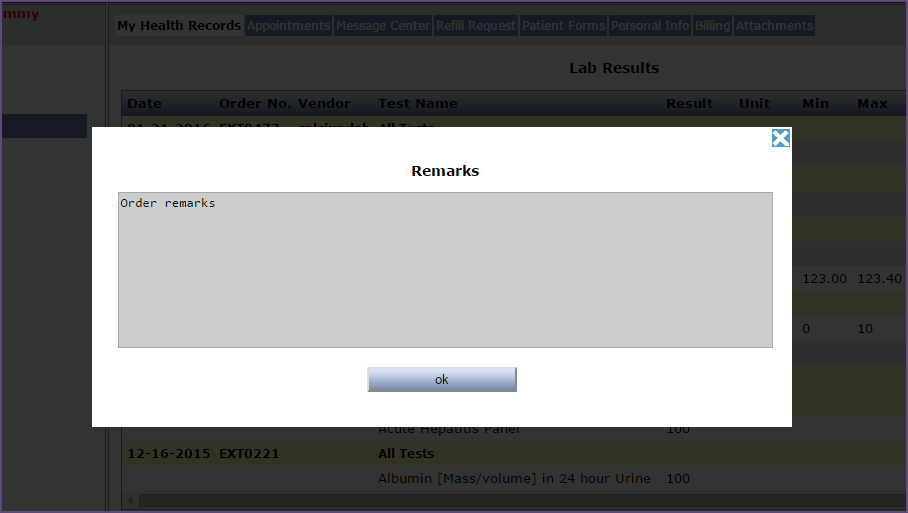
Remarks icon on Lab Results screen on Patient Portal • On click of View Attachment icon: Figure 2.5-3: Lab Results attachments • On click of Show Remarks icon: Figure 2.5-4: Lab Results Remarks |
|||||||||||||||||||||||||||||||||||||||||||||||||||||||||||||||||||||||||||||||||||||||||||||||
| 2.6 | Provision to share document on Portals from the Document List screen | ||||||||||||||||||||||||||||||||||||||||||||||||||||||||||||||||||||||||||||||||||||||||||||||
Navigation: Goto Patient's Encounter
→ Encounter TOC
→ click Document List • PrognoCIS now provides the facility to share documents from Clinic on
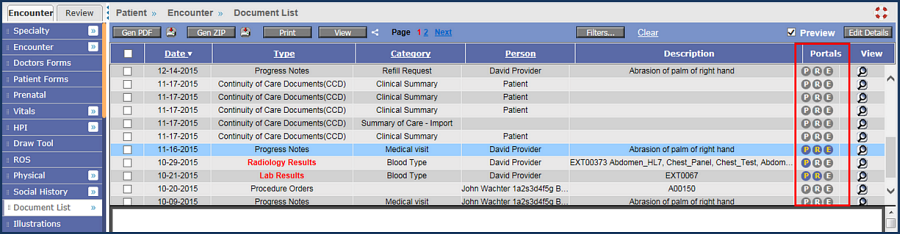
Portals such as Patient, Referring Doc, and Employer Portals. A new Share icon: • To share any document, click on the required document record; click on the Share icon: Figure 2.6-1: Select Portal popup • Once any document from the Document List screen is shared on the Portal then the icon consisting of letters: Figure 2.6-2: Portals column the Document List screen
• To unshare a document that is already shared, select the document and click on the Share icon: • Following table describes the Documents Types that are available for sharing on Portals:
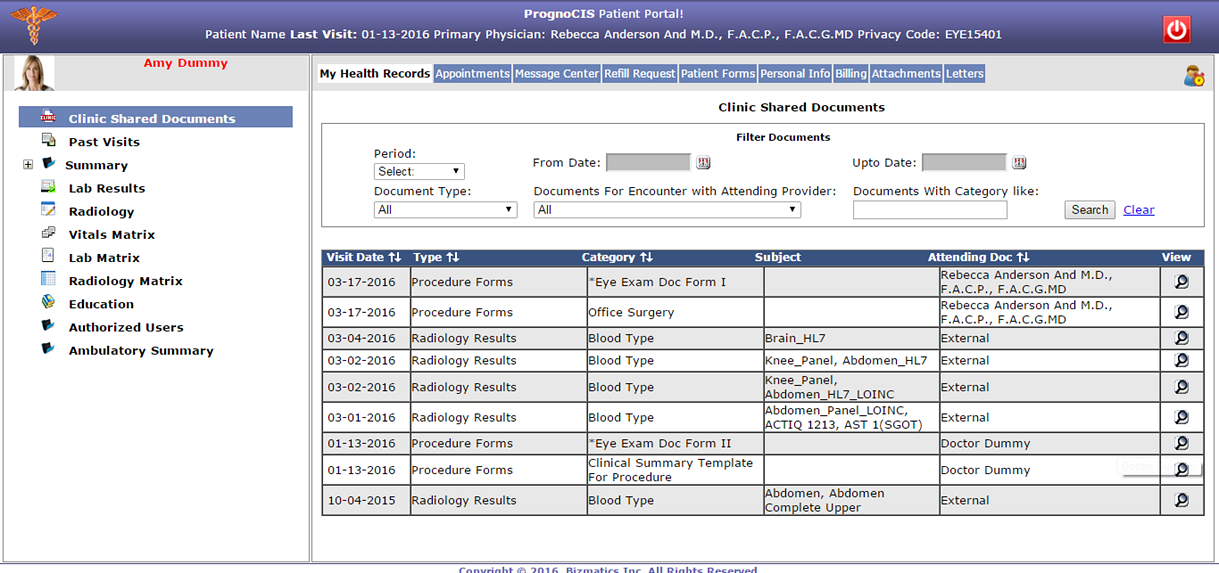
• Also, three new options, Patient Portal, Referring Doc Portal, and Employer Portal have been added under Documents Available on Portal/s section on the Apply Filters popup (click on Filters button on Document List screen) to filter and display all the documents that are shared on respective Portals, when selected. Refer to figure 2.6-3 Figure 2.6-3: Apply Filters popup • A new role, ShareOnPortals has been added. Only the User assigned with this role will have an access to Share icon: • A new menu, Clinic Shared Documents with icon: Figure 2.6-4: Clinic Shared Documents screen • The Clinic Shared Documents menu is available only if the properties governing the Portal tabs consist of the value, ‘CSD’.
• The Clinic Shared Documents screen displays the following information:
• When the document is viewed, the documents popup additionally displays the information such as Patient’s name, Date, Category, and Subject. Also, print and close buttons are displayed to print the document and close the Documents popup. • Patient/Referring Doc also has a provision to filter the shared documents by Period, Date Range, Document Type, Category, and Attending Doctor. To clear the filter and view all the shared documents, the Clear link is available next to the Search button. • On Referring Doc Portal, the Letters submenu is now merged with Clinic Documents and the Letters submenu is now changed to Clinic Shared Documents. • Also, on Patient Portal and Referring Doc Portal, the attached and signed legal Docs displayed in Legal Docs submenu are now available in the Clinic Shared Documents submenu as well.
|
|||||||||||||||||||||||||||||||||||||||||||||||||||||||||||||||||||||||||||||||||||||||||||||||
| 2.7 | Configuration of the list of Patient Forms to be shown on Patient Portal is done from Interface Master screen | ||||||||||||||||||||||||||||||||||||||||||||||||||||||||||||||||||||||||||||||||||||||||||||||
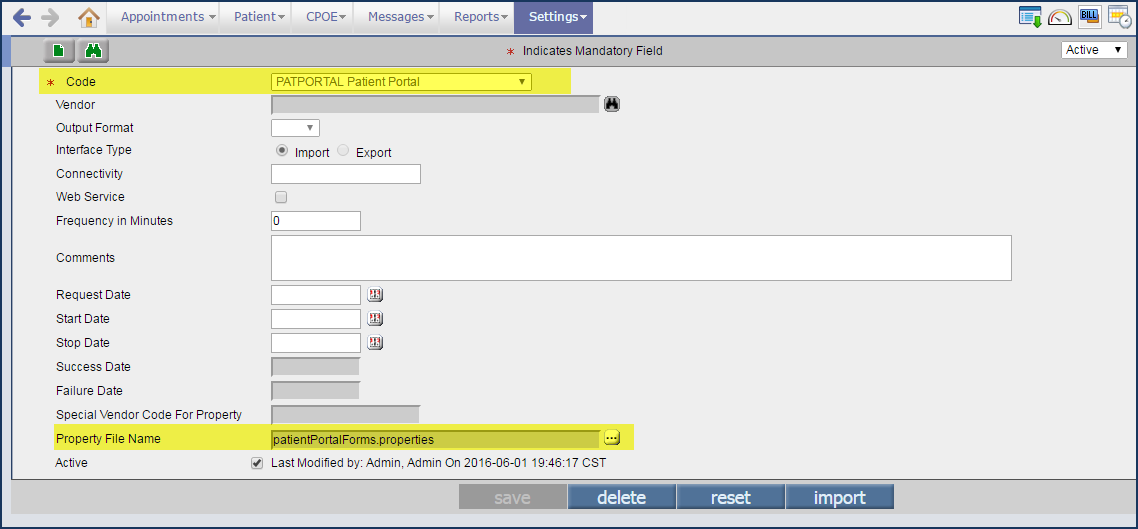
Navigation: Goto menu: Settings → Configuration A newer link, Interface Master has been added – replacing the earlier link of HL7 Interfaces in PrognoCIS UI. Please note that this link is available only on Admin login. The configuration of the list of Patient Forms (for existing and new Patients) to be shown on Patient Portal is done from Interface Master screen. Refer to figure 2.7-1 Figure 2.7-1: UI of Interface Master Configuration of Patient Portal file properties for both new and existing Patients is done from the popup invoked via the […] button next to the field, Property File Name. |
|||||||||||||||||||||||||||||||||||||||||||||||||||||||||||||||||||||||||||||||||||||||||||||||
![]()