| Important Note: The current version of V3B2 is supported with Compatibility View Settings OFF for IE (Internet Explorer) browsers. |
| |
|
| 1. |
Introduction |
| |
This document provides information on settings required on browsers such as IE(versions 9, 10, and 11), Chrome, and Safari to view PrognoCIS TM .
|
| |
|
|
| 2. |
Configuration Settings for IE
11 |
| 2.1 |
Enable the Compatibility View for IE 11 |
| |
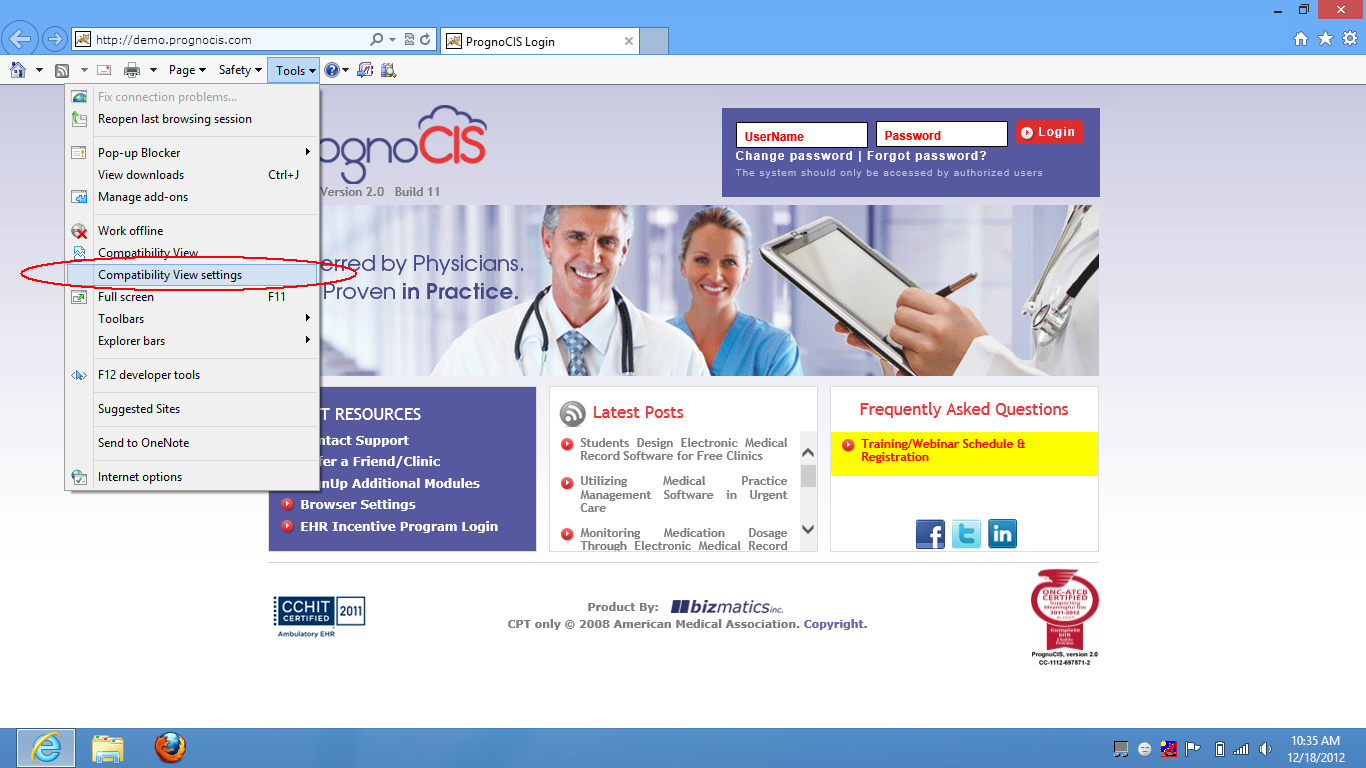
Perform the following steps to enable the compatibility view for IE11:
- Open Internet Explorer browser.
- Type https://<client name> .prognocis.com in the address bar.
- The PrognoCIS LOGIN screen is displayed.
- Click the Tools menu at the top, and then click Compatibility View Settings.
- "Add this website:" text box will show entered Url then click on Add button.
- Click Close button to save changes done
|
| |
|
|
| 2.2 |
Disable the Compatibility View for IE 11 |
| |
Perform the following steps to disable the compatibility view for IE11:
- Open Internet Explorer browser.
- Type https://<client name> .prognocis.com in the address bar.
- The PrognoCIS LOGIN screen is displayed.
- Click the Tools menu at the top, and then click Compatibility View Settings.
- "Websites youve added to Compatibility View:" text box will show the added URL.
- Select the URL then click on Remove button.
- Click Close' button to save changes done
|
| |
|
|
| 2.3 |
Configuration Settings for Microsoft ® Internet Explorer |
| |
To customize your Privacy settings in Microsoft Internet Explorer
- Double-click to open Internet Explorer.
- On the Tools menu, click Internet Options
- Click the Security tab, and then click Trusted Sites Zone.
- Click Sites button.
- Click to select the check box Require server verification (https) for all sites in this zone option.
- Click the close button.
|
| |
|
|
| 2.4 |
Custom Level Settings for Trusted Sites |
| |
Continue these steps after configuration settings for Microsoft Internet Explorer.
- Double-click to open Internet Explorer or Start > All Programs > Internet Explore
- On the Tools menu, click Internet Options.
- Click the Security tab.
- Click the Custom level button within the Security Level for this zone frame.
- Using the vertical scroll bar within the Settings pane, verify or define the following configuration as noted by each category indicated.
Note: Unless otherwise specified, if a category exists but is not cited below, assume the default values and make no changes.
- Scroll to ActiveX controls and plug-ins and select the Enable option for the following:
- Allow previously unused ActiveX controls to run without prompt.
- Allow Scriptlets.
- Automatic prompting for ActiveX controls.
- Binary and script behaviors.
- Download signed ActiveX controls.
- Run ActiveX controls and plug-ins.
- Script ActiveX controls marked safe for scripting*.
- Scroll to ActiveX controls and plug-ins and and select the Disable option for the following:
- Initialize and script ActiveX controls not marked as safe for scripting.
- Only allow approved domains to use ActiveX without prompt.
- Scroll to ActiveX controls and plug-ins and and select the Prompt option for the following:
- Download unsigned ActiveX controls.
- Scroll to Downloads and select the Enable option for the following:
- File download.
- Font download.
- Scroll to Miscellaneous and select the Prompt option for the following:
Display mixed content.
- Scroll to Miscellaneous and select the Enable option for the following:
- Allow META REFRESH.
- Allow scripting of Microsoft web browser control.
- Allow script-initiated windows without size or position constraints.
- Allow websites to open windows without address or status bars.
- Launching program and files in IFRAME.
- Scroll to Miscellaneous and select the Disable option for the following:
- Enable MIME Sniffing.
- Render legacy filters.
- Use SmartScreen Filter.
- Scroll to Scripting and select the Enable option for the following:
- Active scripting.
- Allow Programmatic clipboard access.
- Allow status bar updates via script.
- Allow websites to prompt for information using scripted windows.
- Scripting of Java applets.
- Scroll to Scripting and select the Disable option for the following:
|
| |
|
|
| 2.5 |
Defining Privacy Settings for Sites and Pop-up Blocker |
| |
Continue these steps to define Privacy settings for Sites and Pop-up Blocker:
- Click the Privacy tab.
- Click the Sites button within the Settings frame.
- Type *.prognocis.com in the text-box for Address of website and click 'Allow'. This adds *.prognocis.com to the Managed websites list with Always Allow Setting.
- Check Turn on Pop-up Blocker within the Pop-up Blocker frame.
- Click 'Settings'.
- Type *.prognocis.com in the text-box for Address of website to allow and click ' Add'. This adds *.prognocis.com to the Allowed sites list.
- Check Show Notification bar when a pop-up is blocked.
- Select Medium: Block most automatic pop-ups from the Blocking Level drop-down.
- Click the 'Close' button.
|
| |
|
|
| 2.6 |
Defining Advance Settings for Browsing |
| |
Continue these steps to define Advance Settings for Browsing:
- Click the Advance tab.
- Scroll to Browsing and select the option for the following:
- Check Disable script debugging (Internet Explorer).
- Check Disable script debugging (Other).
- Un-check Display a notification about every script error.
|
| |
|
|
| 2.7 |
Page set up in Internet Explorer |
| |
- On the File menu (of internet explorer), click Page Setup.
- Set Left, Right, Top, Bottom (margins) values to 0.
- The defaults will now be set to values resembling 0.16 or 0.17.
|
| |
|
|
| 2.8 |
Disable Pop-up Blockers |
|
| |
Check to see if the pop-up blockers have been disabled in your system. Users can login to PrognoCIS with a valid user id and password. If the user is unable to login and system displays messages saying pop-up blockers has stopped a window from then pop-up blockers are disabled. Otherwise, do any of the following steps applicable to disable the pop-up blockers.
|
|
| |
|
|
| 2.9 |
Google Toolbar |
| |
1. Allow pop-ups on a specific website
-
Login to https://<clinic name>.prognocis.com and click the Pop-up Blocker button on the Google Toolbar.
- The button text will then change to Pop-ups okay, indicating that the Pop-up Blocker is disabled for the specified website.
2. Disable pop-up blocker completely on the Google Toolbar
- Click the Settings button on Google Toolbar and select Options from the list.
- Click the More tab.
- In Popup Blocker option, click to deselect the Enable Pop-up Blocker check box.
- Click the OK button.
- Click Options on the Google toolbar and click to deselect the pop-up blocker box.
 Note: The previous versions of Google toolbar do not have a settings button in a previous version of Google toolbar. Note: The previous versions of Google toolbar do not have a settings button in a previous version of Google toolbar.
|
| |
|
|
| 2.10 |
Download Adobe Acrobat Reder 11 to view .pdf files |
| |
We recommend you to download Adobe Reader 11.0. If you already have Adobe Reader 5.0 or Adobe Reader 6.0, or Adobe Reader 7.0.9 remove it and then download adobe reader 11.0.
1. Uninstall all previous versions of Adobe Reader
- Click Start > All Programs > Control Panel > Add or Remove Programs.
- List of all programs installed in your computer is displayed.
- Select Adobe Reader 5.0 or 6.0 or 7.0.9 (or any previous versions) and click Remove button.
- This will take you through a sequence of steps confirming your choice to remove the selected version of Adobe Reader.
2. Download Adobe Reader 11.0.02
Note: Make sure that you do not download the Google toolbar along with Adobe Reader 11.0.02
|
| |
|
|
| 2.11 |
Download Alternate Tiff ActiveX Control |
| |
TIFF plug-in is required for viewing most types of tiff image files. It is a free web- browser add-on used for viewing typical scanned documents, with minimal mouse clicks
Install tiff plug-in
- Type in your browser http://www.alternatiff.com/install/
- Once download is complete, users will see a black box, click to Register the plug-in.
- Enter user Name, Company name, email address, and click Register button.
- Click the Send Registration button.
- Users will be displayed If you can read this, the Alternatiff ActiveX control is installed in your browser. in a box; the tiff plug-in is now installed.
|
|
| |
|
|
| 3. |
Configuration Settings for IE 10
|
| 3.1 |
Configuration Settings for Microsoft ® Internet Explorer
|
| |
To customize your Privacy settings in Microsoft Internet Explorer
- Double-click to open Internet Explorer.
- On the Tools menu, click Internet Options.
- Click the Security tab, and then click Trusted Sites.
- Click Sites.
- Click to select Require server verification (https) check box for all sites in this zone option.
- Click Ok
|
| |
|
|
| 3.2 |
Custom Level Settings for trusted sites |
| |
Continue these steps after configuration setting for Microsoft Internet Explorer.
- Click Security Tab > Custom Level
- Several options to be selected are displayed. In the Download Signed ActiveX controls option, click Enable.
In the following Miscellaneous option:
- Allow scripting of Internet Explorer Web browser control, click Enable
- Allow script-initiated windows without size or position control, click Enable
- Display mixed content, click Enable
|
| |
|
|
| 3.3 |
Page set up in Internet Explorer |
| |
- On the File menu (of internet explorer),click Page Setup
- Set Left, Right, Top, Bottom (margins) values to 0.
- The defaults will now be set to values resembling 0.16 or 0.17
|
| |
|
|
| 3.4 |
Disable Popup Blockers |
| |
Check to see if the pop-up blockers have been disabled in your system. Users can login to PrognoCIS with a valid user id and password. If the user is unable to login and system displays messages saying pop-up blockers has stopped a window from then pop-up blockers are disabled. Otherwise, do any of the following steps applicable to disable the pop-up blockers.
|
|
| |
|
|
| 3.5 |
Google Toolbar |
| |
Allow popups on a specific website
- Login to https://<clinic name>.prognocis.com and click the Popup Blocker button on the Google Toolbar; the button text will then change to Popups okay, indicating that the Popup Blocker is disabled for the specified website
Disable popup blocker completely on the Google Toolbar
- Click the "More" tab
- In Popup Blocker option, click to deselect the Enable Popup Blocker check box
- Click OK
- Click Options on the google toolbar and click to deselect the popup blocker box
 Note: The earlier versions of Google toolbar do not have a settings button. Note: The earlier versions of Google toolbar do not have a settings button.
|
|
| |
|
|
| 3.6 |
Yahoo Toolbar |
| |
Allow popups on a specific website
- Login to https://<clinic name>.prognocis.com and click the Popup Blocker button on the Yahoo Toolbar Menu
- Select "Always Allow Pop-Ups From" from the list
- Select the site (https://<clinic name>.prognocis.com from the list of "Sources of Recently Blocked Pop-Ups"
- Click "Allow"; this allows all pop-ups from this web site to appear without further action
Disable popup blocker completely on the Yahoo Toolbar
- Click Pop-Up Blocker button on the yahoo toolbar menu
- Click to deselect Enable Pop-Up Blocker" option from the list
Note: If you have tried the methods listed above and the pop-up you want is still blocked, the window is not blocked by Yahoo! Pop-up blocker or Google popup blocker. Some other popup blocker is blocking the window, it may even be another toolbar installed on the system.
 Hint: If the Popup Blocker is preventing a new window from opening, you can always let a new window open from a "blocked" site by holding down the Ctrl key on your keyboard while you click on a link. Hint: If the Popup Blocker is preventing a new window from opening, you can always let a new window open from a "blocked" site by holding down the Ctrl key on your keyboard while you click on a link.
|
|
| |
|
|
| 3.7 |
Download Adobe Acrobat Reader 7 to view .pdf files |
|
We recommend you to download Adobe Reader 7.0.9. If you already have Adobe Acrobat Reader 5.0 or adobe reader 6.0, remove it and then download adobe reader 7.0.9. Currently, we do not support version higher than 7.0.9. So if you have that version, please revert back to 7.0.9.
Uninstall all previous versions of Adobe Reader
- Click Start > All Programs > Control Panel > Add or Remove Programs
- On the Downloads menu, select Get Adobe Reader option
- Click Choose a different version hyperlink
Download Adobe Reader 7.0.9
- Type in your browser http://www.adobe.com/
- On the Downloads menu, select Get Adobe Reader option
- Click Choose a different version hyperlink
In the Adobe Reader Downloads - All versions page
- Select an operating system > Choose Windows
- Select a version > Choose XP SP2
- Select a Language > Choose English
- Click Continue
- Click Adobe Reader 7.0.9
Note:
Disable the popup blockers to start the download.
- Save the download to a folder and run it
- Follow the installation steps
Note: Make sure that you do not download the Yahoo toolbar along with Adobe Reader 7.0.9
|
| |
|
|
| 3.8 |
Download Alternate Tiff ActiveX Control |
|
TIFF plug-in is required for viewing most types of tiff image files. It is a free web- browser add-on used for viewing typical scanned documents, with minimal mouse clicks.
Install tiff plug-in
- Type in your browser http://www.alternatiff.com/install/
- Click Auto-install AlternaTIFF ActiveX control
- Once download is complete, users will see a black box, click to Register the plug-in
- Enter user Name, Company name, email address, and click Register
- Click Send Registration
- Users will be displayed If you can read this, the Alternatiff ActiveX control is installed in your browser." in a box
The tiff plug-in is now installed.
Create a desktop shortcut for PrognoCIS
- Double-click to open Internet Explorer/
- Type https://<clinicname>.prognocis.com in the address bar;the PrognoCIS LOGIN screen is displayed
- Click Add to Favorites
on the Favorites menu
- Type a new name for the page if required
- On the File menu, point to Send, and then click Shortcut to Desktop
- A desktop shortcut has now been created for PrognoCIS
- Also, add PrognoCISTM url in Favorites of Internet Explorer
|
| |
|
|
| 3.9 |
Enable the compatibility view for IE10 |
|
Perform the following steps to enable the compatibility view for IE10:
- Open Internet Explorer browser
- Click the Tools menu at the top, and then click Compatibility View Settings, Refer to the following figure ; a Compatible View Settings popup is displayed.
Figure 1.1: Compatibility View Settings menu item from Tool menu in IE10
- Select the checkbox next to Display all websites in Compatibility View in the Compatibility View Settings popup, Refer to the following figure
Figure: Screen Compatibility View Settings popup

- Click Close to save changes done
- Access PrognoCIS URL
|
| |
|
|
| 3.10 |
Disable the Compatibility View for IE 10 |
| |
Perform the following steps to disable the compatibility view for IE10:
- Open Internet Explorer browser.
- Type https://<client name> .prognocis.com in the address bar.
- The PrognoCIS LOGIN screen is displayed.
- Click the Tools menu at the top, and then click Compatibility View Settings.
- "Websites you've added to Compatibility View:" text box will show the added URL.
- Select the URL then click on Remove button.
- Click Close' button to save changes done
|
| |
|
|
| 4. |
Configuration Settings for IE 9 |
| 4.1 |
To customize your Privacy settings in Microsoft Internet Explorer
|
|
Perform the following steps to customize your privacy settings in Microsoft Internet Explorer version 9
- Double-click to open Internet Explorer
- On the Tools menu, click Internet Options
- Click the Security tab, and then click Trusted Sites
- Click Sites
- Select Require server verification (https:) check box for all sites in this zone option.
- Click Ok
|
| |
|
|
| 4.2 |
Custom Level Settings for trusted sites
|
|
Perform the following steps to set custom level settings for trusted sites:
- On Security Tab > click Custom Level button; several options are displayed.
- Click Enable in Download Signed ActiveX controls option.
In the ActiveX Controls & Plug-ins option:
i. Allow previously unused ActiveX controls to run without prompt, click Enable
ii. Allow Scriptlets, click Enable
iii. Automatic Prompting for ActiveX controls, click Enable
iv. Download signed ActiveX Controls, click Enable
v. Run ActiveX controls and plug-ins, click Enable
vi. Script ActiveX controls safe for scripting, click Enable
In the Downloads option
i. Automatic prompting for file downloads, click Enable
ii. Font download, click Enable
In the Miscellaneous option
i. Access data sources across domains, click Enable
ii. Allow scripting of Internet explorer web browser controls, click Enable
iii.Allow script-initiated windows without size or position constraints, click Enable
iv. Allow websites to open windows without address or status bar, click Enable
v. Display mixed content, click Enable
vi. Launching programs and files in an IFRAME, click Enable
vii.Use Phishing filter, click Disable
viii. Use Pop-up blocker, click Disable
In the Scripting option
i. Active scripting, click Enable
ii. Allow Programmatic clipboard access, click Enable
iii. Scripting of Java applets, click Enable
iv. Click OK button to save the changes.
v. Click on Privacy tab. In Pop-up Blocker option, if Settings button is active, add PrognoCIS URL to Allowed Sites.
vi. Set filter level to Low.
vii.Click Close to save the changes.
| |
| |
|
|
| 4.3 |
Install security certificate
|
|
Client server users need to install security certificate. ASP server users need not install the security certificate.
To install a security certificate
- Type the following address in the address bar of the Internet Explorer:
https://<IP address of the server>:8443/prognocis/scrUserLogin.jsp?clinic=<pool name> in the address bar of Internet explorer ;
the Security Alert window is displayed.
- In Security Alert window, click View Certificate.
- In Certificate window, click Install Certificate. A Certificate Import Wizard prompts the user through the steps of installing the certificate.
- In Welcome to Certificate Import Wizard window, click Next.
- In Certificate Store window, click Next
- In Completing the Certificate Import Wizard window, enable Automatically select the certificate store based on the type of certificate option
- In Security Warning window, click Yes to complete the installation of the certificate.
- 9. In Certificate Import Wizard, click Ok (this window displays the successful import of security.
| |
| |
|
|
| 4.4 |
Disable Popup Blockers
|
|
Check to see if the pop-up blockers are disabled in your system. Users can login to PrognoCIS with a valid user id and password. If the user is unable to login and system displays messages saying pop-up blockers has stopped a window from then pop-up blockers are disabled. Otherwise, do any of the following steps applicable to disable the pop-up blockers.
| |
| |
|
|
| 4.5 |
Google Toolbar
|
|
Allow popups on a specific website
Login to https://.prognocis.com and click the Popup Blocker button on the Google Toolbar.The button text will then change to Popups okay, indicating that the Popup Blocker is disabled for the specified website.
Disable popup blocker completely on the Google Toolbar
- Click the "Settings" button on google Toolbar and select "Options" from the list.
- Click the "More" tab.
- In Popup Blocker option, click to deselect the Enable Popup Blocker check box.
- Click OK.
Note: The previous versions of google toolbar do not have a Settings button. In a previous version of google toolbar:
i. Click Options on the google toolbar
ii. Click to deselect the Popup Blocker box.
| |
| |
|
|
| 4.6 |
Yahoo Toolbar
|
|
Allow popups on a specific website
- Login to https://.prognocis.com and click Pop-Up Blocker button on the yahoo toolbar menu.
- Select "Always Allow Pop-Ups From" from the list
- Select the site (https://. prognocis.com) from the list of Sources of Recently Blocked Pop-Ups".
- Click "Allow"; this allows all pop-ups from this web site to appear without further action.
Disable pop up blocker completely on the Yahoo! Toolbar
-
Click Pop-Up Blocker button on the yahoo toolbar menu.
-
Click Pop-Up Blocker button on the yahoo toolbar menu.
Note: If you have tried the methods listed above and the pop-up you want is still blocked. The window is not blocked by Yahoo! Pop-up Blocker or Google popup blocker. Some other pop-up blocker is blocking the window, it may even be another toolbar installed on the system.
Hint: If the Popup Blocker is preventing a new window from opening, you can always let a new window open from a "blocked" site by holding down the Ctrl key on your keyboard while you click on a link.
| |
| 4.7 |
Page set up in Internet Explorer
|
|
- On the File menu (of internet explorer), click Page Setup
- Set Left, Right, Top, Bottom (margins) values to 0.
- The defaults will now be set to values resembling 0.16 or 0.17
| |
| |
|
|
| 4.8 |
Enable the Compatibility View for IE 9 |
| |
Perform the following steps to enable the compatibility view for IE9:
- Open Internet Explorer browser.
- Type https://<client name> .prognocis.com in the address bar.
- The PrognoCIS LOGIN screen is displayed.
- Click the Tools menu at the top, and then click Compatibility View Settings.
- "Add this website:" text box will show entered Url then click on Add button.
- Click Close' button to save changes done
|
| |
|
|
| 4.9 |
Disable the Compatibility View for IE 9 |
| |
Perform the following steps to disable the compatibility view for IE9:
- Open Internet Explorer browser.
- Type https://<client name> .prognocis.com in the address bar.
- The PrognoCIS LOGIN screen is displayed.
- Click the Tools menu at the top, and then click Compatibility View Settings.
- "Websites you've added to Compatibility View:" text box will show the added URL.
- Select the URL then click on Remove button.
- Click Close' button to save changes done
|
| |
|
|
| 5. |
Configuration Settings for Google Chrome |
| 5.1 |
Disable Popup Blockers
|
|
Check to see if the pop-up blockers are disabled in your system. Users can login to PrognoCIS with a valid user id and password. If the user is unable to login and system displays messages saying pop-up blockers has stopped a window from then pop-up blockers are disabled. Otherwise, do any of the following steps applicable to disable the pop-up blockers.
- To disable popup blocker go to settings
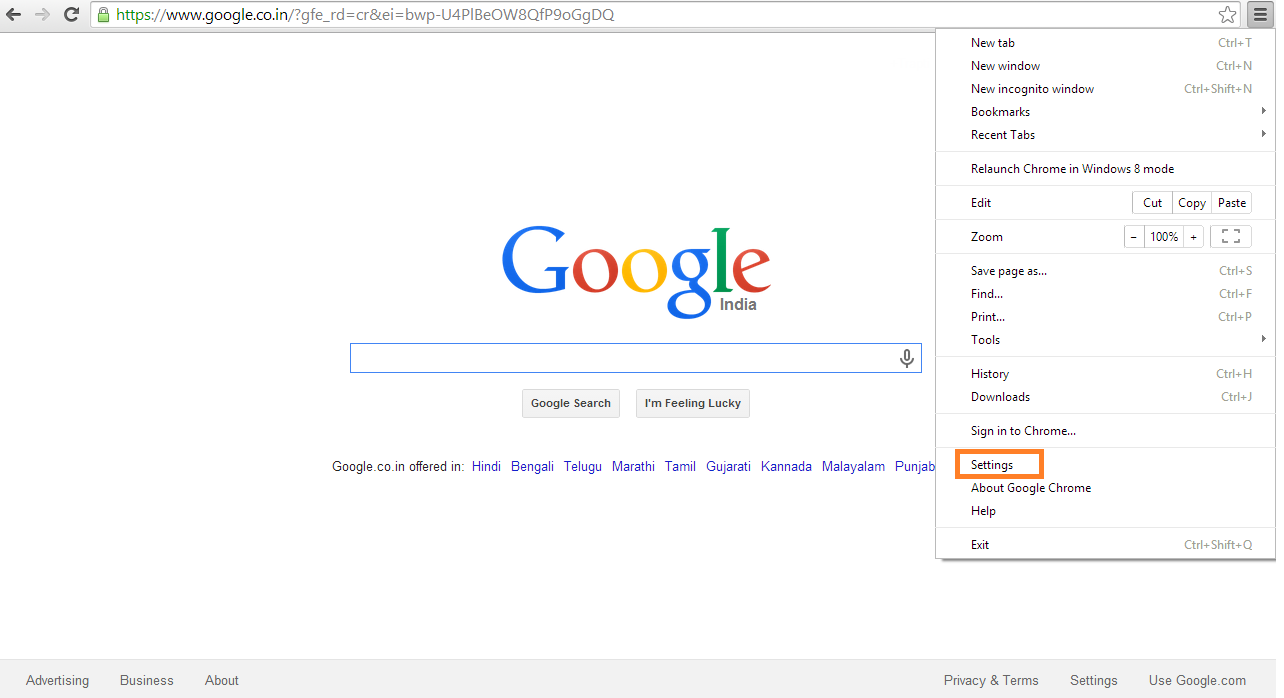
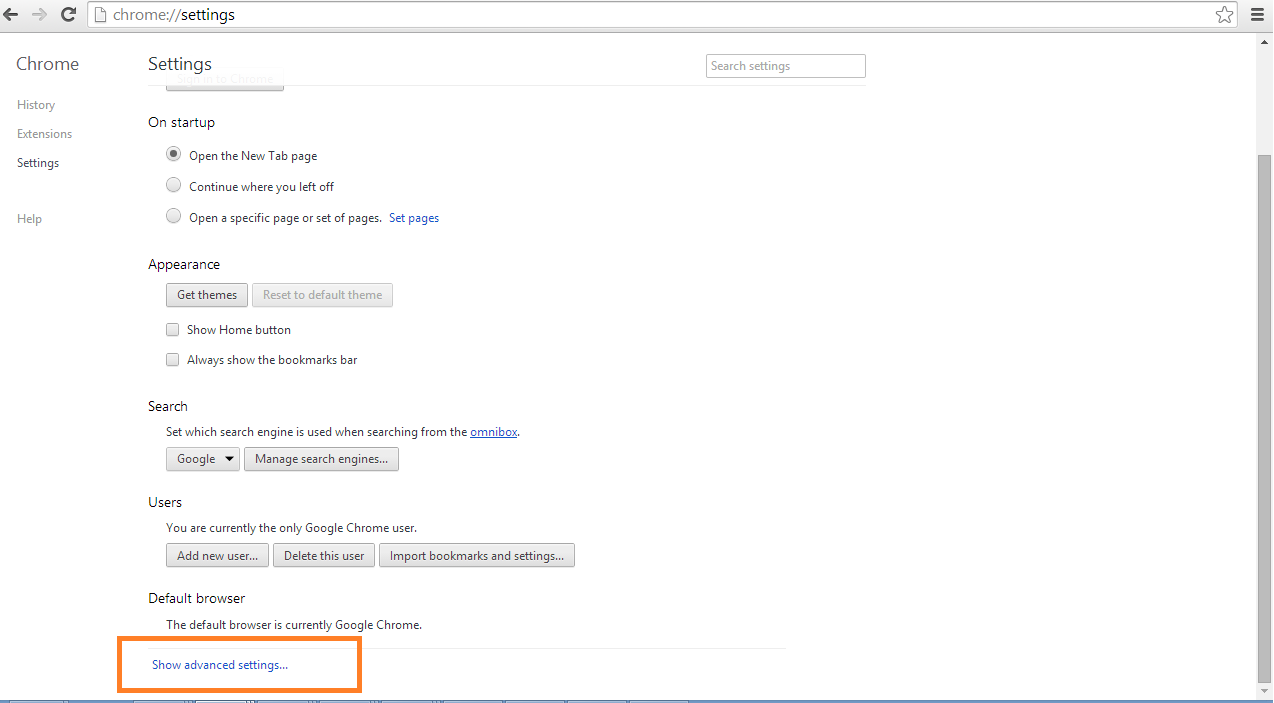
- Following page will be displayed, click on advanced settings as indicated below:
- Following page will be displayed, click on content settings as indicated below
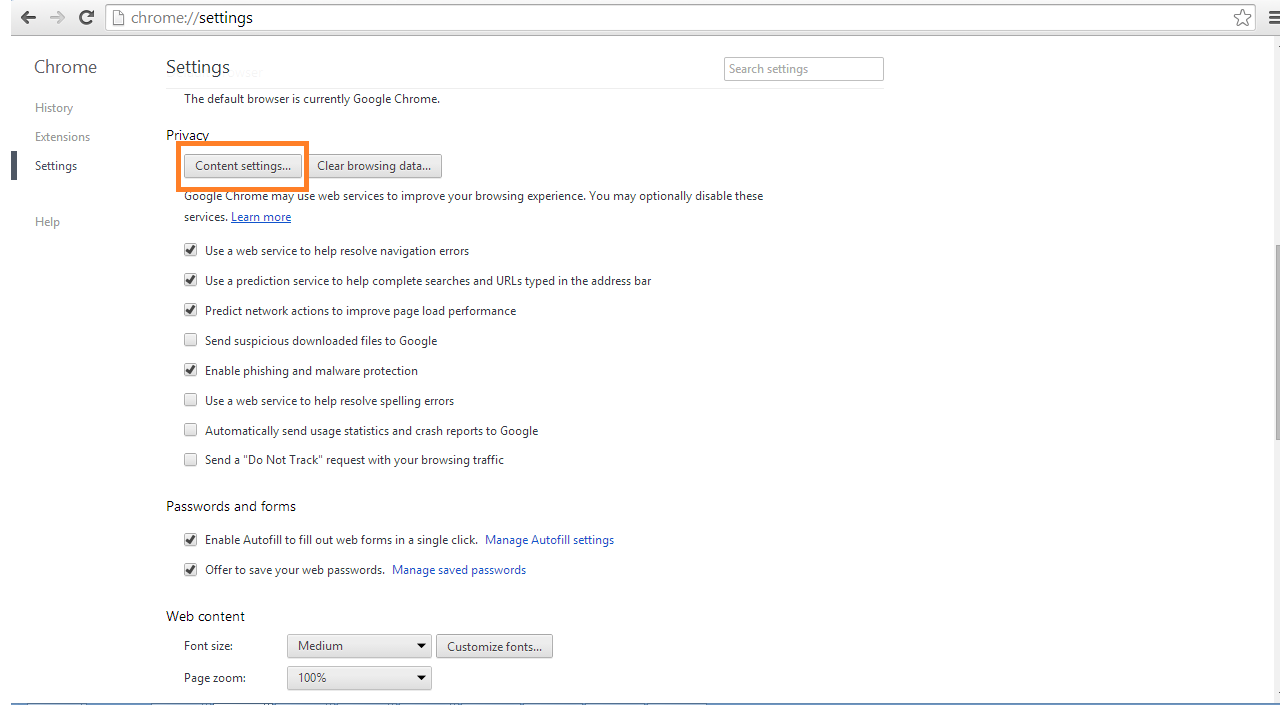
- Following page will be displayed, select Allow all sites to show pop-ups option & click on Done

| |
| |
|
|
| 6. |
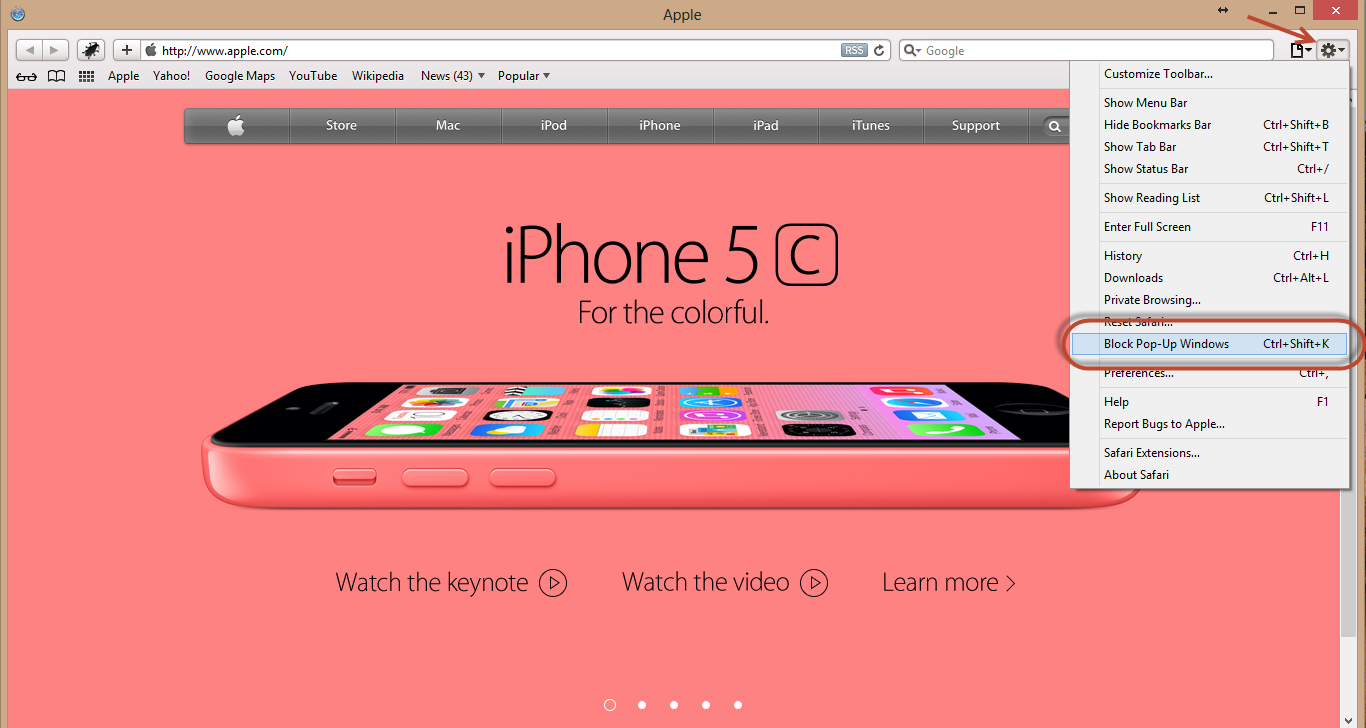
Configuration Settings for Safari on Windows Machine |
| 6.1 |
Disable Popup Blockers
|
|
Check to see if the pop-up blockers are disabled in your system. Users can login to PrognoCIS with a valid user id and password. If the user is unable to login and system displays messages saying pop-up blockers has stopped a window from then pop-up blockers are disabled. Otherwise, do any of the following steps applicable to disable the pop-up blockers.
- To disable popup blocker go to settings as shown below & click on Block Pop-up Windows option
| |
| |
|
|
| 7. |
Configuration of Safari Browser on iPAD |
| 7.1 |
Disable Popup Blockers
| |
|
Perform the following steps to disable the compatibility view for IE9:
- Open the Settings Menu.
- Tap Safari submenu.
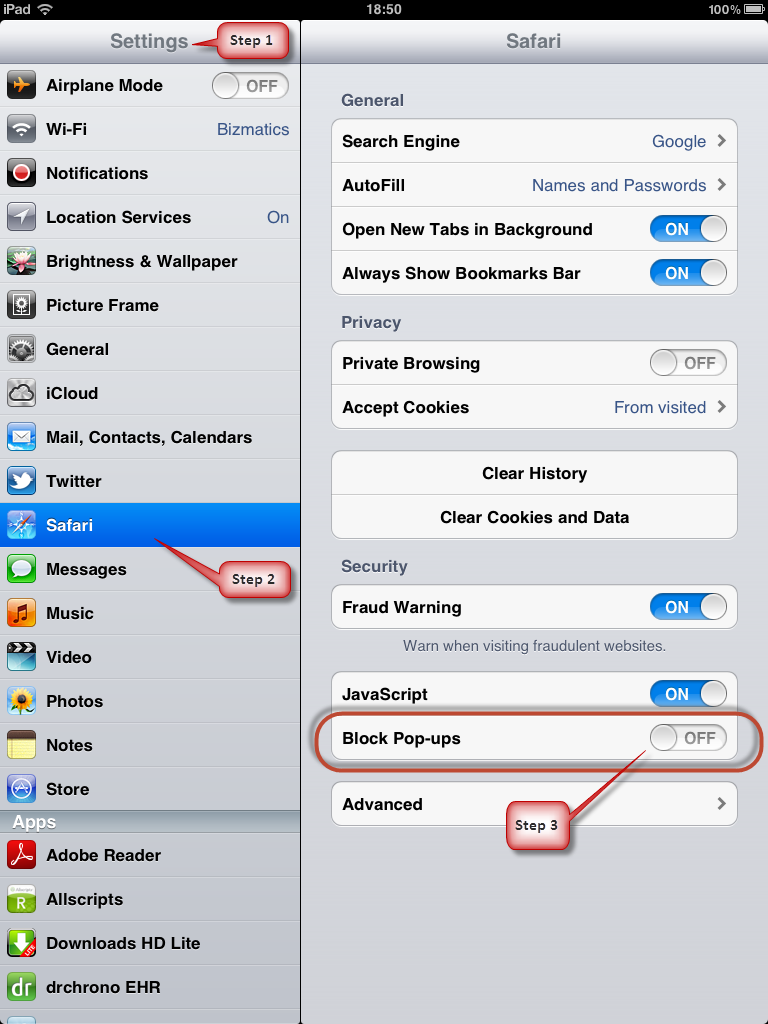
- Switch off the Block Popups option. Refer to the figure 7.1-1 for iOS versions 8.0 and above or Refer to the figure 7.1-2 for iOS versions below 8.0.
Figure 7.1-1: Settings Menu displayed on iPAD Safari of iOS versions 8.0 and above
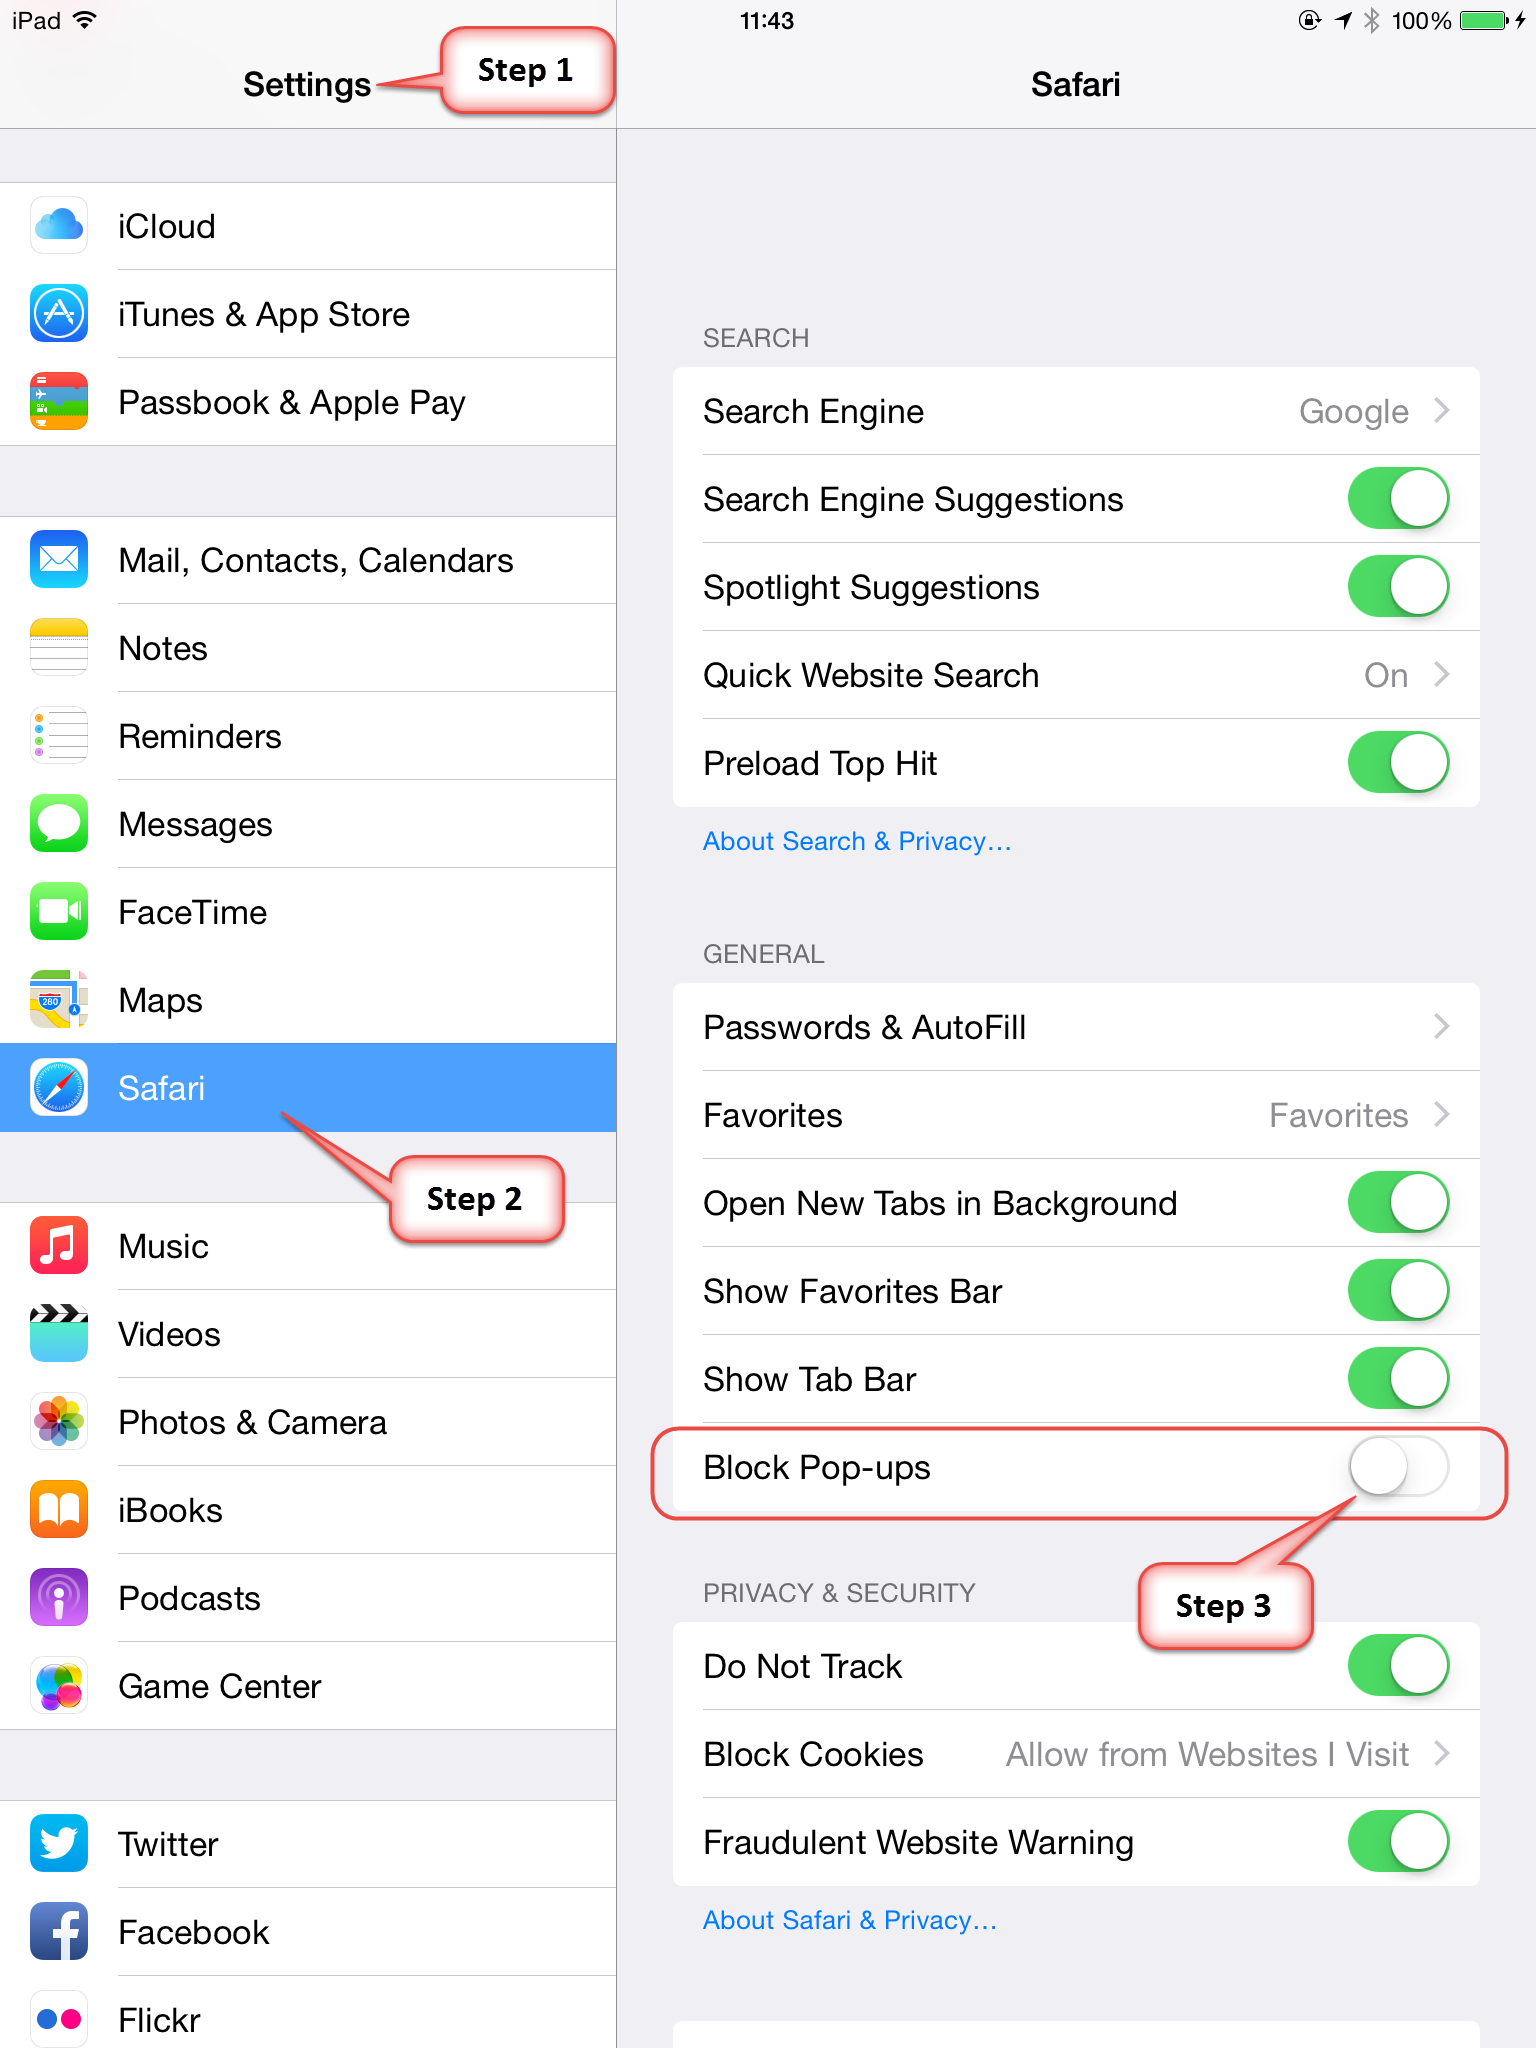
Figure 7.1-2: Settings Menu displayed on iPAD Safari of iOS versions below 8.0
- Login first time to PrognoCIS from an iPad would display the following popup. Refer to figure 7.1-3
Figure 7.1-3: Confirmation popup for permitting pop-up windows
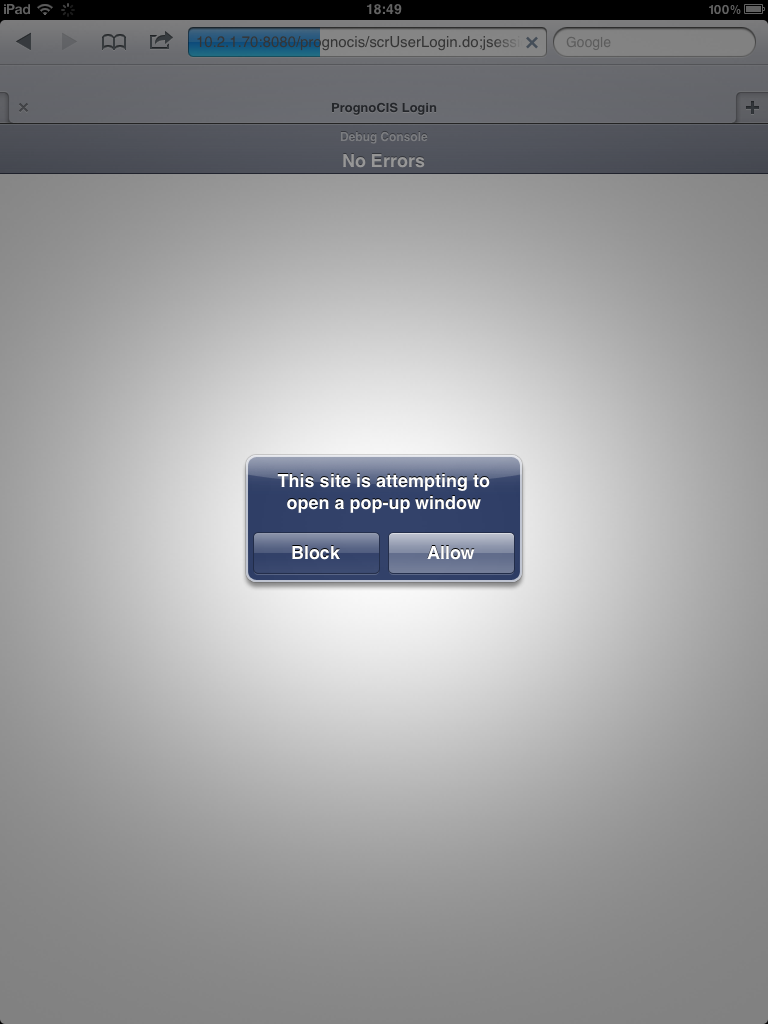
- Tap Allow to permit popup windows to be seen in PrognoCIS.
Note: PrognoCIS works well with iOS versions 8.2 and above.
| |
