Release Notes(EMR)
Version No: 3.0
Build No: 1
| 1. | Introduction | |||||||||||||||||||||||||||||||||||||||||||||||||||||||||||||||||||||||||||||||||||||||||||||
The release note describes the various new features and enhancements carried out in Version 3.0 Build 1 of PrognoCIS TM; with the specifications and UI details wherever applicable. |
||||||||||||||||||||||||||||||||||||||||||||||||||||||||||||||||||||||||||||||||||||||||||||||
| 2. | Home | |||||||||||||||||||||||||||||||||||||||||||||||||||||||||||||||||||||||||||||||||||||||||||||
| 2.1 | Home screen is represented with an icon | |||||||||||||||||||||||||||||||||||||||||||||||||||||||||||||||||||||||||||||||||||||||||||||
Home screen is now represented with a home icon: |
||||||||||||||||||||||||||||||||||||||||||||||||||||||||||||||||||||||||||||||||||||||||||||||
| 2.2 | Provision to have customized Patient Reminder List | |||||||||||||||||||||||||||||||||||||||||||||||||||||||||||||||||||||||||||||||||||||||||||||
Navigation:Click • The Patient Reminder popup has a changed UI Refer to figure 2.2-1 Figure 2.2-1: Patient Reminder popup – V3B1 in comparison with V2B12
• In the earlier versions, the lists of patient reminders displayed on Patient Reminders popup were listed on basis of different pre-defined types available in the Type drop-down list. Now, an additional type, Custom Patient Reminders is included Refer to figure 2.1. The custom patient reminder helps User to create customized Patient Reminder List. For example, List of Patient's having Diabetes or List of Patient's having hypertension. Figure 2.2-2: Pre-defined list of patient reminders 'type'
• On selection of Custom Patient Reminders type additionally two elements are displayed, i.e. Add Custom Reminder icon: Figure 2.2-3: Add and Edit Custom Patient Reminder icons along with field, ‘Selected' displayed • A click on Add Custom Reminder icon: Figure 2.2-3: Add new custom patient reminders
• Additional filters are applied from Patient Filter popup, (invoked from the button, Filter ) that allows User to select a number of criteria for further filtering the list. Refer to figure 2.2-4. To configure a filter, User selects a filter criteria then selects a comparison filter (such as greater than and equal to (>=), or less than and equal to (<=),or greater than (>),or less than (<), or equal to (=) or LIKE (similar to) or IN (in the list – the list entered are comma separated values)) and enters the value that the criteria has to compare with. For example, to display all patients who have been prescribed Tylenol, User needs to select the criteria as ‘Medication Prescribed'; Operator as ‘LIKE'; and enter the medication name (such as ‘Tylenol') in the Value field. Figure 2.2-4: Patient Filter popup
• To edit an existing patient reminder User needs to select the specific custom patient reminder from the search and once the selection is displayed on the Selected field the User needs to click on the Edit Custom Reminder icon: Figure 2.2-4: Custom Patient Reminders popup invoked via Edit Custom Reminder
• A customizable template of Custom Reminder (GoTo tab: Settings → Configuration → Email → select template, ‘Custom Reminders') has been provided. User thus has provision to make changes to the existing template of custom reminder before sending out reminders to patients. |
||||||||||||||||||||||||||||||||||||||||||||||||||||||||||||||||||||||||||||||||||||||||||||||
| 2.3 | Provision to either select or add a Room label on the Home screen Appointment tab | |||||||||||||||||||||||||||||||||||||||||||||||||||||||||||||||||||||||||||||||||||||||||||||
Navigation: Click • Depending upon the property, appointment.rooms.list a User is either provided with a predefined list of Room labels that can have multiple choices to choose from or allow User to add one entry of Room Label at a time. Refer to figure 2.3-1 Figure 2.3-1: Room popup on home screen displaying predefined list of Room Labels
• For the property value SET the Room labels as comma separated list to display as drop-down list or leave it blank to display as a text field wherein Users to enter their values.
|
||||||||||||||||||||||||||||||||||||||||||||||||||||||||||||||||||||||||||||||||||||||||||||||
| 3. | Appointment | |||||||||||||||||||||||||||||||||||||||||||||||||||||||||||||||||||||||||||||||||||||||||||||
| 3.1 | Provision to add Room No. on Patient Workflow as a predefined list | |||||||||||||||||||||||||||||||||||||||||||||||||||||||||||||||||||||||||||||||||||||||||||||
• Depending upon the property, appointment.rooms.list the Room No. field on Patient Workflow can have multiple choices to choose from or allow User to add one entry of Room Label. Refer to figure 3.1-1 Figure 3.1-1: Patient Workflow popup displaying predefined list of Room Labels
• SET the Room labels as comma separated list to display as drop-down list or leave it blank to display as a text field - for Users to enter their values.
|
||||||||||||||||||||||||||||||||||||||||||||||||||||||||||||||||||||||||||||||||||||||||||||||
| 4. | Patient - Register | |||||||||||||||||||||||||||||||||||||||||||||||||||||||||||||||||||||||||||||||||||||||||||||
| 4.1 | Provision to keep the Sex (gender) field as blank | |||||||||||||||||||||||||||||||||||||||||||||||||||||||||||||||||||||||||||||||||||||||||||||
The Sex field specifying the patient's gender can now be kept as blank. The property, patient.default.sex that determines the default gender to be displayed when kept as blank, provides an additional blank option on the Sex drop-down list specifically for the ‘add new' Registration screen when the registration information is added for the first time. |
||||||||||||||||||||||||||||||||||||||||||||||||||||||||||||||||||||||||||||||||||||||||||||||
| 4.2 | User can assign patient's primary contact as ‘No Preference' | |||||||||||||||||||||||||||||||||||||||||||||||||||||||||||||||||||||||||||||||||||||||||||||
For the times when patients do not specify any contact details then User has a provision to select the value, ‘No Preference' from the Primary Contact drop-down list. It's a newly added value in the drop-down list. |
||||||||||||||||||||||||||||||||||||||||||||||||||||||||||||||||||||||||||||||||||||||||||||||
| 4.3 | Provision to decline receiving reminders | |||||||||||||||||||||||||||||||||||||||||||||||||||||||||||||||||||||||||||||||||||||||||||||
Navigation GoTo Patient menu → Register → Address Tab A new option, Declined to Receive Reminder has been added on the Address tab. The option when selected will not display the patient's name in the Patient Reminder list. |
||||||||||||||||||||||||||||||||||||||||||||||||||||||||||||||||||||||||||||||||||||||||||||||
| 4.4 | Additional field added to capture patient's County or Parish code information | |||||||||||||||||||||||||||||||||||||||||||||||||||||||||||||||||||||||||||||||||||||||||||||
Navigation GoTo Patient menu → Register → Address Tab A new field, County/Parish Code has been added on the Address tab to capture patient's parish or county detail. |
||||||||||||||||||||||||||||||||||||||||||||||||||||||||||||||||||||||||||||||||||||||||||||||
| 4.5 | Patient's ‘Other Relation' name can now be entered in three separate fields of First Name; Middle Name; and Last Name | |||||||||||||||||||||||||||||||||||||||||||||||||||||||||||||||||||||||||||||||||||||||||||||
Navigation GoTo Patient menu → Register → Contacts tab → More button Patient Other Relation popup now has a provision to enter patient's other relation name in individual fields of First Name, Middle Name, and Last Name. |
||||||||||||||||||||||||||||||||||||||||||||||||||||||||||||||||||||||||||||||||||||||||||||||
| 4.6 | Patient Demographic related enhancement to support Meaningful Use (MU) standard | |||||||||||||||||||||||||||||||||||||||||||||||||||||||||||||||||||||||||||||||||||||||||||||
Navigation GoTo Patient menu → Register → select patient from ‘Patient Info' search OR click on ‘add new' button → Patient Registration screen → ‘Other Info' tab • Patient Demographic details such as Language, Race, Ethnic Group have been enhanced to support Meaningful Use (MU) standard. Refer to figure 4.6-1 • The Language field is now Pref. Language (Preferred Language). • The fields are now text fields provided with a search. The fields are auto-complete enabled i.e. when a User types in details the system prompts with suggestion. • Each field has a search which displays respective details to select from i.e. Ethnic Group would display Ethnic Group details to choose from. The search lists are standard Meaningful Use (MU) Lists. Figure 4.6-1: Other Info tab on Patient Register screen displaying Pref. Language, Race, and Ethnic Group fields with their respective search popup take new screenshot
• Selection of multiple races for a single patient is allowed, the Race popup has checkboxes to that effect. Refer to figure 4.6-2 Figure 4.6-2: Race popup displaying multi-select checkboxes
• The list provided for Pref. Language , Race , and Ethnic Group cannot be modified (from Group Types master). An admin User has the provision to keep them active or inactive. • All inactive preferred language, race, and ethnic groups are displayed with the text, ‘Inactive' in brackets. Refer figure 4.6-3 Figure 4.6-3: Race field displaying non-standard value being specified as ‘Inactive'
• If the Language , Race , and Ethnic Group entered by User in the previous version does not match with the standard MU list (even with respect to spelling) then these values are displayed in the current version as inactive. Also, if these details have been imported (via HL7) and do not match with the standard MU list then again these values+ are displayed as inactive. It is important to note here that Pref. Language, Race, and Ethnic Group if remain inactive then will not be considered in the MU count. All have auto complete functionality. • Tag, PT_RACE now prints multiple values of races as comma separated list. Pat. Type field now has a provision to select blank. |
||||||||||||||||||||||||||||||||||||||||||||||||||||||||||||||||||||||||||||||||||||||||||||||
| 4.7 | Additional information on Patient's vaccination now captured for Immunization Registry at the time of registration | |||||||||||||||||||||||||||||||||||||||||||||||||||||||||||||||||||||||||||||||||||||||||||||
Navigation GoTo Patient → Register → Other Info tab → click on Vaccination button → Patient Vaccination Details popup Vaccination button invokes Patient Vaccination Details popup which additionally captures details such as patient's mother Maiden (First Name and Last Name); patient's consent with respect to sending them reminder messages (Reminder Recall); and Patient's consent with regard to sharing the vaccination details by the State registry (Protection Indicator). The information captured is a MU requirement for transmission to Immunization registry. Refer to figure 4.7-1 Figure 4.7-1: Patient Vaccination popup 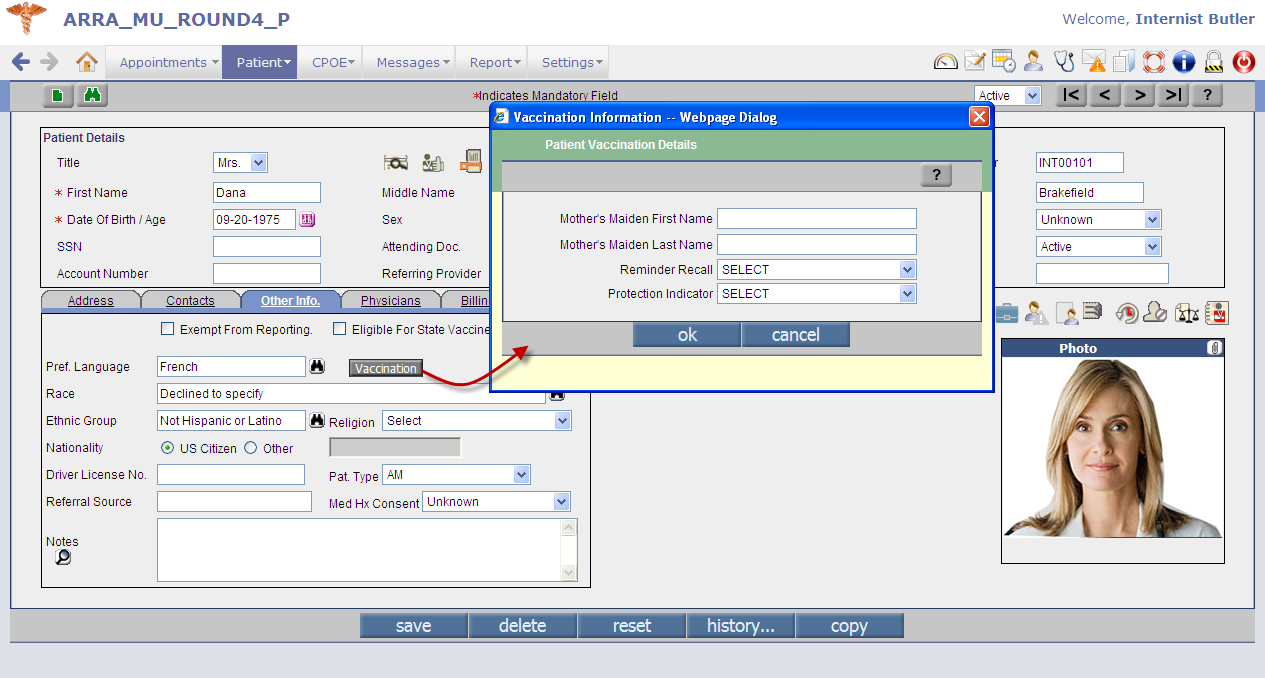 |
||||||||||||||||||||||||||||||||||||||||||||||||||||||||||||||||||||||||||||||||||||||||||||||
| 4.8 | Provision to have selective list of Providers who would be ‘allowed' access to specific patient's record | |||||||||||||||||||||||||||||||||||||||||||||||||||||||||||||||||||||||||||||||||||||||||||||
A new option, ‘Allow Access' made available that would help Users in selecting Providers who would be ‘allowed' access to a particular patient's record. Navigation GoTo Patient → Register → click on Deny/Allow Access icon: In the earlier version only the Deny Access option was available for Users to choose Providers who have to be denied access to any particular patient's records. From the current version an additional option, Allow Access has been included that allows selection of providers who have to be ‘allowed' access to any particular patient's records. Refer to figure 4.8-1 Figure 4.8-1: Deny/Allow Access popup displaying ‘Allow Access' option 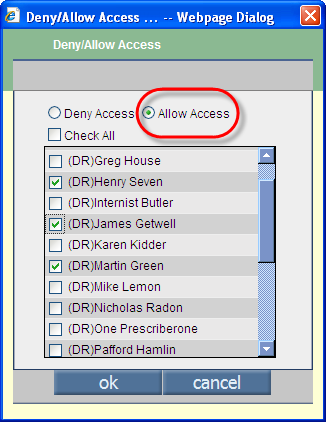 |
||||||||||||||||||||||||||||||||||||||||||||||||||||||||||||||||||||||||||||||||||||||||||||||
| 5. | Patient – Encounter | |||||||||||||||||||||||||||||||||||||||||||||||||||||||||||||||||||||||||||||||||||||||||||||
| 5.1 | Provision to choose patient's appointment at the time of starting an Encounter | |||||||||||||||||||||||||||||||||||||||||||||||||||||||||||||||||||||||||||||||||||||||||||||
Navigation GoTo patient Encounter → Encounter TOC → Start Encounter Users now have a provision to select patient's appointment at the time of starting the Encounter from the Start Encounter screen. Refer to figure 5.1-1 Figure 5.1-1: Start Encounter screen displaying the Appointment Details 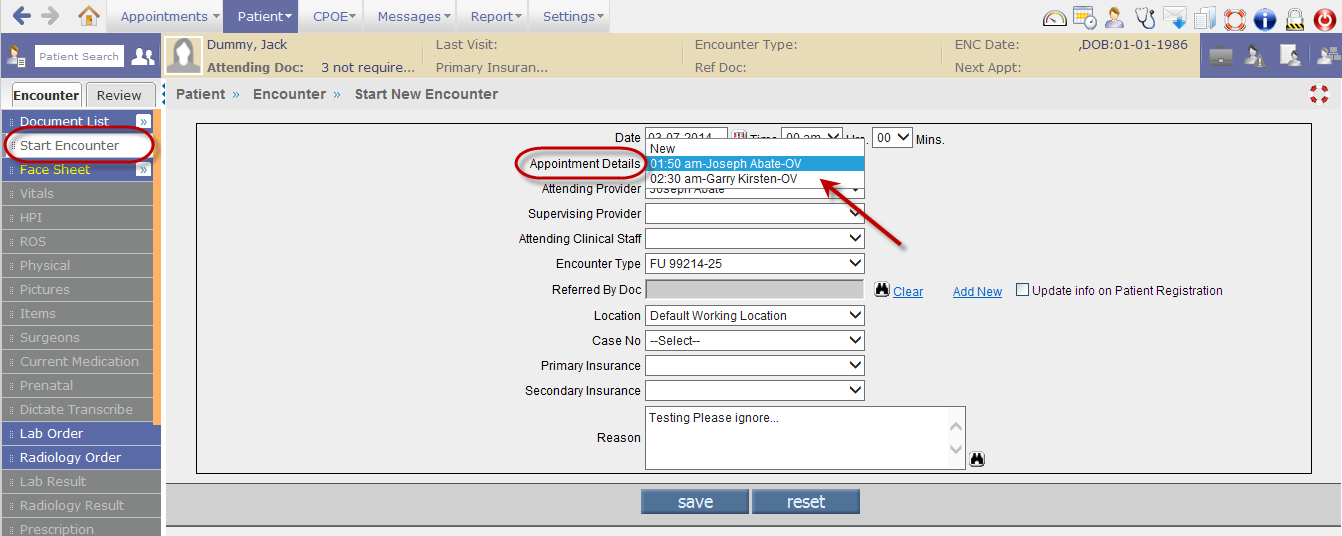
|
||||||||||||||||||||||||||||||||||||||||||||||||||||||||||||||||||||||||||||||||||||||||||||||
| 5.2 | The ‘Referred by Doc' details if changed at the time of starting an encounter then User has provision to update the details on patient registration with a single click | |||||||||||||||||||||||||||||||||||||||||||||||||||||||||||||||||||||||||||||||||||||||||||||
A User changing the Referred by Doc details from the Start Encounter screen has an option to sync the change with patient's registration details by selecting the option, ‘ Update info on Patient Registration ' on the Start Encounter screen. Refer to figure 5.2-1 Figure 5.2-1: Select the option to sync the changes in patient's registration details 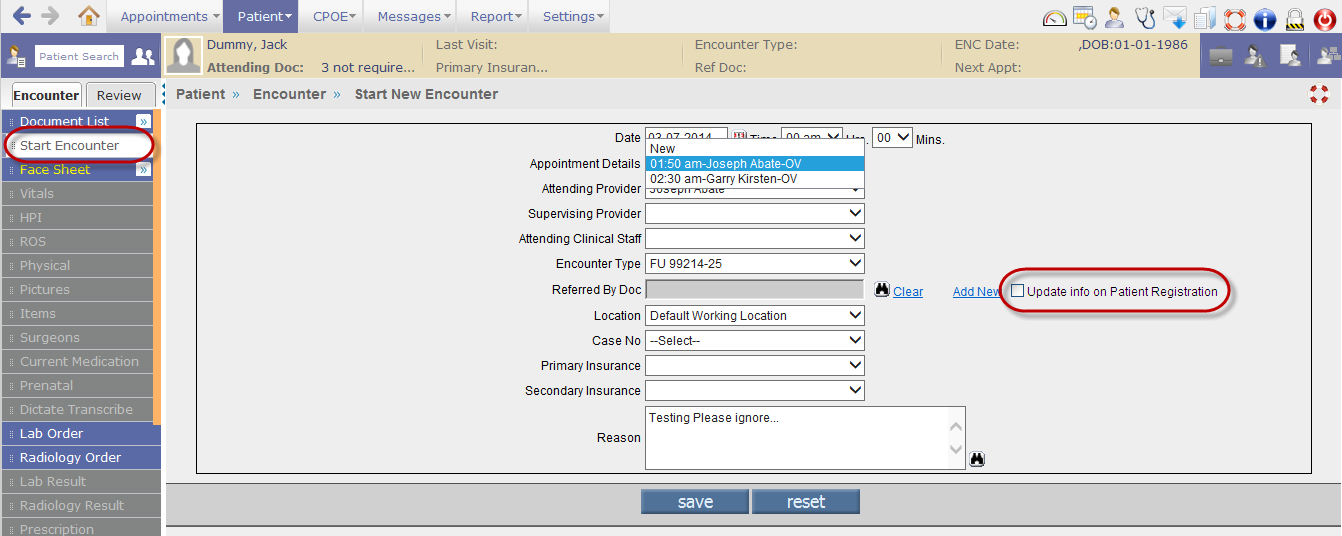 |
||||||||||||||||||||||||||||||||||||||||||||||||||||||||||||||||||||||||||||||||||||||||||||||
| 5.3 | Provision to view the list of last 10 patients whose encounters were accessed by the User | |||||||||||||||||||||||||||||||||||||||||||||||||||||||||||||||||||||||||||||||||||||||||||||
• A newly added Last Accessed Patients icon: Figure 5.1-1: User's ‘Last Accessed Patients' list displayed
• From the list when User clicks on a patient name, the system opens that particular patient's encounter. • The feature is User Login based i.e. depending upon the logged in User; the list displays the last 10 patients accessed by the User. • The patient's encounter currently being accessed by User is not part of the Last Accessed Patient list, only when the User accesses another patient's encounter will the current record become part of the list. • If a User has accessed a patient's encounter (not necessarily the same encounter) a multiple time from the Last Accessed Patients list then the patient's name is displayed ONLY once in the list (only the display sequence changes accordingly). • In the Provider Masters (GoTo Settings → Configuration → Providers (under Medics column)) a new field, Last Accessed Patient's Sequence has been added that takes in two values, RD – Ready for Doctor and LA – Last Accessed. Depending upon the values added in the field i.e. either RD or LA or both the sequence of Last Accessed Patients List is decided or displayed. For example, if the field has the value, ‘RD' then Last Accessed Patients list would display patient encounters whose appointment status is ‘Ready for Doctor'; if the field has the value, ‘LA' then the list would display, last 10 accessed patients; if the field has both the values in the sequence of ‘RD, LA' then the list would display first all encounters that are ‘Ready-for-Doc' first and then the ‘Last Accessed'; and if the field has both the values in the sequence of ‘LA, RD' then the list gives priority to ‘ Last Accessed patients' first in display. |
||||||||||||||||||||||||||||||||||||||||||||||||||||||||||||||||||||||||||||||||||||||||||||||
| 5.4 | A new patient search field with auto-complete feature added | |||||||||||||||||||||||||||||||||||||||||||||||||||||||||||||||||||||||||||||||||||||||||||||
A patient search field with auto-complete feature has been added to the Encounter UI (User Interface). The field is located next to Last Accessed Patients icon. Refer to figure 5.2-1 Figure 5.2-1: Newly added Patient search field with auto-complete functionality 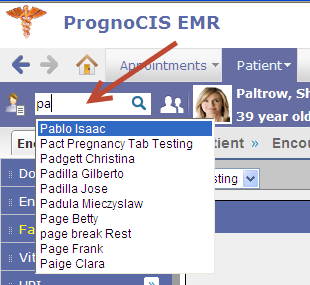 |
||||||||||||||||||||||||||||||||||||||||||||||||||||||||||||||||||||||||||||||||||||||||||||||
| 5.5 | Regular patient search binocular icon on Encounter screen is changed | |||||||||||||||||||||||||||||||||||||||||||||||||||||||||||||||||||||||||||||||||||||||||||||
Regular patient search binocular icon is now replaced with an icon: Figure 5.3-1: New Patient Search icon 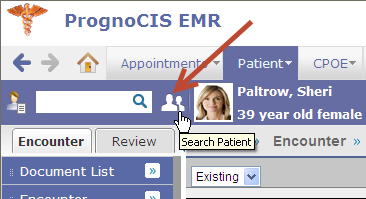 |
||||||||||||||||||||||||||||||||||||||||||||||||||||||||||||||||||||||||||||||||||||||||||||||
| 5.6 | The Encounter screen has a new look-and-feel | |||||||||||||||||||||||||||||||||||||||||||||||||||||||||||||||||||||||||||||||||||||||||||||
• Encounter screen GUI now sports a new look- and-feel. Refer to figures 5.4.1, 5.4.2 and 5.4.3 Figure 5.4-1: Face Sheet view of Open Encounter screen with the new look
Figure 5.4-2: Face Sheet view of Closed Encounter screen with the new look
Figure 5.4-3: Face Sheet Encounter screen – with few links still available in Encounter TOC and the Patient band in different shade of color (tan) in comparison with Open Encounter screen 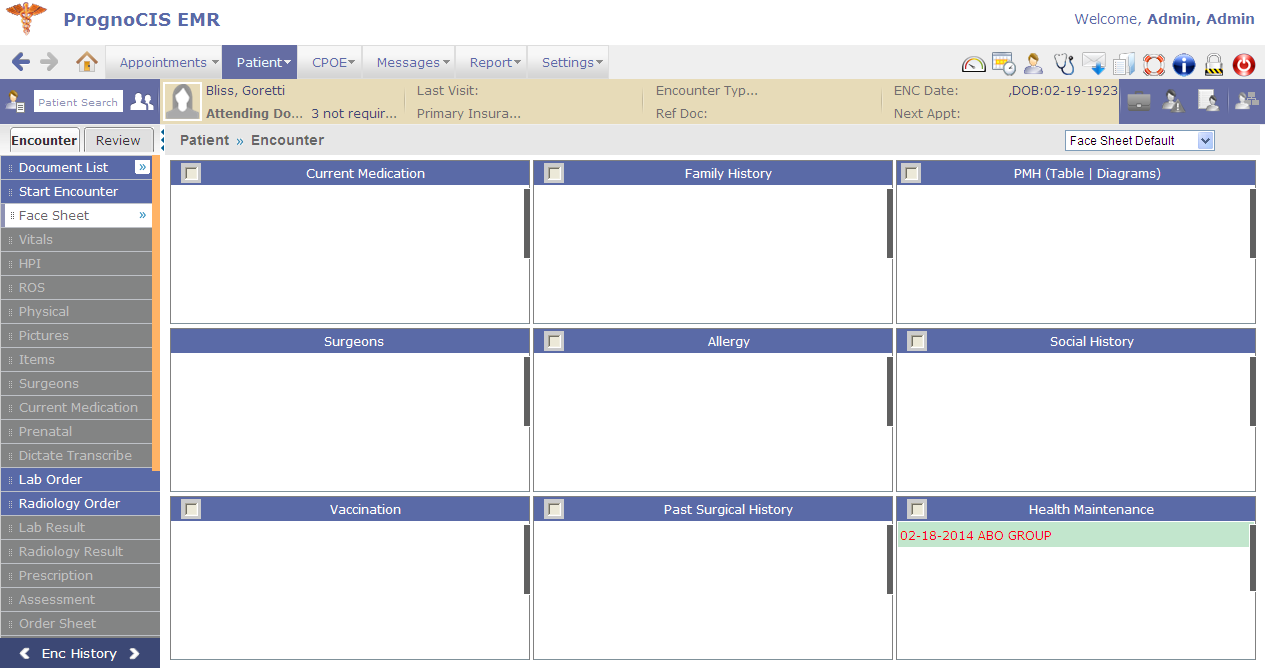 |
||||||||||||||||||||||||||||||||||||||||||||||||||||||||||||||||||||||||||||||||||||||||||||||
| 5.7 | ‘Encounter' and ‘Review' are two separate TOC defined in Encounter screen | |||||||||||||||||||||||||||||||||||||||||||||||||||||||||||||||||||||||||||||||||||||||||||||
Encounter (earlier navigated as Patient tab → Encounter) and Review (earlier navigated as Patient tab → Review) are now two individual tabs displaying contents as Encounter TOC and Review TOC respectively. Refer to figure 5.7-1 Figure 5.7-1: Newly defined Tabs displaying Encounter TOC and Review TOC 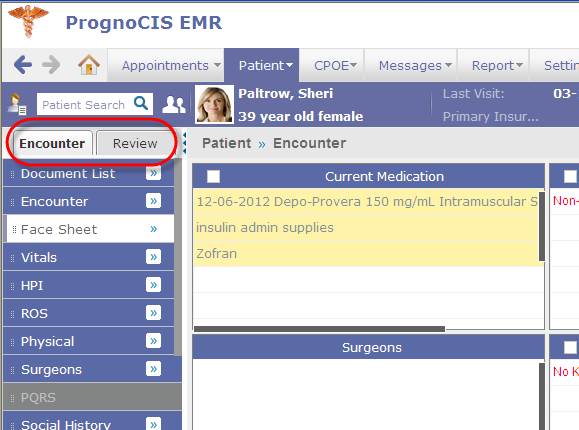 |
||||||||||||||||||||||||||||||||||||||||||||||||||||||||||||||||||||||||||||||||||||||||||||||
| 5.8 | User's navigation path trail displayed on screens of Encounter | |||||||||||||||||||||||||||||||||||||||||||||||||||||||||||||||||||||||||||||||||||||||||||||
Navigation path details (breadcrumb trail) added on every screen throughout Encounter Refer to figure 5.8-1 Figure 5.8-1: Navigation path or breadcrumb trail displayed on every encounter screen 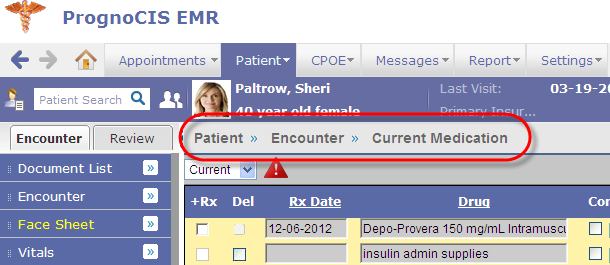 |
||||||||||||||||||||||||||||||||||||||||||||||||||||||||||||||||||||||||||||||||||||||||||||||
| 5.9 | Face Sheet available as menu with list of sub-menus | |||||||||||||||||||||||||||||||||||||||||||||||||||||||||||||||||||||||||||||||||||||||||||||
Face Sheet is now a menu on Encounter TOC displaying its sub-menus. Additionally, Face sheet menu and its sub-menus are also available as a drop-down list on the right end of the screen. Refer to figure 5.7-1 Figure 5.9-1: Face Sheet available as sub-menus on Encounter TOC and as individual drop-down lists
|
||||||||||||||||||||||||||||||||||||||||||||||||||||||||||||||||||||||||||||||||||||||||||||||
| 5.10 | ‘Check All' button used to review Face Sheet cells with a single click has a changed location and is now a checkbox | |||||||||||||||||||||||||||||||||||||||||||||||||||||||||||||||||||||||||||||||||||||||||||||
Check All checkbox is now available from a single location next to the Face Sheet drop-down list. Refer to figure 5.10-1; by selecting the Check All option User indicates that the Face sheet cells have been reviewed. Depending on the property, facesheet.navigate.all only active face sheets are displayed as submenus. Figure 5.10-1: Check All – a single select ensures selection of all the Face Sheet cells 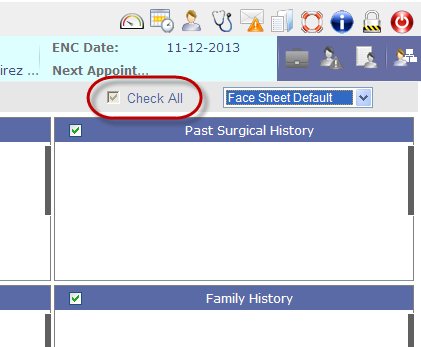 |
||||||||||||||||||||||||||||||||||||||||||||||||||||||||||||||||||||||||||||||||||||||||||||||
| 5.11 | Enhancements on Administer Vaccine popup | |||||||||||||||||||||||||||||||||||||||||||||||||||||||||||||||||||||||||||||||||||||||||||||
• Administer Vaccine popup now has a new layout. Refer to figure 5.11-1 Figure 5.11-1: Administer Vaccine popup with the old layout
Figure 5.11-2: Administer Vaccine popup with the new layout
• Unit field (applicable for each option) is now a drop-down list consisting of standard MU list with respect to the option selected. • VIS (i.e. Vaccine Information Statement) Date field is now captured as VIS Publish Date (date when VIS of the vaccine was published) and VIS Presented Date (date when VIS of the vaccine was presented to the patient). • Vaccination not associated with this visit option is now has new Immunization information source drop-down list consisting of MU standard list. Refer to figure 5.11-3 Figure 5.11-3: Immunization Information source drop-down list displaying MU standard list
• Refused by Patient option now has a new Refusal reason identifier drop-down list consisting of MU standard list. Refer to figure 5.11-4 Figure 5.11-4: Refusal reason identifier drop-down list displaying MU standard list
• Newly added Refused by Clinic option has two drop-down lists such as Disease of Presumed Immunity and Type of Evidence of Immunity (also consisting of MU defined standard list). These two drop-down lists are interdependent. Refer to figure 5.11-5 Figure 5.11-5: Type of Evidence of Immunity drop-down list displaying MU standard list
• If a combo vaccine has been added then a single entry of the vaccine is displayed. And when the combo vaccine is administered the Vaccination screen displays the entry along with all its constituents. Refer to figures 5.9-6. For the vaccine that has been administered, only the combo vaccine name remains editable and not its component or constituents. Refer to figures 5.11-6. Figure 5.11-6: Comparison of Vaccination screen when a combo vaccine is added and when it is administered
|
||||||||||||||||||||||||||||||||||||||||||||||||||||||||||||||||||||||||||||||||||||||||||||||
| 5.12 | Vaccination history now available on Vaccination screen | |||||||||||||||||||||||||||||||||||||||||||||||||||||||||||||||||||||||||||||||||||||||||||||
• Users can now benefit from viewing information on patient's history of current vaccination, a new History button is now available on the Vaccination screen displaying patient's current vaccination history with information on vaccines administered for the patient. Refer to figure 5.12-1 Figure 5.12-1: Newly available ‘history' button invoking ‘Current Vaccination History' popup
|
||||||||||||||||||||||||||||||||||||||||||||||||||||||||||||||||||||||||||||||||||||||||||||||
| 5.13 | Provision to provide patient specific education material on the basis of Problem; Medication; and Lab | |||||||||||||||||||||||||||||||||||||||||||||||||||||||||||||||||||||||||||||||||||||||||||||
|
• It is now possible to provide patients with patient specific education material on the following basis: • Problem (SNOMED code or ICD added in PMH); • Medication (Rx Norm code or NDC code added in Current Medication); and • Lab (LOINC code added on the Lab Order and Lab Result screen). • A new Patient Education icon: Figure 5.13-1: Patient Education icon as displayed on the Assessment screen
• The material displayed is sourced from Medline Plus. Refer to figure 5.13-2 • User has the option to either take print of the material and give patient print copies or send the same as email to patients. Figure 5.13-2: Patient Education popup displaying patient specific education material sourced from Medline Plus
• The email sent has a defined format that can be configured from Email Configurator screen (Settings → Configuration → Email → Patient Education Material option). • For patients who have been given the education materials, the record is seen on the Patient Education screen (GoTo Patient → Encounter → TOC → Education) on the current tab – with all options disabled. • A new column: Source has been added on the Current and Past tabs that would indicate the source of the education material was from PrognoCIS or Medline Plus. |
|||||||||||||||||||||||||||||||||||||||||||||||||||||||||||||||||||||||||||||||||||||||||||||
| 5.14 | Lab Result related enhancements | |||||||||||||||||||||||||||||||||||||||||||||||||||||||||||||||||||||||||||||||||||||||||||||
Navigation GoTo Patient menu → Encounter → TOC → Lab Result • HL7 import version is now upgraded to 2.5.1 • An HL7 link is provided on the UI, which on click invokes a popup displaying the HL7 file details. Refer to figure 5.14-1. • A Find icon: Figure 5.14-1: HL7 message popup displaying detailed segment level details of the HL7 message imported and also find icon invoking Find search popup
• Provision to import and incorporate a valid Hepatitis A B C panel and a reflex test Refer to figure 5.14-2 Figure 5.14-2: Hepatitis A B C panel with reflex tests
• Provision to import and incorporate a valid Parent-Child message for a microbiology/susceptibility culture reporting Refer to figure 5.14-3 Figure 5.14-3: Parent-Child message for a microbiology/susceptibility culture displayed
• The newly added Detail Column displays Order Test Details button: Figure 5.14-4: Lab Order Details
Figure 5.14-5: Lab result details
Table 1: Rejection code list with details
• The Normalcy Flag column is newly added that displays various normalcy codes that interpret received results such as Normal (N); HH (Upper Panic Limit) etc. Refer to table 2 for detailed list of Normalcy flags available. Table 2: Normalcy flags interpretation table
• The newly added Status Column displays individual result test status. Refer to table 3 for list of various test statuses Table 3: Normalcy flags interpretation table
|
||||||||||||||||||||||||||||||||||||||||||||||||||||||||||||||||||||||||||||||||||||||||||||||
| 5.15 | Clinical Information Reconciliation of Medication (Current Medication), Medication Allergy (Allergy), and Problem list (PMH) | |||||||||||||||||||||||||||||||||||||||||||||||||||||||||||||||||||||||||||||||||||||||||||||
• Users are now able to reconcile data (i.e. drug/allergy/problem) in a way that supports Meaningful Use. Reconciliation of data is done from their respective screens such as Current Medication, Allergy, and PMH. • A new section, Transition of Care has been introduced to select and add data before the action of reconciliation is performed. • Reconciliation is done for each list type (Medication, Medication Allergy, and Problem List) wherein provision has been made: • To view single and simultaneous display of two lists with data and their attributes, including the source and last modification date. • To create a single reconciled list each, of medications, medication allergies, and problems. • To review and validate the accuracy of the final set of data and upon User's confirmation, the list is automatically updated.Following are the changes in PrognoCIS on the screens of Current Medication, Allergy, and PMH to support or incorporate Meaningful Use.
Figure 5.15.1-1: The Old and the new Current Medication screen
• The [+] button and Medication History has now been moved from current medication section to the Transition of Care section. • New changes on the Current Medication section,
Table 4: Lists of default sources and its description
• Last Modified: displays information such as the latest modified date, time, and time zone of clinic location. • Edu: displays the Education icon: • Indication: displays diagnoses available with the prescribed drug. • Status: Displays the 'Done' status as available on CCD CCR file. • Transition of Care (TOC) section is collapsible i.e. a toggle has been provided that minimizes or maximizes the section as required. Refer to figure 5.13.1-3 and figure 5.13.1-4 Figure 5.13.1-3: TOC section in minimized or collapsible mode, the toggle icon is being highlighted
Figure 5.13.1-4: TOC section in maximized or expanded mode, the toggle icon is being highlighted
• The section consists of drugs that have been entered via the [+] button, and/or the Medication History, and/or drugs imported through CCDA files. If the CCDA file has been imported in an encounter of the patient then the details of these imported drugs is displayed on the Transition of Care section from the next encounter onwards with the ‘Source' value as CCDA by default – the value is not editable. • The Del checkbox is disabled for the Drugs imported through CCD. • The Reconciliation drop-down list by default displays value, ‘Add' for drugs added via [+] and Medication History , whereas it displays value, ‘Select' for drugs imported via CCD. • To add drugs to the patient's current medication list from Transition of Care section, User has to select the Reconciliation action as ‘Add' on the drug. To remove drugs from Transition of Care section, User has to select the Reconciliation action as ‘Remove' – this entry is not added to the current medication. If the Reconciliation drop-down list is selected as ‘Select' then the drugs remain in the Transition of Care section itself. • Once a drug has been reconciled then that entry is removed from Transition of Care section. • Following are the scenarios when Duplicate popup is displayed: • If a drug added in Transition of Care (with Reconciliation action as ‘Add') is available in patient's current medication list. The duplicate popup displays each duplicate drug entry on Save. Refer to figure 5.13.1-5 Figure 5.13.1-5: Popup displaying duplicate drug entries, the selected drug is retained while the other(s) are removed from the system
• If Transition of Care has multiple entries of the same drug (with Reconciliation action as ‘Add') then on save the duplicate popup displays each duplicate drug entry. • If Transition of Care has multiple entries of the same drug (with Reconciliation action as ‘Add') and current medication list also has same drug(s) added then on save the duplicate popup displays each duplicate drug entry.
- drug name (for example, Lisinopril) - dispensable drugs (for example, Lisinopril 20 mg oral tablet) - edited drug name (for example, Lisinopril_edited)
For example, if Current Medication has the drug, Lisinopril 5 mg oral tablet with direction as 2 Tablet Once a Day and Transition of Care section has the drug, Lisinopril 5 mg oral tablet with direction as 1 Tablet Once a Day. if User selects the drug present in Transition of Care section with 1 Tablet Once a Day then Current medication list is replaced with the drug - Lisinopril 5 mg oral tablet with direction as 1 Tablet Once a Day • A new drop-down list is available that gives the status of Transition of Care done or not done in the current encounter. Following is the list of values and its description: - Transition of Care (New Patient) – is displayed as default if the encounter started is patient's first encounter. Applicable also for a new patient who's CCDA has been imported. - No Transition of Care – is displayed as default if patient is an existing patient and there was no import of CCD. - Transition with Summary of Care – is displayed as default if any CCDA was received in the last encounter. - Transition without Summary of Care – User has to manually select the value if the patient has transitioned from a clinic without a summary of care. • A new option, No Known Transition of Care Medication is available on Current Medication section. User has to select this option if the patient has transitioned without medication. Note, selecting the option would indicate that though there are no medications to reconcile but the reconciliation action has been performed and would be considered in the MU calculations.
Figure 5.13.2-1: New Allergy screen displaying two sections
• The [+] button has now been moved from allergy section to the Transition of Care section. • Transition of Care section consists of allergies that have been entered via the [+] button, and/or allergies imported through CCD files. If the CCD file has been imported in an encounter of the patient then the details of these imported allergies are displayed on the Transition of Care section from the next encounter onwards with source as CCDA by default. • A new drop-down list with the values of ‘Existing' and ‘All' (similar to one in PMH) is added to the Allergy screen. The ‘Existing' sub-menu displays all the allergies that are currently active for the patient. The ‘All' sub-menu displays the current allergy list plus all the allergies from the past encounters up to the current encounter with statuses other than ‘Existing'. • The Del checkbox is disabled for the allergies imported through CCD. • The Reconciliation drop-down list by default displays value, ‘Add' for allergies added via [+] whereas it displays value, ‘Select' for drugs imported via CCD. • To add allergy to the patient's current allergy list from Transition of Care section, User has to select the Reconciliation action as ‘Add' on the allergy. To remove allergy from Transition of Care section, User has to select the Reconciliation action as ‘Remove' – this entry is not added to the patient's allergy list. • Once an allergy has been reconciled then that entry is removed from Transition of Care section. • Duplicate Allergies are decided upon the Type and code of Allergy.
For example, if patient already has Penicillin in the Allergy list with reaction such as diarrhea , hypersensitivity , and nausea and an entry of Penicillin in the Transition of Care section with reaction as neurotoxicity then though the allergy is the same but reaction recorded are different then Show Duplicate Allergies popup is displayed and User has to choose a single entry to be retained. Refer to figure 5.13-3 to view the popup. Figure 5.13-3: Show Duplicate Allergies pop
• Source and Last Modified date are the additional information displayed on the Transition of Care section for each allergy row. • The Source drop-down list displays various sources from where the allergy has been added. It is a mandatory field. • The following table lists out these sources and its description: Table: 5.13-1: Description of various available sources of allergies added
• Along with the No Known Drug Allergies option, a new option, No Known Transition of Care Medication Allergies has been added on Allergy section. • Last Modified field displays information such as the latest modified date, time, and time zone of clinic location.
Figure 5.13-2: PMH screen displaying two sections
• The Ailments [+] /ICD [+] button has now been moved from PMH section to the Transition of Care section. • Transition of Care section consists of problems that have been entered via the Aliments [+] button, or ICD [+] button and/or problems imported through CCD files. If the CCD file has been imported in an encounter of the patient then the details of these imported problems are displayed on the Transition of Care section from the next encounter onwards with source as CCDA by default. • The Del checkbox is disabled for the problems imported through CCD. • The Reconciliation drop-down list by default displays value, ‘Add' for problems added via Ailments [+]/ICD [+] whereas it displays value, ‘Select' for problems imported via CCD. • To add problems or ailments to the patient's current problem list from Transition of Care section, User has to select the Reconciliation action as ‘Add' on the problem. To remove problems from Transition of Care section, User has to select the Reconciliation action as ‘Remove' – this entry is not added to the patient's problem list. • Once an ailment or problem has been reconciled then that entry is removed from Transition of Care section.
- ICD - SNOMED - Ailments - Edited Ailments (i.e. Problem)
• Source and Last Modified date are the additional information displayed on the Transition of Care section for each problem or ailments row. • The Source drop-down list displays various sources from where the drug has been added. It is a mandatory field. • The following table lists out these sources and its description:
• Along with the No Known Medical History option a new option, No Known Transition of Care Problems has been added on PMH section. • Last Modified field displays information such as the latest modified date, time, and time zone of clinic location.
|
||||||||||||||||||||||||||||||||||||||||||||||||||||||||||||||||||||||||||||||||||||||||||||||
| 5.16 | Clinical Summary or MU Summary is now available as standard CCD format and is not configurable like templates | |||||||||||||||||||||||||||||||||||||||||||||||||||||||||||||||||||||||||||||||||||||||||||||
• Clinical Summary or MU Summary is now available with more information with the predefined format. • The summary is generated for current encounter - a summary of data such as Problem list, Current Medication, PMH etc. • A Clinic's MU count increments if patient's clinical summary is provided to patient or the patient's authorized representatives either by print or downloaded form or on portal. Navigation GoTo Patient menu → click Encounter → Enter Patient name → Press keyboard Enter → TOC → Click Encounter Close link →Encounter Close screen → Click MU Summary button → Clinical Summary popup Refer to figure 5.16-1 Figure 5.16-1: Patient's Clinical Summary information
• Notes available on Clinical Summary can be edited. Also, the contents within the sections or the sections itself that need not be sent can be deleted. Refer to figure 5.16-2 Figure 5.16-2: Patient's Clinical Summary information – Editable Mode
• A fresh Clinical Summary is created each time when a User clicks on Recreate button the summary created is from the latest data available for the patient encounter . Once a summary is printed or downloaded already and not recreated again then if a User prints or downloads the summary then it would display the details of the last recreate thus to get the latest or updated details, User has to click on Recreate button. • Clinical summary is sent to patient portal and is displayed on the Past Visits screen on My Health Record tab on the patient portal. Refer to figure 5.16-2. The portal button remains disabled if the clinic does not have the patient portal turned ON. Figure 5.16-2: Patient's health record displaying Clinical Summary button
• Each time that a clinical summary is either printed or exported an entry is registered on the CCD/CCR screen found on Review tab (GoTo patient Encounter → Review Tab). • In a scenario if a patient refuses clinical summary offered by a Provider then the Provider has an option to mark it at the time of closing the patient's encounter from the option Patient Declined MU Summary provided on the Encounter Close screen, doing so ensures the Provider getting the incentives of Meaningful Use. Refer to figure 5.16-3 Figure 5.16-3: ‘Patient Declined MU Summary' option displayed on Encounter Close screen
|
||||||||||||||||||||||||||||||||||||||||||||||||||||||||||||||||||||||||||||||||||||||||||||||
| 5.17 | Provision to allow electronic sending of Lab Order with tests of different temperature types | |||||||||||||||||||||||||||||||||||||||||||||||||||||||||||||||||||||||||||||||||||||||||||||
• At times a single Lab Order may consist of tests with different temperature types and certain Laboratories prefer to receive them as individual orders. In the earlier version, User was required to manually create these tests individually. Now, from the current version the system would automatically split and create the individual orders from a single order and User has to just eSend them individually. • Before the system proceeds to split the single Lab Order a prompt is displayed to the User to inform and ask User's discretion. Refer to figure 5.17-1 Navigation GoTo patient Encounter → TOC → Lab Order Figure 5.17-1: Alert displayed plus notice the single order consisting three tests of different temperature types • The individual Lab Order created after splitting of the single Lab Order has the naming convention such that the Lab Order number remains the same ending with suffices such as ‘A', ‘B', and ‘C'. Refer to figure 5.17-2 Figure 5.17-2: Search displaying three different Lab Orders split from a single order
Figure 5.17-3: Example of individual lab order created with relevant suffix and the eSend button highlighted
• The Tests Search popup when viewed for ‘Any Lab' Lab is different than the Tests search when viewed for any other value of Lab. Refer to figure 5.17-4 Figure 5.17-4: • The Lab test saved displays the Lab test name; its LOINC code; and the temperature type. Refer to figure 5.17-5 Figure 5.17-5: Tool tip displaying the lab test name along with its LOINC code and temperature type details 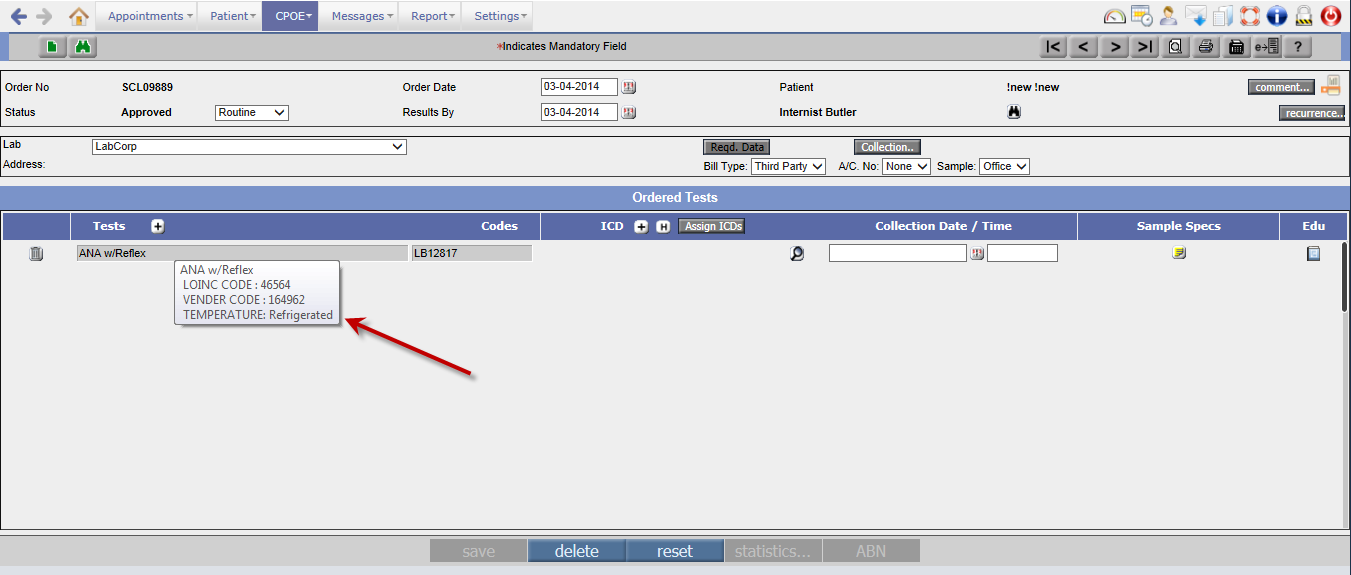 |
||||||||||||||||||||||||||||||||||||||||||||||||||||||||||||||||||||||||||||||||||||||||||||||
| 5.18 | The text on ‘Default tab' and ‘My Notes' tab on Progress Notes are now searchabl | |||||||||||||||||||||||||||||||||||||||||||||||||||||||||||||||||||||||||||||||||||||||||||||
Navigation : GoTo Patient Menu → Click Encounter → Enter patient related info in the search popup → Click on the Patient Name → TOC → Progress Notes i. On Default tab, a new Find icon: Figure 5.18-1: Find popup has provision to display the text one instance at a time or all the occurring instances together
ii. On My Notes tab, a new Find Replace icon: Figure 5.18-2: Find and Replace popup
|
||||||||||||||||||||||||||||||||||||||||||||||||||||||||||||||||||||||||||||||||||||||||||||||
| 5.19 | Enhancements on Family History screen | |||||||||||||||||||||||||||||||||||||||||||||||||||||||||||||||||||||||||||||||||||||||||||||
• The UI (User Interface) has changed – additionally a new pane on the right-hand side of the screen is displayed; depending upon the property, facesheet.familyhistory.byrelation the List of Problems OR Relation is displayed in the right pane. Refer to figure 5.19-1 Figure 5.19-1: UI change of Family History screen
• The default or the standard list available on the right hand pane has SNOMED codes displayed. The associated SNOMED codes to the list in the center pane have the codes displayed on its tooltip. • The Problem [+] search and the Relation [+] search displays the associated SNOMED code in a separate column. Refer to figure 5.19-2 Figure 5.19-2: Example Relation search displaying standard relations associated with SNOMED codes whereas user defined relations do not have any
• There is provision to add User defined Problem or Relation apart from the ones present in the list and the added problem or relation is not added to the Master's List. The field remains editable. And the added Problem or Relation is applicable only to the selected patient. • Provision to enter Comments or Notes is given. |
||||||||||||||||||||||||||||||||||||||||||||||||||||||||||||||||||||||||||||||||||||||||||||||
| 5.20 | SNOMED selection is now available in PrognoCIS | |||||||||||||||||||||||||||||||||||||||||||||||||||||||||||||||||||||||||||||||||||||||||||||
• SNOMED-CT is an acronym for S ystematized No menclature of Med icine – C linical T erminology. It is recognized throughout the US and internationally. Using SNOMED-CT enables providers and E lectronic M edical R ecords (EMR) to communicate in a common language, thus increasing the quality of patient care across many different provider specialties. It is structured into “hierarchies” – 19 of them -- which further define the clinical concept. These hierarchies are then broken down into increasing granularity, resulting in very specific clinical concepts to define a patient's condition. • In PrognoCIS on the Assessment screen, an IMO (Intelligent Medical Object) search is invoked listing out various Problem Codes and its description. At a glance, a User sees the mapping of these problem codes with their respective ICD9, SNOMED, ICD10 codes. Refer to figure 5.20-1 Figure 5.20-1: Columns displaying ICD 9 codes, SNOMED codes and ICD10 codes
• There are two different sets of SNOMED codes provided on the Problem codes search popup, the SNOMED (International) and SNOMED (US). The SNOMED code when selected is then displayed as a tooltip on the Description column along with its ICD 10 code. Refer to figure 5.20-2 Figure 5.20-2: Problem search popup displaying options for ICD 10 code; and SNOMED (International) and SNOMED (US)
• On the CPT/HCPC tab, the CPT/HCPC search is displayed which in turn makes a call to the IMO search thus the respective SNOMED code is displayed at tooltip. Refer to figure 5.20-3 Figure 5.20-3: CPT/HCPC tab displaying IMO search
• On the Goals tab, a SNOMED search is invoked. Refer to figure 5.20-4 Figure 5.20-4: Goals tab invoking SNOMED search
|
||||||||||||||||||||||||||||||||||||||||||||||||||||||||||||||||||||||||||||||||||||||||||||||
| 5.21 | Provision to accommodate goals set by Provider for the patient | |||||||||||||||||||||||||||||||||||||||||||||||||||||||||||||||||||||||||||||||||||||||||||||
Navigation : GoTo patient Encounter → TOC → Assessment • A Provider now has a provision to provide goal-oriented patient care. On the Assessment screen, Goals tab provides a SNOMED search wherein User has provision to search goals based on description or code. Refer to figure 5.21-1 Figure 5.21-1: Goal search of Weight loss being performed by the User
• A direct access to the Doctor forms is available on the Goals tab. Refer to figure 5.21-2 Figure 5.21-2: The Form button when clicked gives direct access to the Doctor forms
|
||||||||||||||||||||||||||||||||||||||||||||||||||||||||||||||||||||||||||||||||||||||||||||||
| 5.22 | Provision to add and delete preferred codes on Assessment | |||||||||||||||||||||||||||||||||||||||||||||||||||||||||||||||||||||||||||||||||||||||||||||
Navigation : GoTo Patient Menu → Click Encounter → Enter patient related info in the search popup → Click on the Patient Name → TOC → Assessment User has provision to add and delete Problem codes from User's preferred list with a single click. Delete preferred code: On the Preferred tab, on each row a delete icon: Figure 5.22-1: Select respective code and then click to remove from the preferred list
Add to preferred: On the All tab, on each row an add icon:
|
||||||||||||||||||||||||||||||||||||||||||||||||||||||||||||||||||||||||||||||||||||||||||||||
| 5.23 | Provision to add custom codes to the already existing Problem codes | |||||||||||||||||||||||||||||||||||||||||||||||||||||||||||||||||||||||||||||||||||||||||||||
A new tab: Custom has been provided on the Problem codes search to facilitate Users to add customized codes. A separate search is provided to list out all the existing custom created codes. Refer to figure |
||||||||||||||||||||||||||||||||||||||||||||||||||||||||||||||||||||||||||||||||||||||||||||||
| 5.24 | Progress Note and Doctor Form can be viewed on Assessment screen | |||||||||||||||||||||||||||||||||||||||||||||||||||||||||||||||||||||||||||||||||||||||||||||
Navigation : GoTo patient Encounter → TOC → Assessment screen • A newly added property, assessment.encnotes.template when set with a progress notes template name then on the Assessment screen a new button: Note… is displayed. On click, the Note… button invokes a popup that displays Encounter Progress Notes for the User's reference. • A newly added property, assessment.doctorform.code when set with a Doctor Form code then on the Assessment screen a new button: Form… is displayed. On click, the Form… button invokes a popup that displays the Doctor Form whose code is set in the property for the User's reference. The Doctor Form displayed is editable. |
||||||||||||||||||||||||||||||||||||||||||||||||||||||||||||||||||||||||||||||||||||||||||||||
| 6. | Patient – Letters-Out | |||||||||||||||||||||||||||||||||||||||||||||||||||||||||||||||||||||||||||||||||||||||||||||
| 6.1 | The text entered on ‘Letters-Out' screen is now searchable |
|||||||||||||||||||||||||||||||||||||||||||||||||||||||||||||||||||||||||||||||||||||||||||||
The Find and Replace icon: |
||||||||||||||||||||||||||||||||||||||||||||||||||||||||||||||||||||||||||||||||||||||||||||||
| 6.2 | Summary of Care |
|||||||||||||||||||||||||||||||||||||||||||||||||||||||||||||||||||||||||||||||||||||||||||||
Navigation GoTo tab: Patient à Letters-Out • When a patient is transitioning to a different Provider in another Clinic then the Summary of Care of the Patient is created and transmitted. The Summary of Care consists of P atient H ealth I nformation (PHI) attached in a form of CCD ( C ontinuity of C are D ocument). • When N2N is enabled, the DocView popup (invoked via the Attach button) displays the CCD files, the last encounter details are generated as ‘New CCD'. The new CCD attached displays the tooltip, ‘New Continuity of Care (CCD)' on the DocView popup. Refer to figure 6.2-1 Figure 6.2-1:
• CCD selected is attached in two formats, XML and HTML. The view of both files is in readable format as the XML file when viewed is translated to HTML - a readable form, but is sent as a proper XML file. A pair of CCD XML and CCD HTML is given for better understanding and better reach of the information. Refer to figure 6.2-2 Figure 6.2-2:
• The TOC option when selected indicates transition of care being given in the current encounter and the patient is being referred to different Provider via Surescript Secured Network (N2N). Refer to figure 6.2-2 • Summary of Care is either sent as a print, downloaded (in encrypted form), and/or sent as N2N mail i.e. Surescript secured email; a new icon: • Following patient details are sent as Summary of Care from PrognoCIS (Face Sheet) in addition to relevant patient and associated care team information and document details: • Problems • Allergies, Adverse Reactions, Alerts • Results • Medication • Procedures • Vital Signs • Immunization • Social History • Plan of Care • Functional and Cognitive Status Encounter Diagnosis |
||||||||||||||||||||||||||||||||||||||||||||||||||||||||||||||||||||||||||||||||||||||||||||||
| 7. |
CPOE |
|||||||||||||||||||||||||||||||||||||||||||||||||||||||||||||||||||||||||||||||||||||||||||||
| 7.1 | Radiology results can now also be labeled as Image or Narrative | |||||||||||||||||||||||||||||||||||||||||||||||||||||||||||||||||||||||||||||||||||||||||||||
Navigation: GoTo CPOE tab → Radiology Result → Attach tab → click on attach button OR GoTo Patient tab → Encounter → TOC → Radiology Result → Attach tab à click on attach button • The attach button on click invokes File Upload popup. The attached images of Radiology are defined with type such as Images, or Narrative, or Images and Narrative. Refer to figure 7.2-1 Figure 7.2-1: Radiology Attachments popup displaying the details of Type drop-down list
• To attach images individually to specific test, User needs to select the test name from the Result drop-down list Refer to figure 7.2-2 ; image attached individually to a test is viewed from the Result tab. Refer to figure 7.2-3 Figure 7.2-2: Result field displaying various tests associated to the result as options including ALL option
Figure 7.2-3: Images attached to individual test is available on the Result tab (via attach button) and the number displaying next to the attach button indicates the number of images attached
• To attach an image to the result as a common attachment and not specific to a single test then User needs to select the value ‘ALL' from the Result drop-down list; the attached image is then viewed on Attach tab itself. Refer to figure 7.2-3 Figure 7.2-2: Results drop-down list displaying various tests to which results could be attached
• Multiple attachments attached are viewed from individual tabs along with their type information. Refer to figure 7.2-3 Figure 7.2-3: Individual tabs incase of multiple attachments along with their type information displayed
• Click on Zoom button displays the magnified version of the attachment in a separate popup. Refer to figure 7.2-4 Figure 7.2-4: Zoom button invokes the magnified version of the displaying attachment
• On click on Delete button the attachment is deleted.
|
||||||||||||||||||||||||||||||||||||||||||||||||||||||||||||||||||||||||||||||||||||||||||||||
| 8. | Messages | |||||||||||||||||||||||||||||||||||||||||||||||||||||||||||||||||||||||||||||||||||||||||||||
| 8.1 | Amendment | |||||||||||||||||||||||||||||||||||||||||||||||||||||||||||||||||||||||||||||||||||||||||||||
Navigation GoTo Messages tab → Amendment • At times, patients call up Clinic requesting for certain amendments to be done to their medical records. Whenever such an amendment request arrives, it is important to keep a track of the request and the subsequent changes done by any Clinic personnel to the patient's medical record. • PrognoCIS now has a new popup called Patient Amendment for logging and tracing the entire sequence of events done for amending a patient record. • Patient Amendment popup is similar to Message Compose screen. Refer to figure 8.1-1 Figure 8.1-1: Patient Amendment popup
Figure 8.1-2: Patient Amendment popup displaying the ‘Search' icon and ‘Add' icon
Figure 8.1-3: Patient Amendments link on TOC Review displaying amendment records
|
||||||||||||||||||||||||||||||||||||||||||||||||||||||||||||||||||||||||||||||||||||||||||||||
| 8.2 | Provision to add new Attach categories directly from the Attach and Scan screen |
|||||||||||||||||||||||||||||||||||||||||||||||||||||||||||||||||||||||||||||||||||||||||||||
I. Attach Navigation: GoTo Messages tab à Attach Refer to figure 8.2-1 Figure 8.2-1: Attach screen displaying newly added ‘Add Category' button
• A provision has been made to add a new category for Attach directly from the Attach screen. Refer to figure 8.2-1 a click on the [+] button invokes Add Category popup; earlier to add a new category to the list displaying in the Category drop-down list User had to do it from the Group Types screen ( GoTo tab: Settings à→ Configuration → Group Types ). • Also, note that the list in the Category drop-down list changes according to the attach type selected from the Attach drop-down list. • II. Scan Navigation GoTo Messages tab à Scan • Similar to Attach, a provision has been made to add a new category for Scan directly from the Scan screen. A click on the [+] button invokes Add Category popup. Refer to figure 8.2-2 Figure 8.2-2: Scan screen displaying newly added ‘Add Category' button 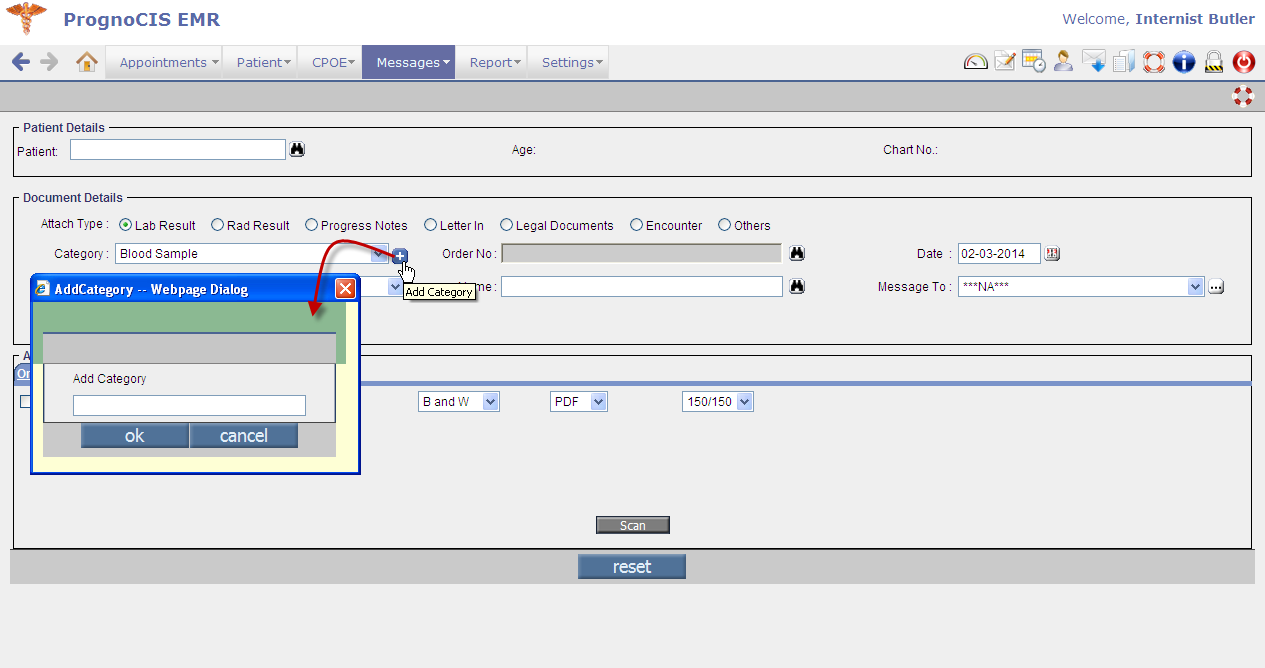 |
||||||||||||||||||||||||||||||||||||||||||||||||||||||||||||||||||||||||||||||||||||||||||||||
| 9. | Report | |||||||||||||||||||||||||||||||||||||||||||||||||||||||||||||||||||||||||||||||||||||||||||||
| 9.1 | MU reports are found under a new sub-menu, Meaningful Use | |||||||||||||||||||||||||||||||||||||||||||||||||||||||||||||||||||||||||||||||||||||||||||||
|
Navigation GoTo Report Menu → Meaningful Use (new sub-menu) • A new sub-menu, Meaningful Use has been included in the Report menu. Refer to figure 9.1-1 Figure 9.1-1: Newly added ‘Meaningful Use' sub-menu displayed
|
||||||||||||||||||||||||||||||||||||||||||||||||||||||||||||||||||||||||||||||||||||||||||||||
| 9.2 | Audit Trail now supports six new actions | |||||||||||||||||||||||||||||||||||||||||||||||||||||||||||||||||||||||||||||||||||||||||||||
Navigation GoTo Report Menu → Audit Trail • Audit Trail sub-menu now additionally supports six new actions as follows, Refer to figure 9.2-1 i. Copy – to view audit trail record of copied patient ii. Query – to view audit trail record of searched patients. iii. Print – applicable for Lab, Radiology, Progress Note, Prescription. iv. Fax – applicable for Lab, Radiology, Progress Note, Prescription. v. Email - to view audit trail record of users to whom email were sent. vi. Esend - to view audit trail record of electronically sent Lab/Rad/Rx. Figure 9.2-1: Newly provided actions on Audit Trail Report popup
• Audit records that have been tampered with from the backend is highlighted with an asterisk (*) in red. Refer to figure 9.2-2 Figure 9.2-2: Record tampered from the backend is being highlighted with red asterisk  |
||||||||||||||||||||||||||||||||||||||||||||||||||||||||||||||||||||||||||||||||||||||||||||||
| 10. | Settings |
|||||||||||||||||||||||||||||||||||||||||||||||||||||||||||||||||||||||||||||||||||||||||||||
| 10.1 | Data Portability | |||||||||||||||||||||||||||||||||||||||||||||||||||||||||||||||||||||||||||||||||||||||||||||
• Support available for Data Portability i.e. patient's summary export to facilitate a Provider's transition from one EMR to another. Navigation GoTo Settings Menu → Configuration → Data Portability (under column: Clinic) • Data portability is based on the following: • Patient's name – multiple selections are allowed; • Medics (i.e. Primary doctor) name – all patients associated to the primary doctor will be selected; • Encounter date range – with the option to select a particular medic or else by default ALL medics is selected. Refer to figure 10.1-1 Figure 10.1-1:
• Following message viewed by the User indicates that the process is running in the background and the User will be notified once the file is generated. Refer to figure 10.1-2 Figure 10.1-2:
• After file generation a message is sent to the logged in User (Messages à In) with the subject, “Background process complete: Data export completed”. On click on Zoom icon, a Save As popup is displayed which allows user to save the file copy in zip format. Each folder contained in the zip folder represents each patient's information. • The Data Portability message is sent only if the event supported property is set with the value 212 (GoTo Settings → Configuration → Properties → event.supported = 212).
|
||||||||||||||||||||||||||||||||||||||||||||||||||||||||||||||||||||||||||||||||||||||||||||||
| 10.2 | Provision to enter Code and Name of unspecified formulation for vaccine | |||||||||||||||||||||||||||||||||||||||||||||||||||||||||||||||||||||||||||||||||||||||||||||
User has provision to enter code and name of unspecified formulation for the vaccine. Navigation GoTo Settings → Configuration → Vaccine (under Codes/Drugs column) à Unspecified Formulation Refer to figure 10.2-1 Figure 10.2-1: The Vaccine Master screen displaying fields to enter code and name of the unspecified formulation 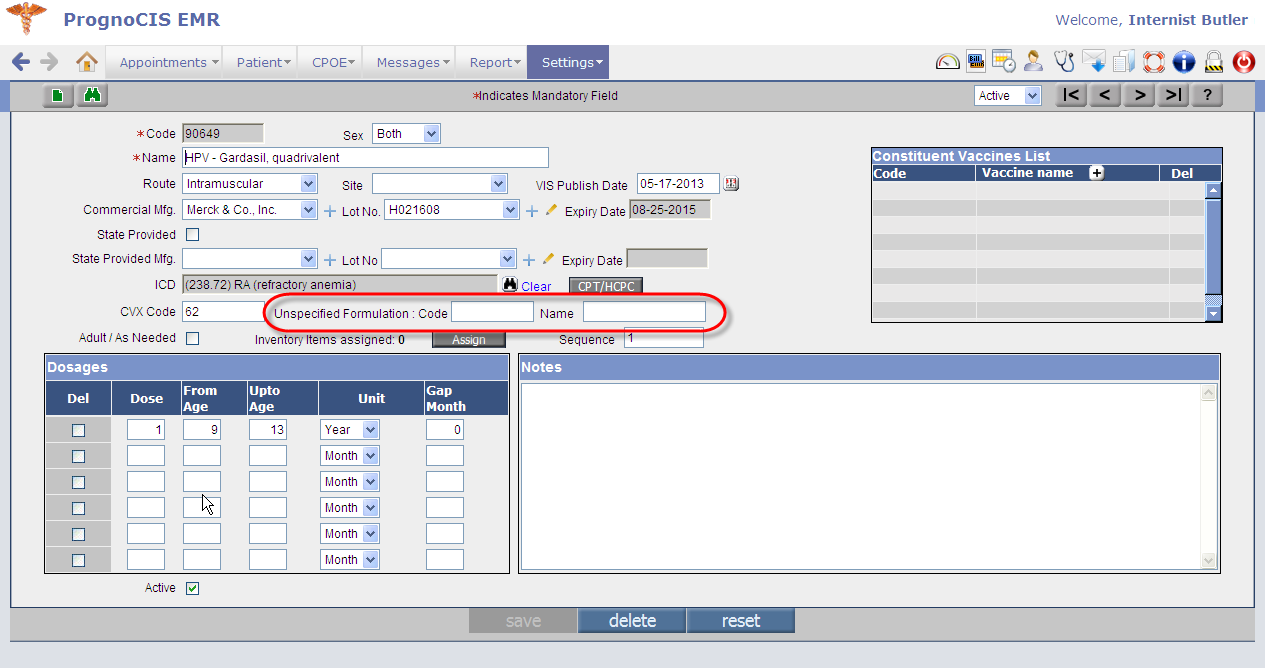 |
||||||||||||||||||||||||||||||||||||||||||||||||||||||||||||||||||||||||||||||||||||||||||||||
| 10.3 | Additional categories in Education Master | |||||||||||||||||||||||||||||||||||||||||||||||||||||||||||||||||||||||||||||||||||||||||||||
• On Education Master (GoTo Settings → Configuration → Education) the Category drop-down list now has three new values such as Drug ; Lab Test Result ; and Problem SNOMED code (for PMH). Refer to figure 10.3-1 Figure 10.3-1: Category drop-down list displaying newly added Education material categories
• For category such as Lab Test Result there are individual materials available for individual results of ‘Normal Range', ‘Above Normal Range' and ‘Below Normal Range'. Refer to figure 10.3-2 Figure 10.3-2: Category – Lab Test Result when selected provides results option on granular level
|
||||||||||||||||||||||||||||||||||||||||||||||||||||||||||||||||||||||||||||||||||||||||||||||
| 10.4 | Enhancements related to Expressions | |||||||||||||||||||||||||||||||||||||||||||||||||||||||||||||||||||||||||||||||||||||||||||||
Following are the enhancements affecting Expression screen: Navigation GoTo Settings → Configuration → Expression i. Based on the source of information procured, the Expressions are now categorized in two different types, i.e. EMR and Medlineplus . Refer to figure 10.4-1. The type, EMR facilitates a User to ‘enter' Bibliography whereas the type, Medlineplus facilitates a User to procure information externally from the website of Medline Plus®. Figure 10.4-1: Two types of expression – EMR and Medlineplus displayed
ii. User has provision to select User Type from the search provided; the expression becomes available to the User Type selected. By default, ALL is the value that remains selected if nothing is specifically selected. Refer to figure 10.4-1
iii. For EMR type of expressions, Info button is available on the Expression screen whereas for Medlineplus type of expressions, Params button is available. The usage of both the buttons is such that the ‘Info' button invokes Edit Notes popup titled, ‘Bibliography'. Refer to figure 10.4-2. User can enter text in the Bibliography section. And the Params button invokes Expression Params popup. Figure 10.4-2: Edit Notes popup displaying text entered as Bibliography
iv. A new option, ‘Special' has been included in the Select type options consisting of a new List of Special Conditions. Following is the list of newly added tags for special conditions: Table 10.4.1: List of newly added tags for special conditions
When a User adds the tags of type ‘Special' and enters the appropriate values (i.e. codes such as SNOMED; ICD; CPT; RxNorm; NDC; and LOINC) then automatically these values are also available on the Expression Params popup that is invoked from the Param button. Refer to figure 10.4-3 . Figure 10.4-3: Expression Params popup displaying values entered on the expression screen
v. The Expression (message) popup (invoked in an encounter) displays the EMR type of expression with the hyperlink, ‘See Bibliography' and the Medlineplus type of expression with the text, ‘For details from Medline Plus click here ' wherein the text, ‘click here' is a hyperlink. Refer to figure 10.4-4 Also, consider an example where expressions E1 and E2 are of EMR type and expressions E3 and E4 are of Medlineplus type then the system concatenates the messages as E1+E2+E3+E4 and displays the same on the Expression popup. Refer to figure 10.4-4 Figure 10.4-4: An Expression popup invoked in an encounter displaying both EMR and Medlineplus expression links.
vi. On click, the link, See Bibliography invokes a popup, Expression Bibliography , Refer to figure 10.4-5 displaying the details that was entered in Edit Notes or Bibliography popup (invoked via Info button on Expression screen). Figure 10.4-5: Expression Bibliography popup displaying Bibliography as entered via
vii. On click, the link, click here invokes a popup, Expression Medline , Refer to figure 10.4-5 displaying the details procured from the Medline Plus website and concatenated according to the codes entered in the Expression Params popup ( Refer to figure 9.4-6 ). Figure 10.4-5: Expression Medline popup displaying a concatenated list of details that is procured from Medline Plus® website
|
||||||||||||||||||||||||||||||||||||||||||||||||||||||||||||||||||||||||||||||||||||||||||||||
| 10.5 | An UI (User Interface) has been provided for Users to run Insurance import process on Clinic database | |||||||||||||||||||||||||||||||||||||||||||||||||||||||||||||||||||||||||||||||||||||||||||||
• Running an Insurance import process on Clinic database was earlier a tedious backend process. A new UI has been integrated with the EDI setup that helps User to import all Insurances supported by a particular clearing house, or import all Insurances supported by the Clearing house but for specific states, or import specific Insurances only. • The Insurance import is done from FDB database where the Master Insurance library is maintained. Navigation GoTo tab: Settings → Configuration → EDI Setup → click on Import Ins button → Insurance Import from FDB popup Refer to figure 10.5-1 Figure 10.5-1: Insurance Import from FDB popup 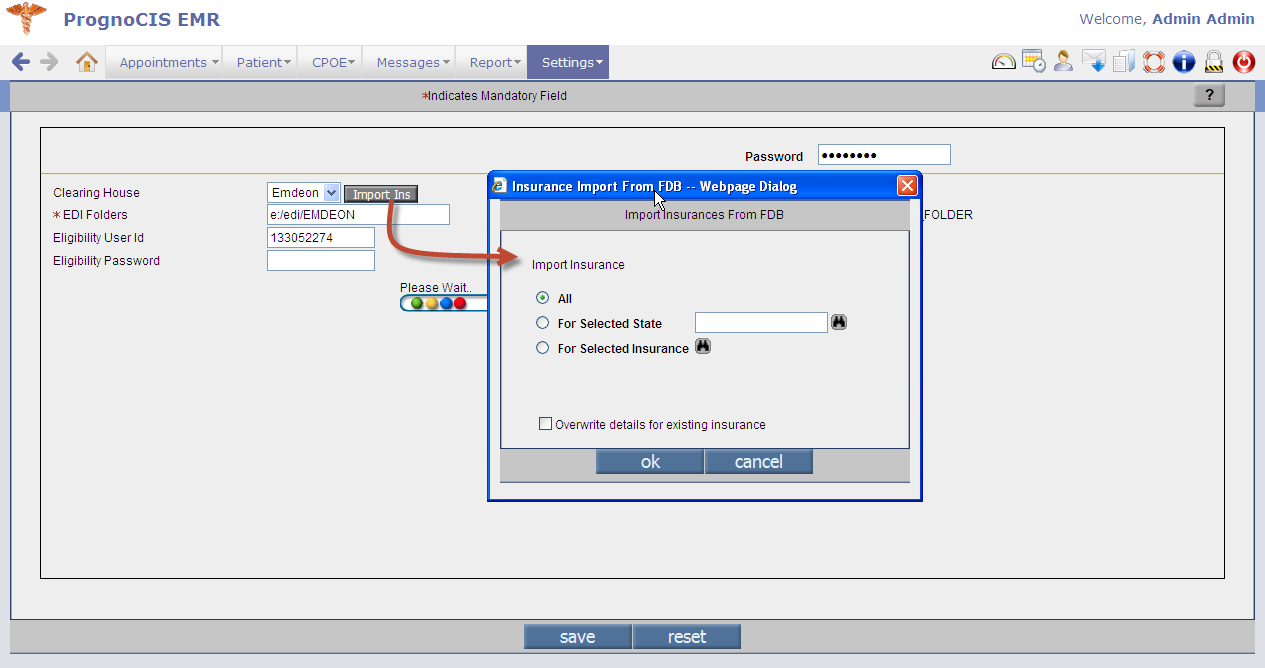 |
||||||||||||||||||||||||||||||||||||||||||||||||||||||||||||||||||||||||||||||||||||||||||||||
| 10.6 | Provision to define Meaningful Use criteria individually for each Provider | |||||||||||||||||||||||||||||||||||||||||||||||||||||||||||||||||||||||||||||||||||||||||||||
• It is now possible to define certain Meaningful Use criteria at Provider level. Configuring certain conditions at Provider level helps in the automated measure calculation. Navigation GoTo tab: Settings → Configuration → Providers → MU Details button → MU Details popup. Refer to figure 10.6-1 Figure 10.6-1: MU Details
• In the MU Details popup there are three sections that require User's input: Vitals; MU Stage; ePrescription. • Vitals – if User selects one or multiple option(s) that is available under the Vitals section i.e. Height & Weight and Blood Pressure then these are not considered for Meaningful Use (MU) calculation. • MU Stage – Depending upon the value selected by the User i.e. either None or Stage 1 or Stage 2 the clinical summary popup displays details at the close of encounter. The date range selected considers the Provider only for that particular period in MU calculations. ePrescription – The option, EPCS out of scope when selected will not consider the Provider for Meaningful Use (MU) calculation for controlled substances. |
||||||||||||||||||||||||||||||||||||||||||||||||||||||||||||||||||||||||||||||||||||||||||||||
| 10.7 | Provision to define MU Details for Encounter Type |
|||||||||||||||||||||||||||||||||||||||||||||||||||||||||||||||||||||||||||||||||||||||||||||
Navigation GoTo tab: Settings → Configuration → Enc Types. Refer to figure 10.7-1 • Three new options related to MU have been provided on Enc Types screen that helps User to define an encounter type in association with them. The options are as follows: • Office Visit • Seen by Eligible Provider • Exempt from Reporting Figure 10.7-1: MU Details on Enc Type screen
• When a User selects the option of Office Visit and/or Seen by Eligible Provider then encounters of the selected encounter type are considered for Meaningful Use (MU) calculation. • When a User selects either of the options of Office Visit and Seen by Eligible Provider or both along with the third option of Exempt from MU Reporting then the option of ‘Exempt from MU Reporting' overrides the other options and encounters of the selected encounter type are not considered in MU calculation.
|
||||||||||||||||||||||||||||||||||||||||||||||||||||||||||||||||||||||||||||||||||||||||||||||
| 10.8 | Provision to add same CVX code to more than one vaccine | |||||||||||||||||||||||||||||||||||||||||||||||||||||||||||||||||||||||||||||||||||||||||||||
| It is possible that a single CVX code is available for more than one vaccine, considering this system now allows addition of same CVX code to more than one vaccine. | ||||||||||||||||||||||||||||||||||||||||||||||||||||||||||||||||||||||||||||||||||||||||||||||
| 10.9 | Implementation of SNOMED codes in PrognoCIS | |||||||||||||||||||||||||||||||||||||||||||||||||||||||||||||||||||||||||||||||||||||||||||||
• SNOMED-CT is an acronym for S ystematized No menclature of Med icine – C linical T erminology. It is recognized throughout the US and internationally. Using SNOMED-CT enables providers and E lectronic M edical R ecords (EMR) to communicate in a common language, thus increasing the quality of patient care across many different provider specialties. It also improves the accuracy of patient data analysis. SNOMED codes are now available throughout in PrognoCIS. • Following is the example of SNOMED code implementation in Social History section of PrognoCIS – the availability of SNOMED for recording smoking status: Refer to table 10.9 - Recording smoking status with SNOMED code patients who are 13 years or older has been mandatory in Stage I and Stage II of Meaningful Use (MU). From the current version, Smoking statuses are coded in SNOMED codes each. Table 10.9: List of standard SNOMED associated with smoking statuses:
• Users with admin login have provision to assign SNOMED code to smoking statuses, navigate to the Elements masters as follows: Navigation : GoTo tab: Settings → Configuration → under Social Hist column → Elements Refer to figure 10.9-1 Figure 10.9-1: Assigning SNOMED code to smoking statuses
• Similarly, following is the list of elements wherein SNOMED codes are available for customization: • Social History • Vitals • HPI • ROS • Physical • Education • Expression • Patient Reminder • Vaccine |
||||||||||||||||||||||||||||||||||||||||||||||||||||||||||||||||||||||||||||||||||||||||||||||
| 10.10 | Family Problem associated with SNOMED code for first degree relations increases MU count | |||||||||||||||||||||||||||||||||||||||||||||||||||||||||||||||||||||||||||||||||||||||||||||
It is important to associate SNOMED codes with a family problem. The MU count increases if User selects first degree family relation (from Face Sheet → Family History) thus it is also important to associate the SNOMED codes with first degree relations. Navigation : GoTo tab: Settings → Configuration → Family Relation Refer to figure 10.10-1 Figure10.10-1: Setting the degree of relation along with the SNOMED code
|
||||||||||||||||||||||||||||||||||||||||||||||||||||||||||||||||||||||||||||||||||||||||||||||
| 10.11 | Provision to implement MU Settings for a Provider and Clinic from a single location | |||||||||||||||||||||||||||||||||||||||||||||||||||||||||||||||||||||||||||||||||||||||||||||
• Navigation : GoTo tab: Settings → Configuration → MU Settings • A new link: MU Settings invokes the MU Settings popup Refer to figure 10.11-1 Figure 10.11-1: MU Settings popup displaying Provider tab details
• The Provider tab configures settings for individual medics ( Refer to figure 10.11-1 ) whereas the Clinic tab configures settings for the Clinic as a unit Refer to figure 10.11-2 and the Settings Required tab lists out interface details as to when it was requested for and if not available then User could request for the same by clicking on Send email button. Refer to figure 10.11-3 Figure 10.11-2: Clinic tab displaying details
Figure 10.11-3: Setup Required tab displaying details 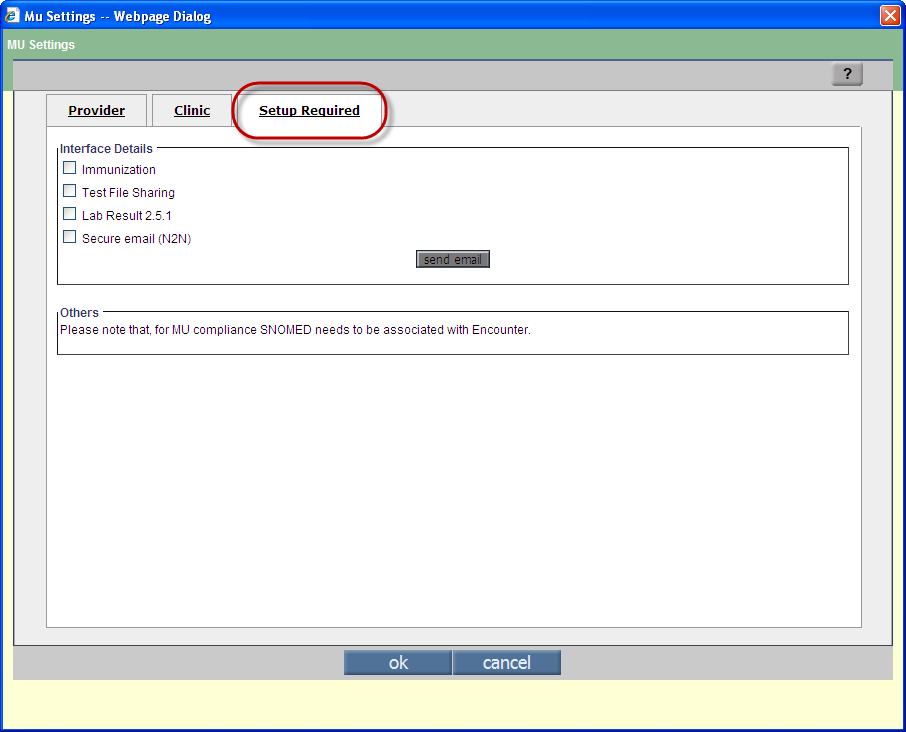 |
||||||||||||||||||||||||||||||||||||||||||||||||||||||||||||||||||||||||||||||||||||||||||||||
| 11. | Miscellaneous |
|||||||||||||||||||||||||||||||||||||||||||||||||||||||||||||||||||||||||||||||||||||||||||||
| 11.1 | Speech bubbles introduced for a better First Time Use Experience (FTUX) | |||||||||||||||||||||||||||||||||||||||||||||||||||||||||||||||||||||||||||||||||||||||||||||
• Due to many subtle UI changes done in the current version of PrognoCIS and to help User get accustomed to them, few speech bubbles or speech balloons have been introduced thus enhancing the User's First Time Use Experience (FTUX). • The speech balloons carry either navigational or important information about specific element or field in the screen. • Following screens display Speech balloons: • On Encounter sc reen, • to highlight the availability of TOC collapse icon: • to inform the User the availability of different Face sheet layout in the Face Sheet drop-down list. Refer to fi gure 11.1-1 Figure 11.1-1: Speech bubbles as displayed on Face Sheet
• On Allergy, PMH (Past Medical History), and Current Medication screen to highlight and inform the User – about add button [+] on the TOC (Transition of Care) section that is collapsible and expanded. Refer to figure 11.1-2 Figure 11.1-2: Speech bubbles as displayed on Face Sheet
• Along with the information contained in the speech balloons, there are two links available, namely, hide and Don't show this again . • On click, the hide link, hides the balloon until User manually refreshes the screen or clicks on any of the action button such as Save . On click the Don't show this again link hides the balloon or bubble for the User permanently and does not display again for that particular logged in User. |
||||||||||||||||||||||||||||||||||||||||||||||||||||||||||||||||||||||||||||||||||||||||||||||
| 11.2 | List of properties that are now obsolete | |||||||||||||||||||||||||||||||||||||||||||||||||||||||||||||||||||||||||||||||||||||||||||||
|
||||||||||||||||||||||||||||||||||||||||||||||||||||||||||||||||||||||||||||||||||||||||||||||
| 11.3 | List of newly defined properties | |||||||||||||||||||||||||||||||||||||||||||||||||||||||||||||||||||||||||||||||||||||||||||||
|
||||||||||||||||||||||||||||||||||||||||||||||||||||||||||||||||||||||||||||||||||||||||||||||
| 11.4 | List of new icons added in this version | |||||||||||||||||||||||||||||||||||||||||||||||||||||||||||||||||||||||||||||||||||||||||||||
|
||||||||||||||||||||||||||||||||||||||||||||||||||||||||||||||||||||||||||||||||||||||||||||||
| 12. | Patient Portal | |||||||||||||||||||||||||||||||||||||||||||||||||||||||||||||||||||||||||||||||||||||||||||||
| 12.1 | Patient can appoint an authorized User to access his or her portal account to view the ambulatory summary and messages | |||||||||||||||||||||||||||||||||||||||||||||||||||||||||||||||||||||||||||||||||||||||||||||
• A patient can now have a self assigned authorized User to view patient's ambulatory summary, messages, compose and send replies on behalf of the patient. • A new option, Authorized Users has been provided under Personal Info tab. Refer to figure 12.1-1 Figure 12.1-1:
• Patient can add, delete, and maintain a list of authorized Users to allow them anytime access to their (patient's) ambulatory summary and messages on PrognoCIS patient portal. • The authorized User receives an email with the subject line such as, ‘Your login details for Patient Portal' along with a PDF file as an attachment. The attachment is password protected and the User is expected to enter his or her birth date in mmddyyyy format. The attachment when opened contains User's login credential (User ID and Password) for the patient portal. • After the first login, the User is expected to change password and in case the changed password is forgotten by the authorized User anytime then patient has a provision to generate password via Generate password button available on the same screen. |
||||||||||||||||||||||||||||||||||||||||||||||||||||||||||||||||||||||||||||||||||||||||||||||