


![]()
Release Notes - Billing
Version No: 2.0
Build No: 10
Table of Contents
2.
Reports.
2.1
Reports >> By Claims and Reports >> By Charges are merged.
2.2 Reports >> Search and Display now shown on same screen.
2.3
Reports >> Statistics : New menu option added for finding quick counts and
amounts.
2.4
Reports >> Custom Report 1
to 5 : Provision to add 5 customized reports.
3.
PreAuthorization functionality
updated.
3.1
Patient Insurance icon – Ability to add Charge Code wise Pre Authorizations .
3.2
Appointment Schedule – Pre Auth. Pop Up changes.
3.3
Claim Screen – PreAuth hyperlink related changes.
3.4
Claim Screen – New PreAuthorization Number can be added from the Claim
Screen.
4. Referring Org and Org Provider master screens added.
6.
Patient
Registration.
6.1
Label ‘Patient Attorney’ is now renamed
to ‘Attorney’ on Other Info>Case Manager>Details pop-up.
6.2
Button 'Details' now shows a checkmark when data is present in Other Info>Case Manager>Details pop-up..
7. Address Book >> Search: Columns 'Phone' and 'Address' added.
9.
Claims >> Edit Screen
.
9.1 A new tab 'Specialty' is added on
Claim's 'Progress Note' icon.
9.2 Any Charge codes selection by typing it in default option 'ALL'.
9.3 Assigning ICD Codes is mandatory Even for Charges Billed to Patient and there is
a Pri Insurance Assigned.
9.4 Names of Billed and Allowed Fee Schedules used in the claim are displayed on I button.
9.5 Claim Charge row now accepts comments upto 80 chars. This can be printed in Gray
Band of CMS 1500 using tag [BLD_COMMENTS] or tag [BLD_NDCNOC__COMMENTS].
9.6 'I' button : 2 Fields are renamed.
9.7 ‘UB04’ EDI - Place Of service: The institutional claim will consider the first 2 digits of 'Bill Type' as Place of Service and last digit of the 'Bill Type' field as Frequency.
10.
Claim >> Outstanding.
10.1 'excel' and 'print' Layout is modified with extra columns to display 'Loc',
'BU', 'AssignTo', 'AssignDate', 'AssignStatus'.
10.2 Label 'Provider' changed to 'Rendering Doc' to avoid confusion of interpreting it as 'Attending Doc'.
11.
Claim >> Send
Claims.
11.1
By default the Overdue field considers number of days as '30 days'.
12. Remittance >> Capitation Receipt.
14.
Settings >> Configuration
>> Download files.
14.1
Automatically delete the downloaded files after the specified days.
14.2
Category Listbox is
added.
14.3
Edit Button is added.
14.4
Two new columns are added.
15. Settings >> Diagnostics.
15.1
A new case is added in Diagnostics Screen to list out.
16. Settings >> Config >> Scheduled Process.
17.
Settings >> Config >>
Templates
17.1 Various templates are updated to support
various features.
17.2 A new templates is added to support a
new feature.
Numbers of new features related to PrognoCIS Billing have been released in Version 2.0 Build10.
Reports > By Claims and Reports > By Charges are merged together into Reports > By Claims to generate reports which provides quick details about Claims wise / Charge code wise break up details with / without filters being specified.These two windows 'By Charge' and 'By Claims' were having the same fields except the Selection Location field.These two windows are merged together into a single menu option 'Reports >> By Claims'. On clicking the Reports >> By Claims menu a single window opens.The label Billing Reports has two radio button options as By Claims and By Charges. By default the radio button By Claims is selected and the respective Select Layout dropdown selection is seen for the 'By Claims'. If 'By Charges' radio button is selected the respective Select Layout dropdown appears for the By Charges Layout. Rest of the features for the Layout Button as well as Filters are same.
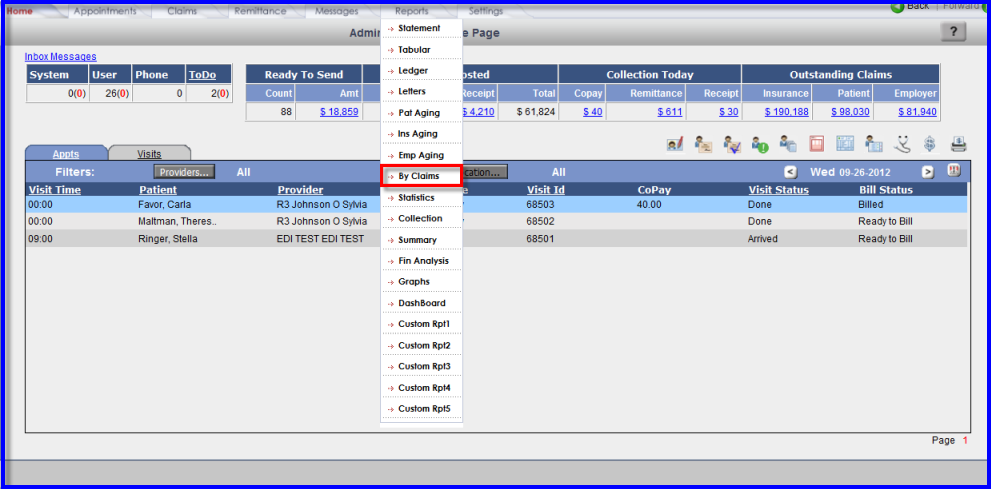
Figure 2.1.a: Report >> By claims menu.
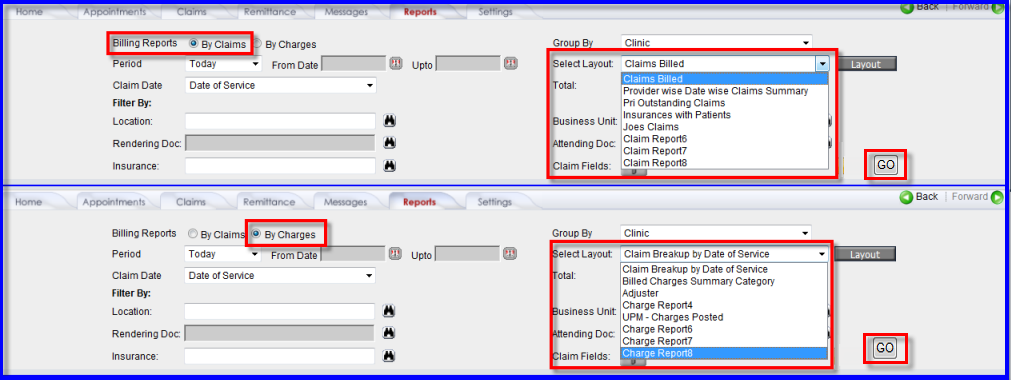
Figure 2.1.b: Report >> By Claims and Report >> By Charge are merged.
After selecting the particular options for the Claims, click on the 'GO' button to see the output on the same screen.You can also change the search criteria and see the output on the same window. To view the output in full mode/ full screen click on the Hide Selection hyperlink and to view the output on same screen (Parameter Selection Window) click on the Show Selection hyperlink.
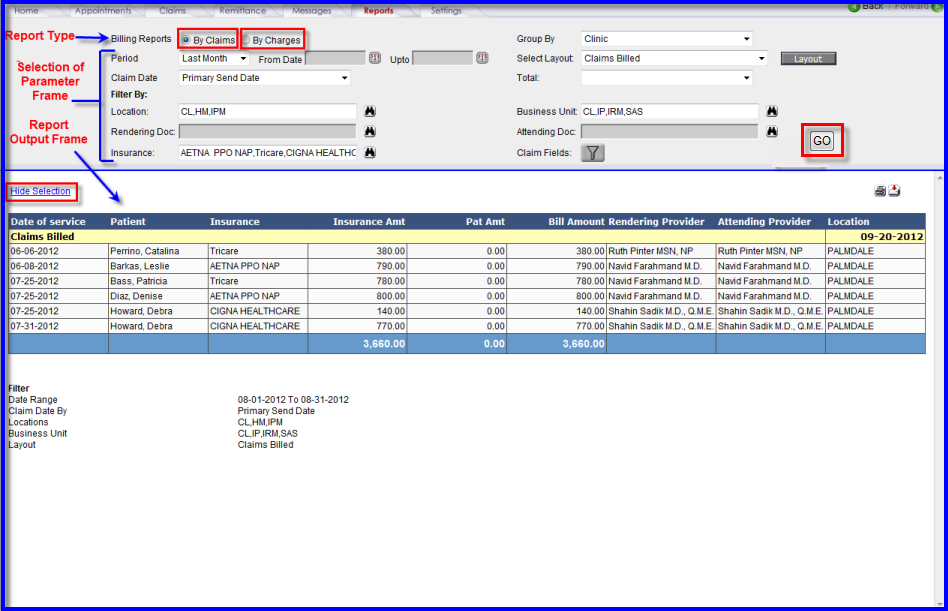
Figure 2.2 :Reports By claims and By
Charge code with Parameter selection frame and Output generation frame.
A new menu option ‘Reports >> Statistics’ has been introduced to generate Statistics Reports. This report will give different quick claims counts and values as well as amounts between the selected period and the selected From Data and Upto Date by selecting multiples reports. The output is generated as the Billing Production Statistics Report. To change the selection for the counts and values click on the Change Selection hyperlink on the bottom of the statistics report. This hyperlink opens the pop-up Change Selection Report window in which you can change the Period as well as the From Date / Upto Date.
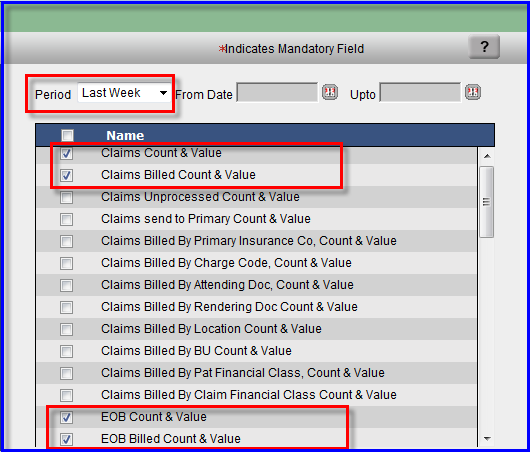
Figure 2.3.a: Pop-up 'Charge Reports Statistics' to generate Count & Value.
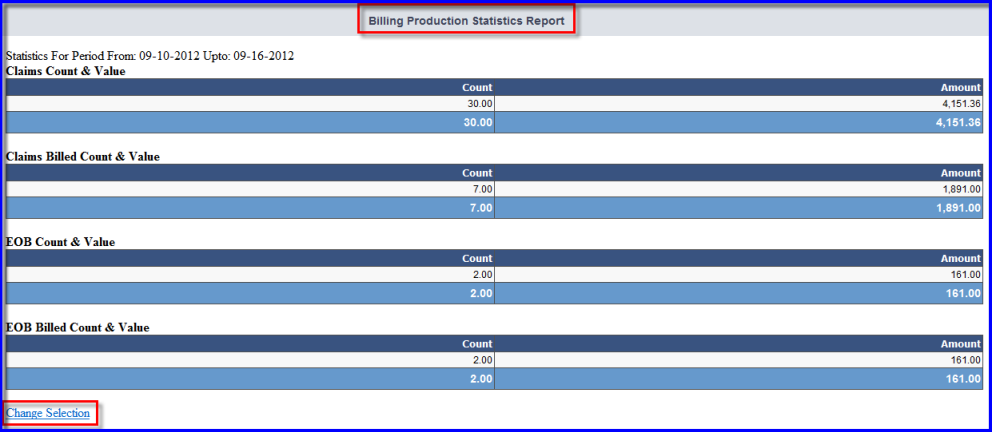
Figure 2.3.b: Statistics report for Count &
Value.
One new Custom Report is introduced under Reports. A provision has been made to add upto 5 such custom reports. It is based on the following property:
'billing.custom.report.menunames' : This property accepts upto 5 comma seperated Custom Report Names. Reports Menu option will show all these report options.
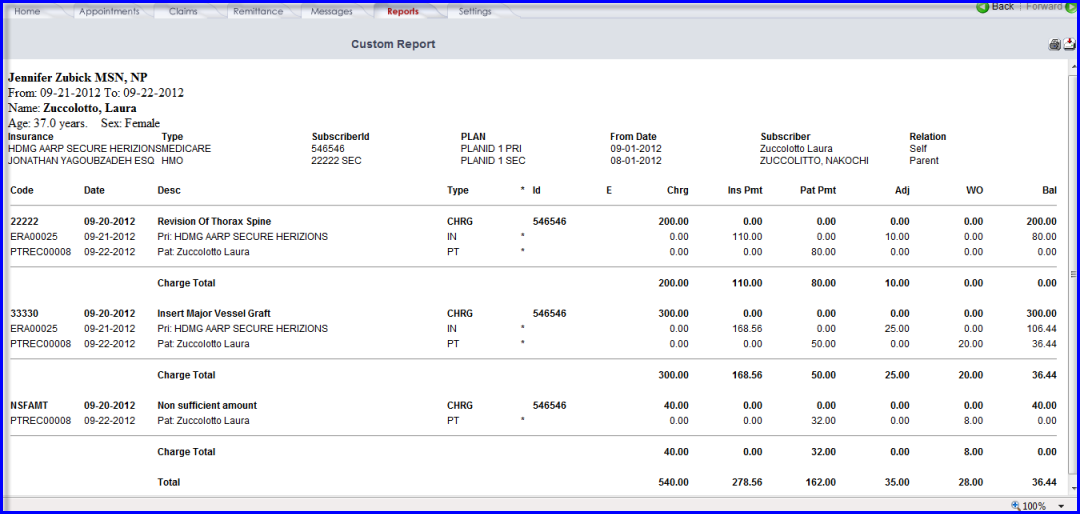
Figure 2.3.b: Custom report output.
Two new columns are introduced in the Insurance PreAuthorization window ie. 'Proc_Code' and 'Initial Used'.
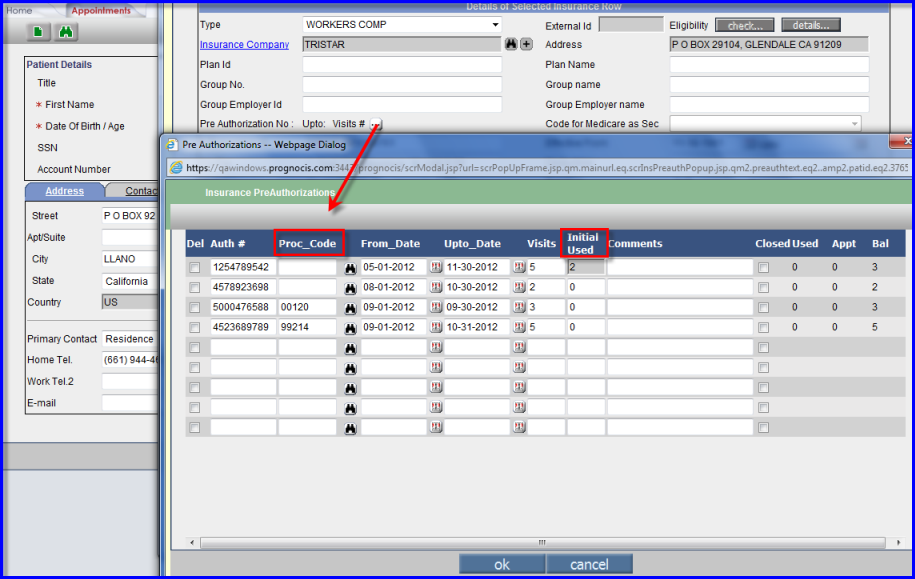
Figure 3.1.a: Insurance PreAuthorization.
![]() Note: Duplicate PreAuth is not
allowed. When trying to enter the duplicate PreAuth Number and Proc_Code an
alert message is displayed 'XXXXX PreAuth number and charge code are duplicate.'
Note: Duplicate PreAuth is not
allowed. When trying to enter the duplicate PreAuth Number and Proc_Code an
alert message is displayed 'XXXXX PreAuth number and charge code are duplicate.'
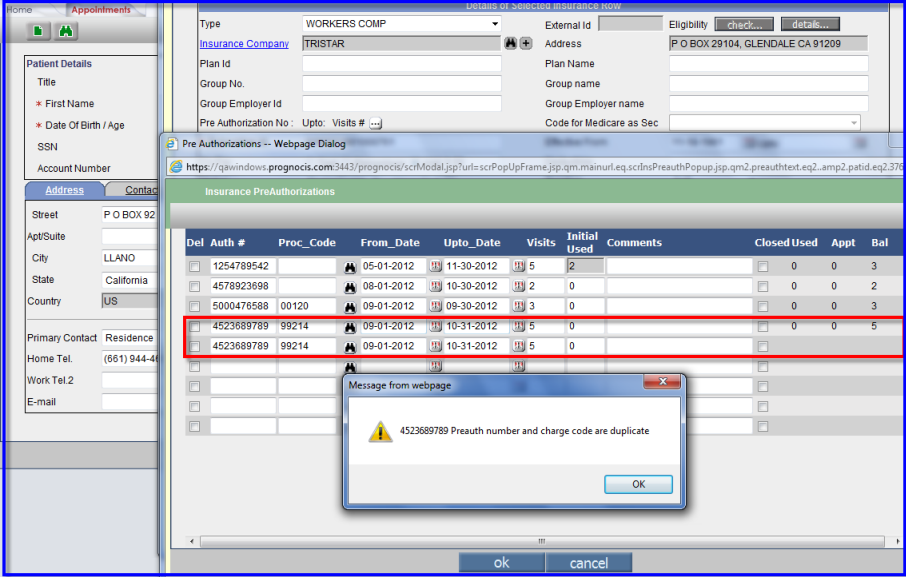
Figure 3.1.b: Duplicate PreAuthorization is not allowed.
The window opens with 5 rows as default. The number of rows is increased after the PreAuth number is saved. For eg.: If we have added 2 rows of PreAuth number then we have 3 blanks rows in our hands. After saving the PreAuth number 2 more blank rows are added so that we always have 5 blanks rows in our hands. In short we can always add 5 PreAuthorization numbers at a time.
The Pre Auth.Pop-up gives all PreAuth No. for all the patient. It allows the user to select multiple PreAuth Number.
![]() Note: The user cannot select 2
PreAuth without Procedure Codes.
Note: The user cannot select 2
PreAuth without Procedure Codes.
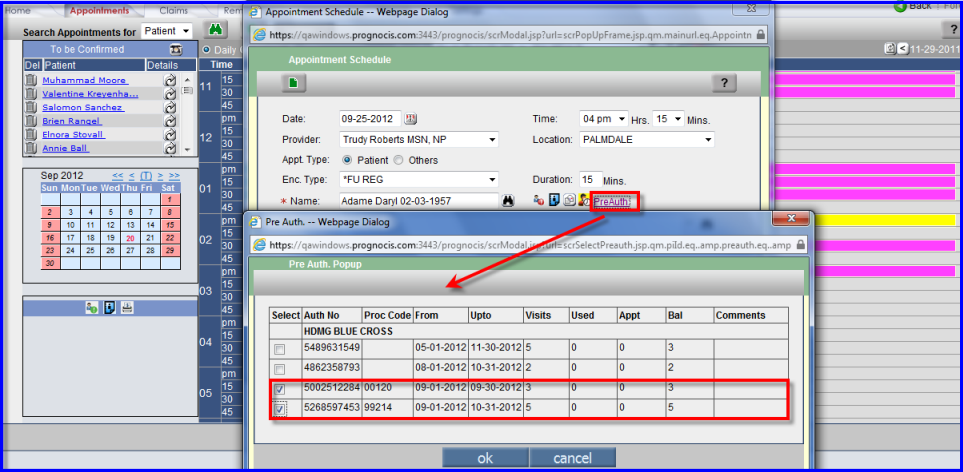
Figure 3.2.a: Appointment Schedule PreAutharization popup.
If the user selects 2 or more PreAuth without Procedure Codes. an alert message is displayed 'Can Not Select two or more rows without CPT Code.'
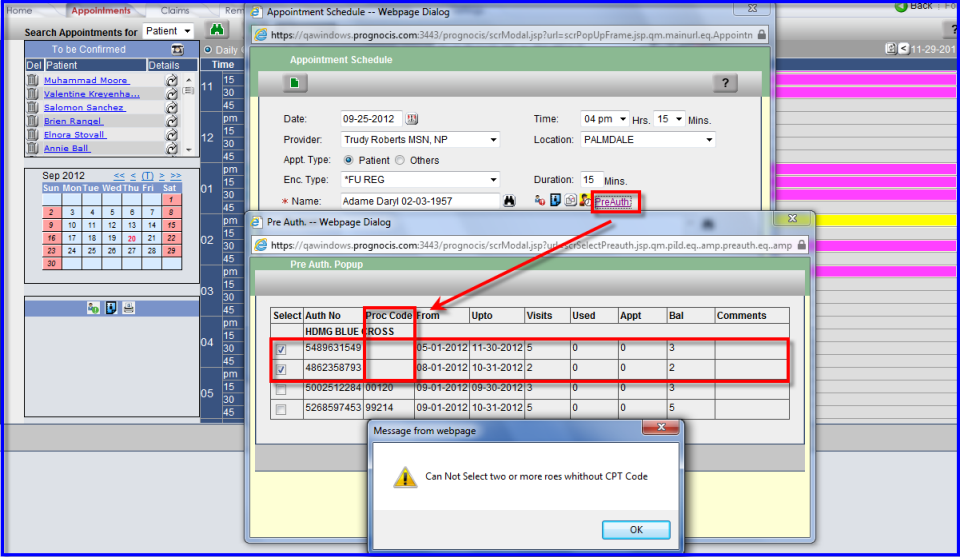
Figure 3.2.b: Selection of Preautharization no. using Appointment Schedule screen.
Once the PreAuth No. is selected, the selected PreAuth Number is displayed on the space next to the PreAuth hyperlink. If associated Procedure Codes is present then it is displayed next to thePreAuth Number eg.XXXX(YYYY).
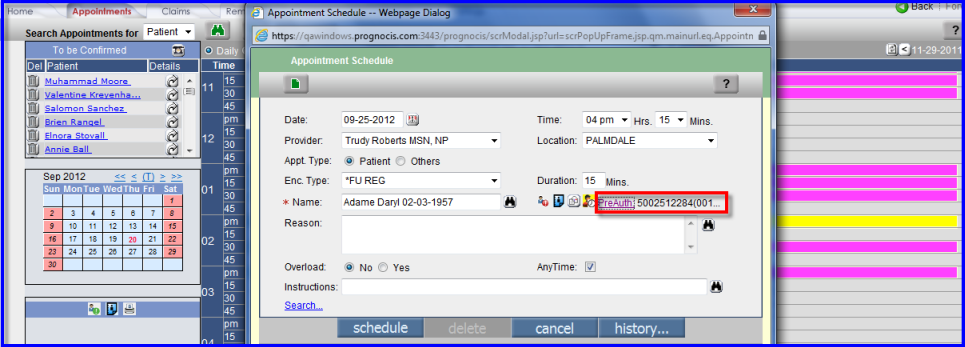
Figure 3.2.c:PreAuth Number and Procedure Code on the Appointment Schedule screen.
If the patient claim is created from the EMR side and the PreAuth is used in Appointment Schedule screen, by default the PreAuth No. is selected on the PreAuth. Popup. The space beside the PreAuth hyperlink will have the same PreAuth No. from the Appointment Schedule followed by the CPT, HCPC or Special Charge Codein bracket.
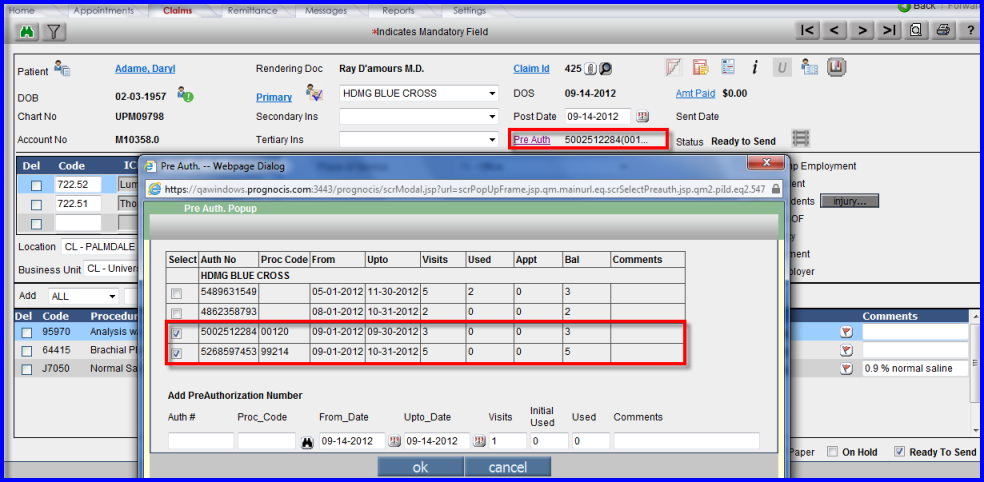
Figure 3.3: Claim Screen – Displaying selected PreAuth No on Pre Auth. Popup.
We can now add new PreAuthorization Number from the Pre Auth. Popup of the Claim Screen. By default From_Date and Upto_Date is selected as Claim DOS and the Visits value is 1.
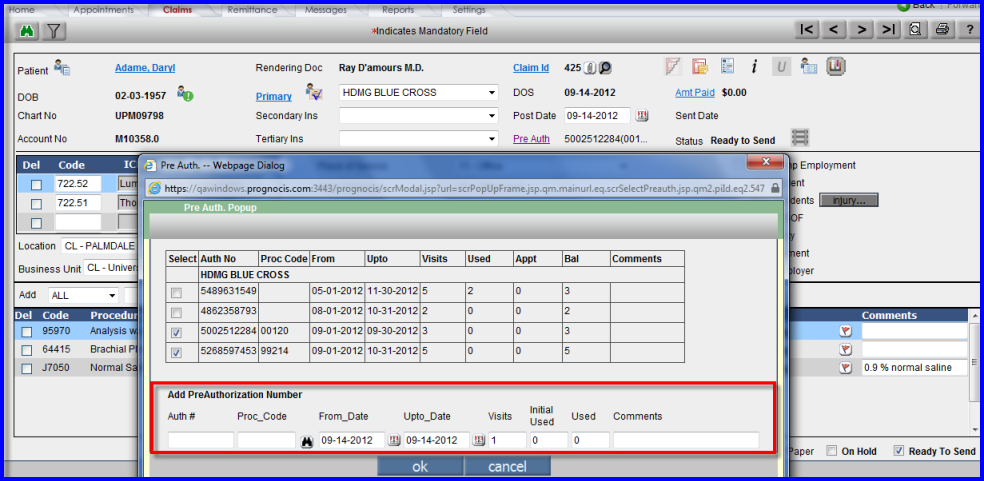
Figure 3.4.a: Claims screen : Preauth Popup.
![]() Note: If the selected PreAuth
has Procedure Code and this code is not used in the Claim, when checked on the
Ready To Send checkbox and saving the claim a alert message is displayed 'Charge
Code for selected PreAuth is not used in Claim : XXXXX'
Note: If the selected PreAuth
has Procedure Code and this code is not used in the Claim, when checked on the
Ready To Send checkbox and saving the claim a alert message is displayed 'Charge
Code for selected PreAuth is not used in Claim : XXXXX'
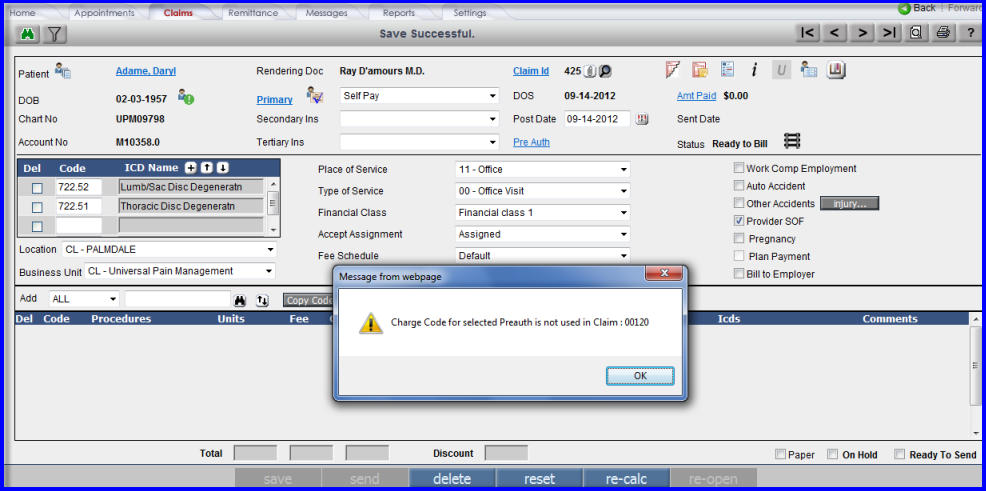
Figure 3.4.b: Charge Code for selected Preauth is not used in Claim: XXXXX
Two new options ‘Org provider’ & ‘Ref Org’ are added in Settings > Configuration of Medics column to define Rendering Organization and Referring Organization.
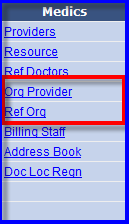
Figure 4.1 : Ref Provider and Org Provider option added in Settings > Configuration.

Figure 4.2: Ref Org

Figure 4.3: Org Provider
![]() Note: Earlier Referring Organization was being added in Providers list and a new license was required for adding it. Now a dedicated screen has been desgned for the same. Once this screen is available, the provider entry for Organization will have to be manually transferred to this new screen.
Note: Earlier Referring Organization was being added in Providers list and a new license was required for adding it. Now a dedicated screen has been desgned for the same. Once this screen is available, the provider entry for Organization will have to be manually transferred to this new screen.
The User can select a new Rendering Provider from the Claim
Additional Info icon or the ![]() button on the Claim screen once this new Organization Provider is added in Org Provider screen. An
Additional Claim Information window opens with all the additional Claim
information to be added, you need to click on the Search button or the binoculars
next to the Rendering Provider label and select the appropriate Rendering
Provider.
button on the Claim screen once this new Organization Provider is added in Org Provider screen. An
Additional Claim Information window opens with all the additional Claim
information to be added, you need to click on the Search button or the binoculars
next to the Rendering Provider label and select the appropriate Rendering
Provider.
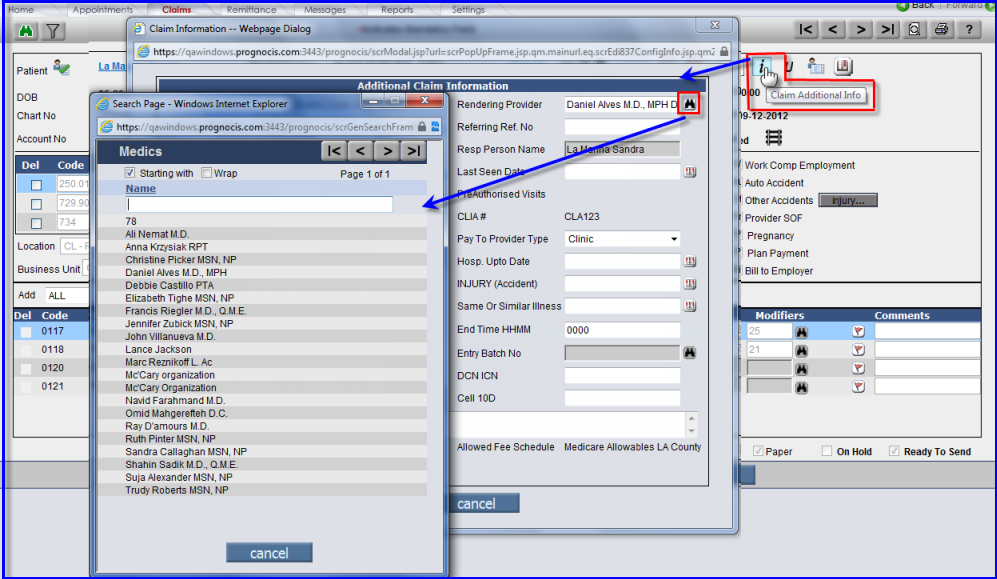
Figure 4.4:
Selecting Rendering Provider from claims ' i ' button.
![]() Note: If referring Provider chosen is the Organization Provider, the 24J (NPI) and 25(Tax ID) will be the Group Information as added while defining Organization Provider. Its equivalent information will be sent in EDI loops appropriately.
Note: If referring Provider chosen is the Organization Provider, the 24J (NPI) and 25(Tax ID) will be the Group Information as added while defining Organization Provider. Its equivalent information will be sent in EDI loops appropriately.
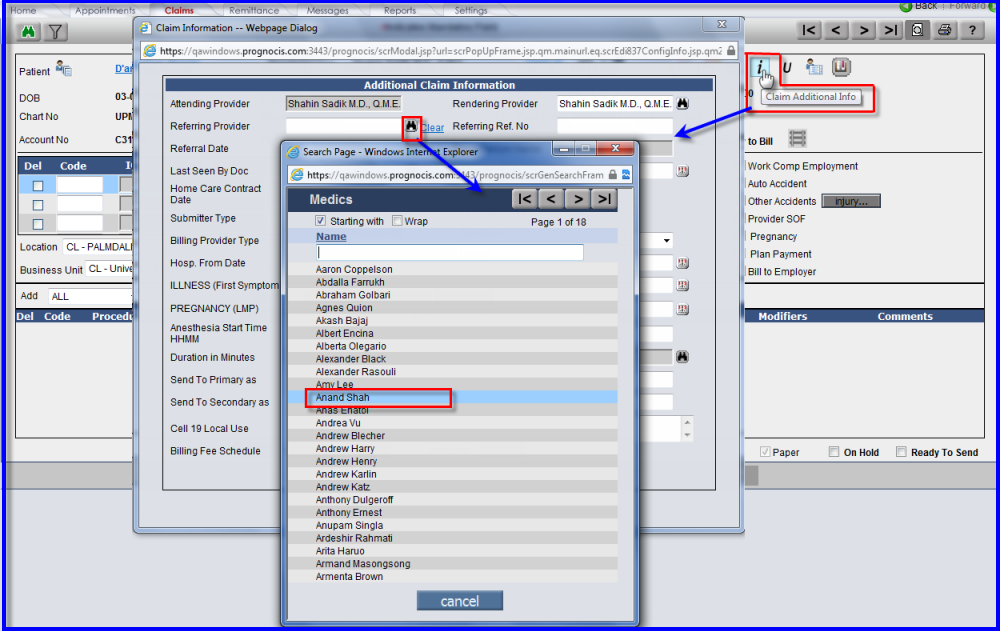
Figure
4.5:Selecting Referring Provider from claims ' i ' button.
Sometimes, instead of referral being received from an individual provider, the referral is received from an Organization or Hospital. In such a case, the new screen 'Ref Org' can be chosen to define this Organization or Hospital. On the claim screen, the field 'Referring Provider' on Claim
Additional Info icon or the ![]() button will show a combined list of Referring Providers and Referring Organizations added in this new screen. Organiation NPI will be sent in CMS1500 Cell 17b. and its equivalent EDI loop when Referring Organization is sent as Referring Provider CMS1500 Cell 17.
button will show a combined list of Referring Providers and Referring Organizations added in this new screen. Organiation NPI will be sent in CMS1500 Cell 17b. and its equivalent EDI loop when Referring Organization is sent as Referring Provider CMS1500 Cell 17.
CMS 1500
The name of the 'Referring Provider' and the 'Rendering Providers ID' is displayed on the CMS 1500 and also on EDI 837 Preview screen.
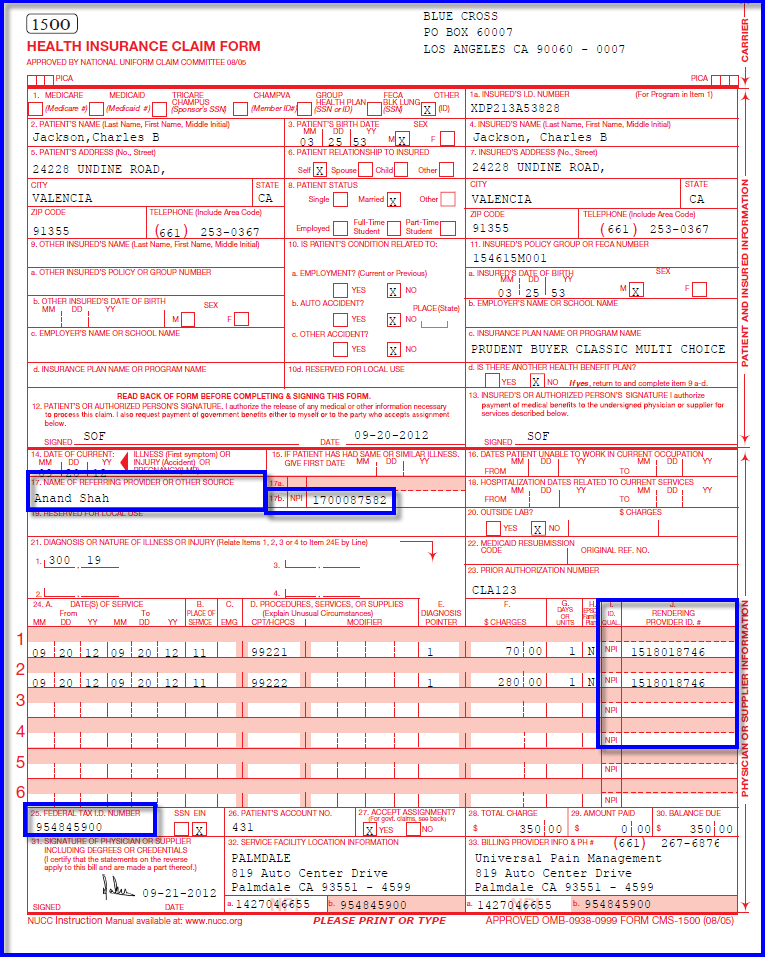
Figure 4.6: CMS 1500 with 24J and 25 - Org Prov Group Details will be sent and 17 and 17b. Referring Org Group Details will be sent.
EDI
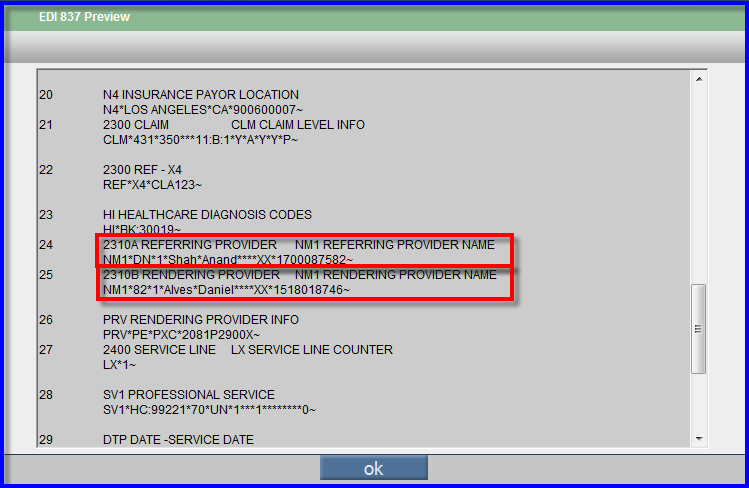
Figure 4.7: EDI Preview
The system gives an Alert message if any folder defined in
properties / in EDI Parameter master does not exist, etc i.e. if the PrognoCIS set-up is incomplete or changed and there is some mismatch. When users are moved from
one server to another, this provides a good alert to ensure all folders are also
properly moved to the new environment. It is also handy for ISG
group for setting up a new user.
![]() Note: This Alert will be seen only by Admin User.
Note: This Alert will be seen only by Admin User.
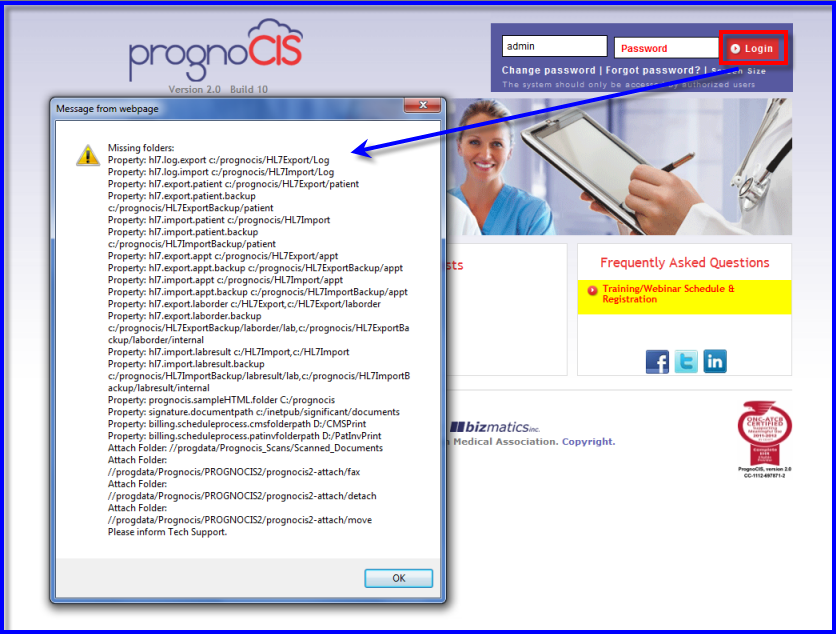
Figure 7: Login Splash Screen with Alert of incomplete set-up.
Label 'Patient Attorney' is now renamed to 'Attorney'.
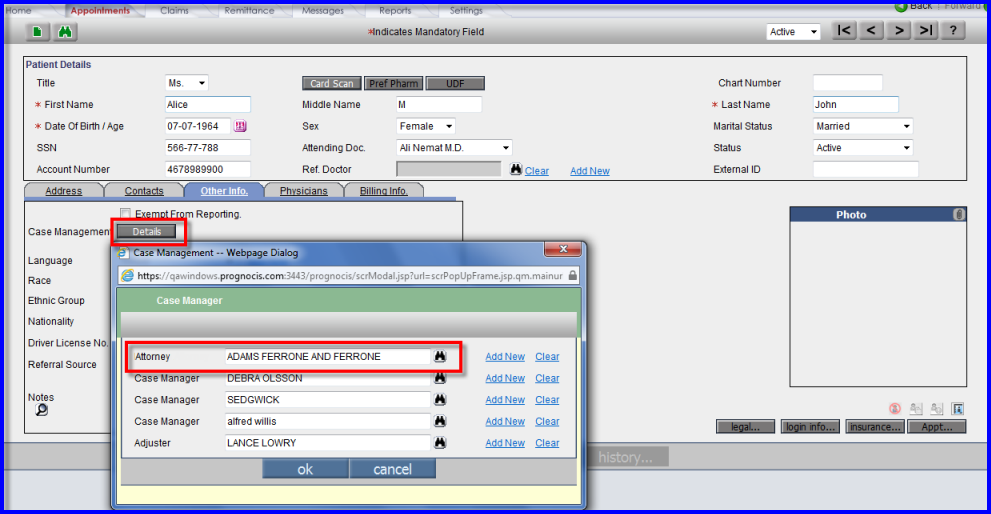
Figure 6.1- Patient Attorney changed to Attorney.
When the data is present
in any field of Case ManagerDetails pop-up, the button 'Details' will have a Check Mark ![]() and if the Data is not present it will be a
simple Details Button
and if the Data is not present it will be a
simple Details Button ![]() without a Check Mark. This will help users to know if there is any data present without requiring them to click on button 'Details'.
without a Check Mark. This will help users to know if there is any data present without requiring them to click on button 'Details'.
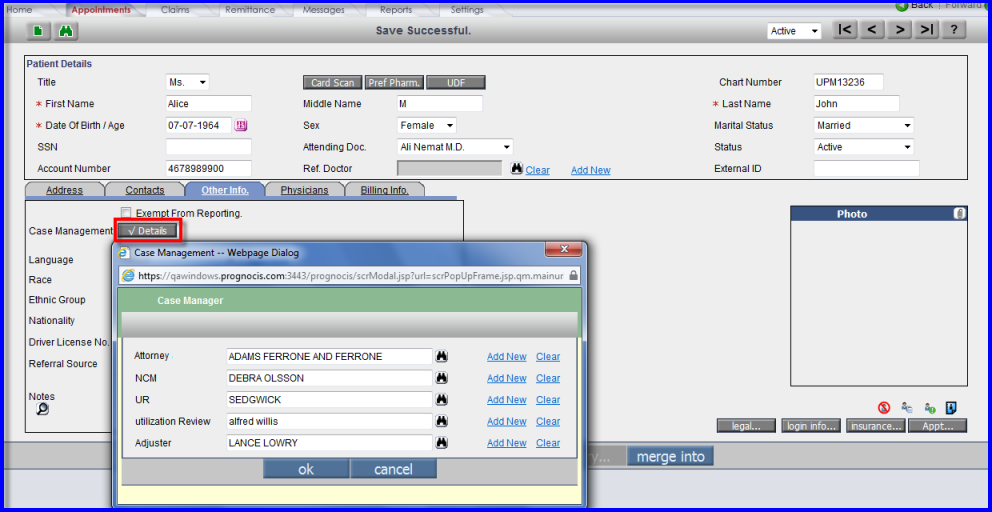
Figure 6.2: Change of Icon Case Manager>Details when data is present.
New columns ‘Phone’ and ‘Address’ are introduced in Address Book. These columns will display the Phone Numbers and Address of any Address Book entry like the Case Manager, Attorney, etc. On the Message > Attach or Message > Scan screen, from the list box of the 'From' field select the 'Other' option. Click on the search binocular icon next to the Name field, a pop-up 'Address Book' is seen with the two new columns added ie.'Phone' and 'Address'. This feature is also added on the EMR side Patient > Letter-Out. Select the 'Address Book' from the list and click on the search binocular next to the Patient label. The Address Book is invoked with the two columns added.
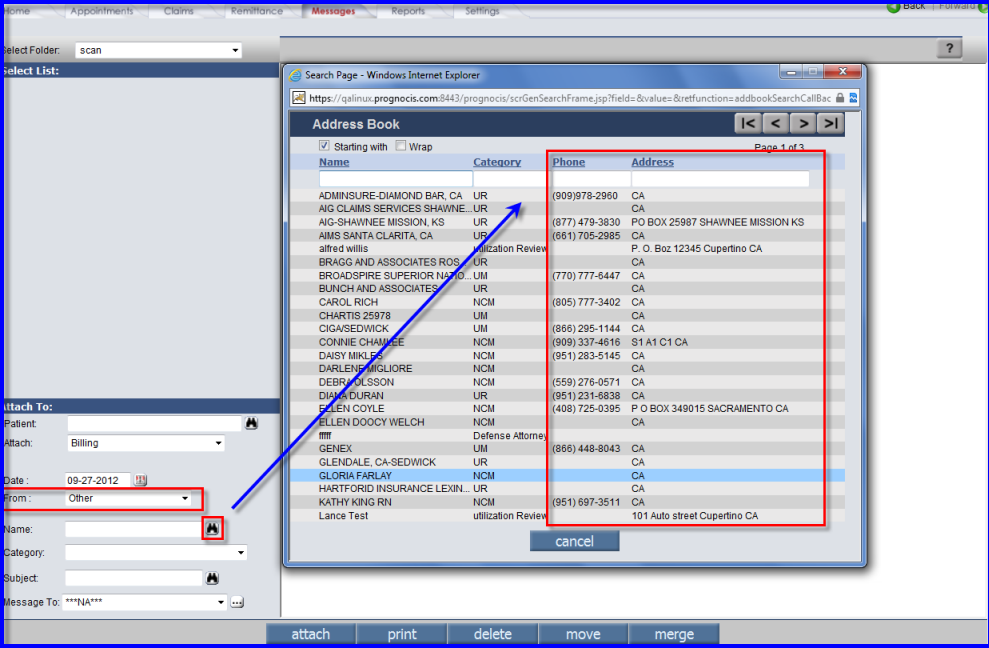
Figure 7.1- Two new column 'Phone' and 'Address' are added in search section of Address Book, also reflected wherever Address Book search is displayed.

Figure 8.1 : Filter
![]() Note: These changes are applicable on all screens where this icon
‘Filter’ is displayed like Claims >> Outstanding, Claims >> Claims
Center, Claims >> Charges Center, Reports >> By Claims, etc.
Note: These changes are applicable on all screens where this icon
‘Filter’ is displayed like Claims >> Outstanding, Claims >> Claims
Center, Claims >> Charges Center, Reports >> By Claims, etc.
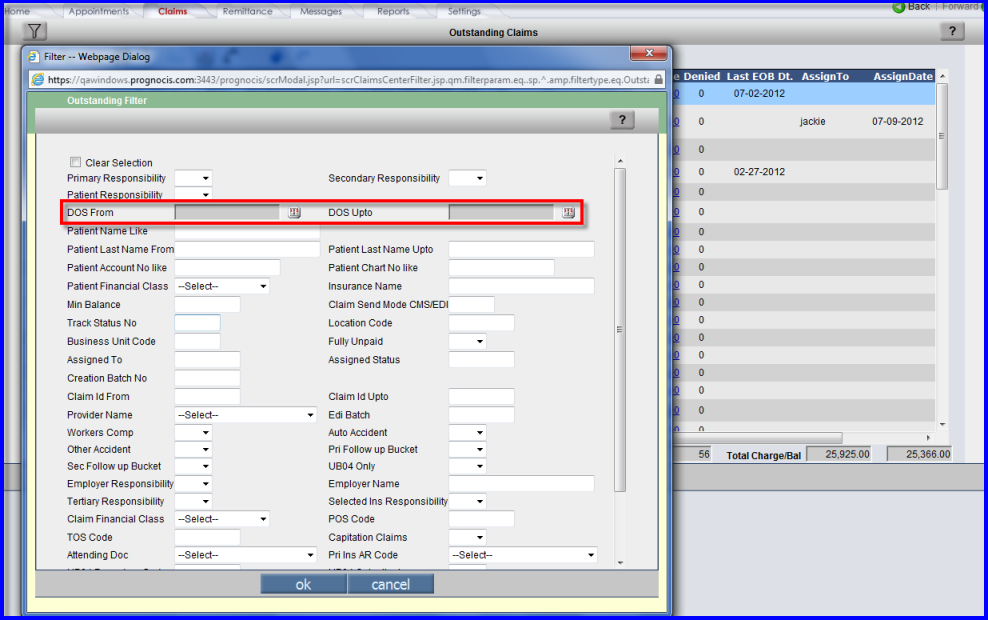
Figure 8.2 : From and Upto Date pair are always on a new row next to each other.
A new tab is added on the 'Progress Note' icon on the Claims screen. Its functionality is explained below:
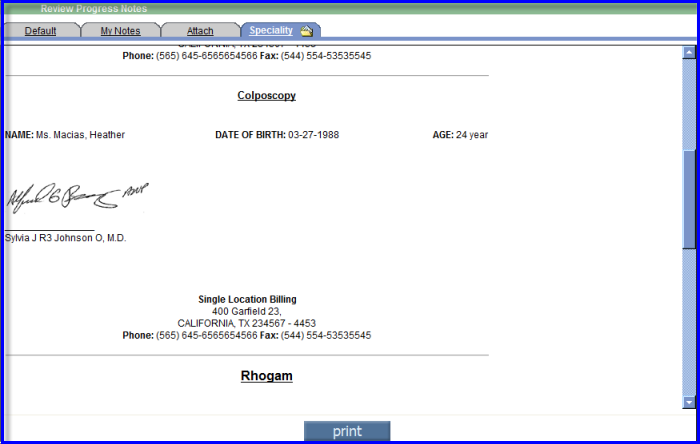
Figure 9.1 - A new 'Specialty' tab on the 'Progress Note' icon on Claim screen.
Claims >> New or Claims >> Edit : The Add Field has a new list 'ALL' added which would contain a combination of 'CPT', 'HCPC', 'Spl Charge', 'Items' and 'Revenue Codes'. Default 'ALL' is displayed.
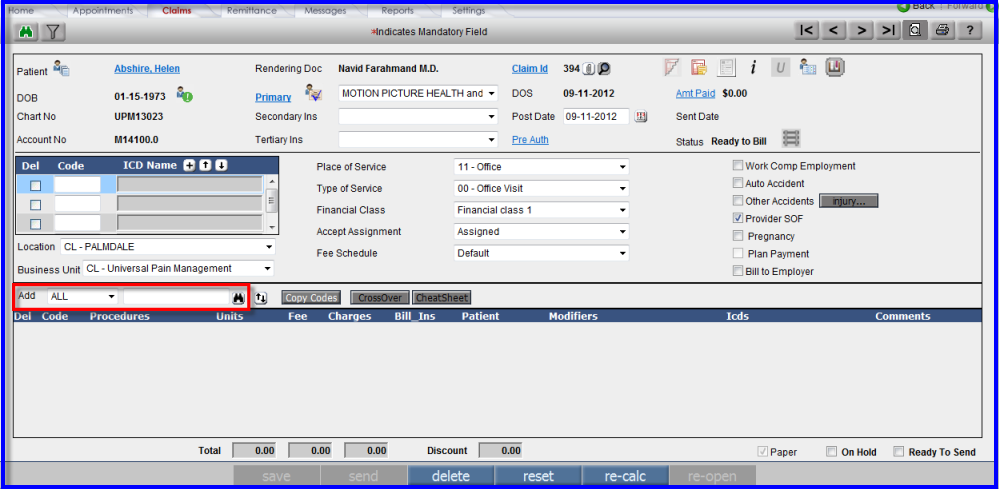
Figure 9.2.a: Claim screen having default as 'ALL' drop down at charge row level.
When Claim code selection List Box is set to ALL and we click on the search binocular it will give an alert message 'Only if List Box is other than ALL'.
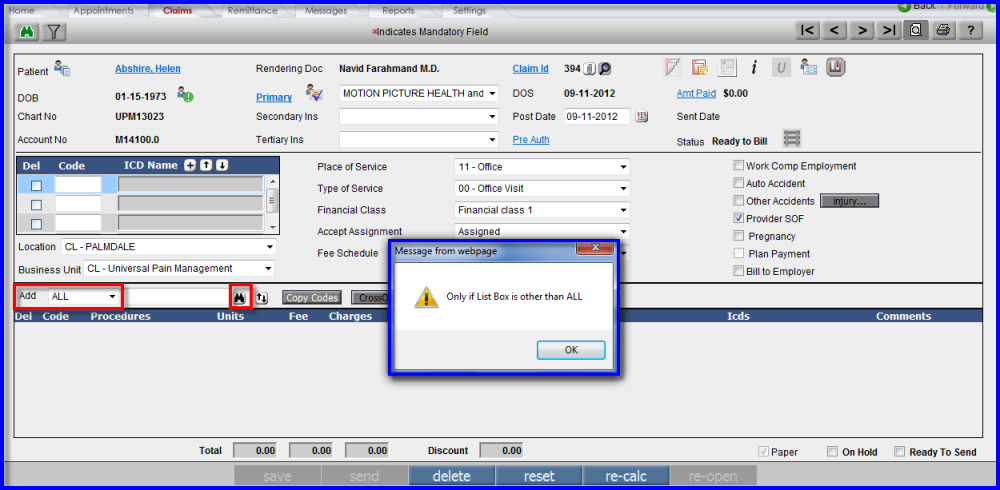
Figure 9.2.b: Showing Alert msg on click on search binocular if List Box is set to ‘All’.
User can type CPT, HCPC, Spl Charges codes, Items or Revenue Codes and tab out when Claim code selection List Box is set to ALL. The advantage is that all charge codes are available under All and it avoids the need to select different categories if charge codes from different categories are to be selected.
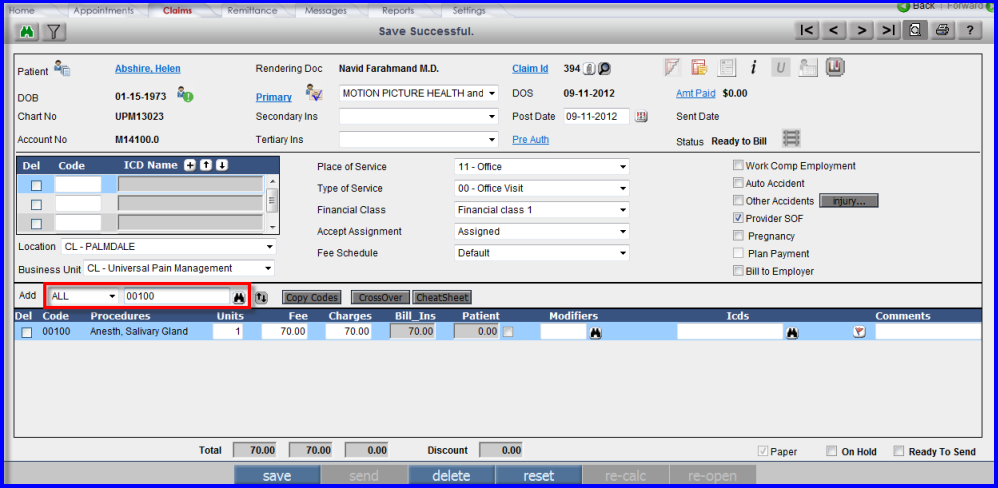
Figure 9.2.c: If List Box is set to ‘All’, type in any charge code and tab out.
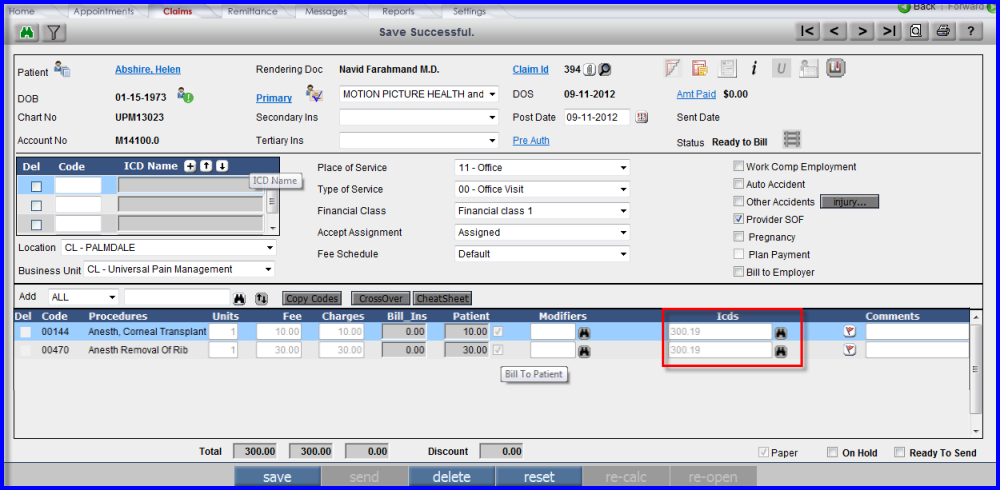
Figure 9.3: Assign ICD code to charge code billed to Patient if all charge codes are billed to Patient.
For quick reference to the biller working on the claim, now i button will show the names of the Billing and Allowed Fee schedules used for populating fees on the claim. It includes Insurance Claims as well as Self Pay Claims (Provided Self Pay Fee Schedule is defined). For Self Pay Claims, if there is a Special Fee Scheduled defined with checkbox 'Special checked and the the Fee Schedule has Name starting with work 'Self Pay', this Self Pay Fee Schedule will automatically populate fees associated. There is no need to manually select the Self pay Fee Schedule from Fee Schedule dropdown.
Self pay Claim
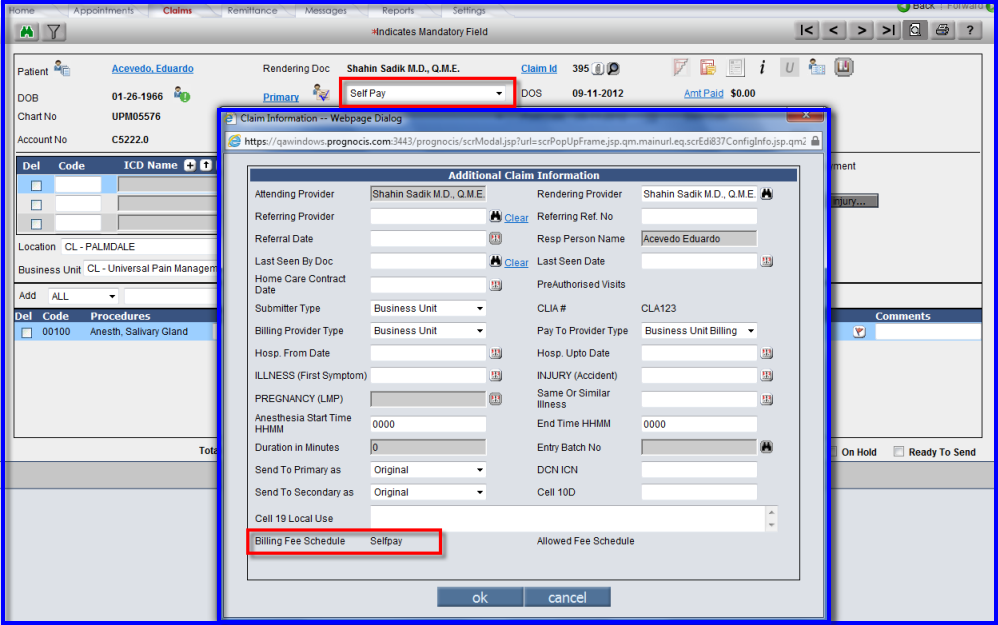
Figure 9.4.a: Fee Schedule name is displayed on I button for Selfpay claim
Insurance Claim
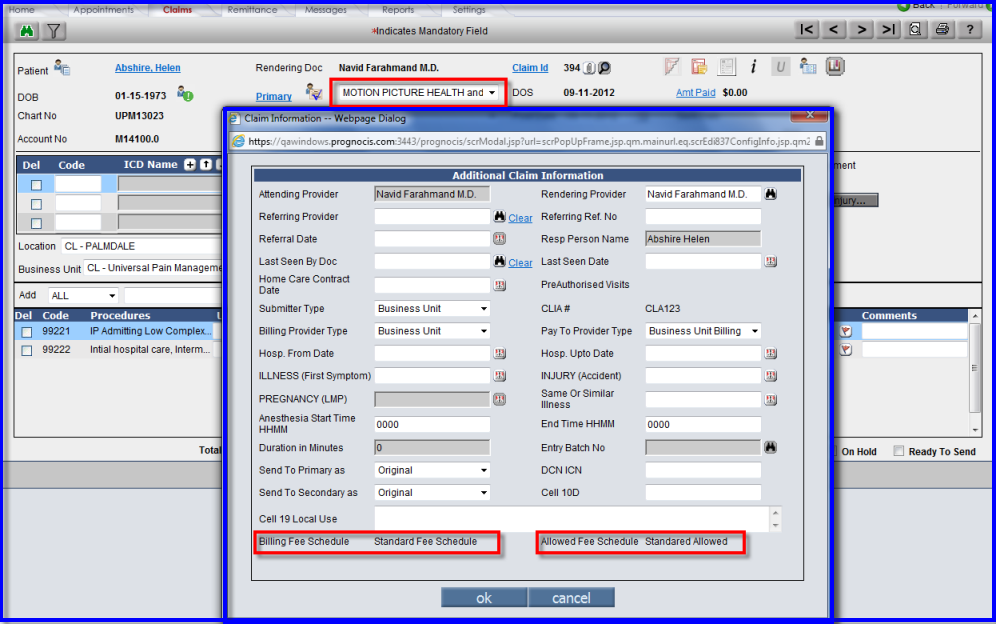
Figure 9.4.b:Billing Fee Schedule and Allowed Fee Schedule names displayed on I button for Insurance claim.
The comments column for each charge row on claim
screen can now accept 80 characters.
All 80 characters will be sent in
appropriate loop in EDI.
These comments can now be printed on the gray band
of CMS 1500 in 24 D to 24 G which accomodates around 50 characters. There are 2
tags added for printing comments on CMS 1500.
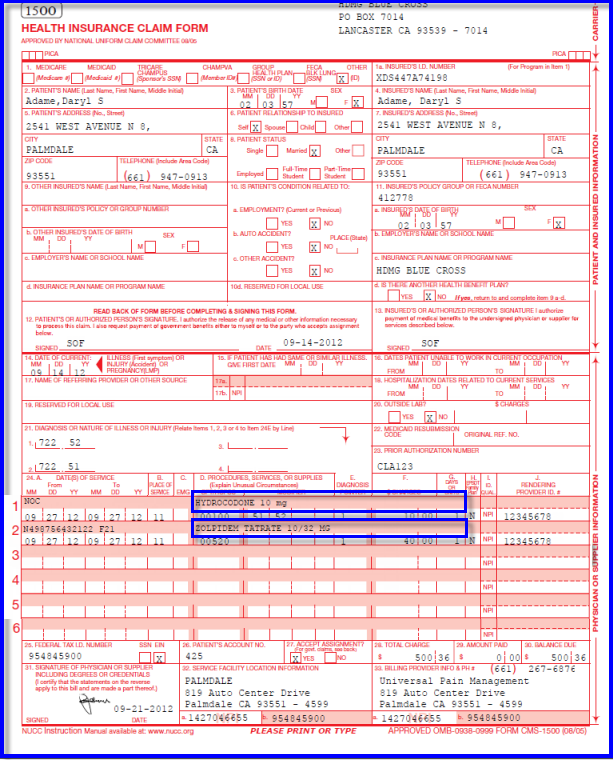
Figure 9.5: Claim Charge row now accepts comments
upto 80 chars.
![]() Note: EDI claims send 80 character comments when charge code is NOC code and Insurance has Claim Filing Code set to 'Medicare Part B'.
Note: EDI claims send 80 character comments when charge code is NOC code and Insurance has Claim Filing Code set to 'Medicare Part B'.
![]() Note: EDI Clais send 80 character comments when there is NDC code associated to charge code.
Note: EDI Clais send 80 character comments when there is NDC code associated to charge code.
On ‘I’ button the label is renamed from 'Send To Primary as' to 'Send To Prof Primary as' and 'Send To Secondary as' to 'Send To Prof Secondary as' and these values will be used for the professional claims only and not for Institutional claims.
The first two characters of 'Bill Type' field from U button will be send through 'EDI 837' of a UB04 claim or the Institutional claims as Place of Service. The institutional claim would read the last digit of field 'Bill Type' as status or Frequency of sending claim like Original, Corrected, Replacement, etc.
Claims >> Outstanding screen: It lists those unpaid claims against which remittance is not yet received. On this screen, when buttons 'excel' and 'print' are clicked, five more columns are included. These columns are ‘Loc’, 'BU', 'AssignTo', 'AssignDate' and ‘AssignStatus’.
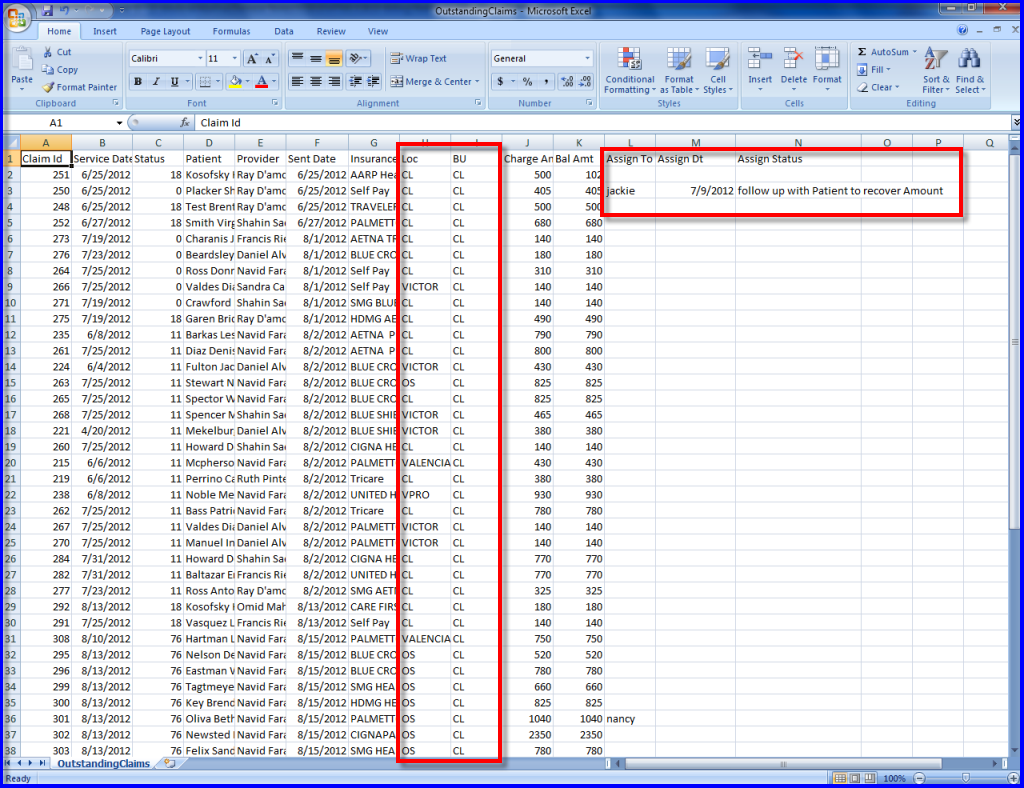
Figure 10.1 : Claims outstanding screen with print and excel buttons printing additional columns.
A new button ‘excel’ is now provided on
‘Outstanding’ screen to export the claim. When button ‘excel’ is invoked
‘Outstanding’ screen, the whole outstanding claims are exported in '.csv' format
or to an excel sheet.
![]() Note:The same change has been done on Claims>Claims Center and
Note:The same change has been done on Claims>Claims Center and
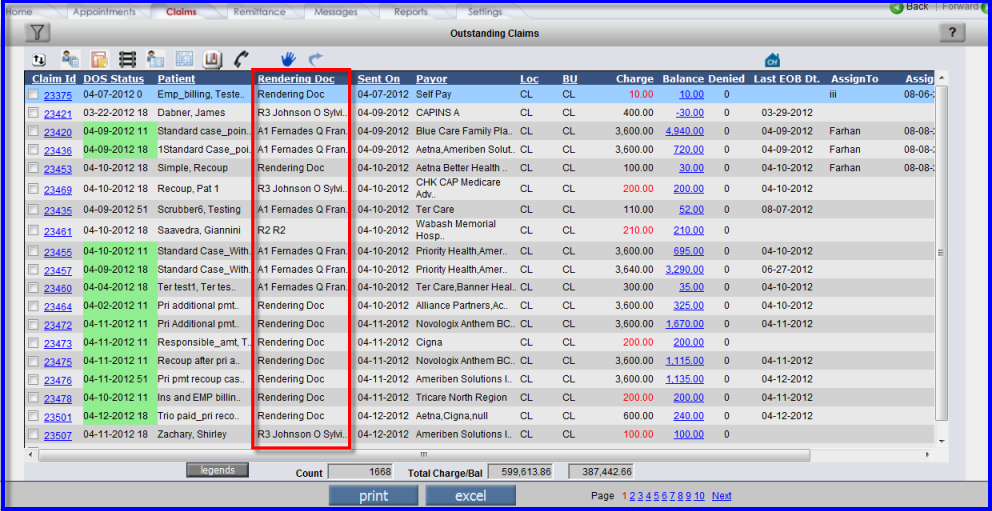
Figure 10.2: Claim Outstanding Screen with column label 'Provider' changed to 'Rendering Doc'.
The Overdue after days field has been modified, in which it considered only the Insurance Company which has the Response days specified. If the Overdue after days is not specified For Eg. its Zero (0)then it is assumed to be 30 days by default.
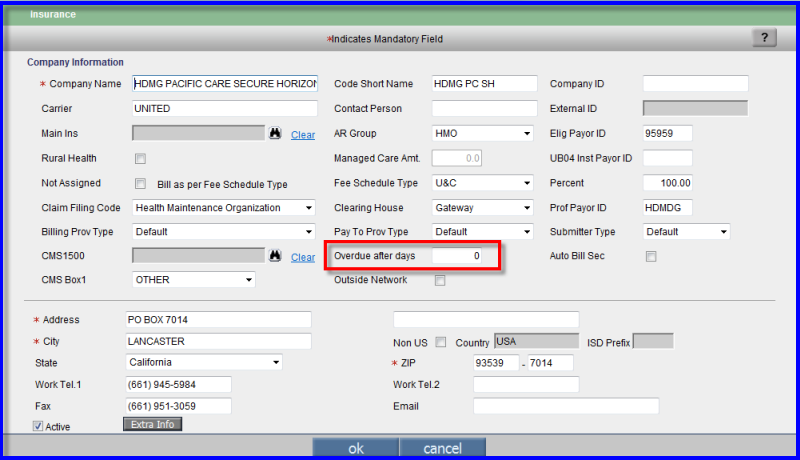
Figure 11 : Insurance Master
If the property 'era.caprcpt.capinsurance.only' is set to 'N', it allows user to select all the Insurances used in the Claims while posting Capitation Receipt. If it is set to 'Y', then the Insurance on Capitation Receipt has to be the Insurance used in atleast one Capitation Claim OR it should match with the parent of that Insurance.
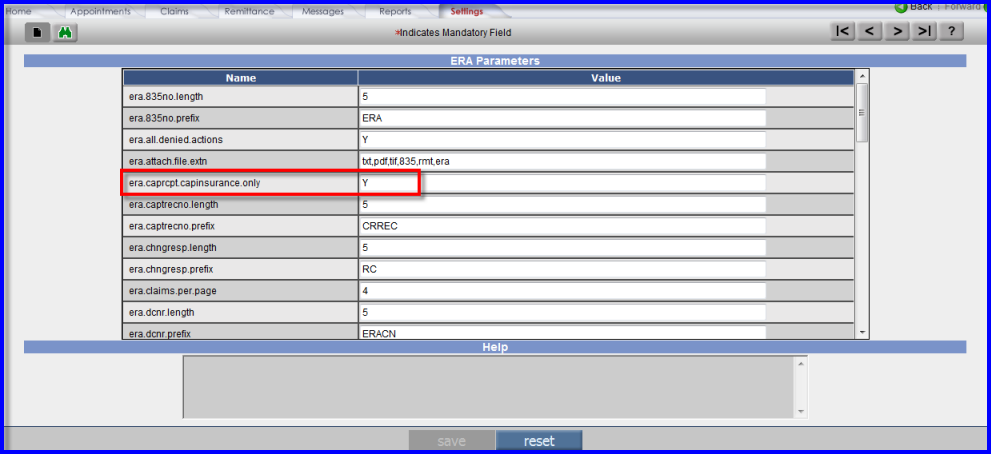
Figure 12.a: Property ‘era.caprcpt.capinsurance.only’ is set to Y.
When creating a Capitation Receipt if the property 'era.caprcpt.capinsurance.only' is set to ' Y ' and there is not a single Capitation claim found for that Insurance or its Parent and we try to post the Claim, a message is displayed as 'Cannot Post. Does not match any Capitation Claim Insurance Or its Parent.'

Figure 12.b: Capitation Receipt Screen with 'Cannot Post' Message when Captation Claim is not found when property is set to Y.
The Statement for CSV is generated using the
Scheduled Process.To get the CSV Statement we need to specify the From Last Name
and Upto Last Name of the Patient in the Parameter window.For eg., From Last
Name is AA and the Upto Last Name is AC and run the process. The output is seen
on the Patient A/C window for all the patients for whom CSV Statement was generated in Statements Table. The Id will be suffixed with 'CSV' and will show the
Statement Date, From Date, Upto Date and the Outstanding Balance of that
particular CSV statement.
Note: The CSV Statement entry on Patient Account will not have a hyperlink to show the sent CSV file. It will only show the keyword 'CSV' in the 'Id' column.
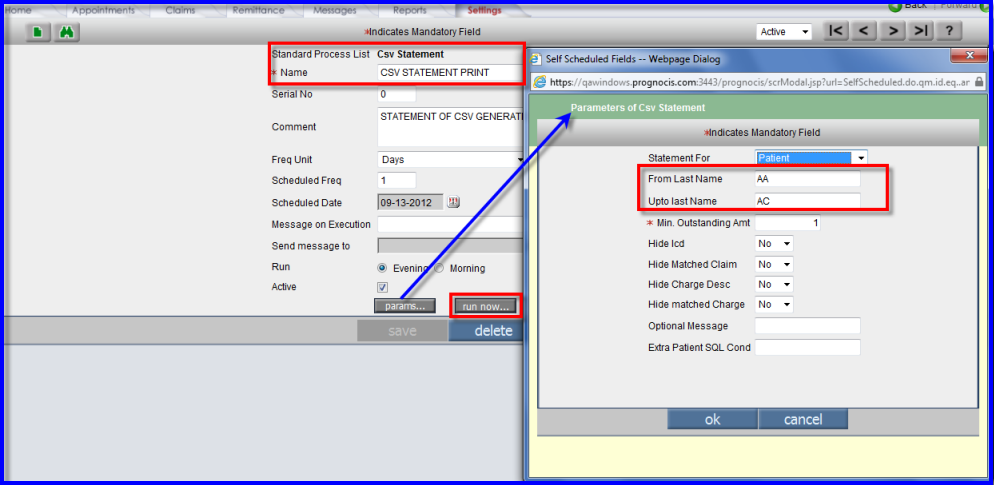
Figure 13.a: CSV Statement Scheduled Process
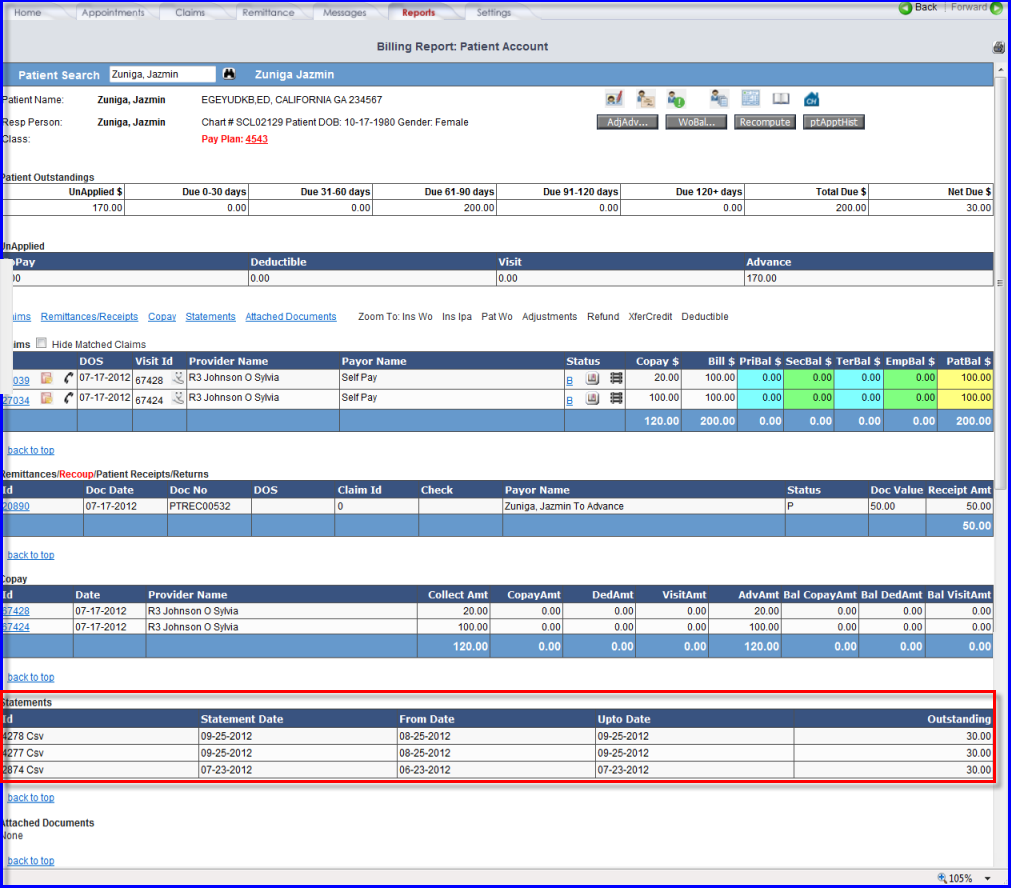
Figure 13.b: CSV entry on Patient Account.
A new property
'prognocis.delete.downloadfile.afterdays' has been added in
which you have to specify the no of days after which the download file entries
will automatically be deleted.
For Eg. If
'prognocis.delete.downloadfile.afterdays ' is set as 5 days.
The downloaded files will be deleted after 5 days from the date of download.
A new Category List Box is added on the Downloaded Files screen.The list consists of the following files:
The downloaded files Category names also give us the number of particular files in that category in the starting and ending paranthesis beside the Category name selected.
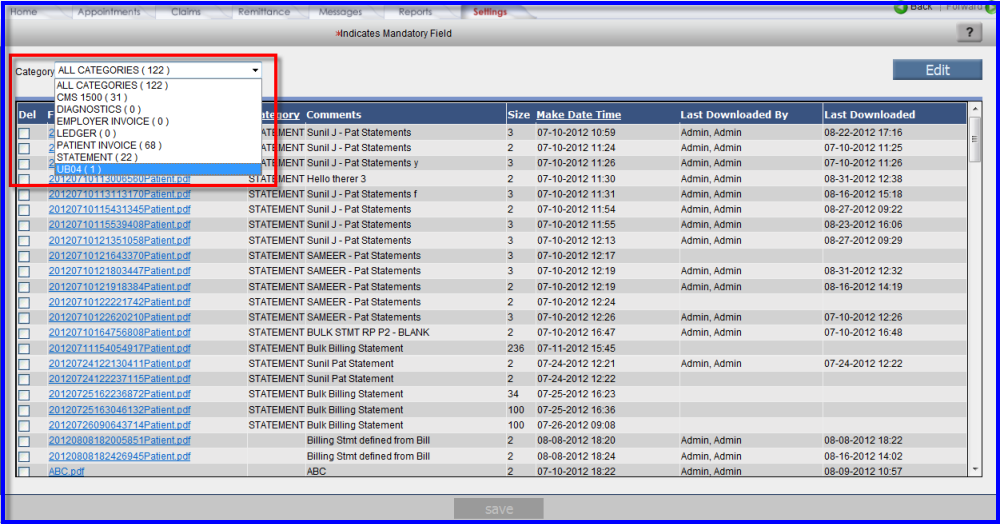
Figure 14.a : Download Files
A new 'Edit' button is added on the Downloaded files screen to change the following:
![]() Note: Depending on whether invoked from EMR or Billing side, this screen will
display only those corresponding entries.
Note: Depending on whether invoked from EMR or Billing side, this screen will
display only those corresponding entries.
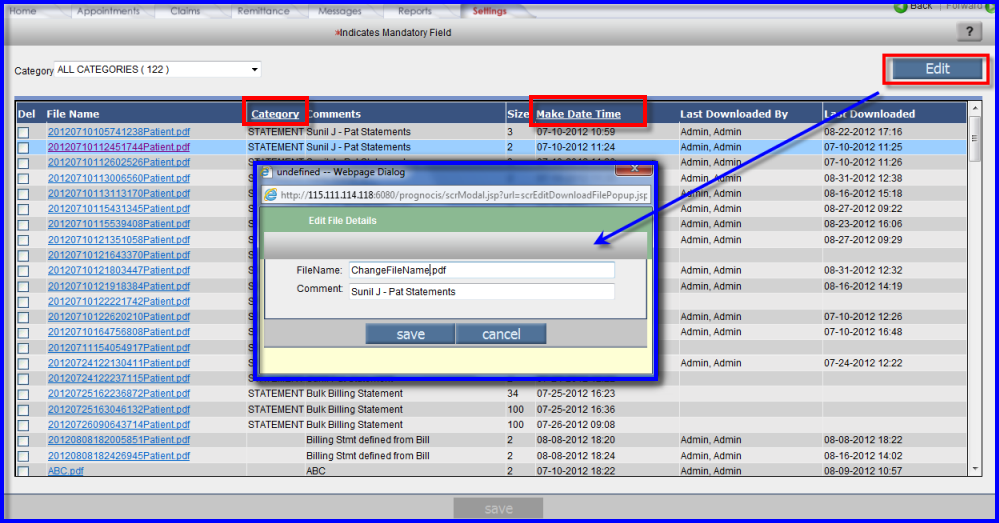
Figure 14.b: Edit Button on Download File
Two new columns are added 'Category' and 'Make Date Time'. The 'Category' column will show the selected category and the 'Make Date Time' will show the date and time of the file when created on the server. Both the column can be sorted in the ascending / descending orders.
New diagnostics case is added to list out problems
in exceptional case. This tool is used by admin to resolve problems.
New
diagnostic case is added as follows:
The process 'EdiSentAndFailureCount' is run as a self schedule process to obtain details of EDI files process status for each client.
PrognoCIS has updated various templates to support features. These templates are listed as follows:
Billing Templates
PrognoCIS has added a new templates to support a new features. This templates is listed as follows:
Billing Templates
|
Property |
Description |
|
property lab.matrix.date.field |
Permitted values are LOH_ORDER_DATE, LOH_RESULT_DATE or LOD_COLLECTION_TIMESTAMP |
|
prognocis.delete.downloadfile.afterdays |
Specify no of days after which the download file entries will automatically be deleted. |
|
billing.claim.hide.void.button |
If set to Y, system will hide void Button on claim screen |
|
billing.ub04.templatename |
UB04 form will be printed for insurance considering the above template name defined under Billing template. |
|
billing.ub04.visittype.value |
Claim for the visit type mentioned in the property will be created as a UB04 claim. |
|
billing.ub04.source.value |
Denotes the default value for the patient source. |
|
billing.auto.crossover |
By-default it is set to N. If set to Y on every save, the system checks and changes Charge rows to cross over codes if applicable. If this is done AND one of the charge rows did not have any fee assigned AND Ready to Send was checked, it will get unchecked. |
|
billing.default.statistics.options |
Set Value as a string of YN corresponding to each option checked / unchecked. |
|
billing.retainfee.on.crossover |
Default value is set to 'N'. The Fee Schedule rates applicable for crossed over codes will be applied, otherwise the existing rates will be left unchanged |
|
statement.reminder.email.to |
Send Patient Statement reminder emails before 3 days to specified email Ids. |
|
statement.reminder.email.lastsentdate |
Store Patient Statement reminder emails last sent date |
|
os.writeoff.names |
Section changed from OrderSheet to Billing Parameters 2 |
|
billing.custom.report.menunames |
This property accepts upto 5 comma seperated Custom Report Names. Reports Menu option will show all these report options. |
PT_PCP$
PT_ADDRESSBOOK$
ENC_SPL_THISPROCNOTES$
BLD_COMMENTS
BLD_NDCNOC__COMMENTS
BLH_PREAUTHS__CLIA
BLH_PREAUTH_NOS
None